想象这样一个场景:你的团队同时使用 Cursor、GitHub Copilot、Claude Code 等多种 AI 编程工具,每天都会产生大量由 AI 生成的代码。但是,你如何准确地知道 Git 仓库里最终有多少代码是 AI 生成的?又有多少 AI 生成的代码被真正“采纳”并保留了下来?
传统的 Git 只会记录提交者信息,却无法区分每一行代码的「真实作者」是人还是机器。而各家 AI 工具都有自己独立的会话管理方式,无法跨工具进行统一的追踪。这正是 git-ai 这个工具所要解决的核心问题。
为什么值得深入研究它的源码?
- 架构精妙:它巧妙利用 Git Plumbing 命令和 Git Notes 机制,实现了一个完全 Git-native 的 AI 代码追踪系统,性能开销控制在 100ms 以内。
- 多平台适配:它如何做到支持 Cursor、Claude Code、GitHub Copilot 等 10 多种 AI 工具的统一接入?
- Rust 工程化实践:如何利用 Rust 的异步、零成本抽象和强大的类型系统,实现一个高性能的 Git 代理层?
快速上手指南
项目地址:https://github.com/git-ai-project/git-ai
如果你想在深入源码之前先体验一下,可以按以下步骤快速上手:
# 1. 一键安装 (Mac/Linux/WSL)
curl -sSL https://usegitai.com/install.sh | bash

# 2. 安装 IDE 钩子 (自动检测并配置 Cursor、VSCode、Copilot 等)
git-ai install-hooks

# 3. 正常使用 AI 工具编写代码,然后 commit
git commit -m "Add feature with AI assistance"

# 4. 查看 AI 代码归属 (类似 git blame,但显示 AI 信息)
git-ai blame <文件路径>

# 5. 查看统计信息
git-ai status
安装完成后,git-ai 就像一个“隐形人”在后台默默记录。你可以继续使用 git commit、git rebase、git merge 等所有 Git 命令,git-ai 会自动处理 AI 归属信息在这些操作间的传播。
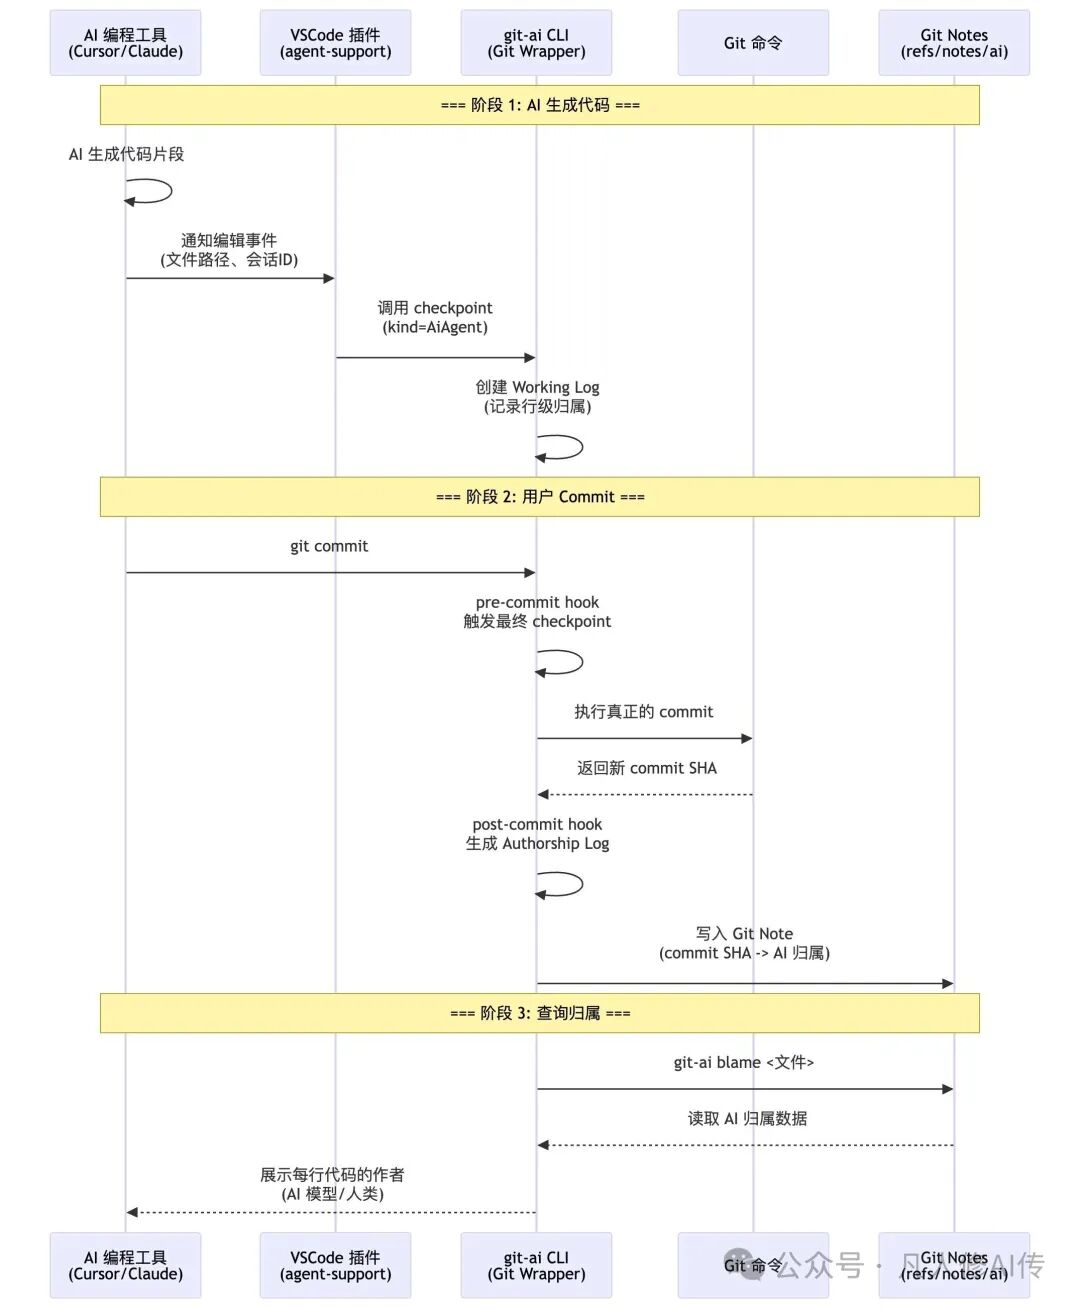
一、核心架构图解
设计思想
git-ai 的核心设计可以概括为三个关键点:
- Git Wrapper 模式:将
git-ai 安装为 Git 的代理,拦截所有 Git 命令,在 commit、rebase、merge 等关键节点插入自定义的 Hook。
- Git Notes 存储:利用 Git 原生的 Notes 机制(存储在
refs/notes/ai 引用下)来保存 AI 归属信息,避免污染 commit 历史。
- Checkpoint 机制:引入“检查点”概念,在 AI 或人类每次编辑后创建快照,最终在 commit 时合并为完整的归属日志。
核心流程图
二、核心源码解读
01、Git Proxy 的优雅实现 —— 如何无缝拦截 Git 命令
位置:src/commands/git_handlers.rs
核心代码 (为便于理解已简化,实际代码更复杂):
// src/commands/git_handlers.rs (简化版)
pub fn handle_git(args: &[String]) {
    let mut parsed_args = parse_git_cli_args(args);
    let mut repository_option = find_repository(&parsed_args.global_args).ok();

    let config = config::Config::get();
    let skip_hooks = !config.is_allowed_repository(&repository_option);

    // === 关键设计 1: Pre-hook 拦截 ===
    let exit_status = if !parsed_args.is_help && repository_option.is_some() && !skip_hooks {
        let repository = repository_option.as_mut().unwrap();

        // 性能监控: 记录 pre-hook 耗时
        let pre_command_start = Instant::now();
        run_pre_command_hooks(&mut command_hooks_context, &mut parsed_args, repository);
        let pre_command_duration = pre_command_start.elapsed();

        // === 关键设计 2: 透明代理到真实 Git ===
        let git_start = Instant::now();
        let exit_status = proxy_to_git(&parsed_args.to_invocation_vec(), false);
        let git_duration = git_start.elapsed();

        // === 关键设计 3: Post-hook 处理 ===
        let post_command_start = Instant::now();
        run_post_command_hooks(&mut command_hooks_context, &parsed_args, exit_status, repository);
        let post_command_duration = post_command_start.elapsed();

        // 性能监控: 如果总耗时超过阈值,记录日志
        log_performance_target_if_violated(
            parsed_args.command.as_deref().unwrap_or("unknown"),
            pre_command_duration, git_duration, post_command_duration
        );

        exit_status
    } else {
        proxy_to_git(&parsed_args.to_invocation_vec(), false)
    };

    exit_with_status(exit_status);
}

// 透明代理的核心实现 (实际代码处理了更多细节)
fn proxy_to_git(args: &[String], exit_on_completion: bool) -> ExitStatus {
    #[cfg(unix)]
    {
        // 交互式终端检测: TTY 模式下不创建新进程组,避免 SIGTTIN/SIGTTOU 挂起
        let is_interactive = unsafe { libc::isatty(libc::STDIN_FILENO) == 1 };
        let should_setpgid = !is_interactive;

        let mut cmd = Command::new(config::Config::get().git_cmd()); // 不是硬编码"git"
        cmd.args(args);

        unsafe {
            cmd.pre_exec(move || {
                if should_setpgid {
                    let _ = libc::setpgid(0, 0);  // 创建新进程组
                }
                Ok(())
            });
        }

        let (mut child, setpgid) = cmd.spawn().expect("Failed to execute git");

        // 如果创建了新进程组,安装信号转发处理器
        if setpgid {
            CHILD_PGID.store(child.id() as i32, Ordering::Relaxed);
            install_forwarding_handlers();  // 转发 SIGTERM/SIGINT/SIGHUP/SIGQUIT
        }

        let status = child.wait().expect("Failed to wait for git");

        // 清理信号处理器
        if setpgid {
            CHILD_PGID.store(0, Ordering::Relaxed);
            uninstall_forwarding_handlers();
        }

        status
    }

    #[cfg(windows)]
    {
        let mut cmd = Command::new(config::Config::get().git_cmd());
        cmd.args(args);
        if !is_interactive_terminal() {
            cmd.creation_flags(CREATE_NO_WINDOW);  // 非交互模式隐藏窗口
        }
        let mut child = cmd.spawn().expect("Failed to execute git");
        child.wait().expect("Failed to wait for git")
    }
}
解读:
- Wrapper 而非 Fork:git-ai 没有重新实现 Git 逻辑,而是作为一个透明的“中间人”。用户执行
git commit,实际调用的是 git-ai commit,后者再调用真正的 git。这保证了:
- 高兼容性:所有 Git 功能都能正常使用。
- 零侵入性:不需要修改 Git 本身。
- 信号转发的魔法:
- 在 Unix 系统上,如果用户按
Ctrl+C 中断 Git 命令,git-ai 需要把信号正确转发给子进程。
- 但有一个例外:「交互式终端」(TTY 模式)不能创建新进程组,否则会收到
SIGTTIN/SIGTTOU 导致挂起。
- 代码通过
libc::isatty() 检测是否为交互式终端,只在非交互模式创建新进程组。
- 如果创建了新进程组,会安装全局信号处理器,转发
SIGTERM/SIGINT/SIGHUP/SIGQUIT 到子进程。
- 跨平台处理:
- Unix:使用
pre_exec 钩子设置进程组,安装信号处理器。
- Windows:使用
CREATE_NO_WINDOW flag 隐藏窗口(非交互模式)。
- Git 命令路径通过
config::Config::get().git_cmd() 获取,支持用户自定义。
- 性能监控:
- 每个 Git 命令都会记录 pre-hook、git 执行、post-hook 的耗时。
- 如果总耗时超过目标值(100ms),会记录性能日志用于优化。
启示:
- Wrapper 模式的威力:不需要重写整个系统,在外面包一层代理就能扩展功能,同时保障兼容性。
- 交互式 vs 非交互式:进程管理要区分场景,TTY 模式和后台运行的信号处理逻辑完全不同。
- 性能监控的重要性:每个 Hook 都记录耗时,发现性能瓶颈后才能优化。
02、Checkpoint 机制 —— 如何精准追踪“这行代码是谁改的”
位置:src/commands/checkpoint.rs
核心代码 (为便于理解已简化,省略了 INITIAL attributions 处理等复杂逻辑):
// src/commands/checkpoint.rs (简化版)
// 实际函数签名有 11 个参数,这里只展示核心逻辑
fn get_checkpoint_entry_for_file(
    file_path: String,
    ……
    ts: u128,
) -> Result<Option<(WorkingLogEntry, FileLineStats)>, GitAiError> {
    let current_content = working_log.read_current_file_content(&file_path)?;

    // === 关键设计 1: 获取文件的“上一个状态” ===
    let from_checkpoint = previous_checkpoints.iter().rev().find_map(|checkpoint| {
        checkpoint.entries.iter()
            .find(|e| e.file == file_path)
            .map(|entry| {
                (
                    working_log.get_file_version(&entry.blob_sha).unwrap_or_default(),
                    entry.attributions.clone(),
                )
            })
    });

    let (previous_content, prev_attributions) = if let Some((content, attrs)) = from_checkpoint {
        // 文件在之前的 checkpoint 中存在,直接使用
        (content, attrs)
    } else {
        // === 关键设计 2: 从 Git HEAD 重建初始状态 ===
        let previous_content = if let Some(tree_id) = head_tree_id.as_ref().as_ref() {
            let head_tree = repo.find_tree(tree_id.clone()).ok();
            if let Some(tree) = head_tree {
                match tree.get_path(std::path::Path::new(&file_path)) {
                    Ok(entry) => {
                        if let Ok(blob) = repo.find_blob(entry.id()) {
                            String::from_utf8_lossy(&blob.content().unwrap_or_default()).to_string()
                        } else {
                            String::new()
                        }
                    }
                    Err(_) => String::new(),  // 新文件
                }
            } else {
                String::new()
            }
        } else {
            String::new()
        };

        // 如果文件内容没变,跳过
        if current_content == previous_content && initial_attrs_for_file.is_empty() {
            return Ok(None);
        }

        // === 关键设计 3: 用 git blame 反推历史归属 ===
        let mut prev_line_attributions = initial_attrs_for_file.clone();

        // 配置 blame 选项
        let mut ai_blame_opts = GitAiBlameOptions::default();
        ai_blame_opts.no_output = true;
        ai_blame_opts.return_human_authors_as_human = true;
        ai_blame_opts.use_prompt_hashes_as_names = true;

        // 根据 feature flag 决定是否运行 blame
        let ai_blame = if Config::get().get_feature_flags().inter_commit_move {
            repo.blame(&file_path, &ai_blame_opts).ok()
        } else {
            None // 跳过 blame,所有行默认为 human
        };

        if let Some((blames, _)) = ai_blame {
            for (line, author) in blames {
                if author != CheckpointKind::Human.to_str() {
                    prev_line_attributions.push(LineAttribution {
                        start_line: line,
                        end_line: line,
                        author_id: author.clone(),
                        overrode: None,
                    });
                }
            }
        }

        // 将行级归属转换为字符级归属
        let prev_attributions = line_attributions_to_attributions(
            &prev_line_attributions,
            &previous_content,
            INITIAL_ATTRIBUTION_TS
        );

        (previous_content, prev_attributions)
    };

    // === 关键设计 4: 计算当前状态与上一状态的差异 ===
    let tracker = AttributionTracker::new();

    // 先填充未归属的范围
    let filled_prev_attributions = tracker.attribute_unattributed_ranges(
        &previous_content,
        &prev_attributions,
        &CheckpointKind::Human.to_str(),
        ts - 1,
    );

    // 使用 imara-diff 算法计算行级变更
    let new_attributions = tracker.update_attributions(
        &previous_content,
        ¤t_content,
        &filled_prev_attributions,
        author_id.as_ref(),
        ts,
    )?;

    let line_attributions = attributions_to_line_attributions(&new_attributions, ¤t_content);

    // 计算文件的行统计信息
    let line_stats = compute_file_line_stats(&previous_content, ¤t_content);

    let entry = WorkingLogEntry::new(
        file_path,
        file_content_hash,
        new_attributions,
        line_attributions,
    );

    Ok(Some((entry, line_stats)))
}
解读:
- 增量计算的智慧:
- 第一次遇到文件时,用
git blame 反推历史归属(谁在之前的 commit 改过这行)。
- 后续编辑时,只需要基于上一个 checkpoint 的状态做 diff,避免重复计算。
- 这就像 Git 本身的“快照 + 增量”设计,性能极高。
- Feature Flag 控制 Blame 行为:
let ai_blame = if Config::get().get_feature_flags().inter_commit_move {
    repo.blame(&file_path, &ai_blame_opts).ok()
} else {
    None // 跳过 blame,所有行默认为 human
};
inter_commit_move flag 控制是否使用 git blame 反推历史归属。- 关闭时,所有历史行都标记为
human,性能更好但会丢失跨 commit 的 AI 归属追踪。
- 开启时,可以检测到用户复制粘贴 AI 代码的情况。
- 行级归属 vs 字符级归属:代码中有
LineAttribution 和 Attribution 两种数据结构:
为什么需要两种?因为当文件内容变化时,「行号会变,但字符偏移更稳定」(配合 diff 算法)。最终输出时再转回行号给用户看。
LineAttribution: 给人看的(第 10-15 行是 AI-xxx 写的)。Attribution: 内部使用的字符范围(第 120-450 个字符是 AI-xxx 写的)。
-
AttributionTracker 的核心算法:这是整个系统最复杂的部分,它要解决一个难题——「当文件被编辑后,如何更新每个字符的归属?」
举个例子:
# 初始状态 (全是 AI-session-123 写的)
def hello():
    print("Hello")

# 用户在中间插入一行 (human 写的)
def hello():
    name = "World" # 这行是人类加的
    print("Hello")
AttributionTracker 会:
- 用
imara-diff 算法找出变更点(插入了 name = "World"\n)。
- 旧内容的归属被拆分成三段:
[AI: 0-24] → [AI: 0-24, Human: 24-43, AI: 43-end]。
- 保留所有历史作者信息,用于后续的
git-ai blame 查询。
启示:
- 增量计算是性能的关键:基于上一个 checkpoint 做 diff,避免重复计算,提升性能。
- 数据结构要为业务服务:行号给人看(
LineAttribution),字符偏移给算法用(Attribution),各司其职。
- Feature Flag 控制复杂度:
inter_commit_move flag 让用户在性能和准确性之间权衡。
- 善用成熟算法:
imara-diff 实现了 Git 的 Myers diff 算法,不要重复造轮子。
03、多工具适配 —— 如何统一支持 10+ 种 AI 工具
位置:src/commands/install_hooks.rs 和 agent-support/vscode/src/extension.ts
核心代码 (Rust 侧):
pub fn run(args: &[String]) -> Result<HashMap<String, String>, GitAiError> {
    let binary_path = get_current_binary_path()?;
    let params = HookInstallerParams { binary_path };

    // === 关键设计 1: 插件式架构 ===
    let installers = get_all_installers();  // 返回所有支持的 AI 工具安装器

    for installer in installers {
        let name = installer.name();  // "Cursor", "Claude Code", "GitHub Copilot"

        // 检测工具是否安装
        match installer.check_hooks(¶ms) {
            Ok(check_result) if check_result.tool_installed => {
                // === 关键设计 2: 动态安装钩子 ===
                match installer.install_hooks(¶ms, dry_run) {
                    Ok(Some(diff)) => {
                        println!("{}: Hooks updated", name);
                        // 修改了 VSCode 的 settings.json 或 Cursor 的配置文件
                    }
                    Ok(None) => {
                        println!("{}: Already up to date", name);
                    }
                    Err(e) => eprintln!("{}: Failed - {}", name, e),
                }
            }
            _ => continue,  // 工具未安装,跳过
        }
    }

    Ok(statuses)
}
核心代码 (VSCode 插件侧):
// agent-support/vscode/src/ai-edit-manager.ts
export class AIEditManager {
    private snapshotOpenEvents = new Map<string, {
        timestamp: number;
        count: number;
        uri: vscode.Uri;
      }>();

    // === 关键设计 3: 捕获 Snapshot 打开事件 ===
    public handleOpenEvent(doc: vscode.TextDocument): void {
        // VSCode Copilot/Claude 在生成代码时会先打开一个特殊的 snapshot 文档
        if (doc.uri.scheme === "chat-editing-snapshot-text-model" ||
            doc.uri.scheme === "chat-editing-text-model") {
            const filePath = doc.uri.fsPath;
            const now = Date.now();

            this.snapshotOpenEvents.set(filePath, {
                timestamp: now,
                count: (this.snapshotOpenEvents.get(filePath)?.count || 0) + 1,
                uri: doc.uri  // 保存 URI,稍后解析 sessionId
              });

            // 在 AI 编辑前触发一次 human checkpoint (记录基准状态)
            console.log('[git-ai] Snapshot open event detected, triggering human checkpoint');
            this.triggerHumanCheckpoint([filePath]);
        }
      }

    // === 关键设计 4: 文件保存时检查是否为 AI 编辑 ===
    public handleSaveEvent(doc: vscode.TextDocument): void {
        const filePath = doc.uri.fsPath;

        // Debounce: 300ms 后评估
        setTimeout(() => {
            this.evaluateSaveForCheckpoint(filePath);
        }, 300);
      }

    private evaluateSaveForCheckpoint(filePath: string): void {
        const snapshotInfo = this.snapshotOpenEvents.get(filePath);

        // 如果有对应的 snapshot 打开事件 → 这是 AI 生成的
        if (snapshotInfo && snapshotInfo.count >= 1 && snapshotInfo.uri?.query) {
            const snapshotAge = Date.now() - snapshotInfo.timestamp;

            // 检查 snapshot 是否太旧(> 10 秒则忽略)
            if (snapshotAge >= 10000) {
                console.log('[git-ai] Snapshot too old, skipping AI checkpoint');
                return;
              }

            // === 关键设计 5: 从 URI Query 解析 Session ID ===
            try {
                const params = JSON.parse(snapshotInfo.uri.query);
                let sessionId = params.chatSessionId || params.sessionId;

                // VSCode 可能把 sessionId 编码在 chatSessionResource.path 中
                if (!sessionId && params.chatSessionResource?.path) {
                  sessionId = Buffer.from(
                    params.chatSessionResource.path.slice(1),
                    'base64'
                  ).toString('utf-8');
                }

                if (sessionId) {
                    // 读取会话历史文件 (VSCode 自动保存的 .jsonl)
                    const chatSessionPath = path.join(
                        storagePath,
                        'chatSessions',
                        `${sessionId}.jsonl`
                      );

                    // 调用 git-ai checkpoint
                    this.checkpoint("ai", JSON.stringify({
                        hook_event_name: "after_edit",
                        chat_session_path: chatSessionPath,  // 包含完整的 prompt 历史
                        session_id: sessionId,
                        edited_filepaths: [filePath],
                        workspace_folder: workspaceFolder.uri.fsPath,
                        dirty_files: this.getDirtyFiles(),  // 所有未保存的文件内容
                      }));
                }
              } catch (e) {
                console.error('[git-ai] Failed to parse snapshot URI', e);
              }
        }

        // 清理
        this.snapshotOpenEvents.delete(filePath);
      }
}
解读:
- 插件式架构的可扩展性:
- 每个 AI 工具对应一个
AgentInstaller trait 实现。
- 新增工具支持只需实现
check_hooks() 和 install_hooks() 两个方法。
- 主流程完全不用改,完美体现了“开闭原则”,这种设计在开源实战中值得借鉴。
- 配置文件注入的巧妙手法:
- 对于 VSCode/Cursor:修改
settings.json,添加 "git.path": "/path/to/git-ai"。
- 对于 JetBrains:修改
~/.config/JetBrains/xxx/options/git.xml。
- 关键点:「让 IDE 以为在调用
git,实际调用的是 git-ai」。
- VSCode 插件的巧妙检测机制:
- 不是用启发式规则判断,而是利用 VSCode 内部机制!
- 当 Copilot/Claude 生成代码时,VSCode 会先创建一个临时的「snapshot 文档」,URI scheme 是
chat-editing-snapshot-text-model。
- git-ai 插件监听
onDidOpenTextDocument 事件,捕获这些特殊的 snapshot 打开。
- 当文件保存时,检查是否有对应的 snapshot 记录 → 如果有,说明是 AI 编辑。
- 「零误判」:这不是启发式规则,而是利用 IDE 的内部信号,准确率极高。
-
Session ID 的获取方式:
// 从 snapshot URI 的 query 参数解析
const params = JSON.parse(snapshotInfo.uri.query);
let sessionId = params.chatSessionId || params.sessionId;

// VSCode 把 sessionId Base64 编码在 chatSessionResource.path 中
if (!sessionId && params.chatSessionResource?.path) {
  sessionId = Buffer.from(
    params.chatSessionResource.path.slice(1),
    'base64'
  ).toString('utf-8');
}
为什么这么做?
- 「利用 VSCode 的内部数据」:snapshot URI 的 query 包含了会话信息。
- 「获取完整 Prompt 历史」:
chatSessions/${sessionId}.jsonl 是 VSCode 自动保存的会话记录,包含所有对话内容。
- 「零配置」:不需要 AI 工具主动上报,直接从 IDE 的内部数据中“拿”出来。
启示:
- 面向扩展的设计:插件式架构让系统具备无限扩展能力。
- 配置文件注入:很多时候不需要修改应用本身,改配置文件就能实现 Hook。
- 利用平台内部机制:与其猜测用户行为(启发式),不如深挖平台的内部信号(snapshot URI),这种对技术文档和平台特性的深度理解是关键。
- 数据“寄生”策略:VSCode 已经保存了会话历史(.jsonl),git-ai 直接读取,不需要重复收集。
三、总结与思考
在 AI 编程时代,代码的作者不再只是 Git commit 上的那个名字,而是每一行代码背后的智能体。git-ai 巧妙地运用 Git Notes 和 Checkpoint 机制,为这个新时代的代码溯源问题提供了一个优雅而高效的标准答案。其Rust实现也展示了如何用系统级语言构建高性能、可靠的基础开发者工具。
四、One more thing
git-ai 本身专注于记录每一行代码的来源。为了方便团队管理,例如查看多个仓库的 AI生成代码行数占比 或 采纳率,社区还开源了一个配套的分析和查询工具。有需要的开发者可以使用。
项目地址:https://github.com/ForeverPx/ai-code-metrics

附录:技术栈速览
| 模块 |
技术栈 |
作用 |
| 核心 CLI |
Rust + clap + smol |
Git 代理层,Hook 执行,高性能计算 |
| 差分算法 |
imara-diff |
实现 Git 的 Myers diff 算法 |
| Git 操作 |
gix-config + Git Plumbing |
读写 Git Notes、blame、tree 操作 |
| VSCode 插件 |
TypeScript + VSCode API |
监听编辑事件,调用 checkpoint |
| JetBrains 插件 |
Kotlin + IntelliJ Platform |
同上,适配 IntelliJ 系列 IDE |
| 存储格式 |
JSON (Git Notes) + SQLite (Prompt DB) |
AI 归属日志 + Prompt 历史 |
 发表于 2026-2-11 07:09:29
|
查看: 330|
回复: 0
发表于 2026-2-11 07:09:29
|
查看: 330|
回复: 0
