CompletableFuture 是 Java 8 在 java.util.concurrent 包中引入的一个强大且灵活的异步编程工具。它不仅实现了 Future<T> 接口,用于获取异步计算的结果,还实现了 CompletionStage<T> 接口,提供了丰富的链式调用、任务组合以及异常处理能力。这使得它成为构建高性能、非阻塞响应式应用的核心组件之一。
CompletableFuture 核心接口与方法概览
CompletableFuture 的功能涵盖了创建、转换、组合、聚合和异常处理等多个方面,下表列出了其常见方法及适用场景:
| 场景 |
方法 |
| 异步生成值 |
supplyAsync(Supplier<T>) |
| 异步执行无返回 |
runAsync(Runnable) |
| 转换结果 |
thenApply, thenApplyAsync |
| 消费结果 |
thenAccept, thenAcceptAsync |
| 无参动作 |
thenRun, thenRunAsync |
| 顺序依赖(扁平化) |
thenCompose |
| 合并两个结果 |
thenCombine, thenAcceptBoth |
| 任一完成即响应 |
applyToEither, acceptEither |
| 多任务全完成 |
allOf |
| 多任务任一完成 |
anyOf |
| 异常恢复 |
exceptionally |
| 统一处理(正常/异常) |
handle |
| 最终清理(类似 finally) |
whenComplete |
| 手动完成 |
complete(T), completeExceptionally(Throwable) |
创建 CompletableFuture
手动完成(无异步)
CompletableFuture<String> future = new CompletableFuture<>();
future.complete("Manual result");
System.out.println(future.join()); // Manual result
异步执行(有返回值)
CompletableFuture<String> future = CompletableFuture.supplyAsync(() -> {
    return "Async result";
});
System.out.println(future.join()); // Async result
异步执行(无返回值)
CompletableFuture<Void> future = CompletableFuture.runAsync(() -> {
    System.out.println("Running async task");
});
future.join(); // 等待完成
可传入自定义线程池
ExecutorService executor = Executors.newFixedThreadPool(2);
CompletableFuture<String> f = CompletableFuture.supplyAsync(() -> "Custom pool", executor);
链式转换与消费(单阶段)
thenApply – 转换结果(同步)
CompletableFuture<Integer> f = CompletableFuture
    .supplyAsync(() -> "100")
    .thenApply(Integer::parseInt)
    .thenApply(x -> x * 2);
System.out.println(f.join()); // 200
thenApplyAsync – 异步转换(新线程)
CompletableFuture<String> f = CompletableFuture
    .completedFuture("hello")
    .thenApplyAsync(s -> {
        System.out.println("Thread: " + Thread.currentThread().getName());
        return s.toUpperCase();
    });
System.out.println(f.join()); // HELLO(在 ForkJoinPool 线程中执行)
thenAccept – 消费结果(无返回)
CompletableFuture
    .supplyAsync(() -> "World")
    .thenAccept(s -> System.out.println("Hello " + s)); // Hello World
thenRun – 无输入,仅执行动作
CompletableFuture
    .supplyAsync(() -> "ignored")
    .thenRun(() -> System.out.println("Task done!"));
扁平化嵌套(依赖另一个 CompletableFuture)
thenCompose – 顺序依赖(类似 flatMap)
thenCompose 适用于第二个异步操作依赖第一个的结果,并且第二个操作也返回 CompletableFuture<T> 的场景,可以有效避免 CompletableFuture<CompletableFuture<T>> 的嵌套。
CompletableFuture<String> getUser = CompletableFuture.supplyAsync(() -> "Alice");
CompletableFuture<Integer> getLength = getUser.thenCompose(name ->
    CompletableFuture.supplyAsync(() -> name.length())
);

// 可以继续链式调用
CompletableFuture<String> userLevel = getLength.thenCompose(len ->
    CompletableFuture.supplyAsync(() -> {
        if (len >= 5) return "VIP";
        else return "Normal";
    })
);
System.out.println(userLevel.join());  // 输出: VIP
对比错误写法(产生嵌套 future,难以处理):
CompletableFuture<String> getUser = CompletableFuture.supplyAsync(() -> "Alice");
CompletableFuture<CompletableFuture<Integer>> getLength = getUser.thenApply(name ->
      CompletableFuture.supplyAsync(() -> name.length()) // 返回 CompletableFuture<Integer>
);
// 最终返回类型是 CompletableFuture<CompletableFuture<Integer>>,难以直接处理
如果第二个异步操作返回的是普通类型(如 String),则使用 thenApplyAsync 即可:
// 第二个异步操作直接返回 String,无需 thenCompose
CompletableFuture<String> f1 = getUserIdAsync()
    .thenApplyAsync(id -> "User-" + id);
System.out.println(f1.join());
组合两个 CompletableFuture
thenCombine – 合并两个结果(AND)
CompletableFuture<String> f1 = CompletableFuture.supplyAsync(() -> "Hello");
CompletableFuture<String> f2 = CompletableFuture.supplyAsync(() -> "World");

CompletableFuture<String> combined = f1.thenCombine(f2, (a, b) -> a + " " + b);
System.out.println(combined.join()); // Hello World
thenAcceptBoth – 消费两个结果
f1.thenAcceptBoth(f2, (a, b) -> System.out.println(a + " " + b));
runAfterBoth – 两者都完成后执行
f1.runAfterBoth(f2, () -> System.out.println("Both done"));
任一完成即响应(OR)
applyToEither – 返回第一个完成的结果(可转换)
CompletableFuture<String> f1 = CompletableFuture.supplyAsync(() -> {
    sleep(2000); return "Slow";
});
CompletableFuture<String> f2 = CompletableFuture.supplyAsync(() -> {
    sleep(500); return "Fast";
});

String result = f1.applyToEither(f2, s -> s + " wins!");
System.out.println(result); // Fast wins!
acceptEither – 消费第一个结果
f1.acceptEither(f2, System.out::println); // Fast
runAfterEither – 任一完成后执行
f1.runAfterEither(f2, () -> System.out.println("One finished"));
多任务聚合
allOf – 所有完成(无返回值)
CompletableFuture<Void> all = CompletableFuture.allOf(
    CompletableFuture.runAsync(() -> sleep(1000)),
    CompletableFuture.runAsync(() -> sleep(1500)),
    CompletableFuture.runAsync(() -> sleep(800))
);
all.join(); // 等待全部完成(约 1500ms)
System.out.println("All tasks done");
若需获取所有结果,可以在 allOf 完成后分别 join 各个 Future:
CompletableFuture<String> f1 = CompletableFuture.supplyAsync(() -> "A");
CompletableFuture<String> f2 = CompletableFuture.supplyAsync(() -> "B");

CompletableFuture<Void> all = CompletableFuture.allOf(f1, f2);
all.join();

System.out.println(f1.join() + f2.join()); // AB
anyOf – 任一完成即返回(返回 Object)
CompletableFuture<Object> any = CompletableFuture.anyOf(
    CompletableFuture.supplyAsync(() -> "First"),
    CompletableFuture.supplyAsync(() -> {
        sleep(1000); return "Second";
    })
);
System.out.println(any.join()); // First(类型为 Object,需强转)
异常处理
exceptionally – 仅处理异常(类似 catch)
CompletableFuture<String> f = CompletableFuture
    .supplyAsync(() -> {
        throw new RuntimeException("Error!");
    })
    .exceptionally(ex -> "Fallback: " + ex.getMessage());

System.out.println(f.join()); // Fallback: java.lang.RuntimeException: Error!
handle – 统一处理正常/异常结果
CompletableFuture<String> f = CompletableFuture
    .supplyAsync(() -> {
        throw new RuntimeException("Oops!");
    })
    .handle((result, ex) -> {
        // 可以统一处理结果,常用于提供fallback、错误恢复、统一结果格式等
        if (ex != null) {
            return "Default Value"; // 吞掉异常,返回默认值
        }
        return result; // 此处还可以修改返回值
    });

System.out.println(f.join()); // 输出: Default Value(无异常!)
whenComplete – 类似 finally(不改变结果)
CompletableFuture<String> f = CompletableFuture
    .supplyAsync(() -> {
        throw new RuntimeException("Oops!");
    })
    .whenComplete((result, ex) -> {
        // 不可干预结果,常用于记录日志、关闭资源、指标统计等副作用操作
        if (ex != null) {
            System.out.println("Logged error: " + ex.getMessage());
        }
    });

// 异常仍然会抛出!
f.join(); // 抛出 CompletionException -> RuntimeException("Oops!")
whenComplete 不改变返回值,即使内部处理了异常信息,原始异常仍然会传播出去。
完成状态检查与获取
CompletableFuture<String> f = CompletableFuture.supplyAsync(() -> "Done");

// 阻塞等待(推荐),不抛出受检异常
String result = f.join();

// 或使用 get(抛出 InterruptedException / ExecutionException)
// String result = f.get();

// 检查状态
System.out.println(f.isDone());     // true
System.out.println(f.isCompletedExceptionally()); // false
System.out.println(f.isCancelled()); // false
推荐使用 join() 而非 get(),可以避免处理受检异常。
执行策略控制(同步 vs 异步回调)
| 方法 |
执行线程 |
thenApply |
前一个任务的完成线程(可能是同步或异步) |
thenApplyAsync |
总是在另一个线程中执行(默认 ForkJoinPool.commonPool(),可指定 Executor) |
CompletableFuture.supplyAsync(() -> {
    System.out.println("Stage1: " + Thread.currentThread().getName());
    return "data";
})
.thenApply(s -> {
    System.out.println("thenApply (sync): " + Thread.currentThread().getName());
    return s;
})
.thenApplyAsync(s -> {
    System.out.println("thenApplyAsync: " + Thread.currentThread().getName());
    return s;
})
.join();
输出示例:
Stage1: ForkJoinPool.commonPool-worker-1
thenApply (sync): ForkJoinPool.commonPool-worker-1
thenApplyAsync: ForkJoinPool.commonPool-worker-2
为了避免不确定的阻塞(因为前一个任务可能是同步的),对于 I/O 或耗时操作,一般建议使用 xxxAsync 方法,以确保在新线程中执行。
完整实战示例:模拟电商下单流程
下面这个例子综合运用了多种 CompletableFuture 方法,模拟了一个简化的下单流程。
ExecutorService ioPool = Executors.newFixedThreadPool(3);

// 1. 创建订单
CompletableFuture<String> order = CompletableFuture.supplyAsync(() -> {
    return "ORDER-1001";
}, ioPool);

// 2. 支付(依赖订单ID)
CompletableFuture<String> payment = order.thenCompose(ordId ->
    CompletableFuture.supplyAsync(() -> {
        return "PAID-" + ordId;
    }, ioPool)
);

// 3. 扣减库存(与支付并行)
CompletableFuture<String> inventory = CompletableFuture.supplyAsync(() -> {
    return "INVENTORY-OK";
}, ioPool);

// 4. 发货(需支付成功 + 库存扣减)
CompletableFuture<String> shipping = payment.thenCombine(inventory, (pay, inv) -> {
    return "SHIPPED-" + pay;
});

// 5. 异常兜底
CompletableFuture<String> finalResult = shipping.exceptionally(ex -> {
    System.err.println("Order failed: " + ex.getMessage());
    return "FAILED";
});

System.out.println(finalResult.join()); // SHIPPED-PAID-ORDER-1001

ioPool.shutdown();
CompletableFuture 实现原理分析
核心数据结构
CompletableFuture 的核心思想是非阻塞式异步计算,它通过注册回调函数(如 thenApply, thenAccept 等)在结果就绪时自动触发后续操作。
关键字段与结构:
public class CompletableFuture<T> implements Future<T>, CompletionStage<T> {
    volatile Object result; // 存储结果或异常(AltResult)
    volatile Completion stack; // 指向依赖的 Completion 链表(栈结构)的头指针
}
result 字段:
- 若为
null:表示未完成。
- 若为
AltResult:表示异常或 null 值。
- 若为普通对象:表示成功完成的结果。
stack 字段:
- 类型为
Completion(抽象类),是一个栈式单向链表(LIFO,后进先出),记录了所有依赖当前 CompletableFuture 的后续操作(即“依赖图”)。其注册顺序是后注册的靠前(栈顶),执行时先执行栈顶(后注册的)。
- 所有
thenApply、thenCompose 等方法都会创建一个 Completion 子类实例(如 UniApply, BiAccept, ThenCompose 等),并压入此栈。
Completion 是所有回调动作的基类,代表“当某个 future 完成后要做的事”。常见子类包括:
| 子类 |
作用 |
UniApply |
对应 thenApply |
UniAccept |
对应 thenAccept |
BiApply |
对应 thenCombine |
ThenCompose |
对应 thenCompose |
AsyncRun |
对应 runAsync |
核心流程源码分析
CompletableFuture 生命周期的核心流程是:注册回调 → 完成任务 → 触发依赖。
一个典型流程如下:
CompletableFuture<Integer> future1 = new CompletableFuture<>();
// 注册回调(构建依赖)
CompletableFuture<String> future2 = future1.thenApplyAsync(x -> "val=" + x);
CompletableFuture<Void> future3 = future2.thenAccept(System.out::println);

// 完成任务(设置结果),complete 内部的 postComplete 会触发依赖(传播完成)
future1.complete(42); // 触发 complete() → completeValue() → postComplete()
// postComplete() 会依次触发 f2(UniApply),然后 f3(UniAccept)
“注册回调”源码分析(以 thenApplyAsync 为例):
public <U> CompletableFuture<U> thenApplyAsync(Function<? super T,? extends U> fn) {
    return uniApplyStage(asyncPool, fn);
}

private <V> CompletableFuture<V> uniApplyStage(Executor e, Function<? super T,? extends V> f) {
    if (f == null) throw new NullPointerException();
    // 创建新的 future `d` 作为返回值
    CompletableFuture<V> d = new CompletableFuture<V>();
    if (e != null || !d.uniApply(this, f, null)) {
        // 创建 UniApply 对象 `c`,代表一个回调任务
        CompletableFuture.UniApply<T,V> c = new CompletableFuture.UniApply<T,V>(e, d, this, f);
        // 将 `c` 压入当前 future (`this`) 的依赖栈中
        push(c);
        // 尝试立即触发(一种优化)
        c.tryFire(SYNC);
    }
    return d;
}
“完成任务”与“触发依赖”源码分析:
public boolean complete(T value) {
    // 尝试以正常值完成 future
    boolean triggered = completeValue(value);
    // 触发所有已注册的依赖任务
    postComplete();
    return triggered;
}

// 以非异常结果完成 future,除非它已经完成
final boolean completeValue(T t) {
    return UNSAFE.compareAndSwapObject(this, RESULT, null, (t == null) ? NIL : t);
}

// 当确定当前 future 已完成时,弹出并尝试触发所有可达的依赖任务
final void postComplete() {
    CompletableFuture<?> f = this; Completion h;
    while ((h = f.stack) != null || (f != this && (h = (f = this).stack) != null)) {
        CompletableFuture<?> d; Completion t;
        if (f.casStack(h, t = h.next)) {
            if (t != null) {
                if (f != this) {
                    pushStack(h);
                    continue;
                }
                h.next = null;    // detach
            }
            f = (d = h.tryFire(NESTED)) == null ? this : d;
        }
    }
}
注册 → 完成 → 传播的流程总结:
- 注册:调用
thenApplyAsync 等方法时,会创建一个 Completion 对象(如 UniApply)。如果当前任务未完成,则将其压入自身的 stack 依赖栈中。
- 完成:当任务通过
complete(value) 被完成时,使用 CAS 原子地设置 result 字段。
- 传播:随后立即调用
postComplete(),从 stack 中逐个弹出并执行所有已注册的 Completion。每个 Completion 在执行时会消费当前结果、计算新值,并完成其关联的下游 CompletableFuture,从而递归触发整个依赖链的级联执行。
- 整个过程无锁、非阻塞,依靠
volatile + CAS + 回调栈实现高效异步编程流水线。
任务依赖结构图解
CompletableFuture 的依赖关系可从两个层面理解:
- Future 层的依赖(逻辑关系):不同
CompletableFuture 实例之间的依赖关系图(DAG)。
- Completion 链表层的依赖(存储关系):每个
CompletableFuture 内部维护的单向链表,存储所有依赖于它的 Completion 对象。
| 层级 |
名称 |
结构 |
作用 |
| 第一层 |
Future 依赖图 |
DAG(有向无环图) |
描述“哪个 future 依赖哪个”的逻辑关系 |
| 第二层 |
Completion 链表 |
每个 future 内部的单向链表(栈) |
存储“当这个 future 完成后要执行哪些具体操作” |
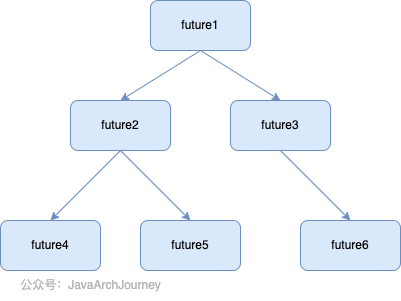
以下面代码为例:
CompletableFuture<String> f1 = new CompletableFuture<>();

// f1 完成后,触发两个独立的后续 future
CompletableFuture<Integer> f2 = f1.thenApply(s -> s.length());         // 分支 A
CompletableFuture<String> f3 = f1.thenApply(s -> s.toUpperCase());     // 分支 B

// f2 和 f3 各自又有多个下游
CompletableFuture<Void> f4 = f2.thenAccept(x -> System.out.println("Len: " + x));   // f2 → f4
CompletableFuture<Void> f5 = f2.thenAccept(x -> System.out.println("Double: " + x * 2)); // f2 → f5
CompletableFuture<Void> f6 = f3.thenAccept(s -> System.out.println("Upper: " + s)); // f3 → f6
逻辑层面的依赖:Future 之间的 DAG 关系图
存储层面的依赖:每个 Future 内部的 Completion 链表
每个 Completion 都持有:
src: 源 CompletionFuture(当前这个 completion 所属的 future)dep: 目标 CompletionFuture(要被完成的那个 future)fn: 要执行的函数
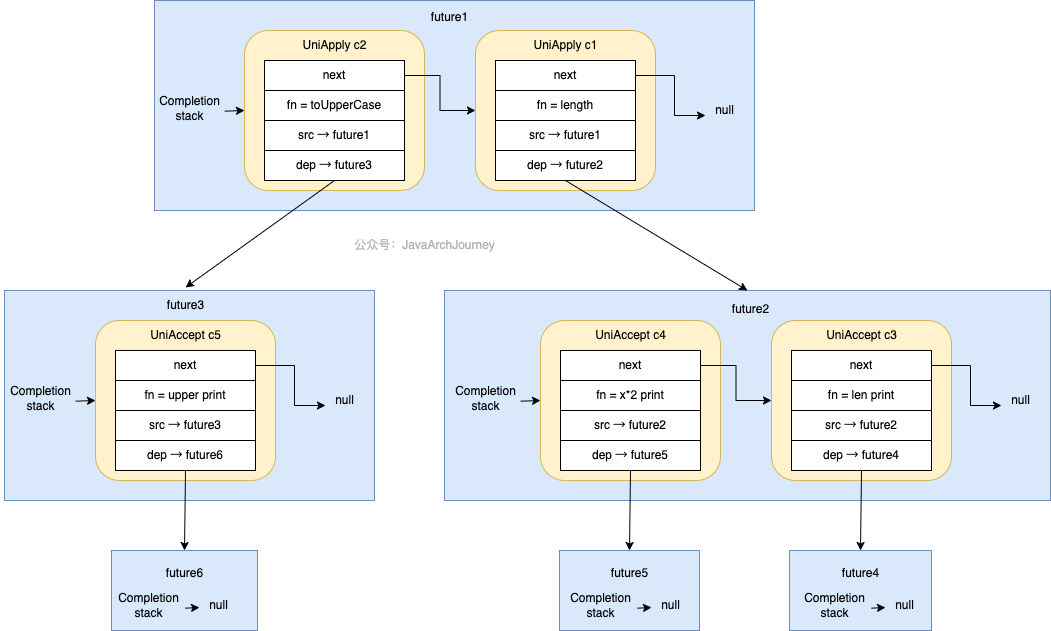
执行流程(当 f1.complete("hello") 被调用):
f1 完成,值为 "hello"。f1.postComplete() 开始处理 f1.stack:
- 先弹出
c2(f3 的任务):
- 执行
toUpperCase("hello") → "HELLO"
- 完成
f3(设置其 result)
- 触发
f3.postComplete()
- 再弹出
c1(f2 的任务):
- 执行
length("hello") → 5
- 完成
f2
- 触发
f2.postComplete()
- 先执行
c4:打印 "Double: 10"
- 再执行
c3:打印 "Len: 5"
注意: 虽然 f2 和 f3 是逻辑上的并行分支,但在单线程完成场景下,postComplete 是循环处理,因此它们是串行执行的。但在异步或并发场景中(例如使用了不同的线程池),它们可能真正并行执行。
掌握 CompletableFuture 的原理,能帮助开发者更好地理解其行为,编写出更高效、健壮的高并发应用。如果你想深入探讨更多Java并发或网络请求的优化技巧,欢迎在云栈社区与其他开发者交流。
 发表于 2026-2-12 11:58:44
|
查看: 238|
回复: 0
发表于 2026-2-12 11:58:44
|
查看: 238|
回复: 0
