使用 Elasticsearch Serverless、Jina Embeddings v5、Elastic Open Web Crawler 和 Elastic Agent Builder,不到一小时即可构建“与您的网站聊天”体验。最终,你将获得一个无需自定义分块或嵌入管道,就能搜索你抓取的网页、引用相关段落并基于网站内容回答问题的智能 RAG 代理。
本教程将一步步指导你如何实现:
- 启动一个 Elasticsearch Serverless 项目。
- 使用支持 Jina Embeddings v5 的
semantic_text 字段创建索引。
- 使用 Elastic Crawler Control(一个开源的 Elastic Open Web Crawler UI + API 封装器)抓取任何网站。
- 在 Kibana 中使用 Elastic Agent Builder 与抓取的数据进行智能对话。
先决条件
- 一个具备写入权限 API 密钥的 Elasticsearch Serverless 项目。
- 已安装的 Docker 与 Docker Compose(用于运行爬虫UI)。
- 已安装的 git(用于克隆仓库)。
1. 启动 Elasticsearch Serverless 项目
首先,我们需要一个 Serverless 项目来托管数据。
- 登录到您的 Elastic Cloud 控制台。
- 点击 创建项目。
- 选择 “搜索” 作为项目类型(此类型针对向量搜索和检索进行了优化)。
- 为项目命名(例如
es-labs-jina-guide),然后点击 “创建”。
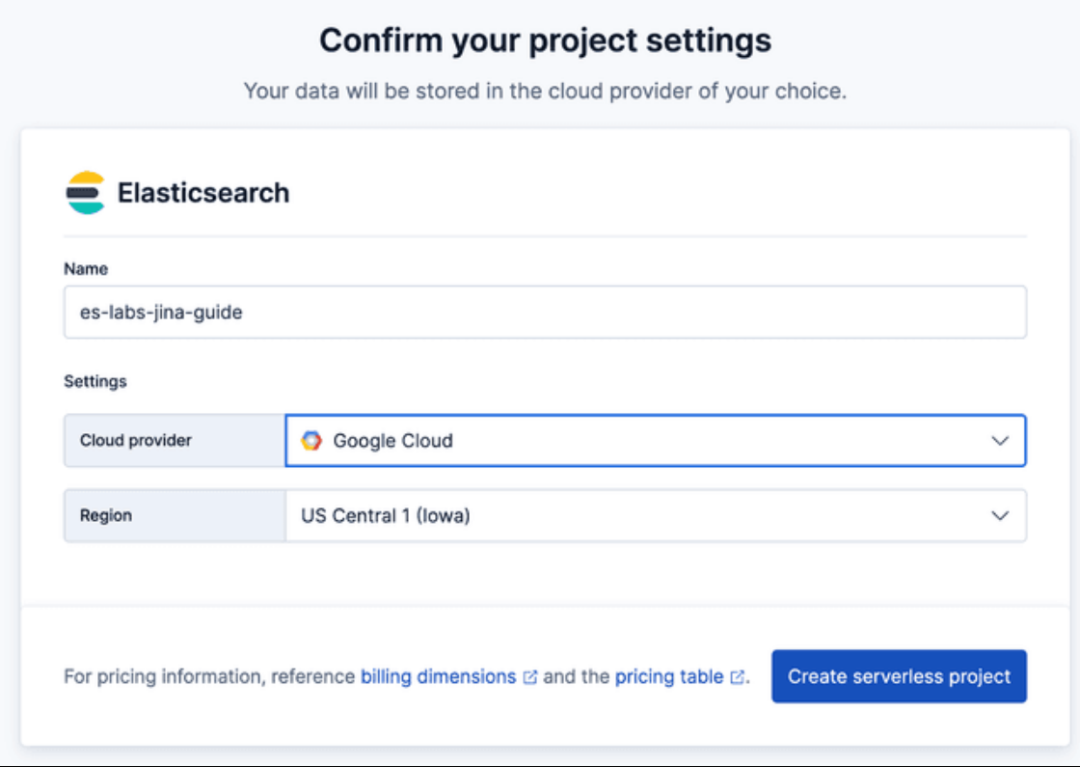
重要提示:请务必保存创建项目时提供的 Elasticsearch 端点 和 API 密钥,后续的爬虫程序需要用到这些信息。

2. 创建支持 Jina v5 的索引
Elasticsearch Serverless 支持 semantic_text 字段类型,它能自动处理文本分块和嵌入生成。我们将使用托管在 Elastic Inference Service GPU 上的 jina-embeddings-v5-text-small 模型。
在 Kibana 的 开发工具 中运行以下命令,创建一个包含 semantic_text 字段的索引。这指示 Elasticsearch 使用指定的推理端点自动对该字段中的内容进行向量化。
PUT furnirem-website
{
  "mappings": {
    "_meta": {
      "description": "Each document represents a web page with the following schema: 'title' and 'meta_description' provide high-level summaries; 'body' contains the full text content; 'headings' preserves the page hierarchy for semantic weighting. URL metadata is decomposed into 'url_host', 'url_path', and 'url_path_dir1/2/3' to allow for granular filtering by site section (e.g., 'blog' or 'tutorials'). 'links' contains extracted outbound URLs for discovery. Crawl timestamp: 2026-01-26T12:54:16.347907."
    },
    "properties": {
      "body_content": {
        "type": "text",
        "fields": {
          "keyword": {
            "type": "keyword",
            "ignore_above": 256
          },
          "semantic_multilingual": {
            "type": "semantic_text",
            "inference_id": ".jina-embeddings-v5-text-small"
          }
        }
      },
      "headings": {
        "type": "text",
        "fields": {
          "keyword": {
            "type": "keyword",
            "ignore_above": 256
          },
          "semantic_multilingual": {
            "type": "semantic_text",
            "inference_id": ".jina-embeddings-v5-text-small"
          }
        }
      },
      "title": {
        "type": "text",
        "fields": {
          "keyword": {
            "type": "keyword",
            "ignore_above": 256
          },
          "semantic_multilingual": {
            "type": "semantic_text",
            "inference_id": ".jina-embeddings-v5-text-small"
          }
        }
      }
    }
  }
}
3. 运行 Elastic Open Web Crawler
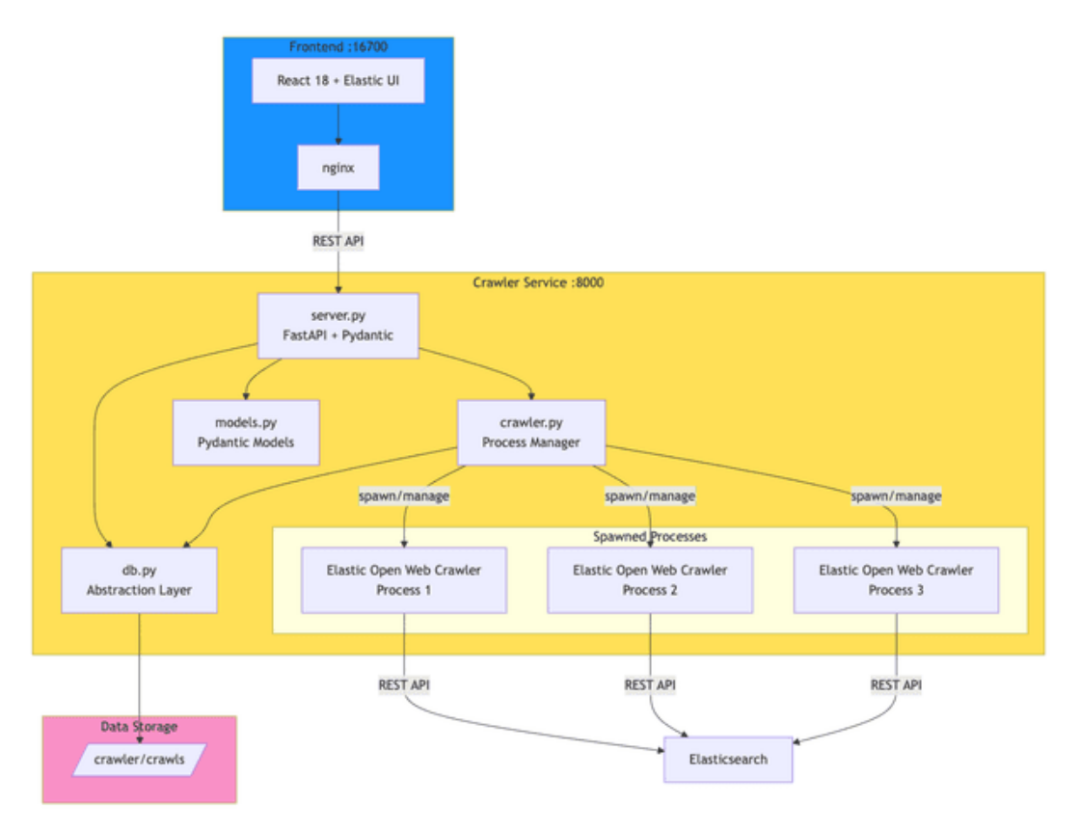
Elastic Crawler Control(Crawly)是一个展示如何围绕 Open Web Crawler 构建应用的示例。它将爬虫封装在 FastAPI 服务中,用于管理进程并持久化执行数据,同时提供了一个 React 前端用于配置和监控。
其核心原理是,爬虫服务(crawler.py)通过 subprocess.Popen 生成 JRuby 进程,以支持多个并发爬虫。每次执行的配置、状态和日志目前会持久化到磁盘。
让我们开始部署和运行它:
- 克隆仓库:
git clone https://github.com/ugosan/elastic-crawler-control
- 在项目根目录下创建一个名为
.env.local 的文件,并添加你的 Elasticsearch 凭据:
ES_URL=https://your-elasticsearch-endpoint.es.cloud
ES_API_KEY=your_api_key_here
- 启动服务:
docker-compose up
- 访问用户界面:
http://localhost:16700
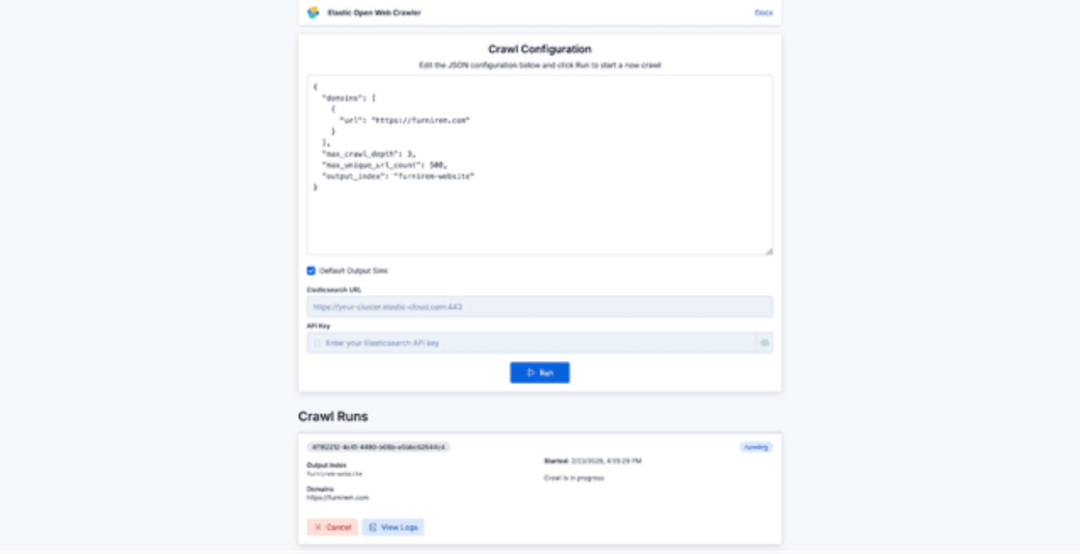
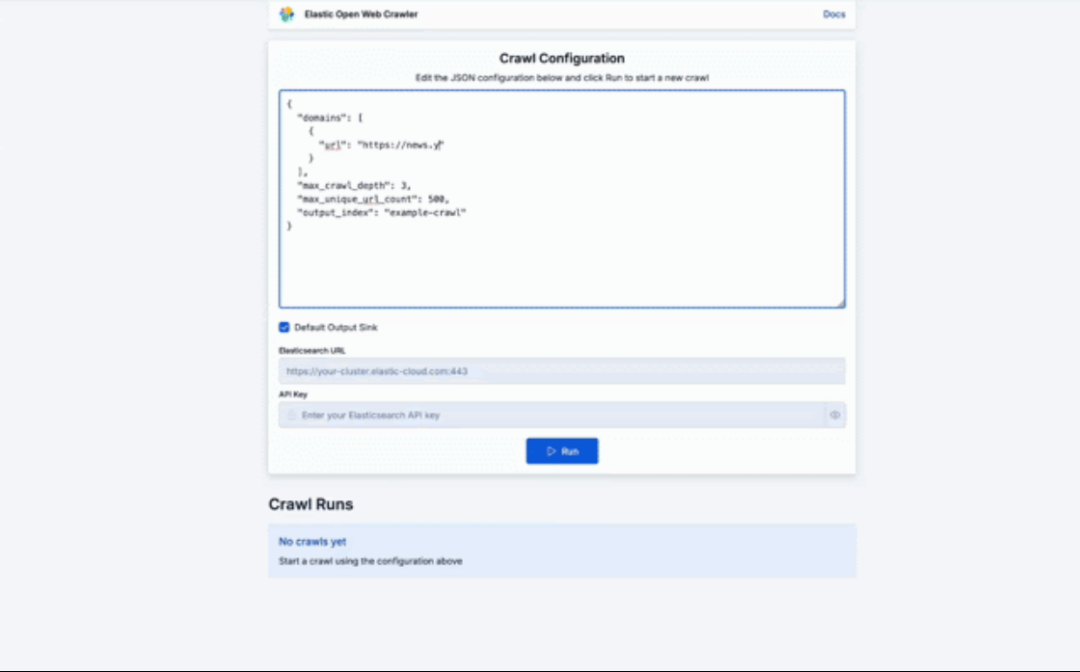
在配置界面中,你可以输入简单的 JSON 配置来启动爬虫。除非你想指定具体的种子 URL,否则 seed_urls 不是必须的。一个基本配置如下:
{
  "domains": [
    {
      "url": "https://furnirem.com"
    }
  ],
  "max_crawl_depth": 3,
  "max_unique_url_count": 500,
  "output_index": "furnirem-website"
}
配置完成后,点击运行即可开始抓取目标网站并查看实时进度。
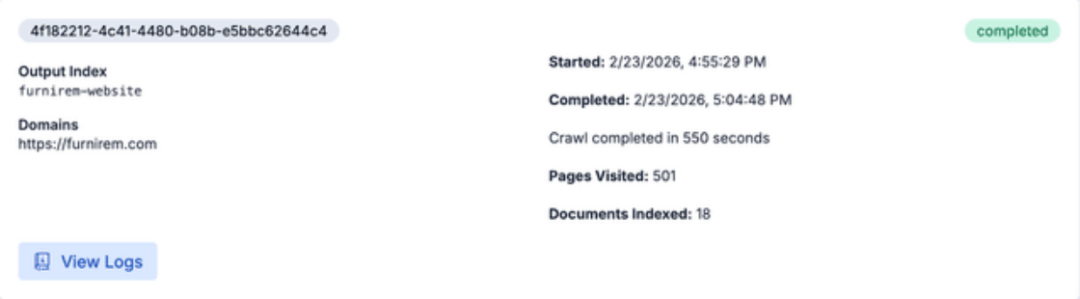
爬虫任务完成后,数据就被索引并向量化了。现在,我们可以直接在 Elasticsearch 中查询这些内容,或者更酷的是,使用 Elastic Agent Builder 与网站进行智能对话。
4. 在 Kibana 中与数据智能对话
现在数据已经准备就绪,我们可以通过 Elastic Agent Builder 与之交互。
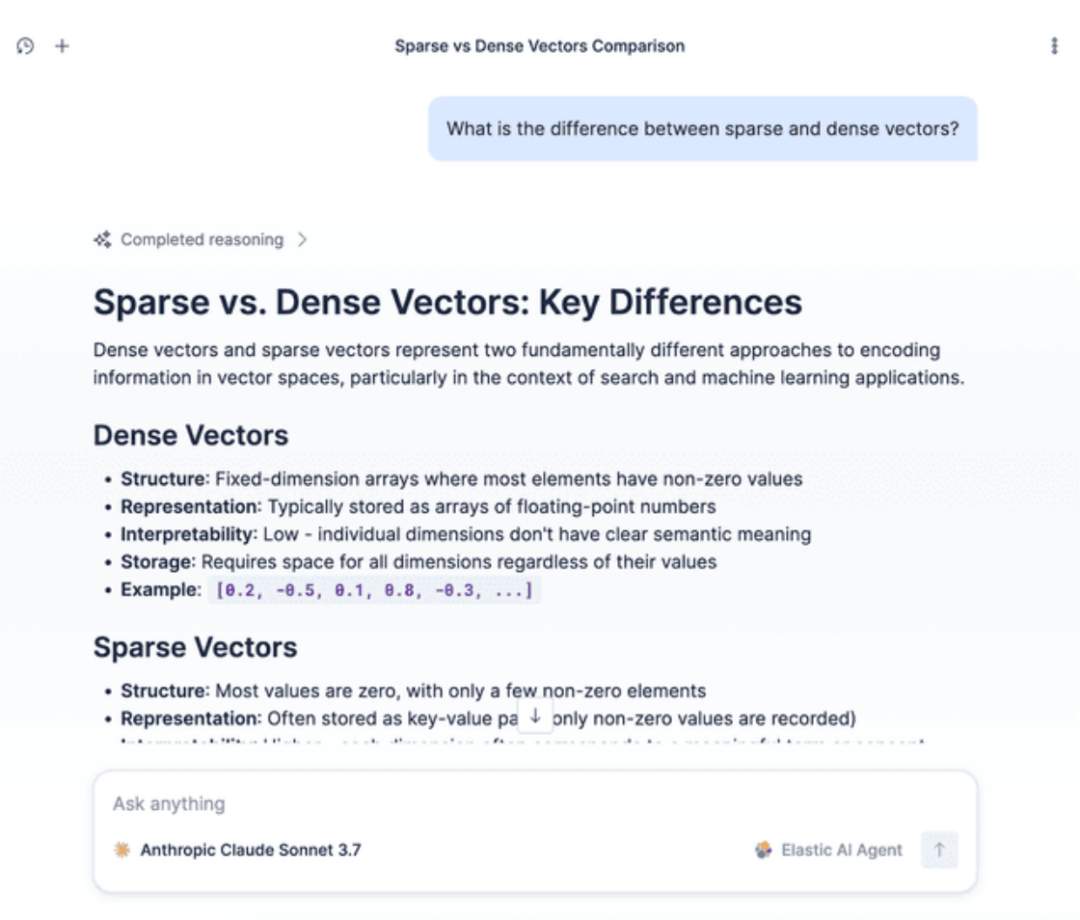
- 打开 Kibana,导航到 “代理”(位于“搜索”部分下)。
- 测试代理:在聊天窗口中提出一个问题,例如:“稀疏向量和稠密向量有什么区别?”
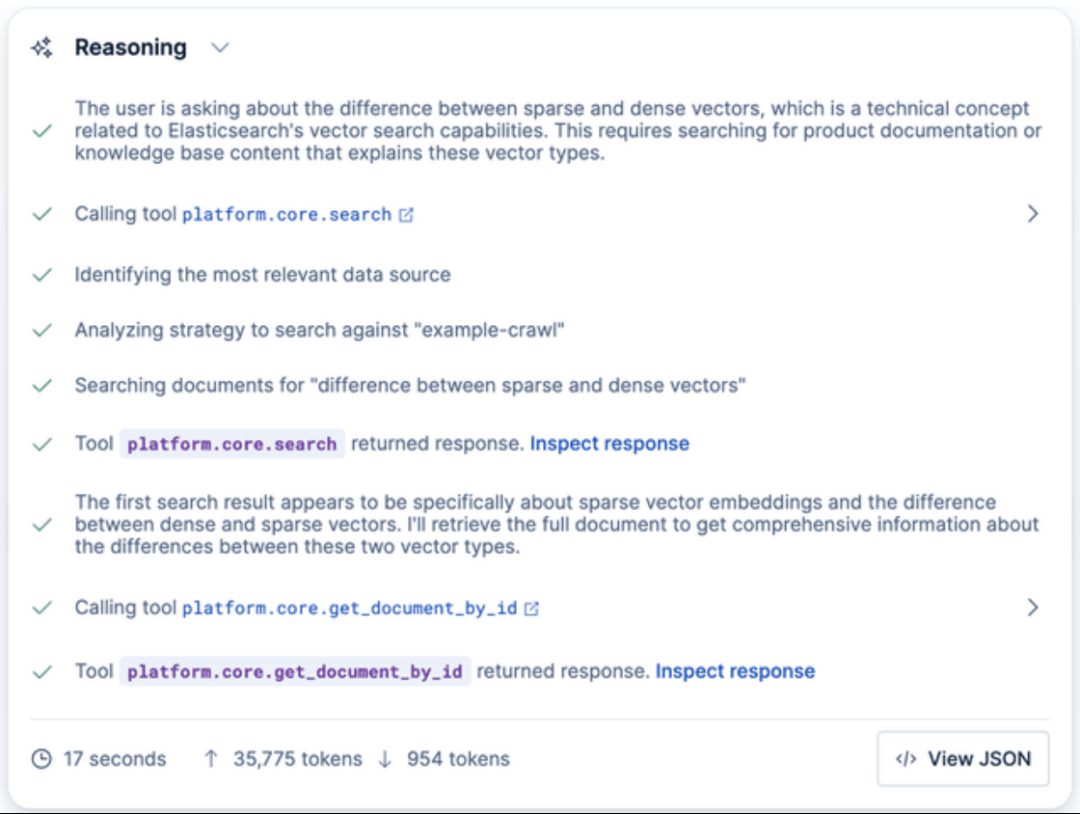
代理将自动搜索你已索引的数据(例如技术博客文章),检索相关片段,并生成一个准确的答案。
你还可以通过 Kibana API 直接与代理交互:
POST kbn://api/agent_builder/converse/async
{
  "input": "What is the difference between sparse and dense vectors?",
  "agent_id": "elastic-ai-agent",
  "conversation_id": "<CONVERSATION_ID>"
}
在 Elastic Agent Builder 中,conversation_id 用于恢复现有对话。如果在初始请求中未提供此参数,API 将启动一个新对话,并在流式响应中返回新生成的 ID。
总结
至此,你已经成功搭建了一个完整的“与网站聊天”技术栈:你的网站被自动抓取、索引,利用 semantic_text 字段和 Jina v5 模型完成向量化,最终通过 Kibana 中的智能代理呈现,该代理能够基于页面内容准确回答问题。
这套模式具有很强的可复用性。你可以轻松地将其应用于其他文档源、知识库或内部维基,在几分钟内快速验证和迭代检索的相关性。如果你在实践过程中有任何心得或疑问,欢迎在云栈社区与更多开发者交流探讨。
 发表于 2026-3-27 04:21:52
|
查看: 90|
回复: 0
发表于 2026-3-27 04:21:52
|
查看: 90|
回复: 0
