本文旨在为测试环境搭建、个人学习提供一份清晰的指引,内容围绕如何在 CentOS Linux 7.9 操作系统上,使用 OBD (OceanBase Deployer) 的图形化界面,部署一个 OceanBase 社区版 4.5 的单机集群。
一、软硬件要求
服务器配置
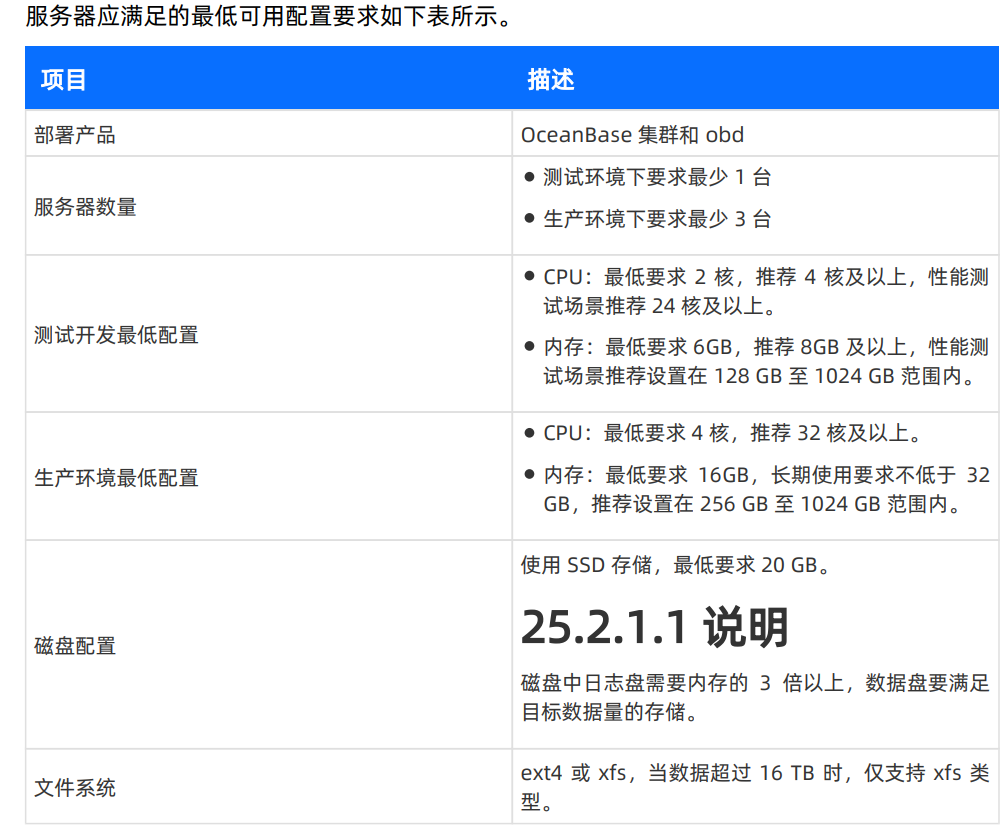
服务器应满足的最低可用配置要求如下表所示。
操作系统要求
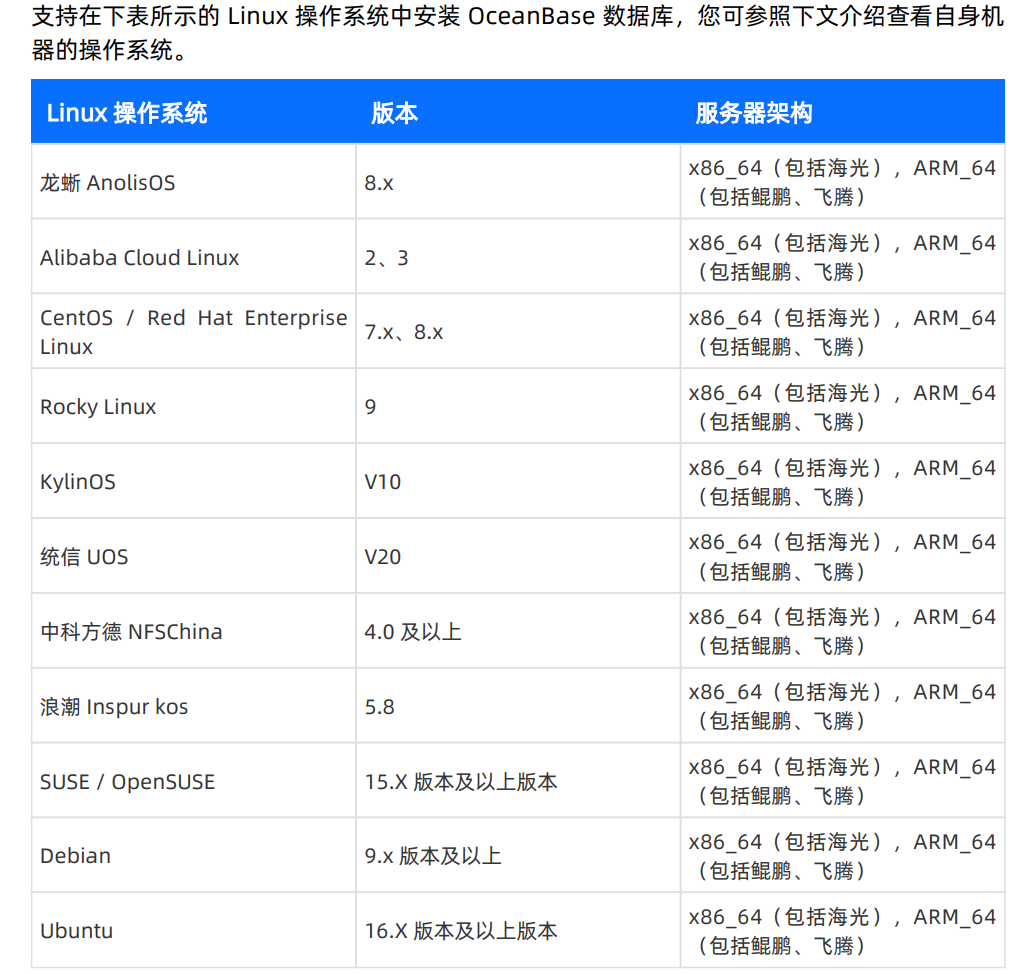
支持在下表所示的 Linux 操作系统中安装 OceanBase 数据库。
二、部署流程
1. 操作系统相关配置
在开始部署 OceanBase 之前,需要对服务器进行一系列的基础配置,以满足数据库的运行要求。这些步骤是保证后续安装顺利进行的关键。
1.1 关闭透明大页
首先检查并关闭透明大页(Transparent HugePages),这有助于提升数据库性能的稳定性。
[root@ob1 ~]#cat /sys/kernel/mm/transparent_hugepage/enabled
[always] madvise never
[root@ob1 ~]#echo never > /sys/kernel/mm/transparent_hugepage/enabled
[root@ob1 ~]#cat /sys/kernel/mm/transparent_hugepage/enabled
always madvise [never]
--修改/etc/rc.d/rc.local,添加以下,方便下次重启生效。
echo never > /sys/kernel/mm/transparent_hugepage/enabled
--给文件+x可执行权限
chmod +x /etc/rc.d/rc.local
1.2 创建部署用户
创建一个专用的管理员用户(如admin)用于部署,并为其配置无密码的 sudo 权限。
--创建用户
[root@ob1 transparent_hugepage]# useradd -U admin -d /home/admin -s /bin/bash
[root@ob1 transparent_hugepage]# chown -R admin:admin /home/admin
[root@ob1 transparent_hugepage]# passwd admin
Changing password for user admin.
New password:
BAD PASSWORD: The password is shorter than 8 characters
Retype new password:
passwd: all authentication tokens updated successfully.
[root@ob1 transparent_hugepage]#
--设置SUDO权限
[root@ob1 transparent_hugepage]# vim /etc/sudoers
在 /etc/sudoers 文件末尾添加如下内容:
## Same thing without a password
# %wheel ALL=(ALL) NOPASSWD: ALL
admin ALL=(ALL) NOPASSWD: ALL
1.3 创建数据目录并授权
为 OceanBase 的数据和日志创建存储目录,并将所有权授予部署用户。
[root@ob1 transparent_hugepage]# cd /
[root@ob1 /]# mkdir data
[root@ob1 /]# mkdir redo
[root@ob1 /]# chown -R admin:admin /data
[root@ob1 /]# chown -R admin:admin /redo
1.4 配置系统资源限制 (limits.conf)
修改系统资源限制,确保 OceanBase 进程能够打开足够多的文件描述符和使用足够的进程数。这是一个关键的运维配置步骤。
在 /etc/security/limits.conf 配置文件中添加以下内容:
* soft nofile 655350
* hard nofile 655350
* soft stack unlimited
* hard stack unlimited
* soft nproc 655360
* hard nproc 655360
* soft core unlimited
* hard core unlimited
需查看 /etc/security/limits.d/20-nproc.conf 文件中是否存在 nproc 的配置,若存在需同步修改该文件中 nproc 的值,将 4096 修改为 655360。
[admin@ob1 /]$ cat /etc/security/limits.d/20-nproc.conf
# Default limit for number of user’s processes to prevent
# accidental fork bombs.
# See rhbz #432903 for reasoning.
* soft nproc 4096
root soft nproc unlimited
 [admin@ob1 /]$ sudo vi /etc/security/limits.d/20-nproc.conf
[admin@ob1 /]$ cat /etc/security/limits.d/20-nproc.conf
# Default limit for number of user’s processes to prevent
# accidental fork bombs.
# See rhbz #432903 for reasoning.
* soft nproc 655360
root soft nproc unlimited
[admin@ob1 /]$
退出当前会话,重新登录。执行以下命令,查看配置是否生效:
[root@ob1 /]# su - admin
Last login: Thu Feb 26 12:34:40 PST 2026 on pts/1
[admin@ob1 ~]$ ulimit -a
core file size          (blocks, -c) unlimited
data seg size           (kbytes, -d) unlimited
scheduling priority             (-e) 0
file size               (blocks, -f) unlimited
pending signals                 (-i) 34264
max locked memory       (kbytes, -l) 64
max memory size         (kbytes, -m) unlimited
open files                      (-n) 655350
pipe size            (512 bytes, -p) 8
POSIX message queues     (bytes, -q) 819200
real-time priority              (-r) 0
stack size              (kbytes, -s) unlimited
cpu time               (seconds, -t) unlimited
max user processes              (-u) 655360
virtual memory          (kbytes, -v) unlimited
file locks                      (-x) unlimited
[admin@ob1 ~]$
1.5 配置内核参数 (sysctl.conf)
调整网络、内存、文件系统等内核参数以优化 OceanBase 运行环境。
执行以下命令,打开 /etc/sysctl.conf 配置文件:
[admin@test001 ~]$ sudo vim /etc/sysctl.conf
在 /etc/sysctl.conf 配置文件中添加以下内容:
#for oceanbase
##修改内核异步 I/O 限制
fs.aio-max-nr = 1048576
##网络优化
net.core.somaxconn = 2048
net.core.netdev_max_backlog = 10000
net.core.rmem_default = 16777216
net.core.wmem_default = 16777216
net.core.rmem_max = 16777216
net.core.wmem_max = 16777216
net.ipv4.ip_forward = 0
net.ipv4.conf.default.rp_filter = 1
net.ipv4.conf.default.accept_source_route = 0
net.ipv4.tcp_syncookies = 1
net.ipv4.tcp_rmem = 4096 87380 16777216
net.ipv4.tcp_wmem = 4096 65536 16777216
net.ipv4.tcp_max_syn_backlog = 16384
net.ipv4.tcp_fin_timeout = 15
net.ipv4.tcp_slow_start_after_idle = 0
vm.swappiness = 0
vm.min_free_kbytes = 2097152
vm.overcommit_memory = 0
fs.file-max = 6573688
fs.pipe-user-pages-soft = 0
##修改进程可以拥有的虚拟内存区域数量
vm.max_map_count = 655360
##设置 core 文件的文件名格式以及目录
kernel.core_pattern = /data/core-%e-%p-%t
其中,kernel.core_pattern 中的 /data 为 OceanBase 数据库的 data 目录。更改配置完成后,执行以下命令,加载配置,使配置生效。
[admin@ob1 ~]$ sudo sysctl -p
1.6 关闭防火墙和 SELinux
为了避免网络访问受阻,需要关闭防火墙并禁用 SELinux。
依次执行以下命令,关闭防火墙:
[admin@ob1 ~]$ sudo systemctl disable firewalld
[admin@ob1 ~]$ sudo systemctl stop firewalld
[admin@ob1 ~]$ sudo systemctl status firewalld
关闭 SELinux:
执行以下命令,打开 /etc/selinux/config 配置文件:
[admin@ob1 ~]$ sudo vim /etc/selinux/config
在 /etc/selinux/config 配置文件中修改对应配置项为以下内容:
SELINUX=disabled
执行以下命令或重启服务器,使更改生效:
[admin@ob1 ~]$ setenforce 0
执行以下命令,查看更改是否生效:
sestatus
1.7 重启服务器
完成以上所有配置后,建议重启服务器,以确保所有配置变更生效。
sudo reboot
2. 通过 OBD 图形化界面部署 OceanBase 集群
本文以 x86 架构的 CentOS Linux 7.9 镜像作为环境介绍如何使用 obd 图形化界面部署 OceanBase 数据库。
2.1 下载并安装 OceanBase All in One 安装包
从 OceanBase 官网软件中心下载最新的 OceanBase All in One 安装包,并上传到服务器。
下载地址:https://www.oceanbase.com/softwarecenter

执行如下命令解压并安装:
[admin@ob1 ~]$ tar -xzf oceanbase-all-in-one-*.tar.gz
[admin@ob1 ~]$ cd oceanbase-all-in-one/bin/
[admin@ob1 bin]$ ./install.sh
安装过程会输出大量信息,最后显示安装成功。根据提示,执行以下命令设置环境变量:
[admin@ob1 bin]$ source ~/.oceanbase-all-in-one/bin/env.sh
2.2 启动 OBD 图形化界面
在命令行执行 obd web 命令启动图形化界面服务。
[admin@ob1 oceanbase-all-in-one]$ obd web
start OBD WEB in 0.0.0.0:8680
please open http://192.168.125.137:8680
根据输出提示,在浏览器中输入 http://<你的服务器IP>:8680,即可访问 OBD 部署向导界面。

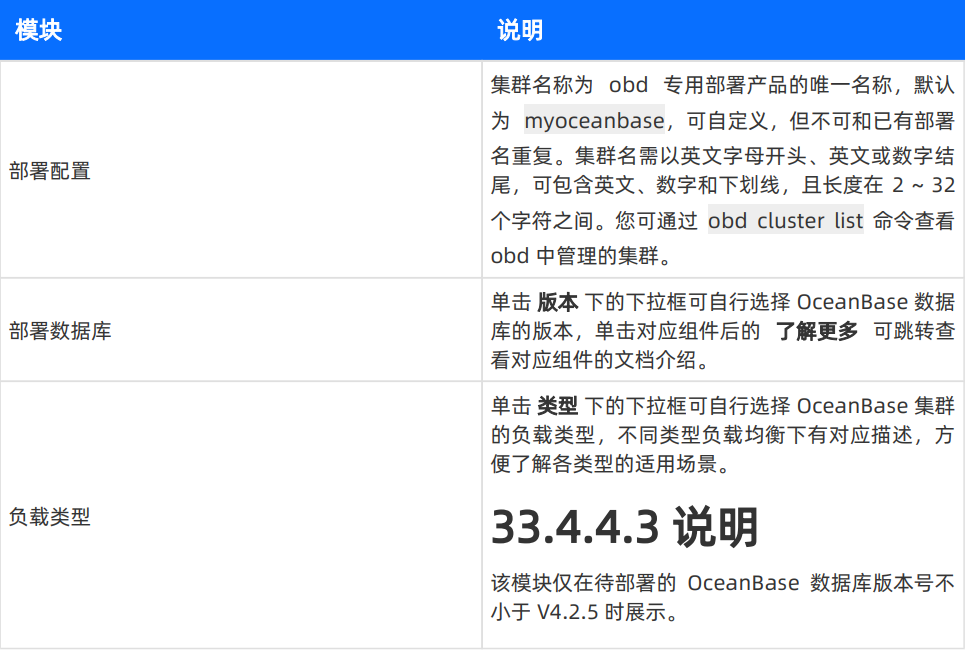
2.3 部署配置
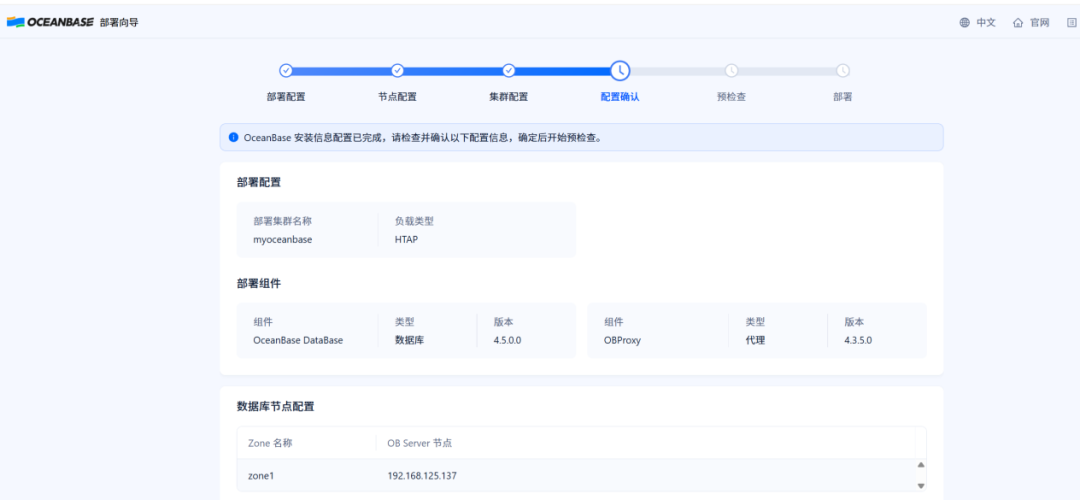
在部署配置页面,需要设置集群名称、部署模式(选择“单机”),并选择要部署的 OceanBase 数据库版本(如 4.5.0.0)和负载类型(如 HTAP)。
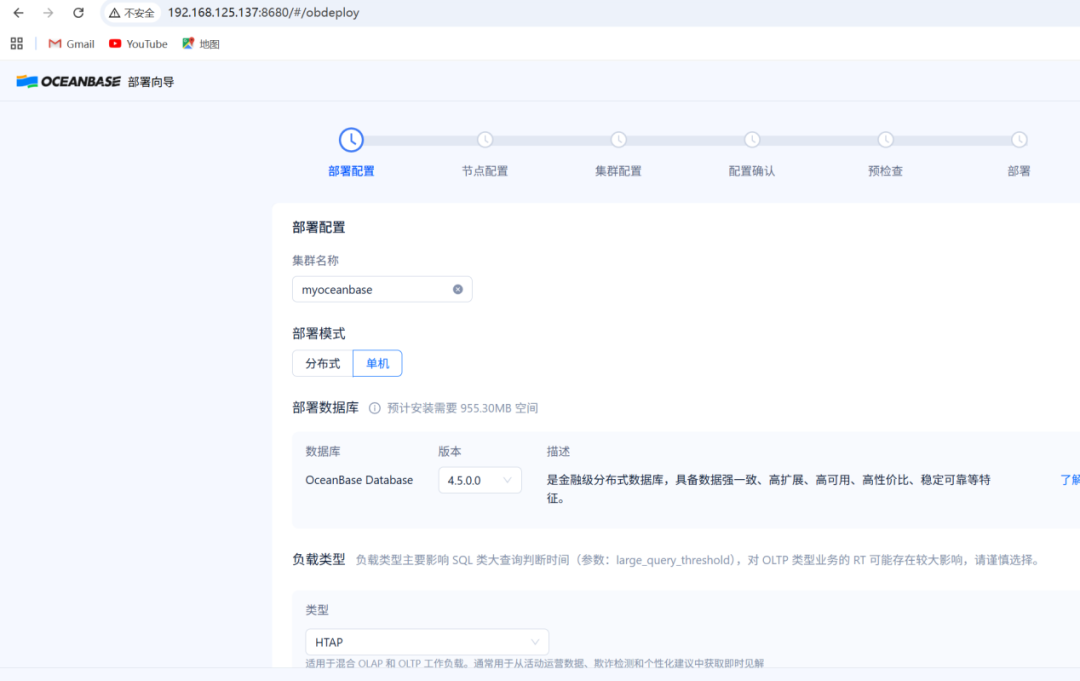
在“部署组件”区域,可以勾选需要安装的额外组件,如 OBProxy(代理)、OBAgent(监控)等。默认仅勾选 OBProxy 组件。

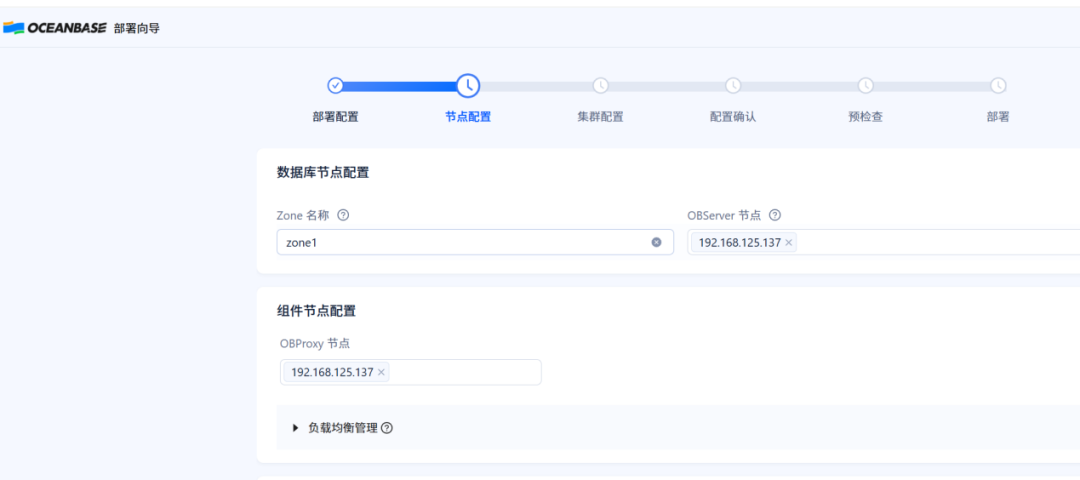
2.4 节点配置
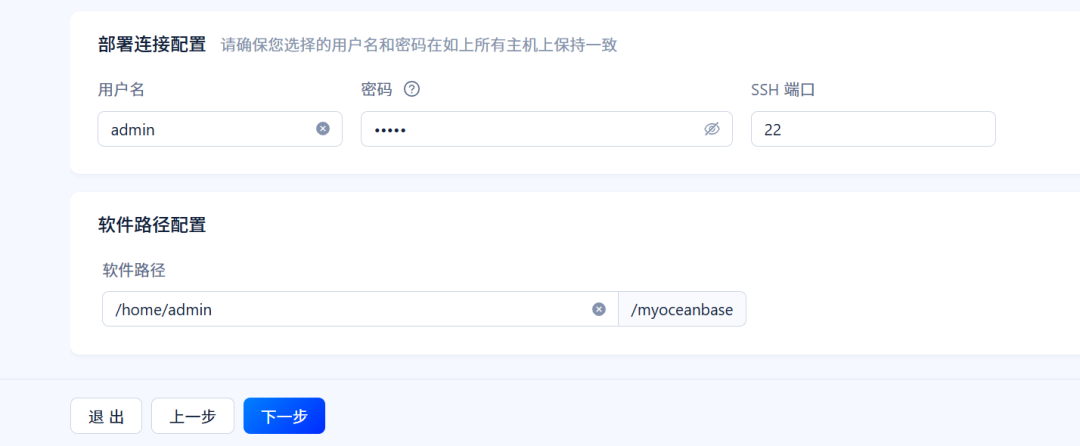
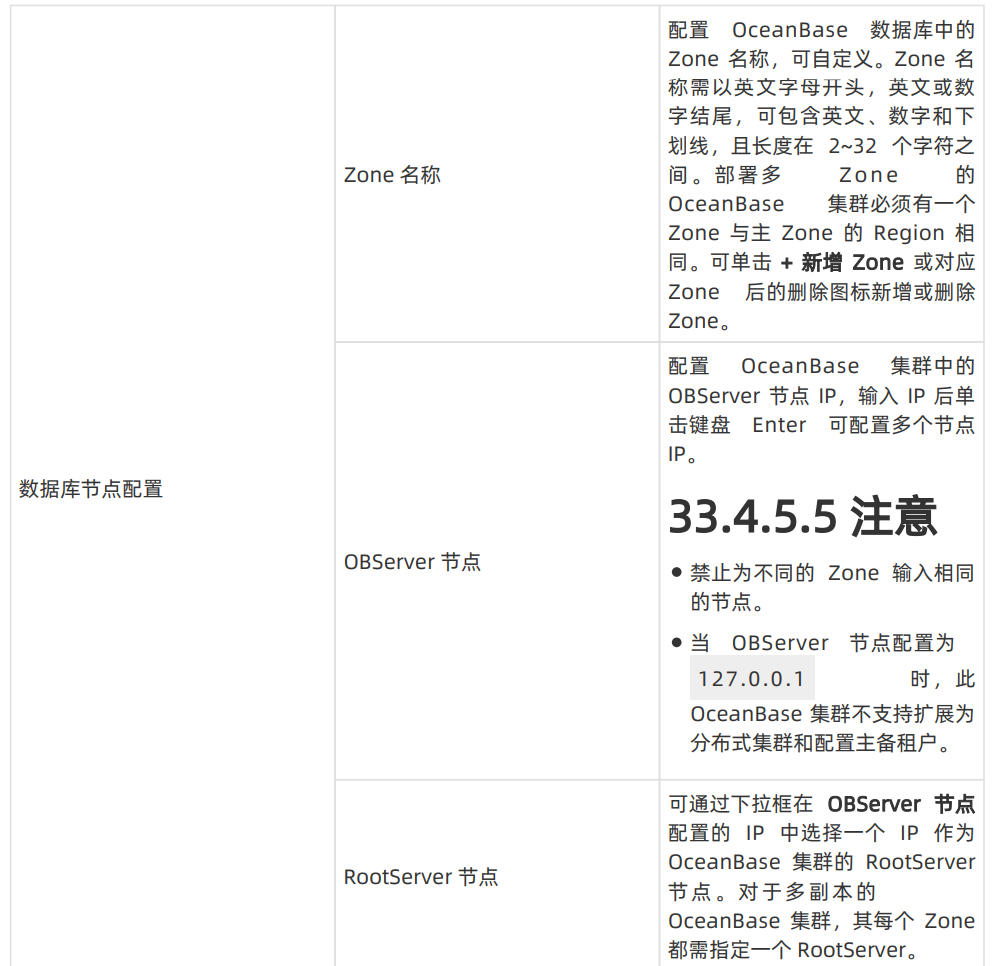
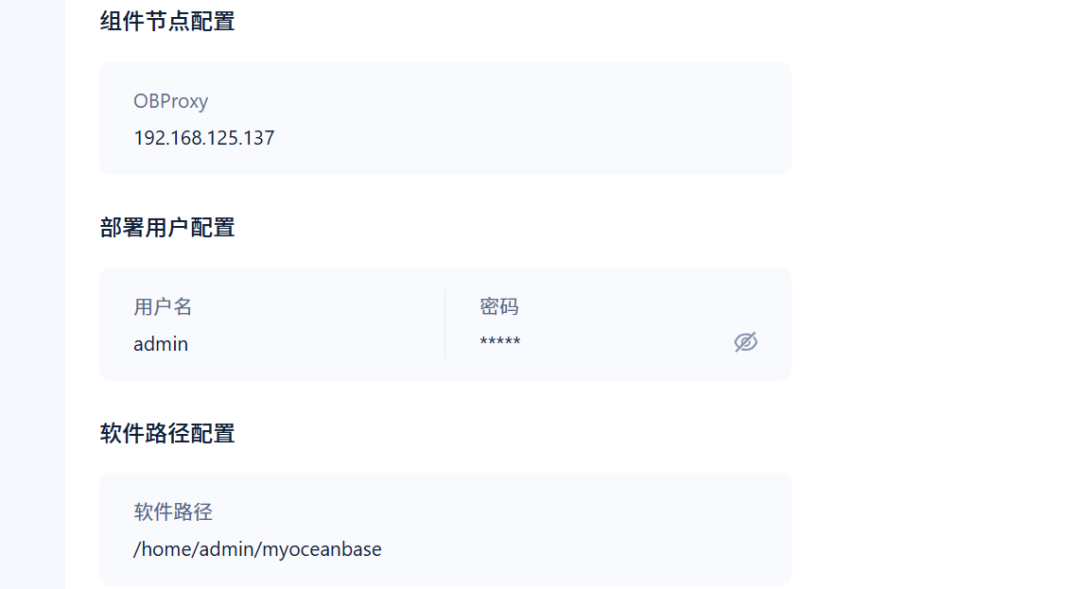
在此界面配置数据库节点、组件节点的 IP 地址、部署用户以及软件安装路径。
- 数据库节点配置:为 Zone(如 zone1)指定 OBServer 节点 IP(例如 192.168.125.137)。
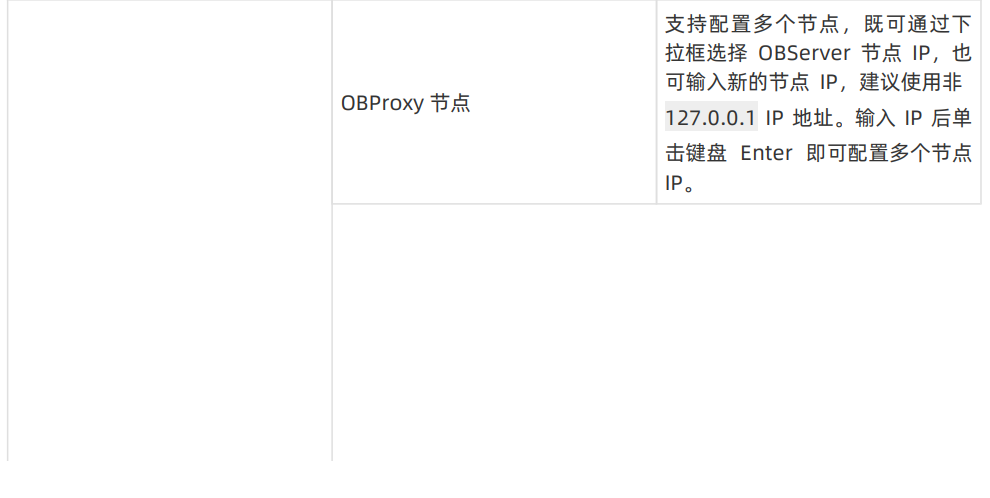
- 组件节点配置:配置 OBProxy 等组件的节点 IP,通常可与数据库节点相同。
- 部署连接配置:输入 SSH 用户名(如 admin)、密码及端口。
- 软件路径配置:指定软件安装的基础路径。
下面是配置界面的详细说明:


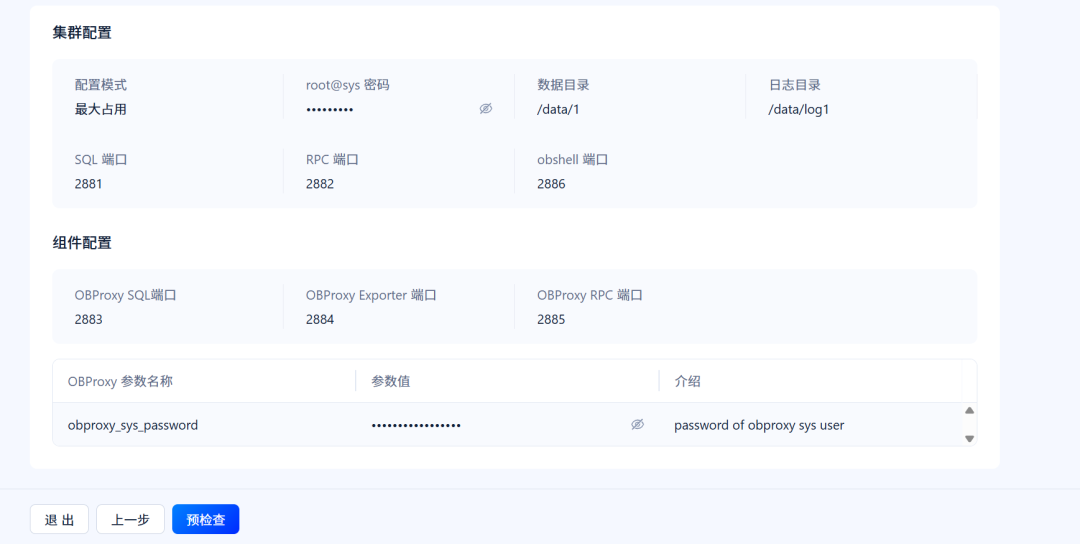
2.5 集群配置
在此步骤设置集群的运行参数。
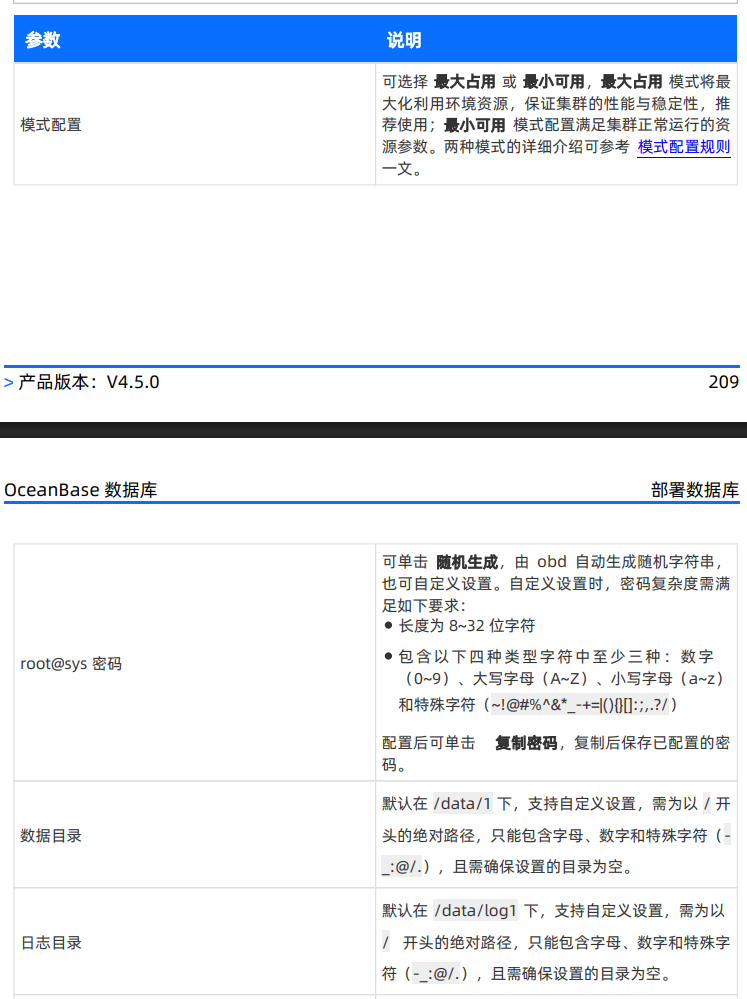
- 模式配置:选择“最大占用”以充分利用服务器资源。
- root@sys 密码:设置 OceanBase 系统租户的管理员密码。
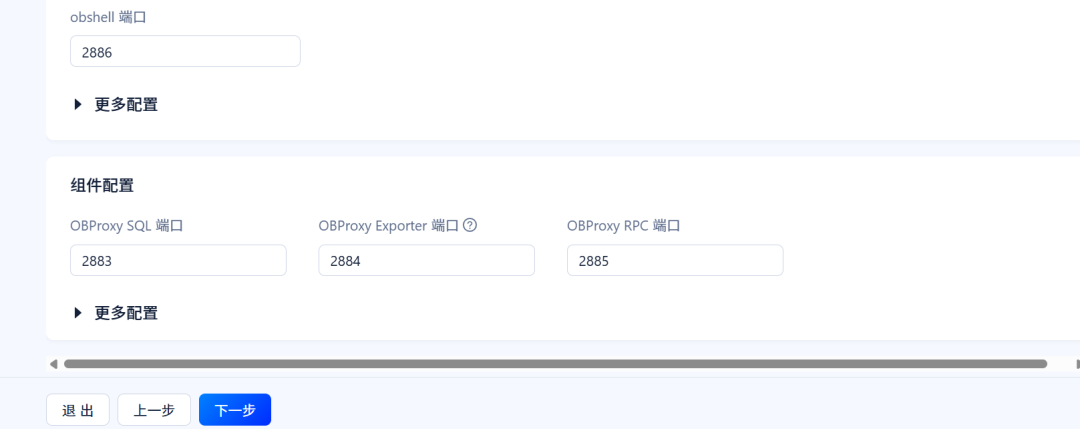
- 目录与端口:确认或修改数据目录、日志目录以及 SQL 端口(默认 2881)、RPC 端口(默认 2882)等。

相关参数说明如下:

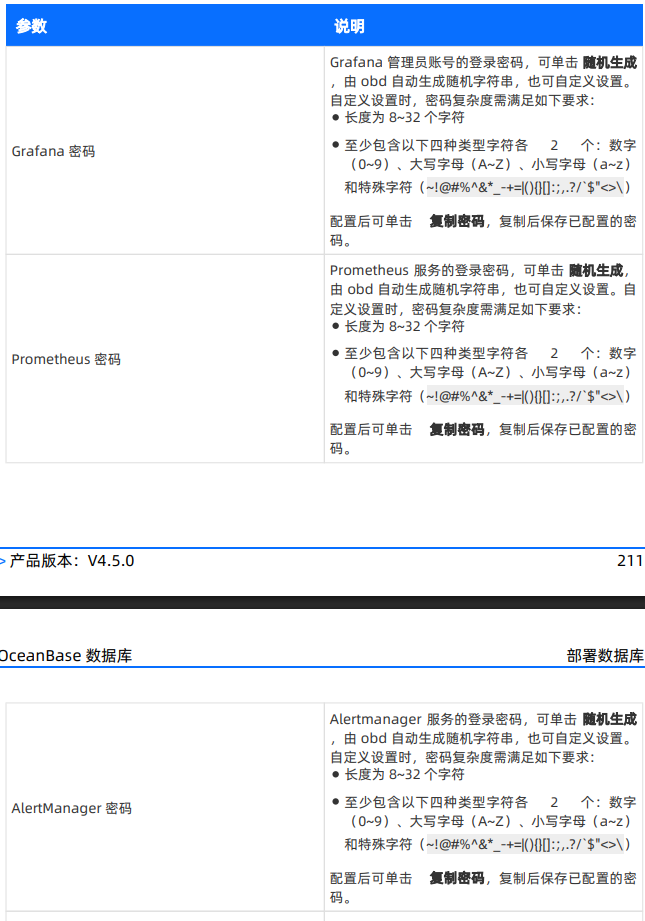
组件(如 Grafana, Prometheus)的密码配置说明:
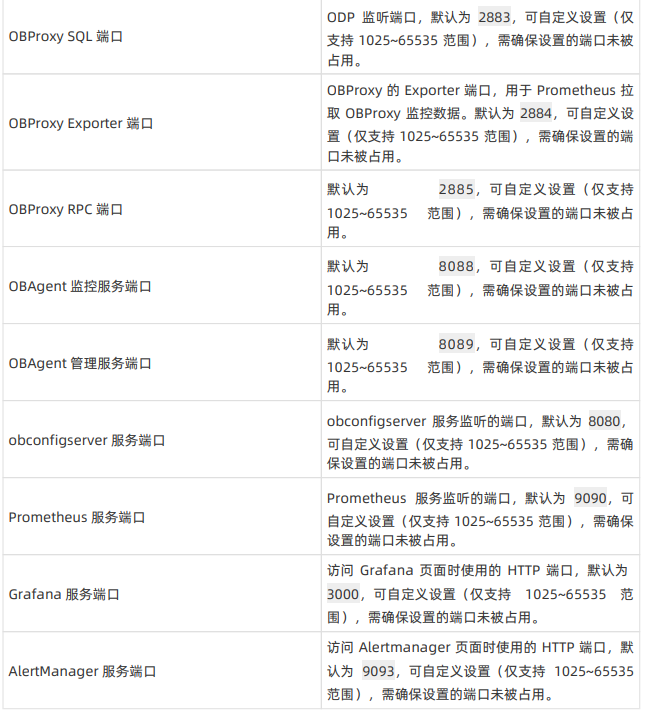
各组件的默认服务端口说明:
2.6 配置确认
在正式部署前,系统会展示所有配置信息的汇总页面,请仔细检查确认。
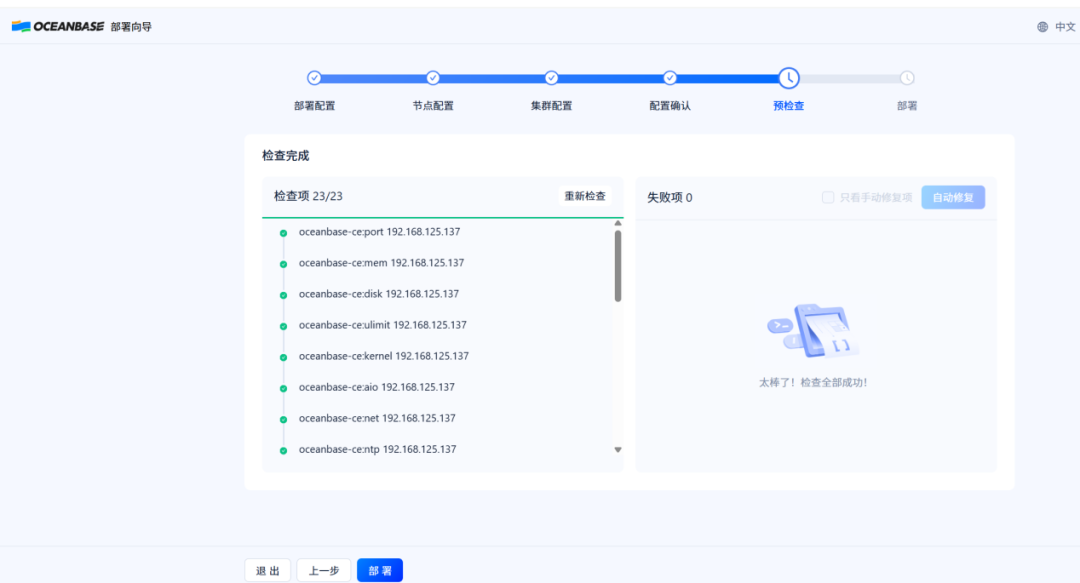
2.7 预检查
OBD 会自动对服务器环境进行一系列检查,包括端口、内存、磁盘、系统参数等。所有检查项通过后,方可进行部署。
2.8 部署执行
点击“部署”按钮,OBD 将自动执行安装流程。部署成功后,界面会显示访问地址、账号密码以及连接信息。请务必妥善保存这些信息。

部署成功后,你可以获得类似以下的连接信息:
- OceanBase 数据库直连:
obclient -h192.168.125.137 -P2881 -uroot@sys -p'root_1234' -Doceanbase -A
- OBProxy 代理连接:
obclient -h192.168.125.137 -P2883 -uroot@proxysys -p'}_(|}nkTGcHIZI:tV&U)ZV(5F.KSo' -Doceanbase -A
- obshell 运维面板:
http://192.168.125.137:2886
2.9 创建业务租户
系统租户(root@sys)主要用于集群管理,不建议直接运行业务。部署成功后,应立即创建一个独立的业务租户。
在部署成功页面点击“创建业务租户”,进入配置流程。
- 租户名称:如
obu1
- 租户模式:选择
MySQL
- 资源配置:根据需求分配 CPU、内存和日志盘空间。
- 连接信息:设置租户 root 用户的密码。

继续配置字符集、时区、IP白名单等信息。

创建成功后,会显示租户的详细信息和连接字符串。
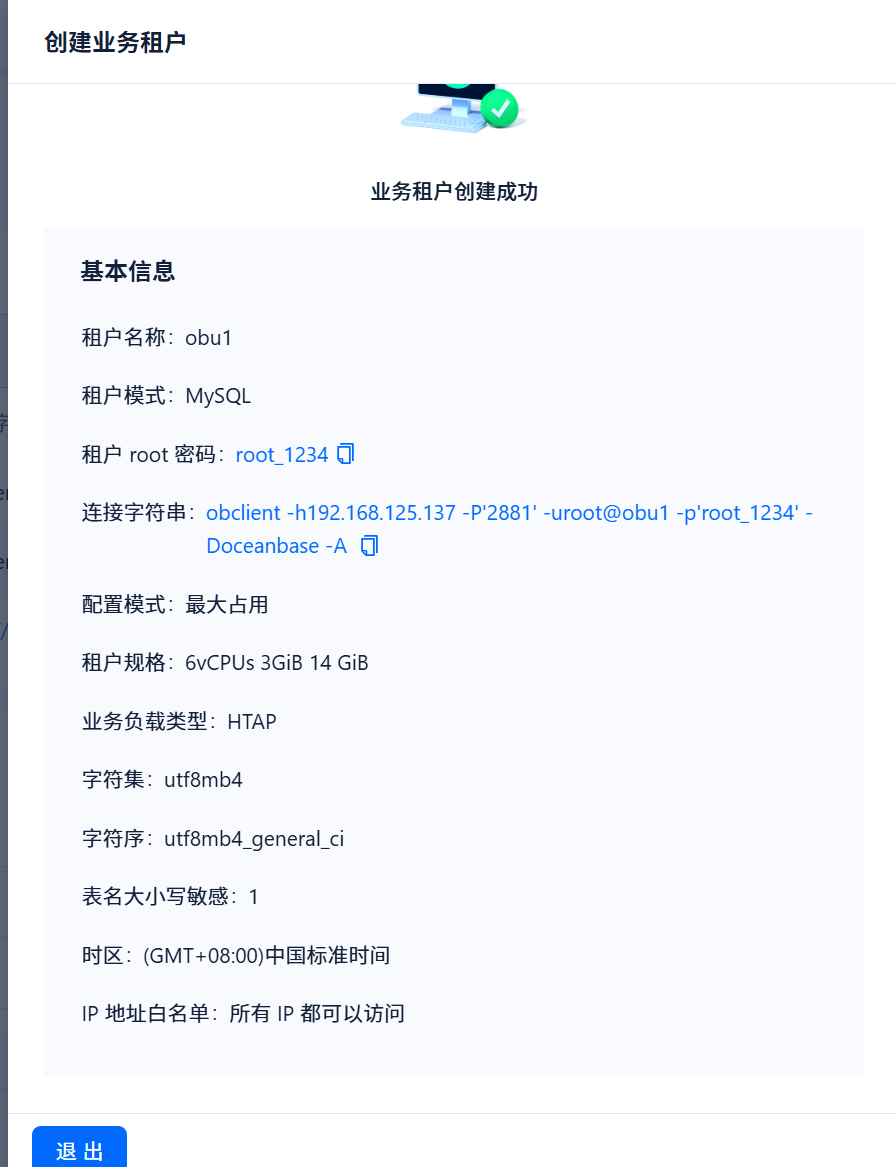
业务租户的连接示例如下:
obclient -h192.168.125.137 -P'2881' -uroot@obu1 -p'root_1234' -Doceanbase -A
3. 管理部署后的集群
部署完成后,你可以通过 OBD 命令行工具方便地管理集群。
查看集群列表
[admin@ob1 ~]$ obd cluster list
+----------------------------------------------------------------------+
|                               Cluster List                           |
+-------------+--------------------------------------+-----------------+
| Name        | Configuration Path                   | Status (Cached) |
+-------------+--------------------------------------+-----------------+
| myoceanbase | /home/admin/.obd/cluster/myoceanbase | running         |
+-------------+--------------------------------------+-----------------+
查看指定集群的详细状态
[admin@ob1 .obd]$ obd cluster display myoceanbase
Get local repositories and plugins ok
Open ssh connection ok
Connect to observer 192.168.125.137:2881 ok
Wait for observer init ok
+---------------------------------------------------+
|                     oceanbase-ce                  |
+-----------------+---------+------+-------+--------+
| ip              | version | port | zone  | status |
+-----------------+---------+------+-------+--------+
| 192.168.125.137 | 4.5.0.0 | 2881 | zone1 | ACTIVE |
+-----------------+---------+------+-------+--------+
... (输出省略) ...
停止集群
[admin@ob1 .obd]$ obd cluster stop myoceanbase
Get local repositories ok
Get local repositories and plugins ok
Open ssh connection ok
Connect to observer 192.168.125.137:2881 ok
Minor freeze ok
Stop observer ok
Stop obshell ok
Stop obproxy-ce ok
myoceanbase stopped
启动集群
[admin@ob1 .obd]$ obd cluster start myoceanbase
Get local repositories ok
Load cluster param plugin ok
Open ssh connection ok
[WARN] OBD-2000: (192.168.125.137) not enough memory. (Free: 6G, Need: 6G)
cluster scenario: htap
Start observer ok
... (输出省略) ...
myoceanbase running
4. 登录 OceanBase 数据库进行验证
使用之前创建的业务租户 obu1 进行登录,并执行一些基本操作以验证数据库功能正常。
[admin@ob1 ~]$ obclient -h192.168.125.137 -P'2881' -uroot@obu1 -p'root_1234' -Doceanbase -A
Welcome to the OceanBase.  Commands end with ; or \g.
Your OceanBase connection id is 3221575155
Server version: OceanBase_CE 4.5.0.0 (r100000012025112711-0e8d5ad012baf0953b2032a35a88bdf8886e9a7a) (Built Nov 27 2025 12:06:16)

Copyright (c) 2000, 2018, OceanBase and/or its affiliates. All rights reserved.

Type 'help;' or '\h' for help. Type '\c' to clear the current input statement.

obclient(root@obu1)[oceanbase]>
obclient(root@obu1)[oceanbase]>
obclient(root@obu1)[oceanbase]> show databases;
+--------------------+
| Database           |
+--------------------+
| information_schema |
| mysql              |
| oceanbase          |
| test               |
+--------------------+
4 rows in set (0.005 sec)

obclient(root@obu1)[oceanbase]>
obclient(root@obu1)[oceanbase]> CREATE DATABASE db1 DEFAULT CHARACTER
-> SET utf8mb4 READ WRITE;
Query OK, 1 row affected (0.049 sec)

obclient(root@obu1)[oceanbase]>
obclient(root@obu1)[oceanbase]> show databases;
+--------------------+
| Database           |
+--------------------+
| db1                |
| information_schema |
| mysql              |
| oceanbase          |
| test               |
+--------------------+
5 rows in set (0.005 sec)

obclient(root@obu1)[oceanbase]> use db1;
Database changed
obclient(root@obu1)[db1]>
obclient(root@obu1)[db1]> CREATE TABLE test (c1 INT PRIMARY KEY, c2
-> VARCHAR(3));
Query OK, 0 rows affected (0.262 sec)

obclient(root@obu1)[db1]>
obclient(root@obu1)[db1]> SHOW CREATE TABLE test\G
*************************** 1. row ***************************
       Table: test
Create Table: CREATE TABLE `test` (
  `c1` int(11) NOT NULL,
  `c2` varchar(3) DEFAULT NULL,
  PRIMARY KEY (`c1`)
) ORGANIZATION INDEX DEFAULT CHARSET = utf8mb4 ROW_FORMAT = DYNAMIC COMPRESSION = 'zstd_1.3.8' REPLICA_NUM = 1 BLOCK_SIZE = 16384 USE_BLOOM_FILTER = FALSE ENABLE_MACRO_BLOCK_BLOOM_FILTER = FALSE TABLET_SIZE = 134217728 PCTFREE = 0
1 row in set (0.054 sec)

obclient(root@obu1)[db1]>
obclient(root@obu1)[db1]> SHOW TABLES FROM db1;
+---------------+
| Tables_in_db1 |
+---------------+
| test          |
+---------------+
1 row in set (0.057 sec)

obclient(root@obu1)[db1]>
obclient(root@obu1)[db1]> insert into test values(1,'1a');
Query OK, 1 row affected (0.005 sec)

obclient(root@obu1)[db1]>
obclient(root@obu1)[db1]> select * from test;
+------+------+
| c1   | c2   |
+------+------+
|    1 | 1a   |
+------+------+
1 row in set (0.012 sec)

obclient(root@obu1)[db1]>s
至此,一个完整的 OceanBase 社区版 4.5 单机集群已在 CentOS 7.9 上部署完毕,并完成了基础验证。希望这篇在云栈社区分享的教程能帮助你快速上手 OceanBase。
 发表于 2026-4-18 02:05:59
|
查看: 180|
回复: 0
发表于 2026-4-18 02:05:59
|
查看: 180|
回复: 0
