1. 做 SSH 互信的目的
在做集群的时候,节点之间往往需要频繁通信,这时配置 SSH 互信 就很有必要,它能让你在另一台节点上直接操作而无需反复输入密码。
另外,当你使用 scp 做远程拷贝时,通常需要输入目标服务器的用户名和密码。如果在多台 Linux 服务器之间配置了 SSH 互信,后续操作就可以实现免密登录,省去不少麻烦。
2. SSH 互信配置的原理
简单来说,就是每台服务器都存放了对方主机的证书(公钥)。当发起 SSH 登录时,系统自动完成认证匹配,因此不需要再手动输入密码。
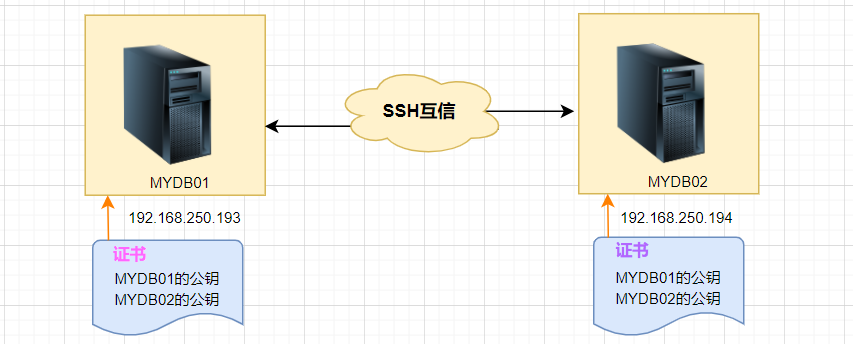
3. SSH 互信配置步骤
1)各节点生成自己的公钥和私钥对。
2)将自己的公钥文件发送给对方。
3)验证互信配置是否成功。
4. 配置 SSH 互信
这里以 MYDB01 和 MYDB02 两台 Linux 主机为例。
4.1 生成公钥私钥对
在两台主机上分别执行以下命令生成密钥对,提示输入信息时直接回车即可。
MYDB01 主机:
[root@MYDB01 ~]# ssh-keygen -t rsa
Generating public/private rsa key pair.
Enter file in which to save the key (/root/.ssh/id_rsa):
Enter passphrase (empty for no passphrase):
Enter same passphrase again:
Your identification has been saved in /root/.ssh/id_rsa.
Your public key has been saved in /root/.ssh/id_rsa.pub.
The key fingerprint is:
SHA256:lQex2+SbdmGGNBvU8vjaTKVCbfAmk8Eva+C6BPJ49G0 root@MYDB01
The key's randomart image is:
+---[RSA 2048]----+
|          oo..   |
|           == .  |
|          + *@   |
|         ..BB=B .|
|    . o S..o=O+o |
|     = o .. +=+. |
|    . o o.E.+*.  |
|     . ... ...o  |
|        ..       |
+----[SHA256]-----+
[root@MYDB01 ~]#
MYDB02 主机:
[root@MYDB02 ~]# ssh-keygen -t rsa
Generating public/private rsa key pair.
Enter file in which to save the key (/root/.ssh/id_rsa):
Created directory '/root/.ssh'.
Enter passphrase (empty for no passphrase):
Enter same passphrase again:
Your identification has been saved in /root/.ssh/id_rsa.
Your public key has been saved in /root/.ssh/id_rsa.pub.
The key fingerprint is:
SHA256:8DGfMHFZDrEOOYhcpFGXI8tndQXTE4FampR6cTowAo4 root@MYDB02
The key's randomart image is:
+---[RSA 2048]----+
|    o++ o.+=+=+o |
|   + =oo=+*+=.o  |
|  E =.o+OB.X.  . |
|      oo+XB.     |
|       oS.+.     |
|                 |
|                 |
|                 |
|                 |
+----[SHA256]-----+
[root@MYDB02 ~]#
这样,两台主机都创建了公钥和私钥,会生成 id_rsa 和 id_rsa.pub 两个文件。
生成的 SSH 密钥默认存放在家目录下的 .ssh/ 目录中。
私钥和公钥的权限分别为 600 和 644,而 .ssh 目录的权限必须是 700。
这里的 -t rsa|dsa 选项用于指定密钥类型,默认采用 rsa 格式。
接着可以查看生成的公钥和私钥文件:
[root@MYDB01 ~]# cd /root/.ssh
[root@MYDB01 .ssh]# pwd
/root/.ssh
[root@MYDB01 .ssh]# ll -sh
总用量 12K
4.0K -rw-------  1 root root 1.7K 2月  14 16:17 id_rsa
4.0K -rw-r--r--  1 root root  393 2月  14 16:17 id_rsa.pub
[root@MYDB01 .ssh]#
4.2 将自己的公钥文件发送给对方
这里使用的命令是:
ssh-copy-id
它的作用是将 id_rsa.pub 文件内容传输到对方的 .ssh 目录中,自动生成名为 authorized_keys 的文件,同时会设置远程主机用户目录的 .ssh 和 .ssh/authorized_keys 权限。
在 MYDB01 上执行以下操作:
[root@MYDB01 .ssh]# ssh-copy-id 192.168.250.194
/usr/bin/ssh-copy-id: INFO: Source of key(s) to be installed: "/root/.ssh/id_rsa.pub"
/usr/bin/ssh-copy-id: INFO: attempting to log in with the new key(s), to filter out any that are already installed
/usr/bin/ssh-copy-id: INFO: 1 key(s) remain to be installed -- if you are prompted now it is to install the new keys
root@192.168.250.194's password:

Number of key(s) added: 1

Now try logging into the machine, with:   "ssh '192.168.250.194'"
and check to make sure that only the key(s) you wanted were added.

[root@MYDB01 .ssh]#
此时在 MYDB02 主机上可以看到:
[root@MYDB02 ~]# cd /root/.ssh
[root@MYDB02 .ssh]# ll
总用量 12
-rw------- 1 root root  393 2月  14 16:41 authorized_keys
-rw------- 1 root root 1679 2月  14 16:20 id_rsa
-rw-r--r-- 1 root root  393 2月  14 16:20 id_rsa.pub
[root@MYDB02 .ssh]# cat authorized_keys
ssh-rsa AAAAB3NzaC1yc2EAAAADAQABAAABAQCtQ+pBp1T9fHAkrifEShaOAfBJFT+HdljR8mBxl7wZ1a91g3Zuzu35gJKsUjD+NqP9JcdyKapE309SHPvosvsJjLfccF4PaEZAgqHryu+S3cBn8zqA6fm62hsx/qI4I80PV0btcqfwphsD+5+vgkDJWAsUGQtqZdmMClAIy5gs0He0K2jpciKHvxWWClB3+dTJ0e9yIuIkV7lM+jqVIqYFJD0bRyy0zgNsY5/cLYFllM42TQDos93hVdqGXOHREpWo01KX2Jd8MKj4yNeiqgnj2mDtiNFWOUSkAbHpcKInuUOErJMqkV7MP0er5UKY/NemDzuORr2RxYqSTWaz/T7N root@MYDB01
[root@MYDB02 .ssh]#
不过,以上操作只实现了单向信任:即 MYDB01 登录 MYDB02 时不需要输入密码,反过来还需要继续配置。
在主机 MYDB02 上将自己的公钥复制到主机 MYDB01:
[root@MYDB02 .ssh]# ssh-copy-id 192.168.250.193
/usr/bin/ssh-copy-id: INFO: Source of key(s) to be installed: "/root/.ssh/id_rsa.pub"
The authenticity of host '192.168.250.193 (192.168.250.193)' can't be established.
ECDSA key fingerprint is SHA256:vThEoRhUOECeD5jhE+m8TZA2+6OoElIoNOQ3XqtopZw.
ECDSA key fingerprint is MD5:97:40:b2:35:6e:07:5a:61:1f:73:f1:b2:6e:54:5b:7d.
Are you sure you want to continue connecting (yes/no)? y
Please type 'yes' or 'no': yes
/usr/bin/ssh-copy-id: INFO: attempting to log in with the new key(s), to filter out any that are already installed
/usr/bin/ssh-copy-id: INFO: 1 key(s) remain to be installed -- if you are prompted now it is to install the new keys
root@192.168.250.193's password:

Number of key(s) added: 1

Now try logging into the machine, with:   "ssh '192.168.250.193'"
and check to make sure that only the key(s) you wanted were added.

[root@MYDB02 .ssh]#
4.3 验证互信
分别在 MYDB01 主机和 MYDB02 主机上通过 SSH 登录对方,检查是否需要输入密码。
在 MYDB01 主机上登录 MYDB02 主机:
[root@MYDB01 .ssh]# ssh 192.168.250.194
Last login: Tue Feb 14 15:41:56 2023 from 103.183.158.21
[root@MYDB02 ~]#
可以看到直接进入了 MYDB02 的 shell,说明免密登录成功。
同样,在 MYDB02 主机上登录 MYDB01 主机:
[root@MYDB02 .ssh]# ssh 192.168.250.193
Last failed login: Tue Feb 14 16:48:54 CST 2023 from 192.168.250.194 on ssh:notty
There was 1 failed login attempt since the last successful login.
Last login: Tue Feb 14 15:41:34 2023 from 103.183.158.21
[root@MYDB01 ~]#
双向均免密登录成功,SSH 互信配置完成。
 发表于 2026-9-2 03:15:03
|
查看: 118|
回复: 0
发表于 2026-9-2 03:15:03
|
查看: 118|
回复: 0

