你是否曾对Spring Boot应用的启动耗时感到困惑,或者为某些配置为何不生效而苦恼?这些问题往往根植于从main方法到应用上下文(ApplicationContext)初始化的底层逻辑中。本文将深入源码,系统地拆解Spring Boot的启动全流程,为你揭开“约定大于配置”背后的实现奥秘。
一、启动入口:SpringApplication.run()
一切始于SpringApplication类的静态run方法。虽然这是每个Spring Boot开发者都熟悉的入口,但其内部精密的初始化步骤却值得深究。下面是一个简化的核心执行流程:
// SpringApplication.java
public ConfigurableApplicationContext run(String... args) {
    StopWatch stopWatch = new StopWatch();
    stopWatch.start();
    ConfigurableApplicationContext context = null;
    Collection<SpringBootExceptionReporter> exceptionReporters = new ArrayList<>();

    configureHeadlessProperty();
    // 1. 获取并启动运行时监听器
    SpringApplicationRunListeners listeners = getRunListeners(args);
    listeners.starting();

    try {
        // 2. 准备应用环境(加载配置、激活Profile)
        ApplicationArguments applicationArguments = new DefaultApplicationArguments(args);
        ConfigurableEnvironment environment = prepareEnvironment(listeners, applicationArguments);
        configureIgnoreBeanInfo(environment);

        // 3. 打印Banner(可选步骤)
        Banner printedBanner = printBanner(environment);

        // 4. 创建ApplicationContext容器
        context = createApplicationContext();
        exceptionReporters = getSpringFactoriesInstances(SpringBootExceptionReporter.class,
                new Class[] { ConfigurableApplicationContext.class }, context);

        // 5. 准备容器上下文(应用初始化器、加载Bean定义)
        prepareContext(context, environment, listeners, applicationArguments, printedBanner);

        // 6. 刷新容器(核心流程,包含Bean工厂后置处理、Bean实例化等)
        refreshContext(context);

        // 7. 刷新后的扩展操作(默认为空,可用于自定义)
        afterRefresh(context, applicationArguments);

        stopWatch.stop();
        if (this.logStartupInfo) {
            new StartupInfoLogger(this.mainApplicationClass).logStarted(getApplicationLog(), stopWatch);
        }
        listeners.started(context);
        // 调用ApplicationRunner和CommandLineRunner
        callRunners(context, applicationArguments);
    } catch (Throwable ex) {
        handleRunFailure(context, ex, exceptionReporters, listeners);
        throw new IllegalStateException(ex);
    }

    try {
        listeners.running(context);
    } catch (Throwable ex) {
        handleRunFailure(context, ex, exceptionReporters, null);
        throw new IllegalStateException(ex);
    }
    return context;
}
这段代码勾勒出了 7个核心阶段:启动监听器 → 准备环境 → 创建容器 → 准备容器 → 刷新容器 → 执行扩展操作 → 通知启动完成。其中,prepareEnvironment和refreshContext承载了最关键的初始化逻辑。
二、环境准备:ConfigurableEnvironment的构建
prepareEnvironment方法负责整合所有配置源,生成应用运行所需的统一环境对象。它处理的配置源优先级通常为:命令行参数 > 系统环境变量 > 配置文件(如application.yml)> 默认值。这正是命令行参数能够覆盖配置文件设置的原理所在。
// SpringApplication.java
private ConfigurableEnvironment prepareEnvironment(SpringApplicationRunListeners listeners,
        ApplicationArguments applicationArguments) {
    // 1. 根据应用类型创建环境对象(Servlet/Reactive/None)
    ConfigurableEnvironment environment = getOrCreateEnvironment();
    // 2. 配置环境:合并命令行参数、系统属性、配置文件等
    configureEnvironment(environment, applicationArguments.getSourceArgs());
    // 3. 发布环境已准备事件,通知相关监听器
    listeners.environmentPrepared(environment);
    // 4. 将环境绑定到当前SpringApplication实例
    bindToSpringApplication(environment);
    if (!this.isCustomEnvironment) {
        environment = new EnvironmentConverter(getClassLoader()).convertEnvironmentIfNecessary(environment,
                deduceEnvironmentClass());
    }
    ConfigurationPropertySources.attach(environment);
    return environment;
}
这个过程充分体现了Spring Boot对应用程序配置和环境管理的封装能力。
三、容器创建:ApplicationContext的类型选择
createApplicationContext方法依据项目类型(通过WebApplicationType枚举判断)动态决定使用哪种ApplicationContext实现类,这是SpringBoot灵活性的体现。
// SpringApplication.java
protected ConfigurableApplicationContext createApplicationContext() {
    Class<?> contextClass = this.applicationContextClass;
    if (contextClass == null) {
        try {
            switch (this.webApplicationType) {
                case SERVLET:
                    // 用于Spring MVC等传统Servlet Web应用
                    contextClass = Class.forName(DEFAULT_SERVLET_WEB_CONTEXT_CLASS);
                    break;
                case REACTIVE:
                    // 用于Spring WebFlux响应式Web应用
                    contextClass = Class.forName(DEFAULT_REACTIVE_WEB_CONTEXT_CLASS);
                    break;
                default:
                    // 非Web应用或普通Java应用
                    contextClass = Class.forName(DEFAULT_CONTEXT_CLASS);
            }
        } catch (ClassNotFoundException ex) {
            throw new IllegalStateException(...);
        }
    }
    return (ConfigurableApplicationContext) BeanUtils.instantiateClass(contextClass);
}
四、容器刷新:AbstractApplicationContext.refresh()
refreshContext最终调用的是Spring框架核心的AbstractApplicationContext.refresh()方法。这是IoC容器启动的核心,也是自动配置(Auto-Configuration)魔法发生的地方。
// AbstractApplicationContext.java
public void refresh() throws BeansException, IllegalStateException {
    synchronized (this.startupShutdownMonitor) {
        // 1. 刷新前的准备(设置启动时间、激活状态、初始化属性源)
        prepareRefresh();

        // 2. 获取或创建BeanFactory,并加载Bean定义
        ConfigurableListableBeanFactory beanFactory = obtainFreshBeanFactory();

        // 3. 准备BeanFactory(注册必要的后置处理器、设置忽略的接口等)
        prepareBeanFactory(beanFactory);

        try {
            // 4. 允许子类对BeanFactory进行后置处理(扩展点)
            postProcessBeanFactory(beanFactory);

            // 5. 调用BeanFactoryPostProcessor(自动配置@EnableAutoConfiguration在此触发!)
            invokeBeanFactoryPostProcessors(beanFactory);

            // 6. 注册BeanPostProcessor(用于Bean初始化前后的拦截)
            registerBeanPostProcessors(beanFactory);

            // 7. 初始化消息源(国际化支持)
            initMessageSource();

            // 8. 初始化事件广播器
            initApplicationEventMulticaster();

            // 9. 模板方法,子类可在此初始化特殊Bean(例如启动Web服务器)
            onRefresh();

            // 10. 注册监听器,将早期事件派发给它们
            registerListeners();

            // 11. 实例化所有非懒加载的单例Bean
            finishBeanFactoryInitialization(beanFactory);

            // 12. 完成刷新,发布ContextRefreshedEvent事件
            finishRefresh();
        } catch (BeansException ex) {
            // ... 异常处理
        }
    }
}
其中第9步onRefresh()是SpringBoot启动嵌入式Web服务器的关键。以ServletWebServerApplicationContext为例:
// ServletWebServerApplicationContext.java
@Override
protected void onRefresh() {
    super.onRefresh();
    try {
        // 创建并启动内嵌的Web服务器(Tomcat/Jetty/Undertow)
        createWebServer();
    } catch (Throwable ex) {
        throw new ApplicationContextException("Unable to start web server", ex);
    }
}

private void createWebServer() {
    WebServer webServer = this.webServer;
    ServletContext servletContext = getServletContext();
    if (webServer == null && servletContext == null) {
        // 通过SPI机制获取Web服务器工厂(默认为TomcatServletWebServerFactory)
        ServletWebServerFactory factory = getWebServerFactory();
        // 调用工厂方法创建WebServer实例
        this.webServer = factory.getWebServer(getSelfInitializer());
    } else if (servletContext != null) {
        // ... 已有ServletContext的处理逻辑
    }
    initPropertySources();
}
TomcatServletWebServerFactory.getWebServer()方法最终会实例化并配置一个Tomcat对象,完成Web服务器的启动。
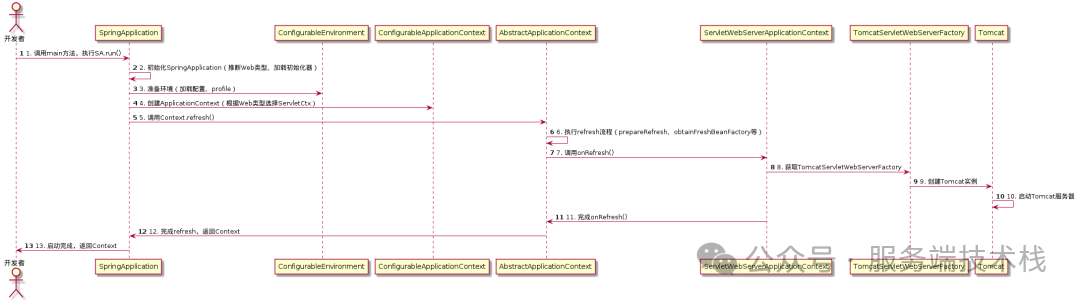
五、核心流程总结:UML时序图
为了更直观地理解各组件在启动过程中的交互顺序,可以参考下面的核心流程时序图:
结语
Spring Boot的“自动配置”并非无迹可寻的魔术,而是建立在Spring框架标准生命周期之上的一系列精妙封装与约定。从main方法到内嵌Tomcat对外提供服务,整个链路在源码中清晰可见。当遇到启动速度、配置加载或Bean初始化等问题时,沿着SpringApplication.run() → prepareEnvironment() → refreshContext()这条主线进行调试和分析,往往能直击问题根源。
 发表于 2025-12-24 17:51:21
|
查看: 231|
回复: 0
发表于 2025-12-24 17:51:21
|
查看: 231|
回复: 0
