在大模型技术浪潮下,Java 开发者们需要一款能无缝融入自身技术栈、降低 AI 能力接入门槛的框架。Spring AI 应运而生,它并非简单移植 Python 生态的方案,而是深度遵循 Spring 设计哲学,为 Java 和 Spring 开发者打造了原生的 AI 开发框架。本文将从 Spring AI 的核心概念与特性出发,结合完整的环境搭建与一个与 DeepSeek 的对话案例,带你快速上手,解锁 Java 生态与 AI 融合的新可能。
一、什么是 Spring AI?
Spring AI 是面向 Java 和 Spring 生态的原生人工智能框架,其核心设计理念完全传承自 Spring:依赖注入、POJO 编程、模块化架构与可配置性。它重构了 AI 应用开发流程,让开发者无需关注底层模型适配细节,就能像调用数据库、Web API 一样轻松集成聊天、文本嵌入、图像生成等 AI 能力。
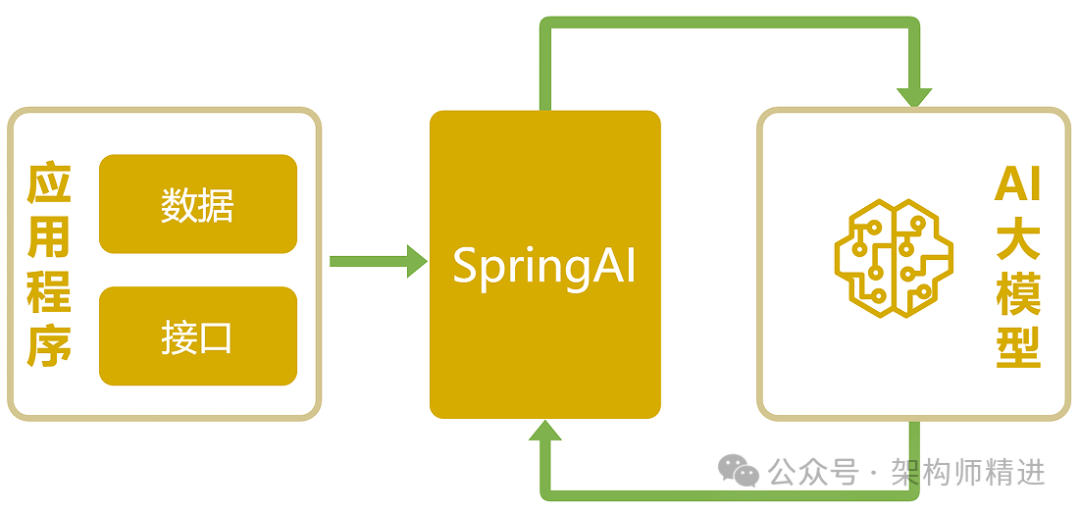
更重要的是,Spring AI 完美解决了多 AI 供应商适配的痛点——通过“一套接口,多种实现”的统一抽象,开发者可以无缝切换 OpenAI、Anthropic、Bedrock、Hugging Face 等主流 AI 服务,无需修改核心业务代码。同时,它还支持企业内部数据与 AI 模型的快速关联,这正是检索增强生成(RAG)等高级场景的核心需求。
官网地址
二、Spring AI 核心特性:为什么值得选?
Spring AI 覆盖了 AI 应用开发的全流程,其核心特性可以总结为以下 7 点:
1. 全栈多供应商模型适配,覆盖主流 AI 能力
深度对接 Anthropic、OpenAI 等主流服务商,覆盖聊天交互、文本嵌入、多模态生成、语音交互、内容安全等核心能力。
- 聊天交互(文本对话、多轮上下文对话)
- 文本嵌入(语义向量转换,支撑语义搜索)
- 多模态生成(文生图、图生文)
- 语音交互(音频转录/语音转文字、文本转语音)
- 内容安全(敏感信息检测与审核)
所有模型统一接口封装,切换模型无需修改业务代码,提升项目灵活性与可扩展性。
2. 标准化抽象 API,统一调用体验
Spring AI 提供了 ChatClient、EmbeddingModel、ImageModel 等标准化接口,开发者无需关心底层模型的差异。支持同步/流式调用及模型高级功能(如 OpenAI Function Calling),聚焦业务逻辑。
3. 原生集成 Spring Boot,开箱即用
遵循 Spring Boot 设计理念,通过 Starter 依赖与自动装配实现 AI 组件一键集成,Spring Initializr 可快速生成项目骨架,贴合 Java 开发者习惯。
4. 结构化输出与类型安全,降低维护成本
支持将 AI 非结构化响应自动解析映射到 Java POJO,保障类型安全,避免繁琐的字符串解析与类型转换。
5. 内置向量存储与 RAG 支持,激活私有知识库
Spring AI 集成了 PostgreSQL/pgvector、Pinecone、Redis 等主流向量数据库,提供元数据过滤、相似度检索能力;同时内置 ETL 流程,可快速搭建 RAG 系统,解决大模型“知识过期”“不懂私有数据”的痛点。
6. 工具调用能力,打通业务系统闭环
原生支持模型驱动的工具调用,可将 Spring Bean 注册为 AI 可调用工具,实现 AI 自动调用业务接口、查询数据库等操作,例如:
- 调用天气 API 获取实时气象数据
- 查询企业 CRM 系统获取客户详情
- 执行业务数据统计与分析操作
实现 AI 与业务流程深度融合,让 AI 从“对话工具”升级为“业务智能入口”。
三、快速上手:环境准备与 Deepseek 对话案例
理论不如实践,下面我们将通过一个完整的案例,教大家搭建 Spring AI 环境,并实现与 Deepseek 模型的对话交互。
3.1 环境要求
Spring AI 构建在 Spring Boot 3.x 之上,对环境有明确要求:
- JDK:必须为 17 及以上版本(不支持 Java 8/11/16)
- Maven:3.6 及以上版本
- Spring Boot:3.x 系列(本文使用 3.5.0 版本)
JDK 17 安装步骤
- 下载地址:https://www.oracle.com/cn/java/technologies/downloads/#java17
- 安装路径建议:
D:\Program Files\Java\jdk17\jdk(可自定义)
- 安装成功后,配置环境变量,也可以在 Spring Boot 项目中指定 JDK 版本。
3.2 创建 Spring Boot 项目
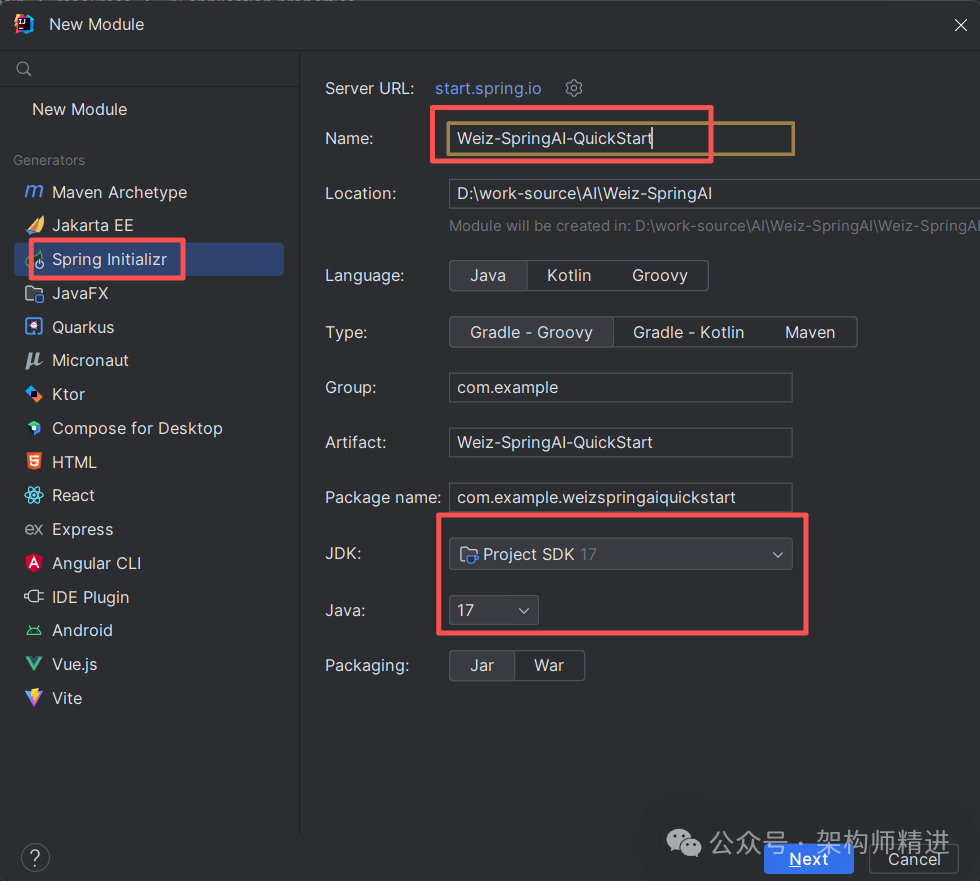
Step 1:访问 Spring Initializr:https://start.spring.io/,或在 IDEA 中直接创建 New Module。项目配置如下:
- Name:
Weiz-SpringAI-QuickStart
- Group:
com.example
- Artifact:
Weiz-SpringAI-QuickStart
- Package name:
com.example.weizspringai
- Language:Java
- JDK:17
- Spring Boot:3.5.3
- Packaging:Jar
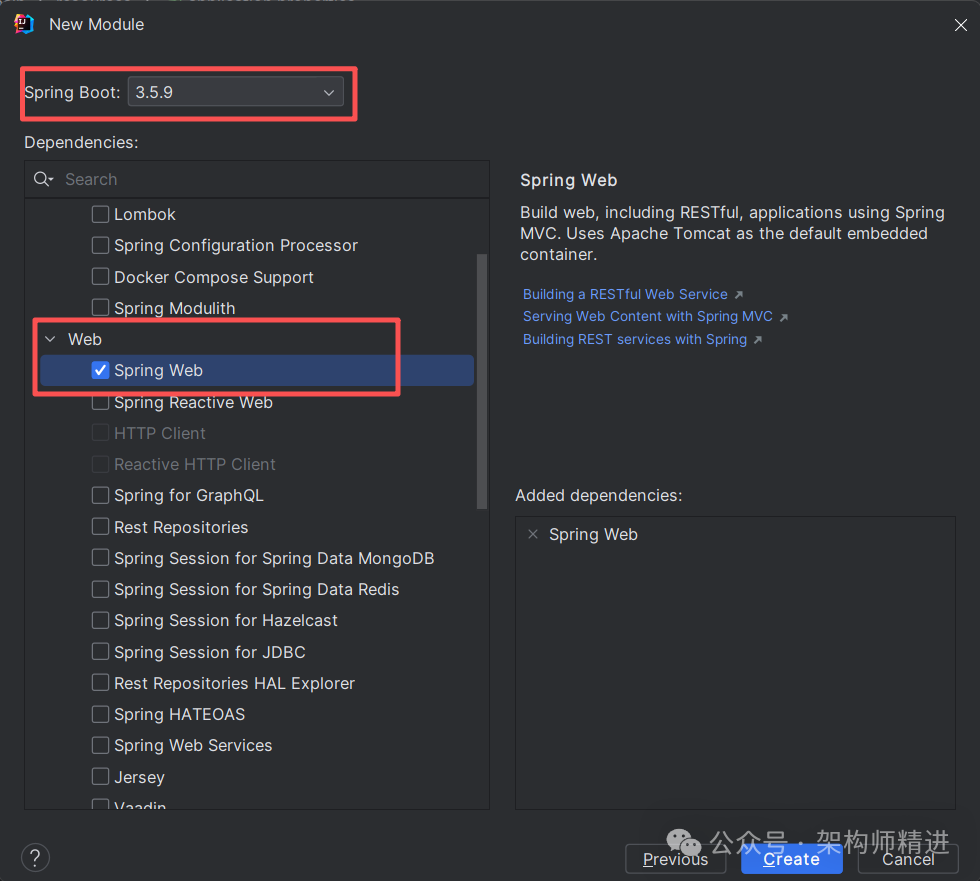
Step 2:Spring Boot 版本选择 3.5.x,依赖选择:仅需添加「Spring Web」依赖(后续通过 Maven 引入 Spring AI 相关依赖)。
创建完成后的项目结构如下:
Weiz-SpringAI-QuickStart/
├── src/
│   ├── main/
│   │   ├── java/
│   │   │   └── com/
│   │   │       └── example/
│   │   │           └── weizspringai/
│   │   │               └── WeizSpringAiQuickStartApplication.java
│   │   └── resources/
│   │       └── application.properties
│   └── test/
└── pom.xml
Step 3:配置 pom.xml 依赖
在 pom.xml 中添加 Spring AI 相关依赖,核心是导入 Spring AI BOM 统一管理版本,并引入 Deepseek 模型 starter:
<?xml version="1.0" encoding="UTF-8"?>
<project xmlns="http://maven.apache.org/POM/4.0.0" xmlns:xsi="http://www.w3.org/2001/XMLSchema-instance"
         xsi:schemaLocation="http://maven.apache.org/POM/4.0.0 https://maven.apache.org/xsd/maven-4.0.0.xsd">
    <modelVersion>4.0.0</modelVersion>
    <parent>
        <groupId>com.example</groupId>
        <artifactId>Weiz-SpringAI</artifactId>
        <version>0.0.1-SNAPSHOT</version>
    </parent>
    <artifactId>Weiz-SpringAI-QuickStart</artifactId>
    <name>Weiz-SpringAI-QuickStart</name>
    <description>Weiz-SpringAI-QuickStart</description>

    <properties>
        <java.version>17</java.version>
        <maven.compiler.source>17</maven.compiler.source>
        <maven.compiler.target>17</maven.compiler.target>
    </properties>

    <dependencies>
        <dependency>
            <groupId>org.springframework.boot</groupId>
            <artifactId>spring-boot-starter-webflux</artifactId>
        </dependency>
        <dependency>
            <groupId>org.springframework.boot</groupId>
            <artifactId>spring-boot-starter-web</artifactId>
        </dependency>
        <dependency>
            <groupId>org.springframework.ai</groupId>
            <artifactId>spring-ai-starter-model-deepseek</artifactId>
        </dependency>
        <dependency>
            <groupId>org.springframework.boot</groupId>
            <artifactId>spring-boot-starter-test</artifactId>
            <scope>test</scope>
        </dependency>
    </dependencies>

    <build>
        <plugins>
            <plugin>
                <groupId>org.springframework.boot</groupId>
                <artifactId>spring-boot-maven-plugin</artifactId>
            </plugin>
        </plugins>
    </build>
</project>
Step 4:配置 application.properties
在 src/main/resources/application.properties 中配置 Deepseek 模型的基础信息:
spring.application.name=Weiz-SpringAI-QuickStart

server.port=8080

# Deepseek URL
spring.ai.deepseek.base-url=https://api.deepseek.com
spring.ai.deepseek.api-key=你的Deepseek appkey
spring.ai.deepseek.chat.options.model=deepseek-chat
注意:Deepseek API 密钥需要在 Deepseek 官网注册获取,替换配置中的占位符。
Step 5:编写 ChatController
创建 com.example.weizspringai.controller 包,并编写 ChatController 类,实现与 Deepseek 模型的交互:
import org.springframework.ai.deepseek.DeepSeekChatModel;
import org.springframework.beans.factory.annotation.Autowired;
import org.springframework.web.bind.annotation.GetMapping;
import org.springframework.web.bind.annotation.RequestMapping;
import org.springframework.web.bind.annotation.RequestParam;
import org.springframework.web.bind.annotation.RestController;

@RestController
@RequestMapping("/ai")
public class ChatController {
    @Autowired
    private DeepSeekChatModel chatModel;

    @PostMapping("/chat")
    public ChatResponse chat(@RequestBody ChatRequest chatRequest){
        String resp = chatModel.call(chatRequest.getMessage());
        return new ChatResponse(resp);
    }

}
Step 6:启动并测试
- 运行
WeizSpringAiEmbeddingApplication.java 启动项目。
- 浏览器访问:
http://localhost:8080/ai/chat?message=你是谁,即可看到模型响应:
你好!我是DeepSeek,由深度求索公司创造的AI助手!😊 我是一个纯文本模型,虽然不支持多模态识别功能,但我有文件上传功能,可以帮你处理图像、txt、pdf、ppt、word、excel等文件,并从中读取文字信息进行分析处理。我完全免费使用,拥有128K的上下文长度,还支持联网搜索(需要你在Web/App中手动点开联网搜索按键)。 你可以通过官方应用商店下载我的App来使用。我很乐意帮助你解答问题、处理文档、进行对话交流等等! 有什么我可以帮你的吗?无论是学习、工作还是日常生活中的问题,我都很愿意协助你!✨
四、实战进阶:流式响应与可视化界面优化
前面我们使用 Spring AI 快速整合 DeepSeek,实现了与大模型对话的基本功能。但这个项目存在两个可以优化的地方:1. 无可视化交互界面;2. AI 响应为一次性返回,缺乏实时感。下面我们对项目进行升级。
Step 1:实现流式返回接口
在 ChatController 中,创建新接口 /ai/chatStream。
@PostMapping("/chatStream")
    public SseEmitter chatStream(@RequestBody ChatRequest chatRequest) {
        SseEmitter emitter = new SseEmitter(Long.MAX_VALUE);

        Flux<String> stream = chatModel.stream(chatRequest.getMessage());

        stream.subscribe(
                chunk -> {
                    try {
                        ChatResponse chatResponse = new ChatResponse();
                        chatResponse.setResponse(chunk);
                        chatResponse.setCode(200);
                        chatResponse.setMessage("streaming");

                        String json = objectMapper.writeValueAsString(chatResponse);
                        emitter.send(SseEmitter.event()
                                .data(json)
                                .build());
                    } catch (IOException e) {
                        emitter.completeWithError(e);
                    }
                },
                error -> {
                    emitter.completeWithError(error);
                },
                () -> {
                    emitter.complete();
                }
        );

        return emitter;
    }
Step 2:创建可视化聊天界面
为了更直观地与模型交互,我们可以在 src/main/resources/static 目录下创建 index.html,实现简单的聊天界面:
<!DOCTYPE html>
<html lang="zh-CN">
<head>
    <meta charset="UTF-8">
    <meta name="viewport" content="width=device-width, initial-scale=1.0">
    <title>AI 聊天助手(流式响应)</title>
    <style>
        * {
            margin: 0;
            padding: 0;
            box-sizing: border-box;
        }

        body {
            font-family: -apple-system, BlinkMacSystemFont, "Segoe UI", Roboto, "Helvetica Neue", Arial, sans-serif;
            background: linear-gradient(135deg, #667eea 0%, #764ba2 100%);
            height: 100vh;
            display: flex;
            justify-content: center;
            align-items: center;
        }

        .chat-container {
            width: 800px;
            height: 600px;
            background: white;
            border-radius: 16px;
            box-shadow: 0 20px 60px rgba(0, 0, 0, 0.3);
            display: flex;
            flex-direction: column;
            overflow: hidden;
        }

        .chat-header {
            background: linear-gradient(135deg, #667eea 0%, #764ba2 100%);
            padding: 20px;
            color: white;
        }

        .chat-header h1 {
            font-size: 24px;
            font-weight: 600;
        }

        .chat-header p {
            font-size: 14px;
            opacity: 0.9;
            margin-top: 5px;
        }

        .chat-messages {
            flex: 1;
            padding: 20px;
            overflow-y: auto;
            background: #f5f5f5;
        }

        .message {
            margin-bottom: 16px;
            display: flex;
            align-items: flex-start;
        }

        .message.user {
            justify-content: flex-end;
        }

        .message.assistant {
            justify-content: flex-start;
        }

        .message-content {
            max-width: 70%;
            padding: 12px 16px;
            border-radius: 12px;
            line-height: 1.5;
            word-wrap: break-word;
        }

        .message.user .message-content {
            background: linear-gradient(135deg, #667eea 0%, #764ba2 100%);
            color: white;
            border-bottom-right-radius: 4px;
        }

        .message.assistant .message-content {
            background: white;
            color: #333;
            border-bottom-left-radius: 4px;
            box-shadow: 0 2px 8px rgba(0, 0, 0, 0.1);
        }

        .chat-input-container {
            padding: 20px;
            background: white;
            border-top: 1px solid #e0e0e0;
        }

        .chat-input-form {
            display: flex;
            gap: 12px;
        }

        #messageInput {
            flex: 1;
            padding: 12px 16px;
            border: 2px solid #e0e0e0;
            border-radius: 24px;
            font-size: 16px;
            outline: none;
            transition: border-color 0.3s;
        }

        #messageInput:focus {
            border-color: #667eea;
        }

        #sendButton {
            padding: 12px 32px;
            background: linear-gradient(135deg, #667eea 0%, #764ba2 100%);
            color: white;
            border: none;
            border-radius: 24px;
            font-size: 16px;
            font-weight: 600;
            cursor: pointer;
            transition: transform 0.2s, box-shadow 0.2s;
        }

        #sendButton:hover {
            transform: translateY(-2px);
            box-shadow: 0 4px 12px rgba(102, 126, 234, 0.4);
        }

        #sendButton:active {
            transform: translateY(0);
        }

        #sendButton:disabled {
            background: #ccc;
            cursor: not-allowed;
            transform: none;
        }

        .typing {
            display: inline-block;
            padding: 8px 12px;
        }

        .typing::after {
            content: '...';
            animation: typing 1.5s steps(4, end) infinite;
        }

        @keyframes typing {
            0%, 100% { content: ''; }
            25% { content: '.'; }
            50% { content: '..'; }
            75% { content: '...'; }
        }

        .welcome-message {
            text-align: center;
            color: #666;
            padding: 40px 20px;
        }

        .welcome-message h2 {
            font-size: 20px;
            margin-bottom: 10px;
            color: #333;
        }

        .welcome-message p {
            font-size: 14px;
        }
    </style>
</head>
<body>
    <div class="chat-container">
        <div class="chat-header">
            <h1>AI 聊天助手</h1>
            <p>基于 Spring AI 和 DeepSeek 的智能对话系统(流式响应)</p>
        </div>

        <div class="chat-messages" id="chatMessages">
            <div class="welcome-message">
                <h2>欢迎使用 AI 聊天助手!</h2>
                <p>请在下方输入您的问题,我会尽力为您解答。</p>
            </div>
        </div>

        <div class="chat-input-container">
            <form class="chat-input-form" id="chatForm">
                <input type="text" id="messageInput" placeholder="输入您的问题..." autocomplete="off" required>
                <button type="submit" id="sendButton">发送</button>
            </form>
        </div>
    </div>

    <script>
        const chatMessages = document.getElementById('chatMessages');
        const chatForm = document.getElementById('chatForm');
        const messageInput = document.getElementById('messageInput');
        const sendButton = document.getElementById('sendButton');
        const welcomeMessage = document.querySelector('.welcome-message');

        // 移除欢迎消息
        function removeWelcomeMessage() {
            if (welcomeMessage) {
                welcomeMessage.remove();
            }
        }

        // 添加消息到聊天界面
        function addMessage(content, isUser = false) {
            removeWelcomeMessage();

            const messageDiv = document.createElement('div');
            messageDiv.className = `message ${isUser ? 'user' : 'assistant'}`;

            const messageContent = document.createElement('div');
            messageContent.className = 'message-content';
            messageContent.textContent = content;

            messageDiv.appendChild(messageContent);
            chatMessages.appendChild(messageDiv);

            // 滚动到底部
            chatMessages.scrollTop = chatMessages.scrollHeight;
        }

        // 添加加载消息
        function addLoadingMessage() {
            removeWelcomeMessage();

            const messageDiv = document.createElement('div');
            messageDiv.className = 'message assistant';
            messageDiv.id = 'loadingMessage';

            const messageContent = document.createElement('div');
            messageContent.className = 'message-content typing';
            messageContent.textContent = 'AI 正在思考';

            messageDiv.appendChild(messageContent);
            chatMessages.appendChild(messageDiv);

            chatMessages.scrollTop = chatMessages.scrollHeight;
        }

        // 移除加载消息
        function removeLoadingMessage() {
            const loadingMessage = document.getElementById('loadingMessage');
            if (loadingMessage) {
                loadingMessage.remove();
            }
        }

        // 发送消息(流式响应)
        async function sendMessage(message) {
            addMessage(message, true);

            addLoadingMessage();
            sendButton.disabled = true;
            messageInput.disabled = true;

            try {
                const response = await fetch('/ai/chatStream', {
                    method: 'POST',
                    headers: {
                        'Content-Type': 'application/json',
                    },
                    body: JSON.stringify({ message: message })
                });

                if (!response.ok) {
                    throw new Error('网络请求失败');
                }

                removeLoadingMessage();

                // 创建一个新的消息容器用于显示流式响应
                const messageDiv = document.createElement('div');
                messageDiv.className = 'message assistant';
                messageDiv.id = 'currentStreamMessage';

                const messageContent = document.createElement('div');
                messageContent.className = 'message-content';
                messageContent.textContent = '';

                messageDiv.appendChild(messageContent);
                chatMessages.appendChild(messageDiv);
                chatMessages.scrollTop = chatMessages.scrollHeight;

                // 处理流式响应
                const reader = response.body.getReader();
                const decoder = new TextDecoder();
                let fullText = '';

                while (true) {
                    const { done, value } = await reader.read();

                    if (done) break;

                    // 解码并解析数据
                    const chunk = decoder.decode(value, { stream: true });

                    // 尝试解析 JSON 行
                    const lines = chunk.split('\n').filter(line => line.trim());

                    for (const line of lines) {
                        try {
                            // 移除可能的数据前缀(如 "data:")
                            const cleanLine = line.replace(/^data:\s*/, '').trim();
                            if (!cleanLine) continue;

                            const jsonStr = cleanLine.replace(/,$/, '').trim();
                            const data = JSON.parse(jsonStr);

                            if (data.response) {
                                fullText += data.response;
                                messageContent.textContent = fullText;
                                chatMessages.scrollTop = chatMessages.scrollHeight;
                            } else if (data.reply) {
                                fullText += data.reply;
                                messageContent.textContent = fullText;
                                chatMessages.scrollTop = chatMessages.scrollHeight;
                            }
                        } catch (e) {
                            console.warn('解析 JSON 失败:', e, line);
                            // 如果解析失败,尝试直接显示文本
                            if (chunk.trim()) {
                                fullText += chunk;
                                messageContent.textContent = fullText;
                                chatMessages.scrollTop = chatMessages.scrollHeight;
                            }
                        }
                    }
                }

                // 移除当前消息的 ID 标记
                if (messageDiv) {
                    messageDiv.removeAttribute('id');
                }

            } catch (error) {
                removeLoadingMessage();
                addMessage('抱歉,发生了错误:' + error.message, false);
            } finally {
                sendButton.disabled = false;
                messageInput.disabled = false;
                messageInput.focus();
            }
        }

        // 表单提交
        chatForm.addEventListener('submit', async (e) => {
            e.preventDefault();

            const message = messageInput.value.trim();
            if (!message) return;

            messageInput.value = '';
            await sendMessage(message);
        });

        // 页面加载时聚焦输入框
        messageInput.focus();
    </script>
</body>
</html>
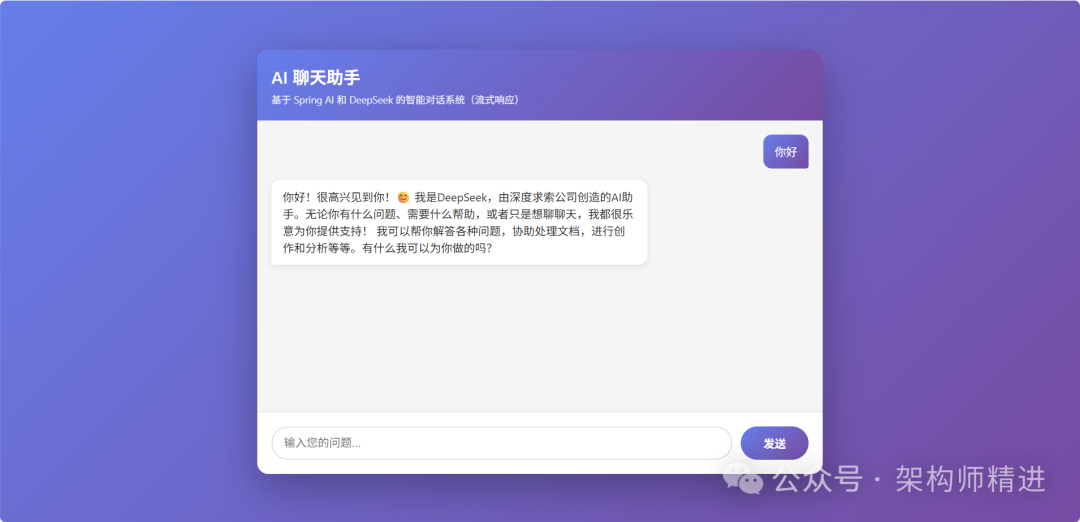
Step 3:启动并测试
重启项目后,访问 http://localhost:8080,即可通过可视化界面与 AI 聊天,例如输入“你好”,模型会以流式方式返回响应。
总结
本文我们从 Spring AI 的核心概念出发,详细介绍了它的 7 大核心特性,并通过一个完整的 Deepseek 对话案例,带大家完成了环境搭建、依赖配置、代码编写与测试的全流程。Spring AI 的核心优势在于“原生集成 Spring 生态”与“统一抽象接口”,让 Java 开发者无需跨生态就能快速接入 AI能力,极大降低了 AI 应用的开发门槛。
下一篇文章,我们将深入探讨 Spring AI 中的 Embedding 技术——这是实现语义搜索、聚类分析、RAG 等高级场景的基础。我们会详细解释 Embedding 的原理、使用场景,并通过智普 AI 的 Embedding 模型,演示文本向量化、相似文本查找等实操案例。
想与更多开发者交流 Spring AI 或其他技术实践,欢迎访问 云栈社区 。
 发表于 2026-1-5 21:59:42
|
查看: 278|
回复: 0
发表于 2026-1-5 21:59:42
|
查看: 278|
回复: 0
