在日常项目开发中,除了常规的用户名密码、短信验证码等方式,基于时间的一次性密码(TOTP)正成为增强系统安全性的重要手段。本文将详细介绍如何在 Spring Boot 项目中整合 Google Authenticator,实现一套完整的 TOTP 双因素认证流程。
OTP 全称为 One-Time Password(一次性密码),主要分为 HOTP(HMAC-based One-Time Password,基于 HMAC 算法)和 TOTP(Time-based One-Time Password,基于时间戳算法)。Google Authenticator 则是一个广泛使用的、支持 OTP 协议的客户端工具。本文将基于 TOTP 算法进行演示。
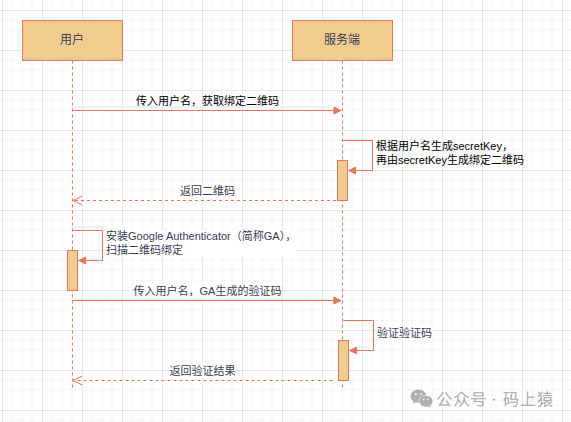
整个整合流程的核心交互如下图所示:
下面,我们将结合详细的代码步骤,一步步实现该功能。
示例环境
- 操作系统:Ubuntu 24.04.2 LTS
- 开发环境:JDK 21.0.2, Apache Maven 3.9.8, IntelliJ IDEA 2025.1.3 (Community Edition)
- 项目框架:Spring Boot 3.3.1
示例代码
1. 引入依赖
首先,在项目的 pom.xml 文件中引入必要的库。
引入 TOTP 算法库:
这里我们使用 googleauth 库来实现 TOTP 的核心逻辑。
<dependency>
   <groupId>com.warrenstrange</groupId>
   <artifactId>googleauth</artifactId>
   <version>1.5.0</version>
</dependency>
引入二维码生成工具库:
为了生成供用户扫描的绑定二维码,需要引入 ZXing 库。
<dependency>
    <groupId>com.google.zxing</groupId>
    <artifactId>core</artifactId>
    <version>3.5.3</version>
</dependency>
<dependency>
    <groupId>com.google.zxing</groupId>
    <artifactId>javase</artifactId>
    <version>3.5.3</version>
</dependency>
引入 Spring Web 相关依赖:
本项目是一个简单的 Web 应用,因此需要引入 Web 和模板引擎(这里使用 Thymeleaf)的 starter。
<dependency>
    <groupId>org.springframework.boot</groupId>
    <artifactId>spring-boot-starter-web</artifactId>
</dependency>
<dependency>
    <groupId>org.springframework.boot</groupId>
    <artifactId>spring-boot-starter-thymeleaf</artifactId>
</dependency>
2. 编写二维码生成工具类
创建一个工具类,用于将字符串(如 OTP 绑定 URL)编码为二维码图片的字节数组。
import com.google.zxing.BarcodeFormat;
import com.google.zxing.EncodeHintType;
import com.google.zxing.WriterException;
import com.google.zxing.client.j2se.MatrixToImageWriter;
import com.google.zxing.common.BitMatrix;
import com.google.zxing.qrcode.QRCodeWriter;
import com.google.zxing.qrcode.decoder.ErrorCorrectionLevel;

import javax.imageio.ImageIO;
import java.awt.image.BufferedImage;
import java.io.ByteArrayOutputStream;
import java.io.IOException;
import java.util.HashMap;
import java.util.Map;

public class QrCodeUtils {
    public static byte[] genQrCode(String data) throws WriterException, IOException {
        // 设置二维码参数
        Map<EncodeHintType, Object> hints = new HashMap<>();
        hints.put(EncodeHintType.CHARACTER_SET, "UTF-8");
        hints.put(EncodeHintType.ERROR_CORRECTION, ErrorCorrectionLevel.H);
        hints.put(EncodeHintType.MARGIN, 1);

        // 创建二维码
        QRCodeWriter writer = new QRCodeWriter();
        BitMatrix bitMatrix = writer.encode(data, BarcodeFormat.QR_CODE, 200, 200, hints);

        // 转换为BufferedImage
        BufferedImage image = MatrixToImageWriter.toBufferedImage(bitMatrix);

        // 转换为字节数组
        ByteArrayOutputStream baos = new ByteArrayOutputStream();
        ImageIO.write(image, "PNG", baos);
        return baos.toByteArray();
    }
}
3. 编写 TOTP 核心服务类
这个 Service 类封装了生成密钥、生成绑定二维码 URL 以及验证验证码的核心功能。
import com.warrenstrange.googleauth.GoogleAuthenticator;
import com.warrenstrange.googleauth.GoogleAuthenticatorKey;
import com.warrenstrange.googleauth.GoogleAuthenticatorQRGenerator;
import org.springframework.stereotype.Component;

@Component
public class GAService {

    /**
     * 生成secretKey
     * @return
     */
    public String genAuthKey() {
        GoogleAuthenticator authenticator = new GoogleAuthenticator();
        return authenticator.createCredentials().getKey();
    }

    /**
     * 生成绑定Google Authenticator二维码URL
     * @param username
     * @param authKey
     * @return
     */
    public String genAuthQrCode(String username, String authKey) {
        return GoogleAuthenticatorQRGenerator.getOtpAuthTotpURL("projdk.com", username,
                new GoogleAuthenticatorKey.Builder(authKey).build());
    }

    /**
     * 验证
     * @param authKey
     * @param code
     * @return
     */
    public boolean verify(String authKey,String code) {
        GoogleAuthenticator authenticator = new GoogleAuthenticator();
        return authenticator.authorize(aKey,Integer.parseInt(code));
    }
}
4. 编写控制器
控制器负责处理前端请求,包括生成二维码图片和验证用户输入的验证码。
import com.projdk.mfa.service.GAService;
import com.projdk.mfa.util.QrCodeUtils;
import org.springframework.stereotype.Controller;
import org.springframework.web.bind.annotation.RequestMapping;
import org.springframework.web.bind.annotation.RequestParam;
import org.springframework.web.bind.annotation.ResponseBody;

import java.util.Base64;
import java.util.HashMap;
import java.util.Map;

@Controller
public class IndexController {
    private static final Map<String, String> authKeys = new HashMap<>();
    private GAService gaService;

    public IndexController(GAService gaService) {
        this.gaService = gaService;
    }

    @RequestMapping("/index")
    public String toIndex() throws Exception {
        return "index";
    }

    /**
     * 生成绑定(base64格式)二维码
     * @param username
     * @return
     * @throws Exception
     */
    @ResponseBody
    @RequestMapping("/getQrCode")
    public String getGoogleAuthQrCode(@RequestParam("username") String username) throws Exception {
        String authKey = this.gaService.genAuthKey();
        authKeys.put(username, authKey);
        String authQrCode = this.gaService.genAuthQrCode(username, authKey);
        byte[] imageBytes = QrCodeUtils.genQrCode(authQrCode);

        // 转换为Base64
        String base64 = Base64.getEncoder().encodeToString(imageBytes);

        return "data:image/png;base64," + base64;
    }

    /**
     * 验证
     * @param username
     * @param code
     * @return
     * @throws Exception
     */
    @ResponseBody
    @RequestMapping("/verify")
    public boolean verify(@RequestParam("username") String username,@RequestParam("code") String code) throws Exception {
        String autKey = authKeys.get(username);
        return gaService.verify(autKey,code);
    }
}
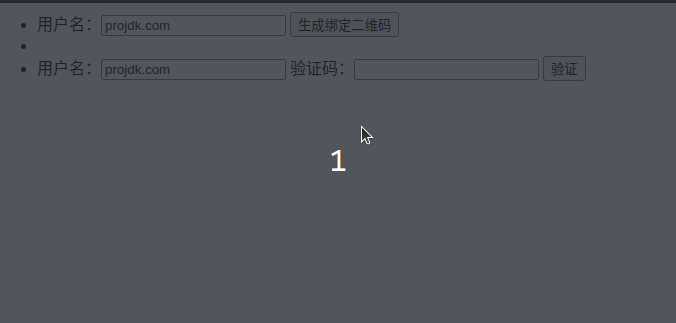
5. 编写前端页面
使用 Thymeleaf 模板编写一个简单的页面,提供输入用户名、生成二维码和输入验证码的功能。
<html xmlns:th="http://www.thymeleaf.org">

<head>
    <meta charset="utf-8" />
    <meta name="viewport"
          content="width=device-width,height=device-height, initial-scale=1.0,maximum-scale=1.0,user-scalable=no" />
    <meta name="apple-mobile-web-app-capable" content="yes" />
    <script src="https://cdn.bootcdn.net/ajax/libs/jquery/3.7.1/jquery.js"></script>

    <script>
        function getQrCode() {
            $.ajax({
                url: "/getQrCode",
                data: { username: $(":input[name='username']").val() },
                success: function (data) {
                    $("#qrCode").html("<img src='" + data + "'/><span id='ret' style='font-size:20px;color:red;'/>");
                }
            });
        }
        function verify() {
            $.ajax({
                url: "/verify",
                data: {
                    username: $(":input[name='username']").val(),
                    code: $(":input[name='code']").val()
                },
                success: function (data) {
                    //alert(data)
                    $("#ret").html("验证结果:"+data);
                }
            });
        }
    </script>
</head>

<body>
<ul>
    <li>
        <label>
            用户名:<input name="username" value="projdk.com" />
        </label>
        <button type="button" onclick="getQrCode()">生成绑定二维码</button>
    </li>
    <li id="qrCode">

    </li>
    <li>
        <label>
            用户名:<input name="username" value="projdk.com" />
        </label>
        <label>
            验证码:<input name="code" />
        </label>
        <button type="button" onclick="verify()">验证</button>
    </li>
</ul>

</body>

</html>
6. 运行与测试
- 启动 Spring Boot 项目。
- 访问
http://localhost:8080/index。
- 在页面输入用户名(示例中默认为
projdk.com),点击“生成绑定二维码”。页面会显示一个二维码。
- 在手机上打开 Google Authenticator 应用,点击“+”号,选择“扫描二维码”,扫描网页上显示的二维码。
- 绑定成功后,应用列表中会新增一项,并显示一个6位数字的动态验证码。
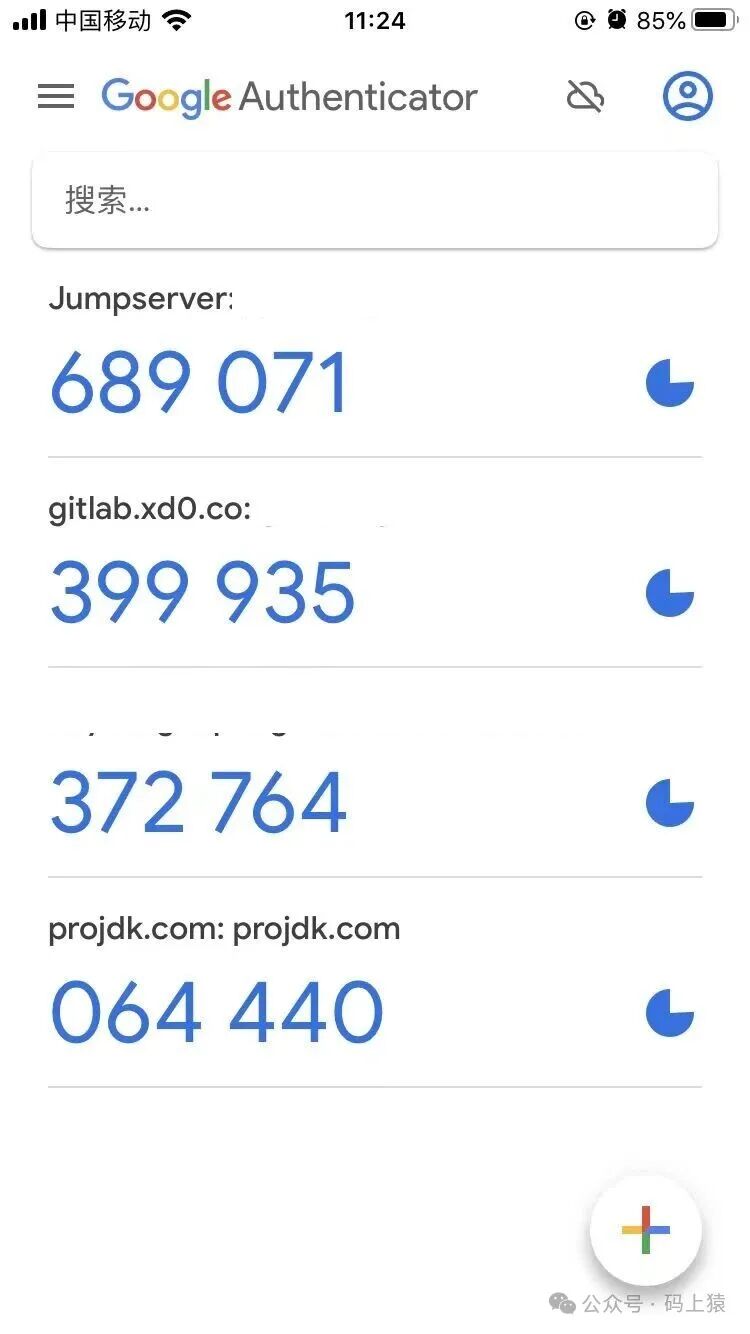
- 在网页下方的验证码输入框中,输入 Google Authenticator 应用里显示的当前验证码,点击“验证”。如果服务器验证通过,页面会显示“验证结果:true”。
注意事项
- 时间同步:TOTP 算法严格依赖时间,因此必须保证客户端(手机)与服务器的时间保持同步。时间偏差过大会导致验证失败。
- 密钥管理:示例中为了演示方便,将生成的
secretKey 临时存储在内存的 Map 中。在实际生产环境中,你需要将 secretKey 与用户关联并持久化到数据库,并在验证时查询使用。
- 绑定URL格式:关于 Google Authenticator 绑定二维码 URL 的生成规则(
otpauth:// 协议),请参考 Key Uri Format。
总结
通过本文的步骤,我们成功在 Spring Boot 项目中整合了 Google Authenticator,实现了基于 TOTP 的双因素认证流程。这种方式能有效提升账户的安全性,是构建安全系统时一个值得考虑的选项。从生成密钥、提供绑定二维码到验证动态码,整个流程清晰且易于实现。
希望这篇教程能帮助你理解并实践 OTP 认证。如果你想进一步了解如何基于 TOTP 构建更完整的 MFA(多因素认证)系统,欢迎在 云栈社区 交流探讨。
附录
Key Uri Format
https://github.com/google/google-authenticator/wiki/Key-Uri-Format
 发表于 2026-1-10 04:55:06
|
查看: 143|
回复: 0
发表于 2026-1-10 04:55:06
|
查看: 143|
回复: 0
