同样是返回JSON数据,为何有的API被前端称赞“清晰好用”,有的却被吐槽“一团乱麻”?规范与性能并重,才是现代API设计的核心所在。
在微服务和前后端分离架构成为主流的今天,RESTful API已成为系统间通信的事实标准。但设计出既符合规范又高性能的API并非易事。
本文结合Spring Boot 3.x的最新特性,与你深入探讨现代RESTful API设计的最佳实践。
01 RESTful设计原则再审视
REST(表征状态转移)由Roy Fielding博士在2000年提出,但实际应用中常被误解。真正的RESTful API应遵循以下核心原则:
- 无状态性:每个请求应包含所有必要信息,服务器不存储客户端上下文
- 统一接口:使用标准的HTTP方法、状态码和媒体类型
- 资源导向:URI应指向资源而非操作
- 可缓存性:明确标识响应是否可缓存
- 分层系统:客户端无需了解是否直接连接最终服务器
- 按需代码(可选):可动态下载执行代码扩展功能
在现代API设计中,HATEOAS(超媒体作为应用状态引擎)常被提及但实际采用有限,主要因其增加了复杂性而实际业务价值有限。
02 Spring MVC核心注解深度解析
@RestController的演进
在Spring Boot 3.x中,@RestController继续作为RESTful API的主要注解,但有了新的最佳实践:
// 传统的RestController
@RestController
@RequestMapping("/api/v1/products")
public class ProductController {
// 方法实现
}

// Spring Boot 3推荐:使用@ControllerAdvice统一处理响应
@RestController
@RequestMapping("/api/v1/products")
public class ProductController {

@GetMapping("/{id}")
public ResponseEntity<ProductResponse> getProduct(@PathVariable Long id){
// 明确返回ResponseEntity以更好控制状态码和头部
        ProductResponse product = productService.findById(id);
return ResponseEntity.ok()
            .cacheControl(CacheControl.maxAge(30, TimeUnit.MINUTES))
            .eTag(product.getVersion().toString())
            .body(product);
    }
}
请求映射策略
HTTP方法映射应严格遵循其语义:
@RestController
@RequestMapping("/api/v1/orders")
public class OrderController {

// GET - 获取资源
@GetMapping("/{id}")
    public Order getOrder(@PathVariable Long id) { /* ... */ }

// GET - 查询资源集合(支持过滤、分页、排序)
@GetMapping
    public Page<Order> getOrders(
@RequestParam(required = false) String status,
@RequestParam(defaultValue = "0") int page,
@RequestParam(defaultValue = "20") int size) { /* ... */ }

// POST - 创建资源
@PostMapping
@ResponseStatus(HttpStatus.CREATED)
    public Order createOrder(@RequestBody@Valid OrderRequest request) { /* ... */ }

// PUT - 完整更新资源
@PutMapping("/{id}")
    public Order updateOrder(@PathVariable Long id,
@RequestBody@Valid OrderRequest request) { /* ... */ }

// PATCH - 部分更新资源(Spring Boot 3增强支持)
@PatchMapping("/{id}")
    public Order partialUpdateOrder(@PathVariable Long id,
@RequestBody JsonPatch patch) { /* ... */ }

// DELETE - 删除资源
@DeleteMapping("/{id}")
@ResponseStatus(HttpStatus.NO_CONTENT)
    public void deleteOrder(@PathVariable Long id) { /* ... */ }
}
03 请求参数处理最佳实践
路径变量与查询参数
@GetMapping("/users/{userId}/orders/{orderId}")
public ResponseEntity<OrderDetail> getOrderDetail(
@PathVariable Long userId,
@PathVariable Long orderId,
@RequestParam(required = false) String expand) {

// 路径变量用于必需标识
// 查询参数用于可选过滤、扩展等
    OrderDetail detail = orderService.getDetail(userId, orderId);

if ("items".equals(expand)) {
// 根据expand参数决定是否扩展数据
        detail.setItems(orderService.getOrderItems(orderId));
    }

return ResponseEntity.ok(detail);
}
复杂查询参数处理
对于复杂的查询场景,推荐使用专用的查询对象来封装参数:
// 查询参数封装对象
public record ProductQuery(
@RequestParam(required = false) String name,
@RequestParam(required = false) BigDecimal minPrice,
@RequestParam(required = false) BigDecimal maxPrice,
@RequestParam(required = false) List<String> categories,
@RequestParam(defaultValue = "0") int page,
@RequestParam(defaultValue = "20") int size,
@RequestParam(defaultValue = "createdAt,desc") String[] sort) {
}

// 控制器中使用
@GetMapping("/search")
public Page<Product> searchProducts(ProductQuery query) {
return productService.search(query);
}
请求体验证增强
Spring Boot 3.x进一步加强了对Jakarta Validation的支持:
public record CreateUserRequest(
@NotBlank(message = "用户名不能为空")
@Size(min = 3, max = 50, message = "用户名长度需在3-50字符之间")
    String username,

@Email(message = "邮箱格式不正确")
@NotBlank(message = "邮箱不能为空")
    String email,

@Pattern(regexp = "^(?=.*[A-Za-z])(?=.*\\d)[A-Za-z\\d]{8,}$",
             message = "密码必须至少8位,包含字母和数字")
    String password,

@NotNull(message = "用户类型必须指定")
    UserType type,

@Min(value = 18, message = "年龄必须满18岁")
@Max(value = 100, message = "年龄不能超过100岁")
    Integer age) {
}

@PostMapping("/users")
@ResponseStatus(HttpStatus.CREATED)
public UserResponse createUser(@RequestBody@Valid CreateUserRequest request) {
// 自动验证请求体,验证失败抛出MethodArgumentNotValidException
return userService.createUser(request);
}
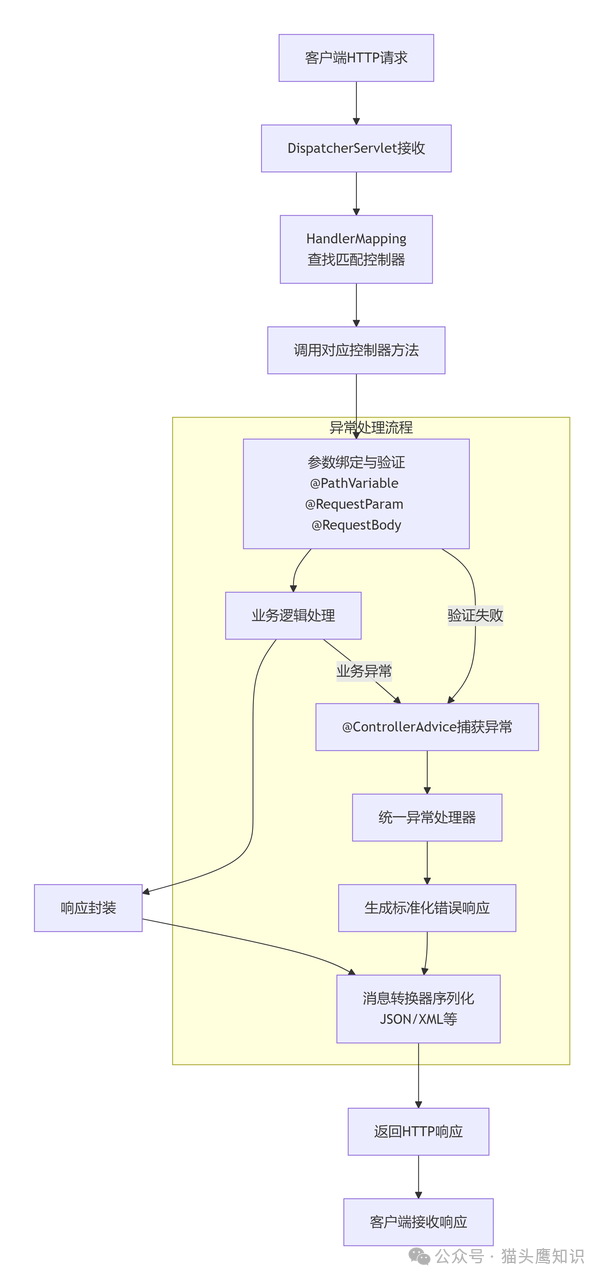
以下是RESTful API请求在Spring MVC中的完整处理流程,清晰地展示了从请求接收到响应返回的各个环节:
04 响应设计与性能优化
统一响应格式
标准化的响应结构对前端消费至关重要,它能显著提升开发效率:
// 通用响应封装
public record ApiResponse<T>(
boolean success,
String code,
String message,
    T data,
    Instant timestamp,
String requestId) {

public static <T> ApiResponse<T> success(T data) {
return new ApiResponse<>(
true, "SUCCESS", "操作成功",
            data, Instant.now(), getCurrentRequestId());
    }

public static ApiResponse<Void> error(String code, String message) {
return new ApiResponse<>(
false, code, message,
null, Instant.now(), getCurrentRequestId());
    }
}

// 使用ResponseEntity封装
@GetMapping("/{id}")
public ResponseEntity<ApiResponse<Product>> getProduct(@PathVariable Long id) {
    Product product = productService.findById(id);
    ApiResponse<Product> response = ApiResponse.success(product);

return ResponseEntity.ok()
        .header("X-Request-ID", getCurrentRequestId())
        .body(response);
}
状态码设计规范
HTTP状态码应准确反映操作结果,这是API设计的“语言”:
- 2xx 成功
200 OK - 通用成功201 Created - 资源创建成功,应在响应头包含Location204 No Content - 成功但无响应体(如DELETE操作)
- 4xx 客户端错误
400 Bad Request - 请求格式错误或参数验证失败401 Unauthorized - 需要认证但未提供或认证失败403 Forbidden - 认证成功但权限不足404 Not Found - 请求资源不存在409 Conflict - 资源状态冲突(如重复创建)
- 5xx 服务器错误
500 Internal Server Error - 通用服务器错误503 Service Unavailable - 服务暂时不可用
性能优化实践
-
分页与流式响应
@GetMapping("/large-data")
public StreamingResponseBody streamLargeData(){
return outputStream -> {
try (BufferedWriter writer = new BufferedWriter(
new OutputStreamWriter(outputStream))) {

// 流式写入大量数据,避免内存溢出
for (int i = 0; i < 1_000_000; i++) {
            writer.write("data line " + i);
            writer.newLine();
            writer.flush(); // 定期刷新缓冲区

// 添加延迟模拟实时数据
            Thread.sleep(1);
        }
    }
};
}
-
响应缓存策略
@GetMapping("/{id}")
@ResponseBody
@Cacheable(value = "products", key = "#id",
           unless = "#result == null")
public Product getProduct(@PathVariable Long id) {
// 方法结果会自动缓存
return productService.findById(id);
}

// 使用HTTP缓存头
@GetMapping("/static/{id}")
public ResponseEntity<Product> getProductWithCache(@PathVariable Long id) {
    Product product = productService.findById(id);

return ResponseEntity.ok()
    .cacheControl(CacheControl.maxAge(1, TimeUnit.HOURS)
        .cachePublic()
        .mustRevalidate())
    .eTag(product.getVersion().toString())
    .body(product);
}
05 API版本管理与错误处理
版本管理策略
-
URI路径版本控制(最常用)
@RestController
@RequestMapping("/api/v1/products")
public class ProductControllerV1 { /* ... */ }

@RestController
@RequestMapping("/api/v2/products")
public class ProductControllerV2 { /* ... */ }
-
请求头版本控制
@GetMapping(value = "/products", headers = "API-Version=1")
public List<Product> getProductsV1() { /* ... */ }

@GetMapping(value = "/products", headers = "API-Version=2")
public List<Product> getProductsV2() { /* ... */ }
-
内容协商版本控制
@GetMapping(value = "/products", produces = "application/vnd.company.v1+json")
public List<Product> getProductsV1() { /* ... */ }

@GetMapping(value = "/products", produces = "application/vnd.company.v2+json")
public List<Product> getProductsV2() { /* ... */ }
全局异常处理
一个健壮的后端服务离不开完善的异常处理机制,它能提供友好的错误信息并提升系统稳定性:
@RestControllerAdvice
public class GlobalExceptionHandler {

private final Logger logger = LoggerFactory.getLogger(getClass());

// 处理验证异常
@ExceptionHandler(MethodArgumentNotValidException.class)
public ResponseEntity<ApiResponse<Void>> handleValidationException(
            MethodArgumentNotValidException ex) {

        List<String> errors = ex.getBindingResult()
            .getFieldErrors()
            .stream()
            .map(error -> error.getField() + ": " + error.getDefaultMessage())
            .collect(Collectors.toList());

        ApiResponse<Void> response = ApiResponse.error(
"VALIDATION_ERROR",
"参数验证失败: " + String.join("; ", errors));

return ResponseEntity.badRequest().body(response);
    }

// 处理业务异常
@ExceptionHandler(BusinessException.class)
public ResponseEntity<ApiResponse<Void>> handleBusinessException(
            BusinessException ex) {

        logger.warn("业务异常: {}", ex.getMessage(), ex);

        ApiResponse<Void> response = ApiResponse.error(
            ex.getErrorCode(),
            ex.getMessage());

return ResponseEntity.status(ex.getHttpStatus()).body(response);
    }

// 处理未捕获异常
@ExceptionHandler(Exception.class)
public ResponseEntity<ApiResponse<Void>> handleGenericException(
            Exception ex, HttpServletRequest request) {

String errorId = UUID.randomUUID().toString();
        logger.error("未处理异常 [ID: {}] - 请求: {} {}",
            errorId, request.getMethod(), request.getRequestURI(), ex);

        ApiResponse<Void> response = ApiResponse.error(
"INTERNAL_ERROR",
"系统内部错误,错误ID: " + errorId);

return ResponseEntity.internalServerError().body(response);
    }
}
06 实战案例:电商交易API设计
让我们通过一个电商订单管理的实战案例,将前面提到的原则和技巧串联起来:
@RestController
@RequestMapping("/api/v2/orders")
@Tag(name = "订单管理", description = "订单创建、查询、状态管理")
public class OrderController {

private final OrderService orderService;

// 创建订单
@PostMapping
@ResponseStatus(HttpStatus.CREATED)
@Operation(summary = "创建新订单")
public ResponseEntity<ApiResponse<OrderResponse>> createOrder(
@RequestBody@Valid CreateOrderRequest request,
@AuthenticationPrincipal UserPrincipal currentUser) {

        OrderResponse order = orderService.createOrder(request, currentUser.getId());

// 返回201 Created,并在Location头包含新资源URI
return ResponseEntity
            .created(URI.create("/api/v2/orders/" + order.getId()))
            .body(ApiResponse.success(order));
    }

// 获取订单分页列表(支持复杂查询)
@GetMapping
@Operation(summary = "获取订单列表")
public ApiResponse<Page<OrderResponse>> getOrders(
            OrderQuery query,
@AuthenticationPrincipal UserPrincipal currentUser,
@RequestHeader(value = "X-Timezone", defaultValue = "UTC") String timezone) {

        Page<OrderResponse> orders = orderService.getUserOrders(
            currentUser.getId(), query, timezone);

return ApiResponse.success(orders);
    }

// 订单部分更新(如取消订单)
@PatchMapping("/{orderId}")
@Operation(summary = "部分更新订单")
public ApiResponse<OrderResponse> updateOrder(
@PathVariable Long orderId,
@RequestBody JsonPatch patch,
@AuthenticationPrincipal UserPrincipal currentUser) {

        OrderResponse updated = orderService.partialUpdate(
            orderId, patch, currentUser.getId());

return ApiResponse.success(updated);
    }

// 异步订单导出
@GetMapping("/export")
@Operation(summary = "导出订单数据")
public CompletableFuture<ResponseEntity<Resource>> exportOrders(
            OrderQuery query,
@AuthenticationPrincipal UserPrincipal currentUser) {

return orderService.exportOrdersAsync(currentUser.getId(), query)
            .thenApply(resource -> {
String filename = "orders_" +
                    LocalDate.now().toString() + ".csv";

return ResponseEntity.ok()
                    .header(HttpHeaders.CONTENT_DISPOSITION,
"attachment; filename=\"" + filename + "\"")
                    .contentType(MediaType.parseMediaType("text/csv"))
                    .body(resource);
            });
    }
}
API文档生成
Spring Boot 3.x与OpenAPI 3.x的集成让API文档生成变得异常简单:
@Configuration
public class OpenApiConfig{

@Bean
public OpenAPI springShopOpenAPI(){
return new OpenAPI()
            .info(new Info()
                .title("电商平台API文档")
                .description("电商平台RESTful API文档,基于OpenAPI 3.0规范")
                .version("v2.0.0")
                .contact(new Contact()
                    .name("技术团队")
                    .email("tech@example.com")))
            .externalDocs(new ExternalDocumentation()
                .description("详细Wiki文档")
                .url("https://wiki.example.com/api"))
            .addSecurityItem(new SecurityRequirement().addList("bearerAuth"))
            .components(new Components()
                .addSecuritySchemes("bearerAuth",
new SecurityScheme()
                        .type(SecurityScheme.Type.HTTP)
                        .scheme("bearer")
                        .bearerFormat("JWT")));
    }
}
总结
优秀的API设计如同精心设计的用户界面,它不仅需要遵循技术规范,更要考虑使用者的体验。现代RESTful API设计已经从简单的CRUD接口,演变为需要考虑性能、安全性、可维护性和开发者体验的复杂工程。
在Spring Boot 3.x的助力下,我们拥有了更强大的工具来实现这些目标。但工具只是手段,真正的关键在于对HTTP协议本质的理解和对业务需求的深刻把握。当API设计不再仅仅满足于“能用”,而是追求“优雅易用”时,系统间的协作才会真正顺畅无阻,后端服务的健壮性才能得到保障。
如果你想与更多开发者交流此类实战经验,欢迎访问云栈社区,一个专注于技术分享与成长的开发者社区。
 发表于 2026-1-13 02:51:49
|
查看: 252|
回复: 0
发表于 2026-1-13 02:51:49
|
查看: 252|
回复: 0
