本文详细介绍在树莓派CM0开发板上实现AI对话功能的完整项目,涵盖终端对话和网页聊天两种交互方式,通过大语言模型API接口实现智能对话系统。
项目概述
本项目基于树莓派CM0开发板,通过集成大语言模型API接口,构建了一套完整的AI对话系统。系统支持两种交互模式:终端命令行对话和Web网页聊天界面,为嵌入式设备上的AI应用开发提供了实用参考。
系统架构
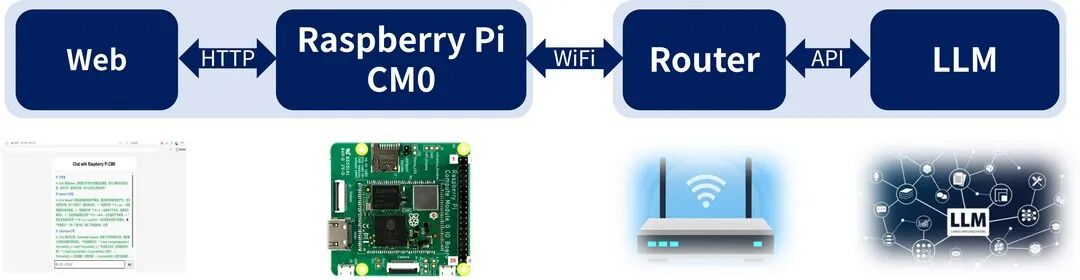
环境准备
系统安装及环境搭建详细步骤请参考官方文档:
https://edatec.cn/docs/zh/cm0/um/3-booting-the-device/
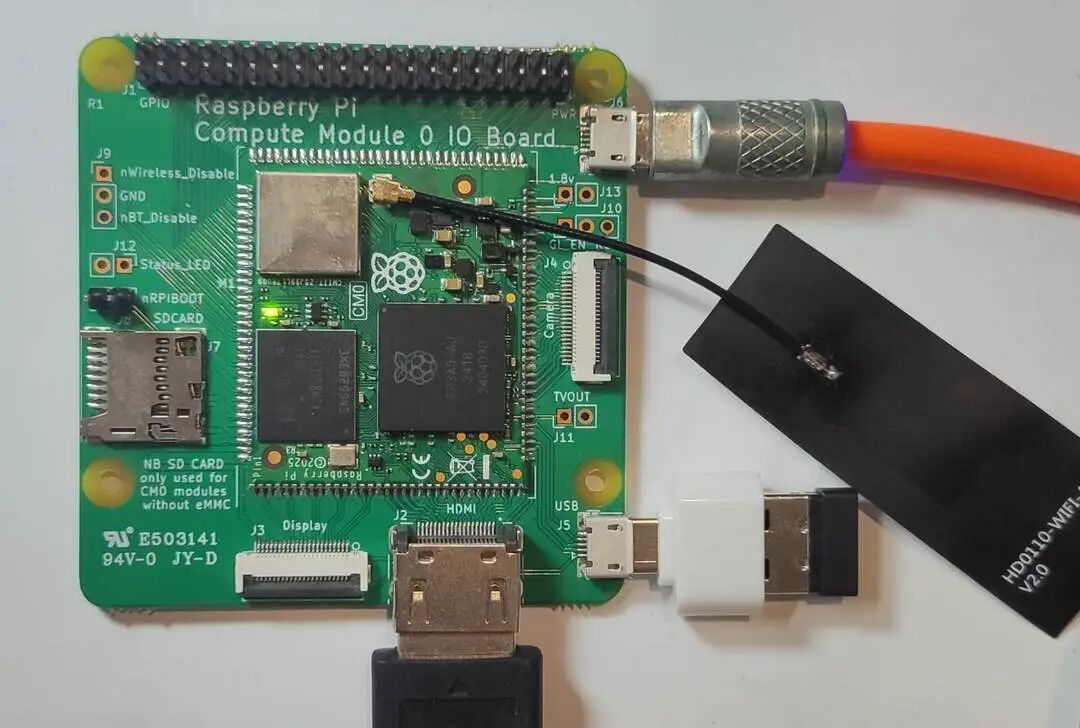
硬件连接配置
- SSH远程登录:仅需连接电源线即可
- 本地操作:需要连接HDMI视频线和USB键盘
软件环境配置
安装网页服务器所需的 Python Flask库,在终端执行:
sudo apt install python3-flask
API密钥获取
本项目支持多种大语言模型API,包括小智、DeepSeek和ChatGPT等。开发者需要前往对应官网申请API密钥,具体申请流程请参考各平台开发者文档。
系统流程设计

项目文件结构
/home/ljl/AgentChat
├── chat_agent_web.py      # 后端主程序
└── web/
    └── index.html         # 前端网页文件
终端对话实现
通过调用大语言模型API接口,实现在Shell终端中的智能对话功能。
核心代码实现
在终端中执行 touch chat_agent.py 创建文件,使用nano编辑器添加以下代码:
#!/usr/bin/env python3
# -*- coding: utf-8 -*-
import json, time, signal, sys, requests

API_KEY = "sk-4160d6151421480b83fa9f0c264axxxx"  # 替换为实际API密钥

def ai_chat(prompt):
    """发送消息到AI并获取回复"""
    try:
        r = requests.post(
            "https://chat.ecnu.edu.cn/open/api/v1/chat/completions",
            headers={"Authorization": f"Bearer {API_KEY}", "Content-Type": "application/json"},
            json={
                "model": "ecnu-plus",
                "messages": [
                    {"role": "system", "content": "简洁回答"},
                    {"role": "user", "content": prompt}
                ],
                "temperature": 0.7,
                "max_tokens": 200
            },
            timeout=10
        )
        return r.json()["choices"][0]["message"]["content"].strip() if r.status_code == 200 else f"错误:{r.status_code}"
    except Exception as e:
        return f"请求异常:{e}"

# 主程序
signal.signal(signal.SIGINT, lambda *_: print("\n退出") or sys.exit(0))
print("AI对话机器人 | 输入exit退出\n")

while True:
    try:
        user_input = input("你: ").strip()
        if user_input.lower() in ['exit', 'quit']: break
        if not user_input: continue
        start_time = time.time()
        reply = ai_chat(user_input)
        print(f"AI: ({time.time()-start_time:.1f}s) {reply}\n")
    except KeyboardInterrupt:
        print("\n再见!")
        break
    except Exception as e:
        print(f"出错: {e}")
运行效果演示
在终端执行 python chat_agent.py 运行程序,即可开始对话:

按 Ctrl + C 退出程序。
多模型支持
系统支持多种大语言模型,以下是不同模型的对话效果:
-
ChatGPT模型对话效果:

-
小智智能体对话效果:

网页聊天界面设计
为了提升用户体验,本项目还提供了基于Web的聊天界面,实现更美观的交互体验。
前端代码实现
创建web目录并新建网页文件:
mkdir web
cd web
touch index.html
编辑index.html文件内容:
<!doctype html>
<html lang="zh-CN">
<head>
<meta charset="utf-8">
<title>Chat with Raspberry Pi CM0</title>
<style>
  body{font-family:Arial,Helvetica,sans-serif;background:#f5f5f5;margin:0;padding:20px}
  #box{max-width:600px;margin:auto;background:#fff;border-radius:8px;padding:20px;box-shadow:0 2px 8px rgba(0,0,0,.1)}
  h2{text-align:center;margin-top:0}
  #history{height:400px;overflow-y:auto;border:1px solid #ddd;padding:10px;margin-bottom:10px;background:#fafafa}
  .line{margin:6px 0}
  .user{color:#0066cc}
  .ai{color:#009933}
  #inputArea{display:flex}
  #msgInput{flex:1;padding:8px;font-size:14px}
  #sendBtn{padding:8px 16px;margin-left:6px}
</style>
</head>
<body>
<div id="box">
  <h2>Chat with Raspberry Pi CM0</h2>
  <div id="history"></div>
  <div id="inputArea">
    <input id="msgInput" placeholder="输入消息,回车发送"/>
    <button id="sendBtn" onclick="send()">发送</button>
  </div>
</div>
<script>
const hist = document.getElementById('history');
const input = document.getElementById('msgInput');

function addLine(cls, txt){
  const div = document.createElement('div');
  div.className = 'line '+cls;
  div.textContent = txt;
  hist.appendChild(div);
  hist.scrollTop = hist.scrollHeight;
}

async function send(){
  const msg = input.value.trim();
  if(!msg) return;
  addLine('user', '你: '+msg);
  input.value = '';
  const res = await fetch('/chat', {method:'POST', body:new URLSearchParams({msg})});
  const data = await res.json();
  addLine('ai', 'AI: '+data.reply);
}

input.addEventListener('keydown', e=>{if(e.key==='Enter') send()});
</script>
</body>
</html>
后端服务代码
对应的后端程序需要调整为支持Web服务:
#!/usr/bin/env python3
# -*- coding: utf-8 -*-
import json, time, requests, signal, sys
from flask import Flask, send_from_directory, request, jsonify

API_KEY = "sk-4160d6151421480b83fa9f0c264axxx"   # 替换为实际API密钥
MODEL_URL = "https://chat.ecnu.edu.cn/open/api/v1/chat/completions"

app = Flask(__name__)

# ---------- AI对话处理 ----------
def ai_chat(prompt: str) -> str:
    try:
        resp = requests.post(
            MODEL_URL,
            headers={"Authorization": f"Bearer {API_KEY}", "Content-Type": "application/json"},
            json={
                "model": "ecnu-plus",
                "messages": [
                    {"role": "system", "content": "简洁回答"},
                    {"role": "user", "content": prompt}
                ],
                "temperature": 0.7,
                "max_tokens": 200
            },
            timeout=10
        )
        if resp.status_code == 200:
            return resp.json()["choices"][0]["message"]["content"].strip()
        return f"错误:HTTP {resp.status_code}"
    except Exception as e:
        return f"请求异常:{e}"

# ---------- 路由定义 ----------
@app.route("/")
def index():
    return send_from_directory("web", "index.html")

@app.route("/static/<path:filename>")
def web_static(filename):
    return send_from_directory("web", filename)

@app.route("/chat", methods=["POST"])
def chat():
    user_input = request.form.get("msg", "").strip()
    if not user_input:
        return jsonify({"reply": "输入不能为空"})
    start = time.time()
    reply = ai_chat(user_input)
    return jsonify({"reply": f"({time.time()-start:.1f}s) {reply}"})

# ---------- 程序退出处理 ----------
signal.signal(signal.SIGINT, lambda *_: print("\n退出") or sys.exit(0))

# ---------- 服务启动 ----------
if __name__ == "__main__":
    print("🚀 网页对话已启动 → http://127.0.0.1:5000")
    app.run(host="0.0.0.0", port=5000, debug=False)
网页效果展示
-
运行后端服务:
python chat_agent_web.py
-
终端显示服务启动信息:

-
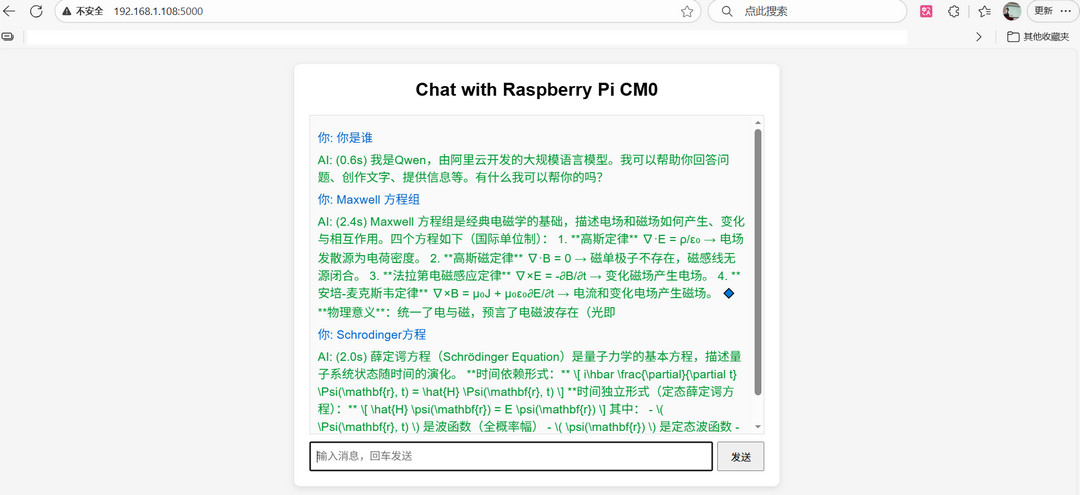
在同一局域网下的浏览器中访问显示的IP地址(如192.168.1.125:5000):
-
在输入框中输入问题,按Enter键发送,即可与 人工智能 进行实时对话。
项目总结
本项目完整展示了在树莓派CM0开发板上构建AI对话系统的全过程,从环境准备、API集成到终端和网页两种交互界面的实现。该系统为嵌入式设备上的智能对话应用开发提供了可行的技术方案和实践参考,特别适合物联网设备和边缘计算场景中的AI功能集成。
 发表于 2025-12-1 01:09:25
|
查看: 177|
回复: 0
发表于 2025-12-1 01:09:25
|
查看: 177|
回复: 0
