对于每一位 Spring 开发者来说,ApplicationContext 都是绕不开的核心,你真的透彻理解它了吗?
引言:Spring Context 的核心地位
Spring Context 是 Spring 框架的心脏,作为 IoC 容器的主要实现,它扮演着一个超级工厂的角色。这个工厂负责创建、组装并管理应用中所有的 Bean 对象,精确地控制它们的生命周期,并自动解决对象之间复杂的依赖关系,是构建健壮 Java 应用的基石。
什么是 Spring Context?
简而言之,Spring Context 是 Spring 框架的核心容器。它继承了 BeanFactory 接口的基本能力,并在此基础上进行了大幅增强,提供了企业级应用所需的一系列高级功能:
- 国际化支持:轻松处理多语言资源。
- 事件传播机制:支持应用内部的事件发布与监听,实现松耦合通信。
- 资源加载:提供统一接口访问各类资源(类路径、文件系统、URL等)。
- AOP 集成:无缝集成面向切面编程,管理横切关注点。
- 事务管理:为声明式事务提供底层支撑。
可以说,正是 ApplicationContext 的这些扩展功能,让 Spring 框架从简单的 IoC 容器蜕变为一个完整的企业级开发平台。
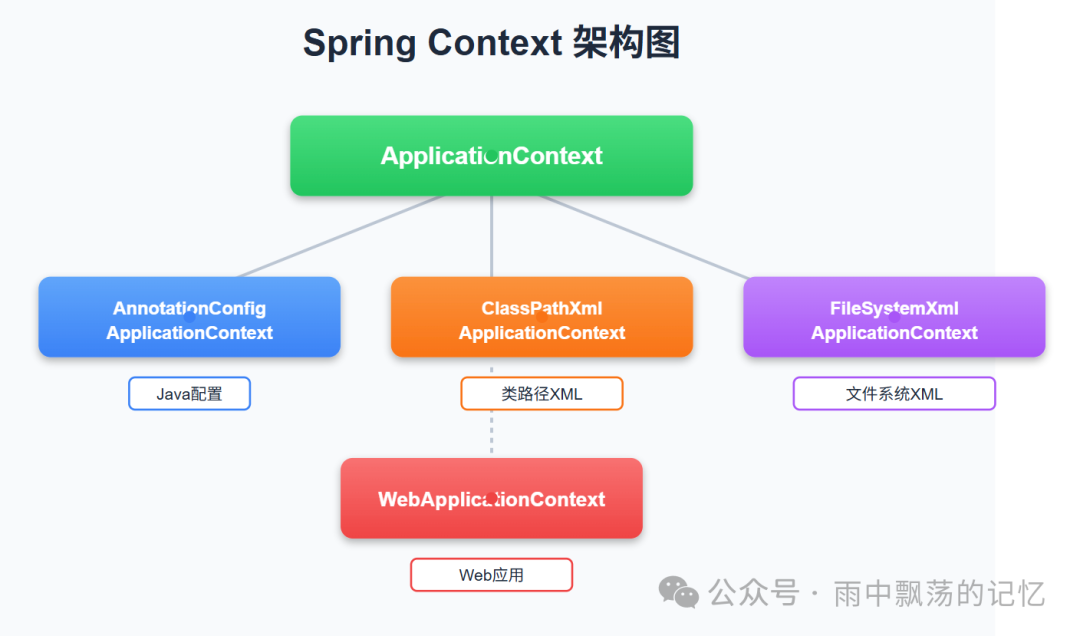
四大 ApplicationContext 全解析
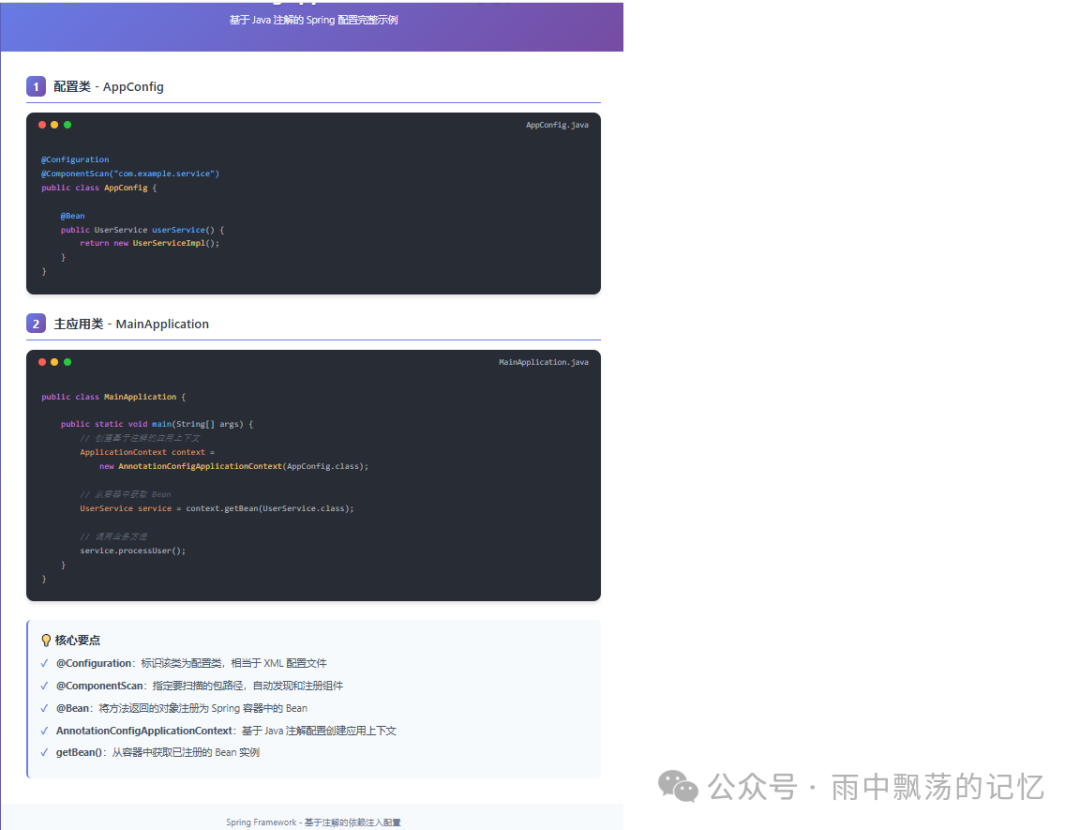
AnnotationConfigApplicationContext - 现代 Java 配置的首选
适用场景:
- 现代的 Spring Boot 应用程序。
- 追求纯 Java 配置、摒弃 XML 的项目。
- 需要强类型检查和编译时安全的配置场景。
核心特点:
- 完全基于注解(如
@Configuration, @Bean)进行配置,更加简洁直观。
- 完美支持 Java 8 及更高版本的特性,如 Lambda 表达式。
- 与 Spring Boot 的自动配置和起步依赖无缝融合。
实战代码示例:
@Configuration
@ComponentScan("com.example.service")
@PropertySource("classpath:application.properties")
public class AppConfig {

    @Value("${app.name}")
    private String appName;

    @Bean
    @Scope(ConfigurableBeanFactory.SCOPE_PROTOTYPE)
    public UserService userService() {
        return new UserServiceImpl();
    }

    @Bean
    public DataSource dataSource() {
        HikariDataSource dataSource = new HikariDataSource();
        dataSource.setJdbcUrl("jdbc:mysql://localhost:3306/mydb");
        dataSource.setUsername("root");
        dataSource.setPassword("password");
        return dataSource;
    }
}

public class MainApplication {
    public static void main(String[] args) {
        // 创建上下文
        ApplicationContext context =
                new AnnotationConfigApplicationContext(AppConfig.class);

        // 获取Bean
        UserService userService = context.getBean(UserService.class);
        DataSource dataSource = context.getBean(DataSource.class);

        // 使用服务
        userService.processUser();
    }
}
生产环境应用:
在 Spring Boot 项目中,我们通常通过 @SpringBootApplication 注解来隐式创建和启动 AnnotationConfigApplicationContext,这是 Spring Boot 项目的主流启动方式:
@SpringBootApplication
public class MyApplication {
    public static void main(String[] args) {
        SpringApplication.run(MyApplication.class, args);
    }
}
ClassPathXmlApplicationContext - 传统 XML 配置的坚守者
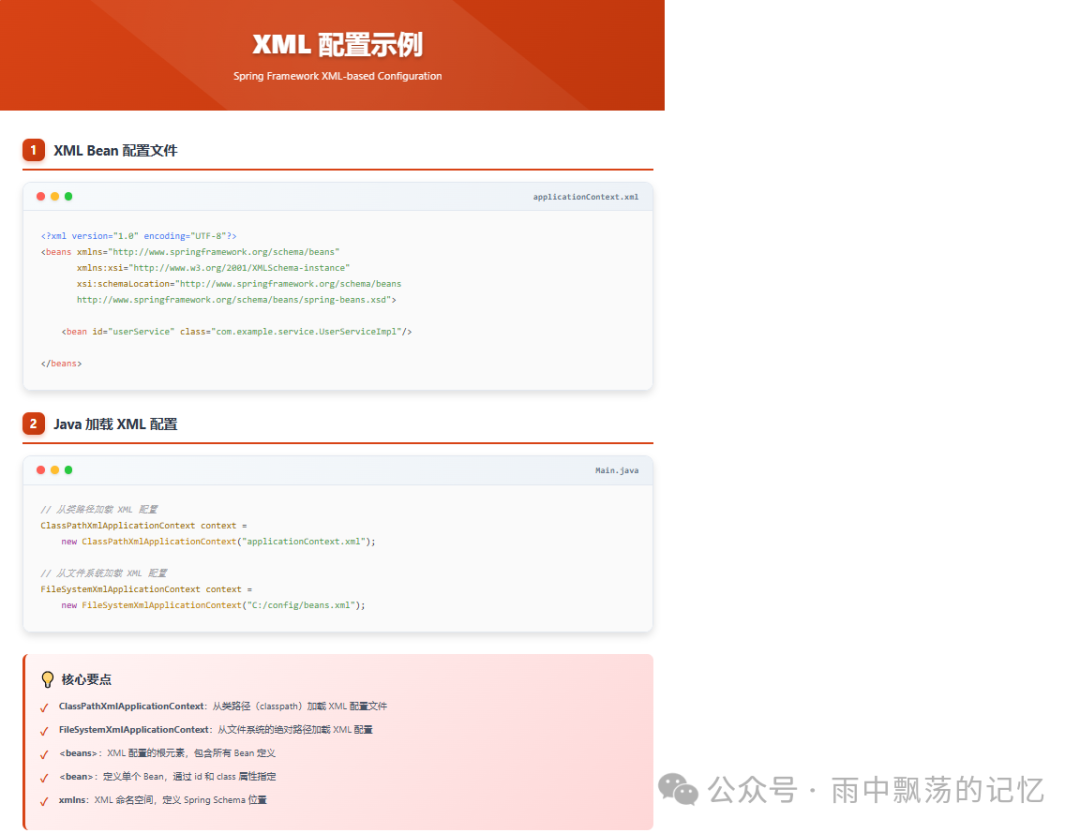
适用场景:
- 遗留的或仍需维护的传统 Spring 应用。
- 需要与大量现有 XML 配置文件保持兼容的项目。
- 配置位于类路径(classpath)下进行统一管理的场景。
核心特点:
- 从类路径(如
src/main/resources)加载 XML 配置文件。
- 支持通配符批量加载配置文件。
- 拥有最广泛的兼容性和社区支持。
实战代码示例:
public class XmlConfigApp {
    public static void main(String[] args) {
        // 1. 基础用法:加载单个配置文件
        ApplicationContext context =
                new ClassPathXmlApplicationContext("applicationContext.xml");

        // 2. 多配置文件加载
        String[] configLocations = {
                "spring-datasource.xml",
                "spring-service.xml",
                "spring-mvc.xml"
        };
        ApplicationContext context2 =
                new ClassPathXmlApplicationContext(configLocations);

        // 3. 使用通配符加载某个目录下所有XML文件
        ApplicationContext context3 =
                new ClassPathXmlApplicationContext("classpath*:spring/*.xml");

        // 获取并使用Bean
        UserService userService = context.getBean(UserService.class);
    }
}
XML 配置文件示例:
<!-- applicationContext.xml -->
<?xml version="1.0" encoding="UTF-8"?>
<beans xmlns="http://www.springframework.org/schema/beans"
       xmlns:xsi="http://www.w3.org/2001/XMLSchema-instance"
       xmlns:context="http://www.springframework.org/schema/context"
       xmlns:tx="http://www.springframework.org/schema/tx"
       xsi:schemaLocation="
           http://www.springframework.org/schema/beans
           http://www.springframework.org/schema/beans/spring-beans.xsd
           http://www.springframework.org/schema/context
           http://www.springframework.org/schema/context/spring-context.xsd
           http://www.springframework.org/schema/tx
           http://www.springframework.org/schema/tx/spring-tx.xsd">

    <!-- 组件扫描 -->
    <context:component-scan base-package="com.example"/>

    <!-- 属性文件 -->
    <context:property-placeholder location="classpath:application.properties"/>

    <!-- 数据源配置 -->
    <bean id="dataSource" class="com.zaxxer.hikari.HikariDataSource">
        <property name="driverClassName" value="${db.driver}"/>
        <property name="jdbcUrl" value="${db.url}"/>
        <property name="username" value="${db.username}"/>
        <property name="password" value="${db.password}"/>
    </bean>

    <!-- JPA配置 -->
    <bean id="entityManagerFactory"
          class="org.springframework.orm.jpa.LocalContainerEntityManagerFactoryBean">
        <property name="dataSource" ref="dataSource"/>
        <property name="packagesToScan" value="com.example.entity"/>
        <property name="jpaVendorAdapter">
            <bean class="org.springframework.orm.jpa.vendor.HibernateJpaVendorAdapter"/>
        </property>
        <property name="jpaProperties">
            <props>
                <prop key="hibernate.dialect">org.hibernate.dialect.MySQLDialect</prop>
                <prop key="hibernate.show_sql">true</prop>
                <prop key="hibernate.hbm2ddl.auto">update</prop>
            </props>
        </property>
    </bean>

    <!-- 事务管理器 -->
    <bean id="transactionManager"
          class="org.springframework.orm.jpa.JpaTransactionManager">
        <property name="entityManagerFactory" ref="entityManagerFactory"/>
    </bean>

    <!-- 启用事务注解 -->
    <tx:annotation-driven transaction-manager="transactionManager"/>
</beans>
FileSystemXmlApplicationContext - 外部化配置的灵活方案
适用场景:
- 配置文件需要放在应用外部(如服务器特定目录)进行管理的场景。
- 开发、测试、生产环境使用不同配置文件的快速切换。
- 需要从绝对路径加载配置的特定需求。
核心特点:
- 从文件系统的绝对或相对路径加载配置文件。
- 便于实现配置与代码的分离,更符合云原生和容器化部署的理念。
- 配置更新无需重新打包应用。
实战代码示例:
public class FileSystemConfigApp {
    public static void main(String[] args) {
        // 1. 使用绝对路径(推荐,路径明确)
        ApplicationContext context1 =
                new FileSystemXmlApplicationContext(
                        "C:/config/spring/applicationContext.xml");

        // 2. 使用多个外部配置文件
        String[] configPaths = {
                "/opt/spring/config/datasource.xml",
                "/opt/spring/config/service.xml"
        };
        ApplicationContext context2 =
                new FileSystemXmlApplicationContext(configPaths);

        // 3. 相对路径(相对于当前工作目录)
        ApplicationContext context3 =
                new FileSystemXmlApplicationContext("config/spring.xml");

        // 使用上下文
        UserService userService = context1.getBean(UserService.class);
    }
}
最佳实践: 通过系统属性动态决定加载哪个环境的配置文件。
public class ConfigManager {
    private static final String CONFIG_DIR = System.getProperty("user.dir") + "/config";

    public static ApplicationContext createApplicationContext(String profile) {
        String configPath = CONFIG_DIR + "/application-" + profile + ".xml";
        return new FileSystemXmlApplicationContext(configPath);
    }

    public static void main(String[] args) {
        // 根据环境变量或系统属性创建不同的上下文
        String env = System.getProperty("spring.profiles.active", "dev");
        ApplicationContext context = createApplicationContext(env);
    }
}
WebApplicationContext - Web 应用的专用容器
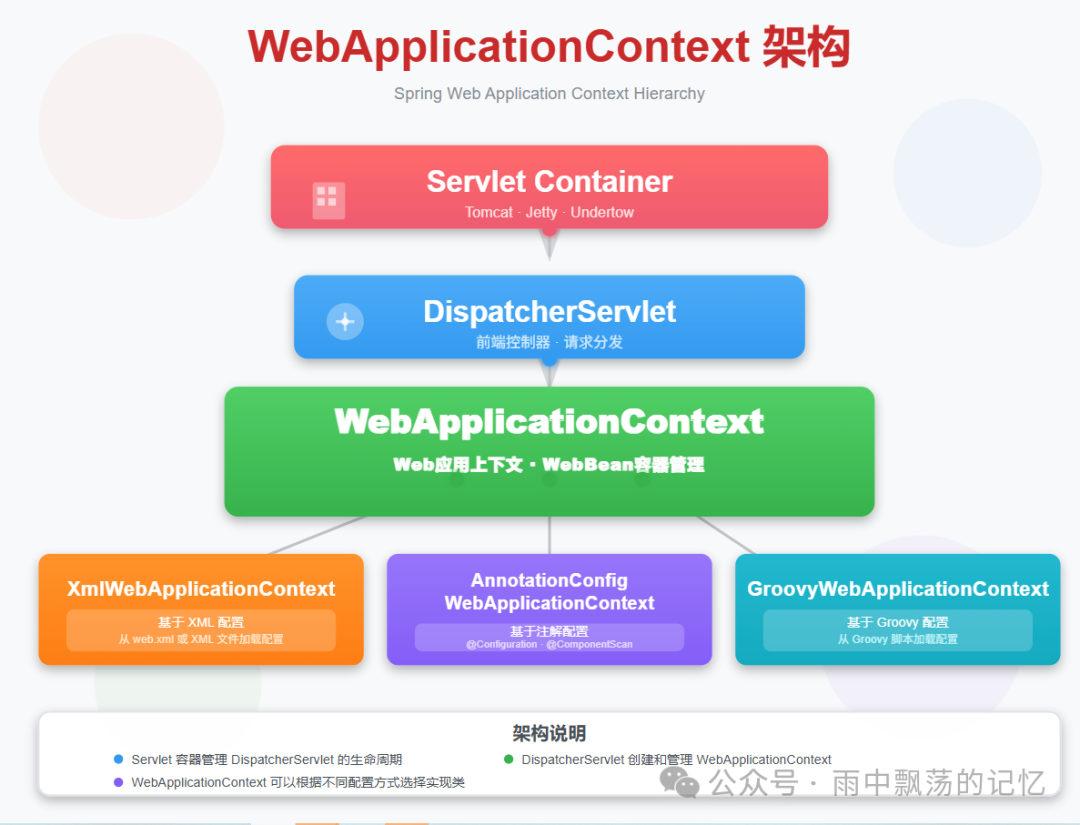
适用场景:
- 所有的 Spring MVC 或 Spring WebFlux Web 应用程序。
- 需要与 Servlet 容器(如 Tomcat, Jetty)集成的项目。
- 开发企业级 Web 服务或网站。
核心特点:
- 继承自
ApplicationContext,专为 Web 环境设计。
- 提供了 Web 特有的功能,如
ServletContext 引用、请求和会话作用域的 Bean。
- 其生命周期与 Servlet 容器紧密绑定。
web.xml 配置示例(传统方式):
<!-- web.xml -->
<web-app xmlns="http://xmlns.jcp.org/xml/ns/javaee"
         xmlns:xsi="http://www.w3.org/2001/XMLSchema-instance"
         xsi:schemaLocation="http://xmlns.jcp.org/xml/ns/javaee
         http://xmlns.jcp.org/xml/ns/javaee/web-app_4_0.xsd"
         version="4.0">

    <!-- Spring 根上下文配置 -->
    <context-param>
        <param-name>contextConfigLocation</param-name>
        <param-value>
            /WEB-INF/spring/root-context.xml
            /WEB-INF/spring/app-config.xml
        </param-value>
    </context-param>

    <!-- 监听器,负责启动根WebApplicationContext -->
    <listener>
        <listener-class>org.springframework.web.context.ContextLoaderListener</listener-class>
    </listener>

    <!-- Spring MVC DispatcherServlet配置 -->
    <servlet>
        <servlet-name>dispatcher</servlet-name>
        <servlet-class>org.springframework.web.servlet.DispatcherServlet</servlet-class>
        <init-param>
            <param-name>contextConfigLocation</param-name>
            <param-value>/WEB-INF/spring/servlet-context.xml</param-value>
        </init-param>
        <load-on-startup>1</load-on-startup>
    </servlet>

    <servlet-mapping>
        <servlet-name>dispatcher</servlet-name>
        <url-pattern>/</url-pattern>
    </servlet-mapping>
</web-app>
Servlet 集成示例:
// 使用注解的Spring MVC控制器(现代方式)
@Controller
@RequestMapping("/api")
public class ApiController {

    @Autowired
    private UserService userService;

    @GetMapping("/users")
    @ResponseBody
    public List<User> getUsers() {
        return userService.getAllUsers();
    }
}
生产环境实战:微服务架构中的 Spring Context
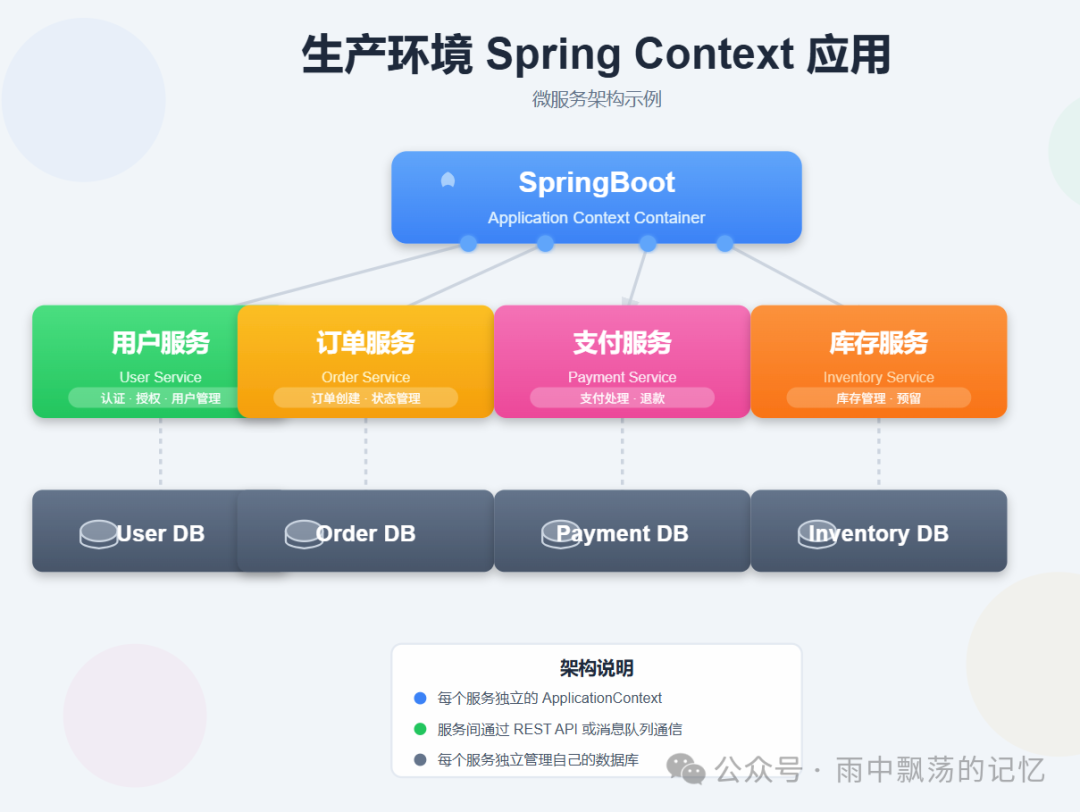
在 微服务架构 中,每个独立的服务都拥有自己专属的 ApplicationContext。这种设计带来了清晰的边界和独立的生命周期管理。
微服务集成示例
// 用户服务配置与启动类
@Configuration
@EnableEurekaClient
@ComponentScan("com.example.user")
public class UserServiceProvider {
    public static void main(String[] args) {
        SpringApplication.run(UserServiceProvider.class, args);
    }
}

// 订单服务配置与启动类
@Configuration
@EnableEurekaClient
@ComponentScan("com.example.order")
public class OrderServiceProvider {
    public static void main(String[] args) {
        SpringApplication.run(OrderServiceProvider.class, args);
    }
}
Spring Boot 与 Spring Cloud 整合
@SpringBootApplication
@EnableDiscoveryClient
@EnableCircuitBreaker
public class MicroserviceApplication {

    public static void main(String[] args) {
        SpringApplication.run(MicroserviceApplication.class, args);
    }

    @Bean
    public WebApplicationContext webApplicationContext() {
        return new AnnotationConfigWebApplicationContext();
    }
}

// 服务实现类,展示了服务间调用和熔断
@Service
public class OrderServiceImpl implements OrderService {

    @Autowired
    private UserClient userClient;

    @Autowired
    private PaymentClient paymentClient;

    @HystrixCommand(fallbackMethod = "createOrderFallback")
    @Override
    public Order createOrder(OrderDTO orderDTO) {
        // 1. 调用用户服务检查用户
        User user = userClient.getUser(orderDTO.getUserId());
        // 2. 调用库存服务检查库存...
        // 3. 调用支付服务处理支付...
        return orderRepository.save(order);
    }

    public Order createOrderFallback(OrderDTO orderDTO) {
        // 服务降级处理逻辑
        Order order = new Order();
        order.setStatus("FAILED");
        return order;
    }
}
性能优化与最佳实践
1. 上下文加载优化
避免一次性加载所有重量级 Bean,使用 @Lazy 注解实现延迟初始化。
@Configuration
public class OptimizedConfig {

    @Lazy // 只有第一次被请求时才会初始化
    @Bean
    public HeavyService heavyService() {
        return new HeavyService();
    }
}
2. 作用域与代理模式
对于有状态的 Bean(如会话作用域),正确使用代理模式以确保注入一致性。
@Bean
@Scope(value = WebApplicationContext.SCOPE_SESSION,
       proxyMode = ScopedProxyMode.TARGET_CLASS)
public UserPreferences userPreferences() {
    return new UserPreferences();
}
3. 多环境配置
利用 Spring Profiles 实现开发、测试、生产环境的配置隔离。
application-dev.properties
spring.datasource.url=jdbc:mysql://dev-db:3306/mydb
spring.datasource.username=dev_user
application-prod.properties
spring.datasource.url=jdbc:mysql://prod-db:3306/mydb
spring.datasource.username=${PROD_DB_USER}
启动时激活环境
java -jar app.jar --spring.profiles.active=prod
总结
四种主要的 ApplicationContext 实现各司其职,服务于不同的技术时代和项目需求:
- AnnotationConfigApplicationContext - 现代 Spring 及 Spring Boot 应用的绝对主力,Java 配置的首选。
- ClassPathXmlApplicationContext - 传统项目的基石,维护大量 XML 配置时的可靠选择。
- FileSystemXmlApplicationContext - 实现配置外部化、适应动态部署的灵活方案。
- WebApplicationContext - 所有 Spring Web 应用的专用容器,与 Servlet 环境深度集成。
理解并熟练运用不同的 ApplicationContext,是掌握 Spring 框架的关键。在实际项目中,应根据团队技术栈、项目历史和维护需求做出明智选择,并结合性能优化与多环境配置等最佳实践,才能构建出高效、稳定的 Spring 应用。希望这篇深入解析能帮助你在 Spring 开发道路上更加得心应手。更多深入的架构讨论和技术分享,欢迎在 云栈社区 与广大开发者交流探讨。
 发表于 2026-1-21 11:26:51
|
查看: 184|
回复: 0
发表于 2026-1-21 11:26:51
|
查看: 184|
回复: 0
