想要快速上手,在 Java 生态中构建功能丰富的 AI 应用吗?本文将带你使用 Spring Boot 3.5.9、JDK 21 以及 Spring AI Alibaba 1.1.2,从零开始,逐步实现一个集成了基础对话、会话记忆、结构化输出、工具调用和 RAG(检索增强生成)的完整 AI 应用。我们将以阿里百炼作为大模型服务,让你一站式体验企业级 AI 集成的核心功能。
一、技术栈
- Spring Boot 3.5.9
- JDK 21
- Spring AI 1.1.2
- 阿里百炼
二、项目创建与配置
-
创建Spring Boot项目
使用 Maven 构建,以下是 pom.xml 的核心依赖配置:
<?xml version="1.0" encoding="UTF-8"?>
<project xmlns="http://maven.apache.org/POM/4.0.0" xmlns:xsi="http://www.w3.org/2001/XMLSchema-instance"
     xsi:schemaLocation="http://maven.apache.org/POM/4.0.0 https://maven.apache.org/xsd/maven-4.0.0.xsd">
    <modelVersion>4.0.0</modelVersion>
    <parent>
        <groupId>org.springframework.boot</groupId>
        <artifactId>spring-boot-starter-parent</artifactId>
        <version>3.5.10</version>
        <relativePath/> <!-- lookup parent from repository -->
    </parent>
    <groupId>com.example</groupId>
    <artifactId>springai</artifactId>
    <version>0.0.1-SNAPSHOT</version>
    <name>springai</name>
    <description>springai</description>
    <url/>
    <licenses>
        <license/>
    </licenses>
    <developers>
        <developer/>
    </developers>
    <scm>
        <connection/>
        <developerConnection/>
        <tag/>
        <url/>
    </scm>
    <properties>
        <java.version>21</java.version>
        <spring-ai.version>1.1.2</spring-ai.version>
    </properties>
    <dependencies>
        <dependency>
            <groupId>org.springframework.boot</groupId>
            <artifactId>spring-boot-starter-web</artifactId>
        </dependency>
        <!-- Spring AI Alibaba Agent Framework -->
        <dependency>
            <groupId>com.alibaba.cloud.ai</groupId>
            <artifactId>spring-ai-alibaba-agent-framework</artifactId>
            <version>1.1.0.0</version>
        </dependency>
        <!-- DashScope ChatModel 支持 -->
        <dependency>
            <groupId>com.alibaba.cloud.ai</groupId>
            <artifactId>spring-ai-alibaba-starter-dashscope</artifactId>
            <version>1.1.0.0</version>
        </dependency>
        <dependency>
            <groupId>org.springframework.ai</groupId>
            <artifactId>spring-ai-starter-vector-store-milvus</artifactId>
        </dependency>
        <dependency>
            <groupId>org.projectlombok</groupId>
            <artifactId>lombok</artifactId>
            <optional>true</optional>
        </dependency>
        <dependency>
            <groupId>org.springframework.boot</groupId>
            <artifactId>spring-boot-starter-test</artifactId>
            <scope>test</scope>
        </dependency>
    </dependencies>
    <dependencyManagement>
        <dependencies>
            <dependency>
                <groupId>org.springframework.ai</groupId>
                <artifactId>spring-ai-bom</artifactId>
                <version>${spring-ai.version}</version>
                <type>pom</type>
                <scope>import</scope>
            </dependency>
        </dependencies>
    </dependencyManagement>

    <build>
        <plugins>
            <plugin>
                <groupId>org.apache.maven.plugins</groupId>
                <artifactId>maven-compiler-plugin</artifactId>
                <configuration>
                    <annotationProcessorPaths>
                        <path>
                            <groupId>org.projectlombok</groupId>
                            <artifactId>lombok</artifactId>
                        </path>
                    </annotationProcessorPaths>
                </configuration>
            </plugin>
            <plugin>
                <groupId>org.springframework.boot</groupId>
                <artifactId>spring-boot-maven-plugin</artifactId>
                <configuration>
                    <excludes>
                        <exclude>
                            <groupId>org.projectlombok</groupId>
                            <artifactId>lombok</artifactId>
                        </exclude>
                    </excludes>
                </configuration>
            </plugin>
        </plugins>
    </build>

</project>
-
配置application.yml
接下来,配置 application.yml 文件,填入从阿里百炼平台获取的 API Key。
spring:
  application:
    name: spring ai
  ai:
    dash-scope:
      api-key: 你的api key
三、第一个AI对话接口
让我们从一个最简单的对话接口开始。
首先,创建控制器 ChatController:
package com.example.springai.controller;

import com.example.springai.service.ChatService;
import org.springframework.web.bind.annotation.GetMapping;
import org.springframework.web.bind.annotation.RequestParam;
import org.springframework.web.bind.annotation.RestController;

@RestController
public class ChatController {

    private final ChatService chatService ;

    public ChatController(ChatService chatService){
        this.chatService = chatService;
    }

    @GetMapping("/chat")
    public String chat(@RequestParam(value = "message", defaultValue = "你好") String message) {
        return chatService.chat(message);
    }
}
然后,创建服务层 ChatService,通过 ChatClient 调用大模型:
package com.example.springai.service;

import org.springframework.ai.chat.client.ChatClient;
import org.springframework.stereotype.Service;

@Service
public class ChatService {

    private static final String SYSTEM_PROMPT = """
            你是一个友好、专业的 AI 助手。
            用简洁、清晰、准确的语言回答用户问题。
            """;

    private final ChatClient chatClient;

    public ChatService(ChatClient.Builder chatClient){
        this.chatClient = chatClient
                .defaultSystem(SYSTEM_PROMPT)
                .build();
    }
    public String chat(String message){
        return chatClient.prompt()
                .user(message)
                .call()
                .content();
    }
}
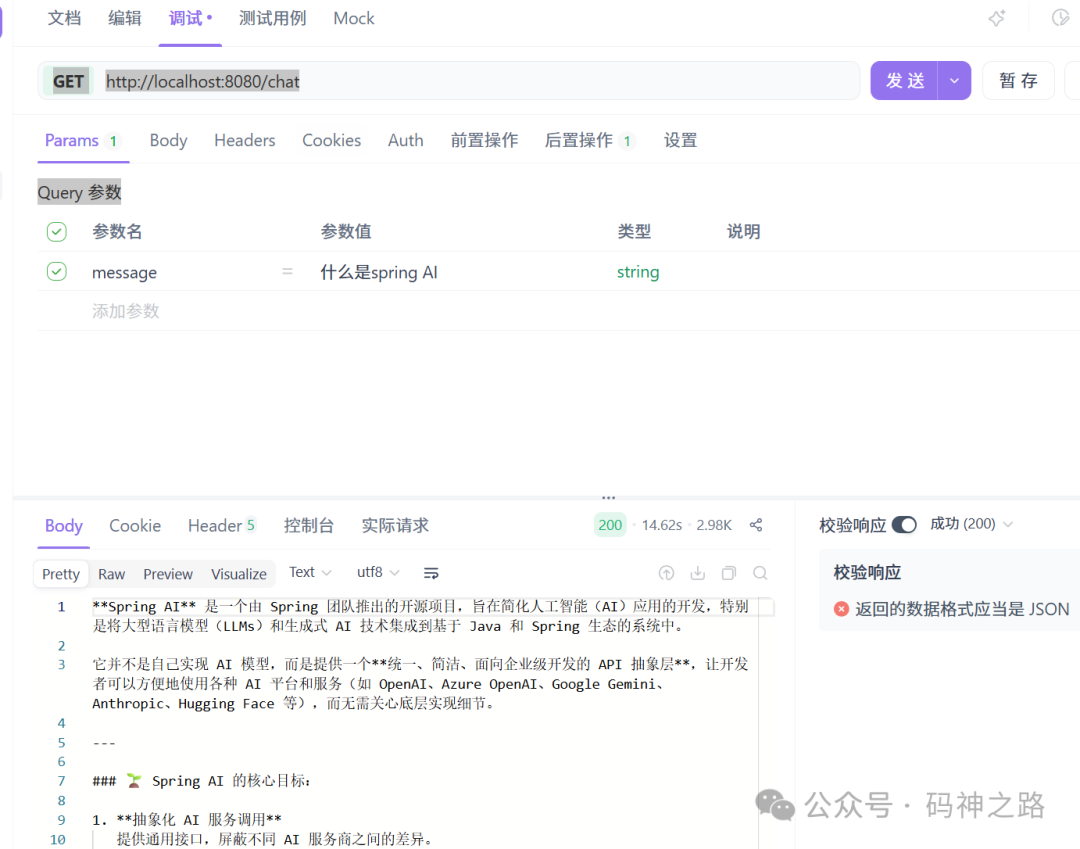
启动应用后,访问 GET http://localhost:8080/chat?message=什么是spring AI 进行测试。
四、实现会话记忆
为了让AI能记住上下文,我们需要引入会话记忆功能。首先添加依赖:
<dependency>
    <groupId>org.springframework.ai</groupId>
    <artifactId>spring-ai-autoconfigure-model-chat-memory</artifactId>
</dependency>
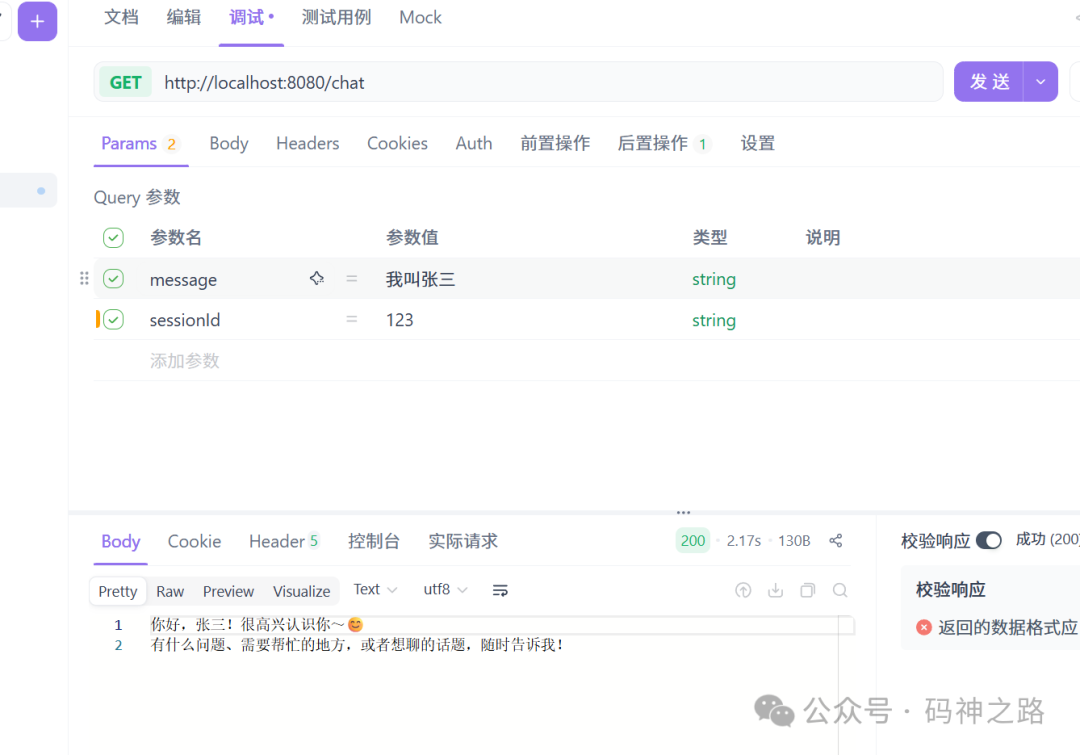
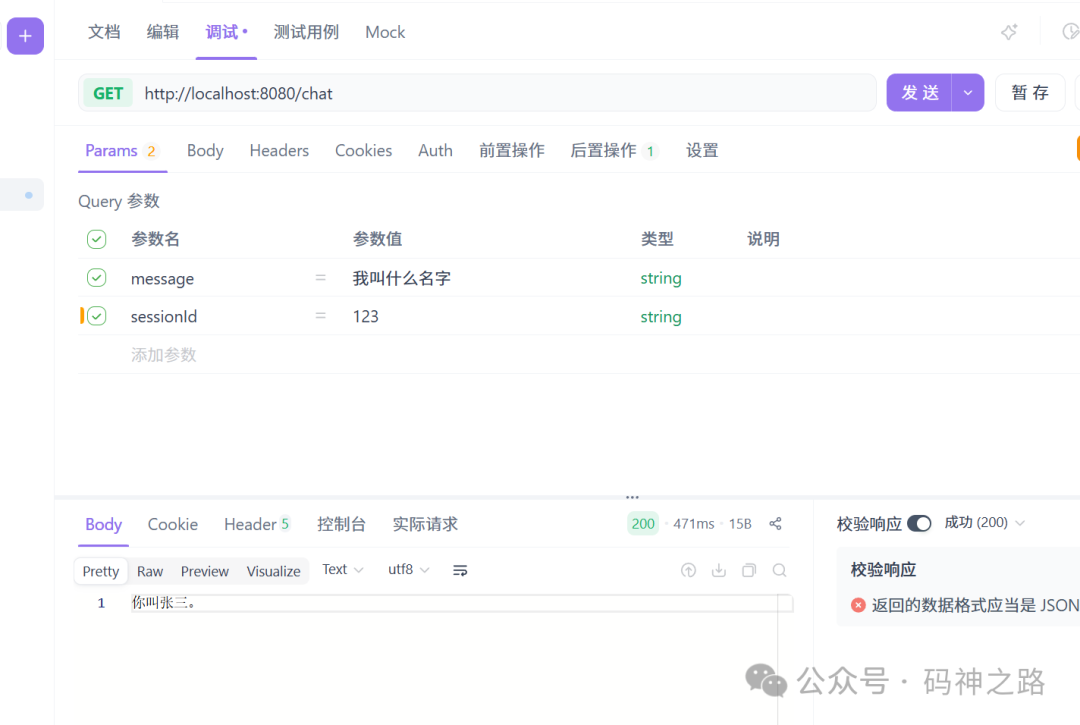
修改 ChatService,注入 ChatMemory 并通过 MessageChatMemoryAdvisor 启用记忆功能。注意,这里通过 sessionId 来区分不同的对话会话。
package com.example.springai.service;

import org.springframework.ai.chat.client.ChatClient;
import org.springframework.ai.chat.client.advisor.MessageChatMemoryAdvisor;
import org.springframework.ai.chat.memory.ChatMemory;
import org.springframework.stereotype.Service;

@Service
public class ChatService {

    private static final String SYSTEM_PROMPT = """
            你是一个友好、专业的 AI 助手。
            用简洁、清晰、准确的语言回答用户问题。
            """;

    private final ChatClient chatClient;

    public ChatService(ChatClient.Builder chatClient, ChatMemory chatMemory){
        this.chatClient = chatClient
                .defaultSystem(SYSTEM_PROMPT)
                .defaultAdvisors(MessageChatMemoryAdvisor.builder(chatMemory).build())
                .build();
    }
    public String chat(String message,String sessionId){
        return chatClient.prompt()
                .user(message)
                .advisors(advisorSpec -> advisorSpec.param(ChatMemory.CONVERSATION_ID,sessionId))
                .call()
                .content();
    }
}
控制器也需要修改,增加 sessionId 参数:
@GetMapping("/chat")
public String chat(@RequestParam String message, @RequestParam String sessionId) {
    return chatService.chat(message,sessionId);
}
现在,使用相同的 sessionId 进行连续对话,AI就能记住之前的信息了。
五、结构化输出
有时我们需要让AI返回结构化的数据,比如JSON对象。Spring AI可以轻松实现这一点。
首先,定义一个记录(Record)来表示期望的结构:
// 使用 @JsonPropertyOrder 指定生成JSON Schema中属性的顺序(可选)
@JsonPropertyOrder({ "title", "year", "genre", "rating" })
public record MovieRecord(
        String title,      // 电影标题
        Integer year,      // 上映年份
        String genre,      // 类型(如 "Sci-Fi", "Comedy")
        Double rating      // 评分(如 8.5)
){}
然后,在服务中创建一个方法,通过调用 .entity(MovieRecord.class) 直接获取结构化的对象:
public MovieRecord extractMovieWithChatClient(String userInput){
    return chatClient.prompt()
                .user(userInput)
                .call()
                .entity(MovieRecord.class); // 直接指定目标类型,自动处理Converter
    }
添加对应的控制器接口:
@GetMapping("/extract-movie")
public MovieRecord chat(@RequestParam String message) {
    return chatService.extractMovieWithChatClient(message);
}
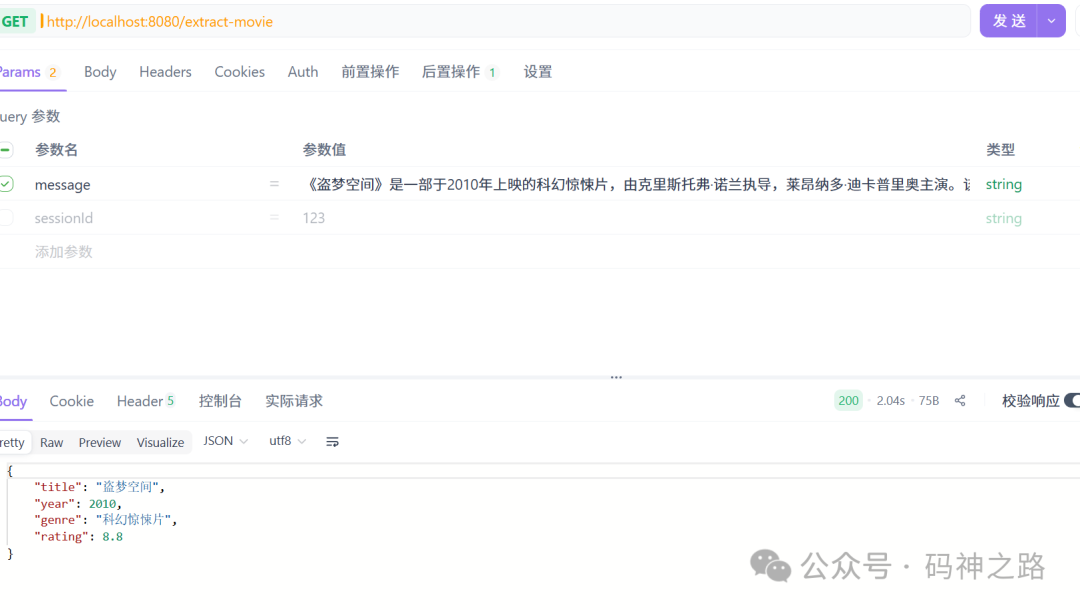
测试一下,输入一段包含电影信息的文本,看看AI是否能准确提取并返回结构化的JSON。
prompt:《盗梦空间》是一部于2010年上映的科幻惊悚片,由克里斯托弗·诺兰执导,莱昂纳多·迪卡普里奥主演。该片获得了广泛好评,IMDb评分高达8.8分。
六、工具调用(Function Calling)
让AI不仅能说,还能“做”事,这就是工具调用的魅力。我们来定义两个简单的工具:获取当前时间和设置闹钟。
首先,创建一个工具类 AssistantTools:
package com.example.springai.tools;

import org.springframework.ai.tool.annotation.Tool;
import org.springframework.ai.tool.annotation.ToolParam;
import org.springframework.stereotype.Component;

import java.time.LocalDateTime;
import java.time.ZoneId;
import java.time.format.DateTimeFormatter;
import java.util.Map;
import java.util.concurrent.ConcurrentHashMap;

@Component
public class AssistantTools {

    // 模拟一个简单的内存存储,用于记录设置的闹钟
    private final Map<String, String> alarms = new ConcurrentHashMap<>();

    /**
     * 工具1: 获取当前日期和时间 (信息检索)
     */
    @Tool(description = "获取当前用户时区的日期和时间")
    public String getCurrentDateTime(){
        return LocalDateTime.now().atZone(ZoneId.systemDefault()).toString();
    }

    /**
     * 工具2: 设置闹钟 (执行操作)
     */
    @Tool(description = "为用户设置一个闹钟。时间必须以ISO-8601格式提供,例如 '2024-01-01T12:00:00'")
    public void setAlarm(
            @ToolParam(description = "设置闹钟的时间,格式为ISO-8601,例如 '2024-01-01T12:00:00'") String time
    ) {
        LocalDateTime alarmTime = LocalDateTime.parse(time, DateTimeFormatter.ISO_LOCAL_DATE_TIME);
        System.out.println(">>> 闹钟已设置: " + alarmTime);
        // 在实际应用中,这里可以调用你的定时任务服务或数据库操作
        alarms.put("alarm", alarmTime.toString());
    }
}
接着,创建一个新的 ToolService,在构建 ChatClient 时通过 .defaultTools() 注册我们的工具:
package com.example.springai.service;

import com.example.springai.tools.AssistantTools;
import org.springframework.ai.chat.client.ChatClient;
import org.springframework.stereotype.Service;

@Service
public class ToolService {
    private static final String SYSTEM_PROMPT = """
            你是一个友好、专业的 AI 助手。
            用简洁、清晰、准确的语言回答用户问题,。
            如果遇到需要调用工具解决的,你也会利用工具解决问题。
            """;
    private final ChatClient chatClient;

    public ToolService(ChatClient.Builder chatClient, AssistantTools assistantTools){
        this.chatClient = chatClient
                .defaultSystem(SYSTEM_PROMPT)
                .defaultTools(assistantTools)
                .build();
    }
    public String chat(String message){
        return chatClient.prompt()
                .user(message)
                .call()
                .content();
    }
}
添加控制器接口:
@GetMapping("/tool")
public String tool(@RequestParam String message) {
    return toolService.chat(message);
}
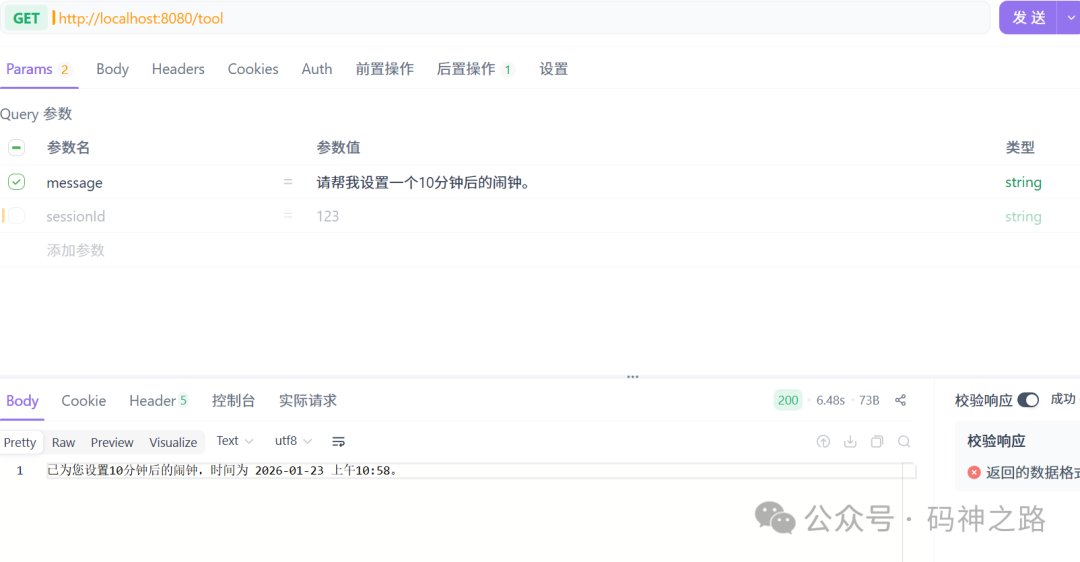
现在,当你请求“请帮我设置一个10分钟后的闹钟”时,AI会自动计算时间,并调用 setAlarm 工具。
七、RAG实战:构建基于私有知识的问答系统
RAG是当前增强大模型知识准确性的重要手段。我们将使用 Milvus 作为向量数据库,构建一个基于本地PDF文档的问答系统。
-
新增配置
首先,在 application.yml 中增加向量化和 Milvus 的配置。你需要准备阿里百炼的 Embedding API Key,并确保本地运行着 Milvus 服务。
spring:
  application:
    name: spring ai
  ai:
    dash-scope:
      api-key: xxx
    embedding:
      api-key: xxx
      options:
        model: text-embedding-v4
        dimensions: 1536
    vectors-tore:
      milvus:
        client:
          host: localhost
          port: 19530
          database-name: default
          collection-name: springAI
          initialize-schema: true
-
准备文档与依赖
在 src/main/resources/documents/ 目录下放入一些 PDF 文档(例如,Java学习笔记、公司内部文档等)。
添加处理 PDF 的依赖:
<dependency>
    <groupId>org.springframework.ai</groupId>
    <artifactId>spring-ai-pdf-document-reader</artifactId>
</dependency>
-
实现RAG服务
创建 RagService。它会在应用启动时自动将 PDF 文档分块、向量化并存储到 Milvus。当用户提问时,它会先从向量库中检索相关文档片段,再结合这些上下文信息让大模型生成答案。
package com.example.springai.service;

import jakarta.annotation.PostConstruct;
import org.springframework.ai.chat.client.ChatClient;
import org.springframework.ai.document.Document;
import org.springframework.ai.reader.pdf.PagePdfDocumentReader;
import org.springframework.ai.reader.pdf.config.PdfDocumentReaderConfig;
import org.springframework.ai.transformer.splitter.TokenTextSplitter;
import org.springframework.ai.vectorstore.SearchRequest;
import org.springframework.ai.vectorstore.milvus.MilvusVectorStore;
import org.springframework.beans.factory.annotation.Value;
import org.springframework.core.io.Resource;
import org.springframework.stereotype.Service;

import java.util.List;
import java.util.stream.Collectors;

@Service
public class RagService {

    @Value("${rag.system-prompt:你是一个专业的AI助手。请仅根据提供的【上下文信息】回答用户的问题,不要利用你的训练数据编造答案。如果上下文中不包含答案,请直接回答“不知道”。}")
    private String systemPrompt;
    private final MilvusVectorStore vectorStore;
    private final ChatClient chatClient;
    @Value("classpath:/documents/java.pdf")
    private Resource pdfResource;
    @Value("${app.embedding.batch-size:10}")
    private int batchSize;
    public RagService(MilvusVectorStore vectorStore, ChatClient.Builder chatClient){
        this.vectorStore = vectorStore;
        this.chatClient = chatClient.build();
    }
    /**
         应用启动后自动执行,将文档加载到 Milvus
         **/
    @PostConstruct
    public void loadDocuments(){
        System.out.println(">>> 开始加载文档到 Milvus...");

        try {
            // 1. 读取 PDF 文档
            PdfDocumentReaderConfig config = PdfDocumentReaderConfig.builder()
                    .withPageTopMargin(0)
                    .withPagesPerDocument(1) // 每页作为一个文档
                    .build();

            PagePdfDocumentReader reader = new PagePdfDocumentReader(pdfResource, config);
            List<Document> documents = reader.get();

            // 2. 文本分片
            // TokenTextSplitter 是基于 Token 的分割,能更精准控制长度,避免截断句子
            TokenTextSplitter splitter = new TokenTextSplitter();
            List<Document> splitDocuments = splitter.apply(documents);
            int totalBatches = (int) Math.ceil((double) splitDocuments.size() / batchSize);
            for (int i = 0; i < splitDocuments.size(); i += batchSize) {
                // 计算当前批次的结束索引,防止越界
                int end = Math.min(i + batchSize, splitDocuments.size());

                // 获取当前批次的子列表
                List<Document> batch = splitDocuments.subList(i, end);

                int currentBatchNum = (i / batchSize) + 1;
                System.out.println(">>> 正在处理第 [" + currentBatchNum + "/" + totalBatches + "] 批次,包含 " + batch.size() + " 个文档...");
                try {
                    // 3. 写入 Milvus
                    // vectorStore.add 会自动调用 EmbeddingModel 进行向量化并存入数据库
                    vectorStore.add(batch);
                } catch (Exception e) {
                    // 捕获单批次异常,避免整个流程中断,同时打印详细错误
                    System.err.println(">>> 第 [" + currentBatchNum + "] 批次写入失败: " + e.getMessage());
                    // 可选:如果希望任何错误都停止,这里可以使用 throw e;
                }
                // (可选) 如果遇到 429 Too Many Requests 错误,可以在这里加短暂延时
                // try { Thread.sleep(500); } catch (InterruptedException ignored) {}
            }
            System.out.println(">>> 文档加载完成!");
        } catch (Exception e) {
            System.err.println(">>> 文档加载失败: " + e.getMessage());
            // 生产环境建议抛出异常或记录日志
        }
    }
    /**
         * 执行 RAG 查询
         */
    public String query(String userQuery){
        // 1. 检索相关文档
        // SearchRequest 构建检索请求
        SearchRequest searchRequest = SearchRequest.builder()
                .query(userQuery)
                .topK(4) // 返回最相似的前 4 个片段
                .similarityThreshold(0.7d) // 相似度阈值,低于此值的过滤掉
                .build();
        List<Document> relevantDocs = vectorStore.similaritySearch(searchRequest);

        if (relevantDocs.isEmpty()) {
            return "对不起,我没有找到相关的信息。";
        }

        // 2. 构建上下文
        String context = relevantDocs.stream()
                .map(Document::getText)
                .collect(Collectors.joining("\n\n------------------\n\n"));

        // 3. 调用 LLM 生成回答
        // 使用 ChatClient 流式 API,体验更好
        return chatClient.prompt()
                .system(systemPrompt)
                .user(u -> u.text("""
                        上下文信息:
                        {context}

                        用户问题:
                        {question}
                        """)
                        .param("context", context)
                        .param("question", userQuery))
                .call()
                .content();
    }
}
-
添加查询接口
最后,提供一个简单的 REST 接口来触发 RAG 查询:
@GetMapping("/rag")
public String rag(@RequestParam String message) {
    return ragService.query(message);
}
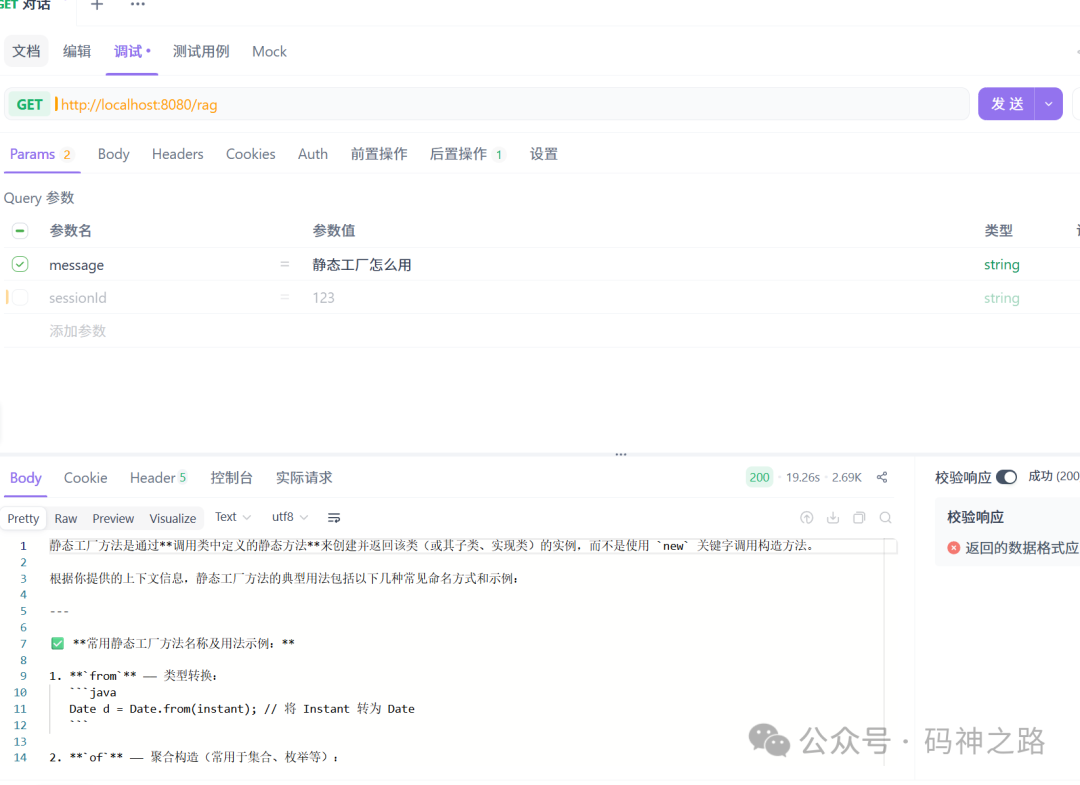
现在,你可以向 /rag 接口提问,AI 会基于你提供的 PDF 文档内容进行回答。这种技术在构建企业知识库、智能客服等场景中非常有用。
总结与拓展
通过以上步骤,我们已经使用 Spring Boot 3 和 Spring AI Alibaba 实现了一个包含多种核心 人工智能 功能的应用程序。Spring AI 的抽象层极大简化了集成流程,而其模块化设计让你可以灵活选择所需功能。
本文涵盖的只是 Spring AI 能力的冰山一角。它还包括更复杂的智能体(Agent)编排、多种模型供应商支持、以及与其他 Spring 生态项目的深度集成。如果你想深入探索,可以参考以下官方资源:
希望这篇实战指南能帮助你快速上手,在 Java 和 Spring 生态中开启你的 AI 应用开发之旅。欢迎在云栈社区交流更多开发心得。
 发表于 2026-1-25 03:05:21
|
查看: 190|
回复: 0
发表于 2026-1-25 03:05:21
|
查看: 190|
回复: 0
