此篇文章介绍 Azure Kubernetes Service(即 Azure AKS)服务的完整落地实践,涵盖集群创建、网络模型理解、应用暴露、Ingress-nginx 部署、证书自动化管理(cert-manager + Cloudflare DNS01)、内部负载均衡改造,以及最终通过 Application Gateway Ingress Controller(AGIC)实现生产级 HTTPS 流量路由。全过程基于真实 Azure 门户操作与 kubectl/helm 命令验证,适配 Azure CNI 网络模型与 West Europe 区域环境。
1. 创建 Azure AKS 集群
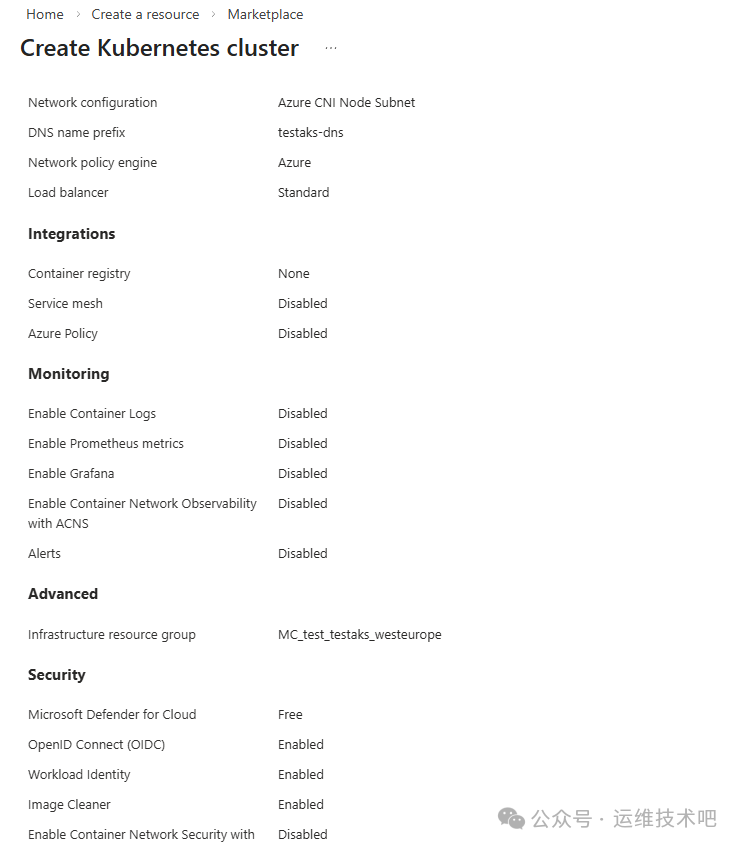
在 Azure 门户中,通过 Create a resource → Marketplace → Kubernetes service 启动集群创建流程。关键配置如下:
- Subscription:
starttech
- Resource group:
test
- Region:
West Europe
- Cluster name:
testaks
- Kubernetes version:
1.33.7(LTS 版本,兼顾稳定性与新特性)
- Node pools: 1 个默认节点池,禁用虚拟节点与自动扩缩容
- Network configuration: 默认
Azure CNI Node Subnet(Pod 与 Node 共享同一 VNet 子网)

后续进入 Networking 配置页,确认网络策略引擎为 Azure,Load Balancer 类型为 Standard,DNS 名称前缀为 testaks-dns。
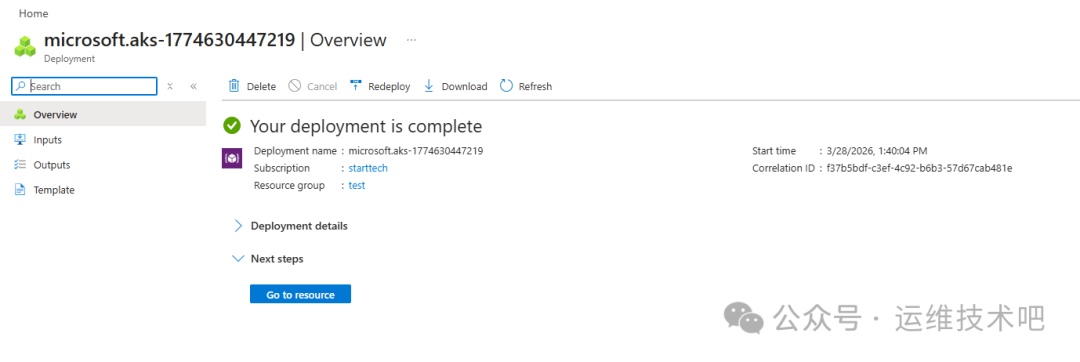
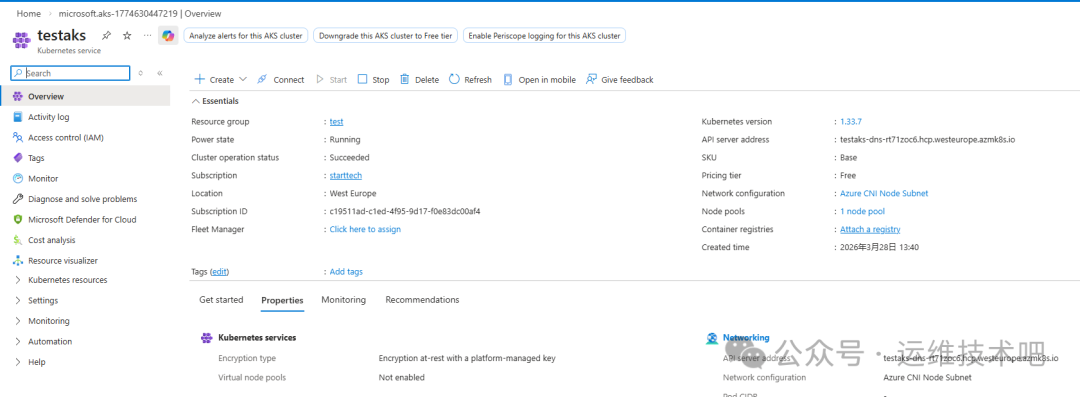
点击 Review + create 完成校验后部署。部署成功后跳转至资源概览页,状态显示 Your deployment is complete,集群运行状态为 Running,操作状态为 Succeeded。
集群仪表盘显示关键元数据:
- 资源组:
test
- 位置:
West Europe
- Kubernetes 版本:
1.33.7
- API 服务器地址:
testaks-dns-r7f1zoc6.hcp.westeurope.azmk8s.io
- SKU:
Base,定价层级:Free
2. 理解 AKS 网络模型与资源拓扑
由于创建时未指定已有虚拟网络(VNet),Azure 自动创建配套资源:
- 虚拟网络:
aks-vnet-31772138
- 子网:
aks-subnet(CIDR: 10.224.0.0/16)
- 负载均衡器:
kubernetes(Public IP 类型)
- 网络安全组、VM、磁盘、网络接口等一并生成
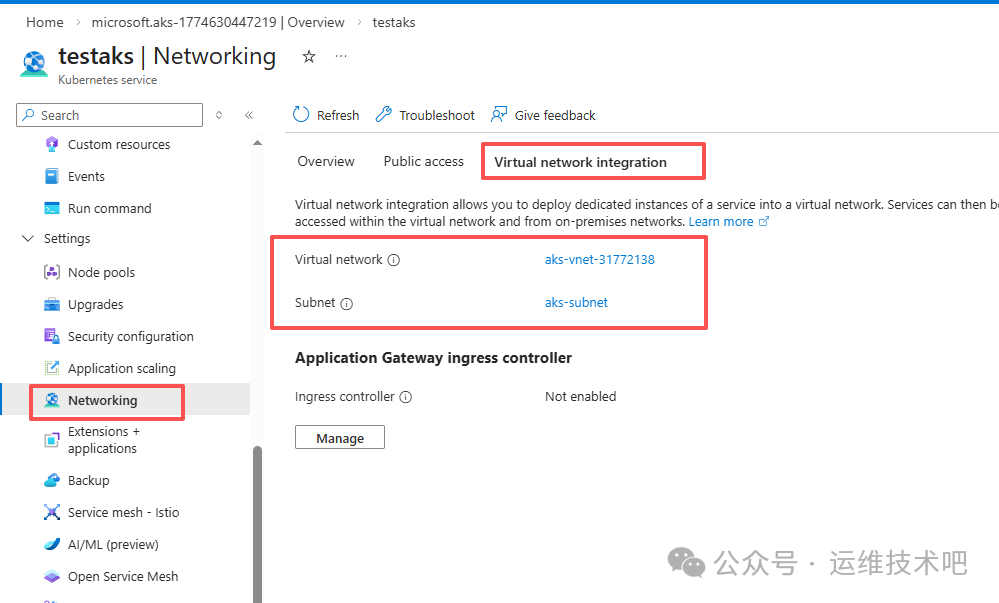
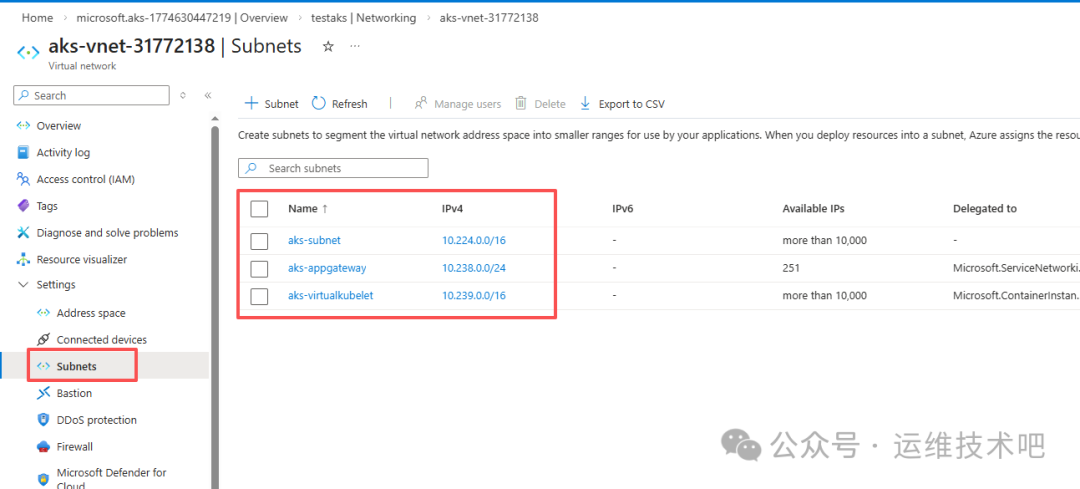
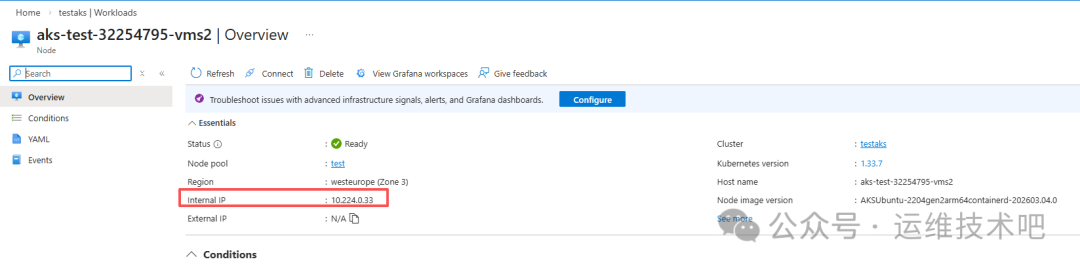
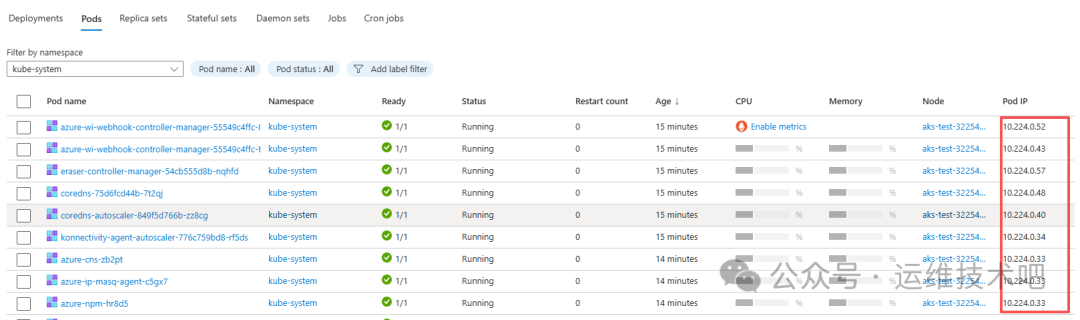
该集群采用 Azure CNI Node Subnet 模式,意味着 Pod IP 与 Node IP 处于同一 VNet 地址空间(如 10.224.0.0/16)。这种设计带来高性能直连,但也要求提前规划子网容量——若业务增长导致 Pod 数量激增,需确保子网 CIDR 足够容纳所有 Node + Pod IP。
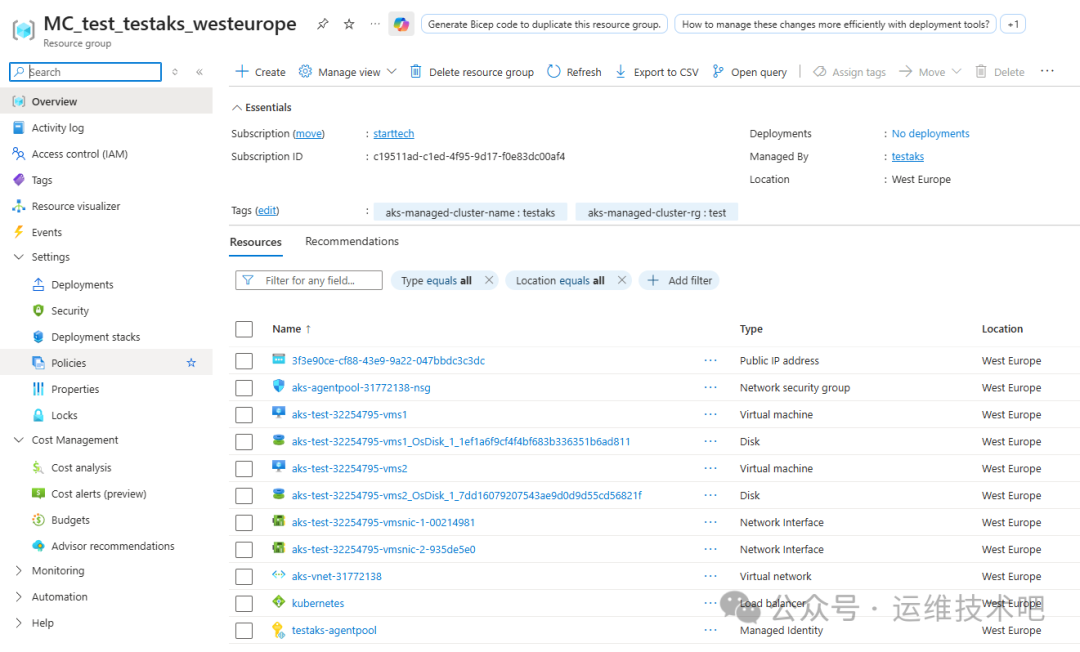
查看资源组 MC_test_testaks_westeurope 可见 Azure 自动生成的底层资源,包括:
- 公共 IP 地址(
kubernetes LB 使用)
- 网络安全组(
aks-agentpool-31772138-nsg)
- 虚拟机(
aks-test-32254795-vms1/vms2)
- 虚拟网络(
aks-vnet-31772138)
- 负载均衡器(
kubernetes)
3. 获取 AKS 集群 kubeconfig 并验证连接
为脱离 Azure 门户进行命令行操作,需获取集群认证凭据:
[root@k8sworker ~]# az login
[root@k8sworker ~]# az account set --subscription "starttech"
[root@k8sworker ~]# az aks get-credentials --resource-group test --name testaks
Merged "testaks" as current context in /root/.kube/config
验证节点状态:
[root@k8sworker ~]# kubectl get nodes
NAME                         STATUS   ROLES    AGE   VERSION
aks-test-32254795-vms1       Ready    <none>   25m   v1.33.7
aks-test-32254795-vms2       Ready    <none>   25m   v1.33.7
4. 部署应用并通过 LoadBalancer Service 暴露
4.1 部署 Nginx Deployment
# nginx-deploy.yaml
apiVersion: apps/v1
kind: Deployment
metadata:
  name: nginx
  namespace: default
  labels:
    app: nginx
spec:
  replicas: 1
  selector:
    matchLabels:
      app: nginx
  strategy:
    type: RollingUpdate
    rollingUpdate:
      maxSurge: 25%
      maxUnavailable: 25%
  template:
    metadata:
      labels:
        app: nginx
    spec:
      containers:
      - name: nginx
        image: anolis-registry.cn-zhangjiakou.cr.aliyuncs.com/openanolis/nginx:1.14.1-8.6
        imagePullPolicy: IfNotPresent
        ports:
        - containerPort: 80
          protocol: TCP
        resources:
          requests:
            cpu: 250m
            memory: 256Mi
          limits:
            cpu: 500m
            memory: 512Mi
        livenessProbe:
          httpGet:
            path: /
            port: 80
          initialDelaySeconds: 30
          periodSeconds: 10
          timeoutSeconds: 5
          failureThreshold: 3
        readinessProbe:
          httpGet:
            path: /
            port: 80
          initialDelaySeconds: 5
          periodSeconds: 5
          timeoutSeconds: 3
          failureThreshold: 1
应用部署:
[root@k8sworker aks]# kubectl create -f nginx-deploy.yaml
deployment.apps/nginx created
[root@k8sworker aks]# kubectl get pod
NAME                        READY   STATUS    RESTARTS   AGE
nginx-68b45b8b47-s9dmr       1/1     Running   0          67s
4.2 创建 LoadBalancer Service
# nginx-svc.yaml
apiVersion: v1
kind: Service
metadata:
  name: nginx-service
spec:
  type: LoadBalancer
  selector:
    app: nginx
  ports:
  - protocol: TCP
    port: 80
    targetPort: 80
[root@k8sworker aks]# kubectl apply -f nginx-svc.yaml
service/nginx-service created
[root@k8sworker aks]# kubectl get svc
NAME TYPE CLUSTER-IP EXTERNAL-IP PORT(S) AGE
kubernetes ClusterIP 10.0.0.1 <none> 443/TCP 39m
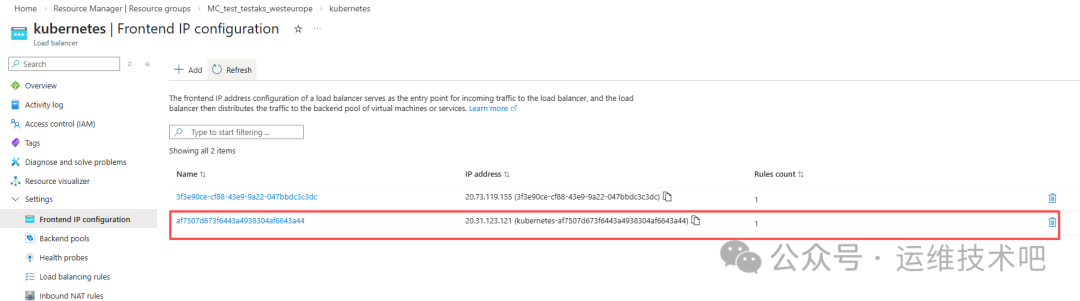
nginx-service LoadBalancer 10.0.169.185 20.31.123.121 80:32424/TCP 44s
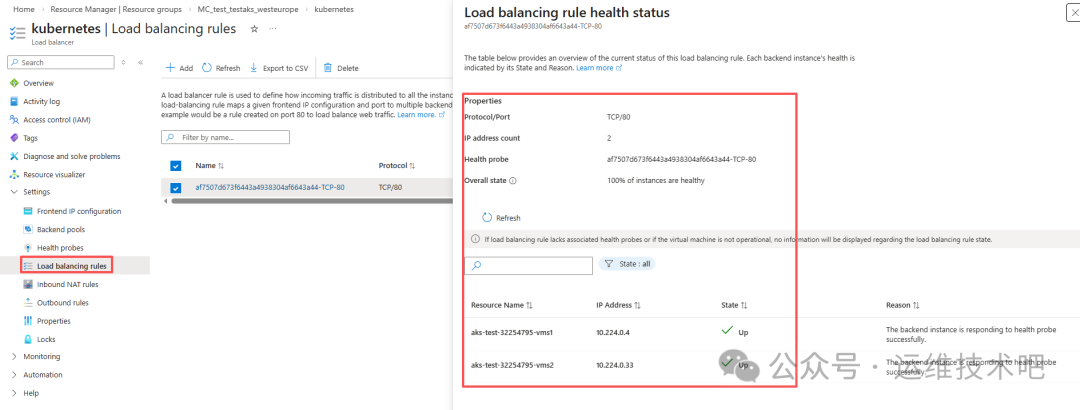
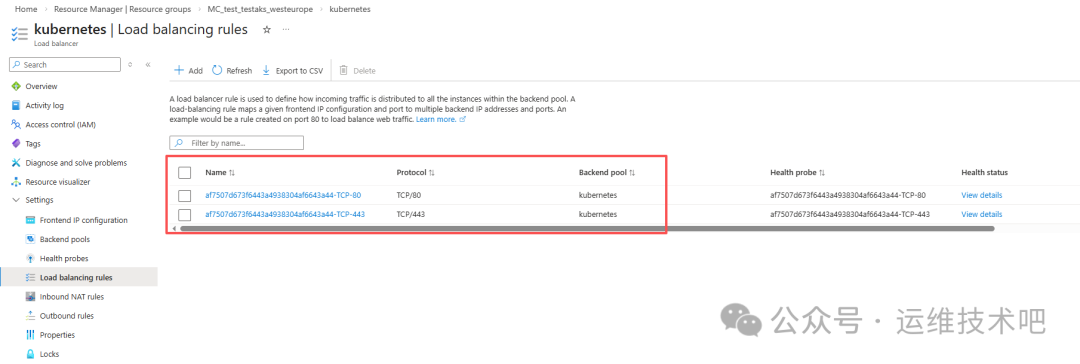
此时 Azure 自动分配公网 IP 20.31.123.121,并创建对应健康探针(TCP:80)与后端池规则。
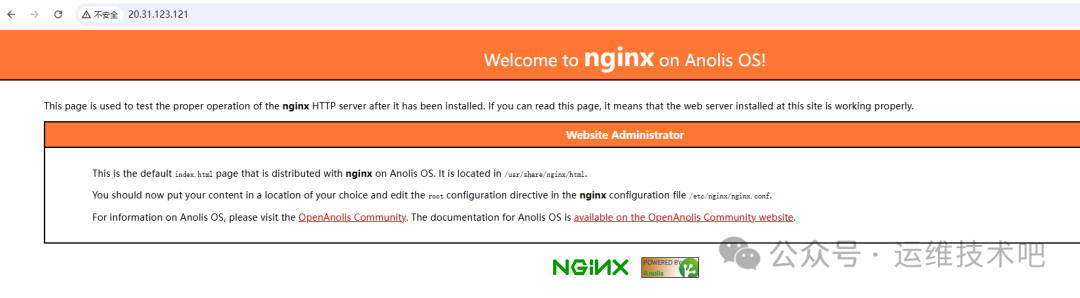
访问 http://20.31.123.121 可见 Nginx 欢迎页(Anolis OS 版本):
4.3 绑定自定义域名并启用 HTTPS
为支持 HTTPS,需扩展 Service 监听 443 端口:
# nginx-svc.yaml(更新版)
apiVersion: v1
kind: Service
metadata:
  name: nginx-service
spec:
  type: LoadBalancer
  selector:
    app: nginx
  ports:
  - name: http
    port: 80
    targetPort: 80
  - name: https
    port: 443
    targetPort: 443
[root@k8sworker aks]# kubectl apply -f nginx-svc.yaml
service/nginx-service configured
[root@k8sworker aks]# kubectl get svc
NAME            TYPE           CLUSTER-IP     EXTERNAL-IP     PORT(S)                          AGE
kubernetes      ClusterIP      10.0.0.1       <none>          443/TCP                          55m
nginx-service   LoadBalancer   10.0.169.185   20.31.123.121   80:32424/TCP,443:30811/TCP       16m
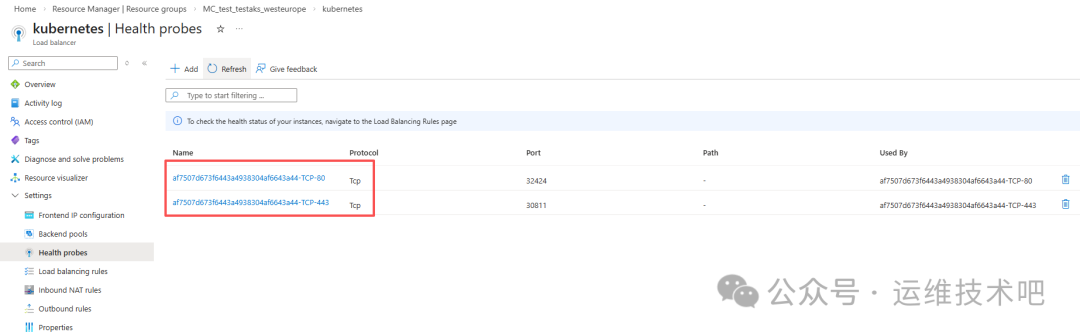
Azure 自动新增 TCP:443 健康探针与负载均衡规则:
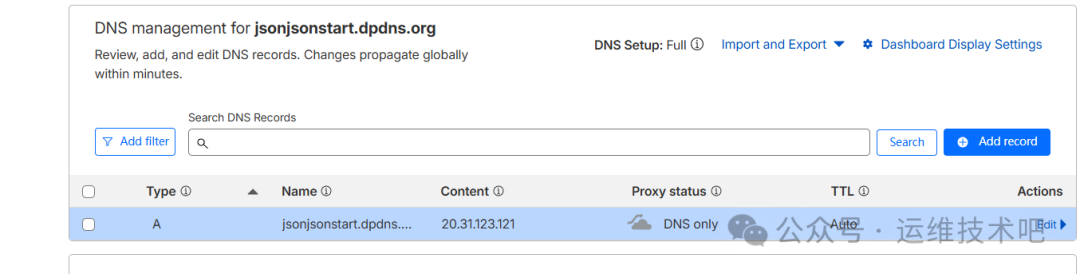
在 DNS 提供商(如 Cloudflare)为域名 jsonjsonstart.dpdns.org 添加 A 记录指向 20.31.123.121:
访问 http://jsonjsonstart.dpdns.org 成功,但 HTTPS 尚未生效(因无证书与 TLS 终止)。

5. 部署 ingress-nginx 并切换为 Internal LoadBalancer
5.1 安装 Helm 并部署 ingress-nginx
[root@k8sworker aks]# curl https://raw.githubusercontent.com/helm/helm/master/scripts/get-helm-3 | bash
[root@k8sworker aks]# helm version
version.BuildInfo{Version:"v3.20.1", GitCommit:"a2369ca71c0ef633bf6e4fccd66d634eb379b371", GitTreeState:"clean", GoVersion:"go1.25.8"}
[root@k8sworker aks]# helm install ingress-nginx ingress-nginx/ingress-nginx -n ingress-nginx --create-namespace
部署后检查资源:
[root@k8sworker aks]# kubectl -n ingress-nginx get all
NAME READY STATUS RESTARTS AGE
pod/ingress-nginx-controller-6797f4dc8c-wtxbv 1/1 Running 0 64s
NAME TYPE CLUSTER-IP EXTERNAL-IP PORT(S) AGE
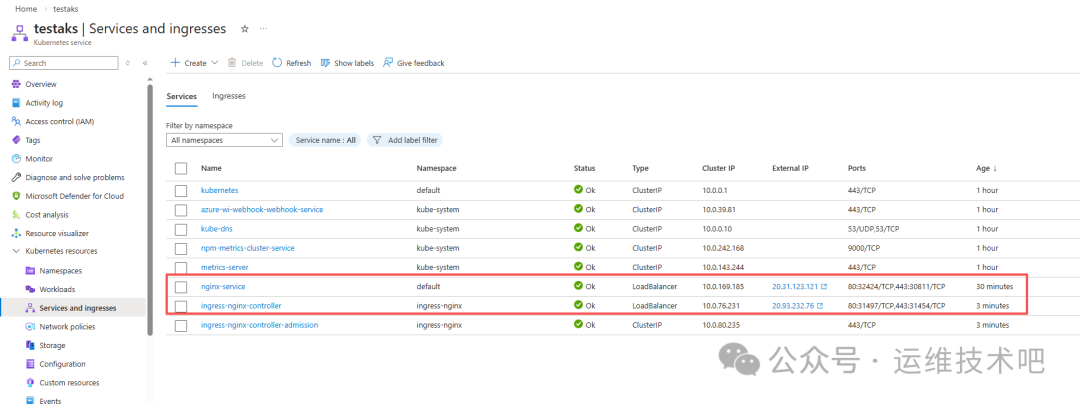
service/ingress-nginx-controller LoadBalancer 10.0.76.231 20.93.232.76 80:31497/TCP,443:31454/TCP 65s
service/ingress-nginx-controller-admission ClusterIP 10.0.80.235 <none> 443/TCP 65s
NAME READY UP-TO-DATE AVAILABLE AGE
deployment.apps/ingress-nginx-controller 1/1 1 1 66s
NAME DESIRED CURRENT READY AGE
replicaset.apps/ingress-nginx-controller-6797f4dc8c 1 1 1 66s
5.2 修改 Service 为 Internal LoadBalancer
默认 ingress-nginx-controller Service 是 Public 类型。为增强安全性并配合后续 AGIC 架构,需将其改为 Internal(Private)IP:
编辑 Service YAML,在 metadata.annotations 中添加:
service.beta.kubernetes.io/azure-load-balancer-internal: "true"

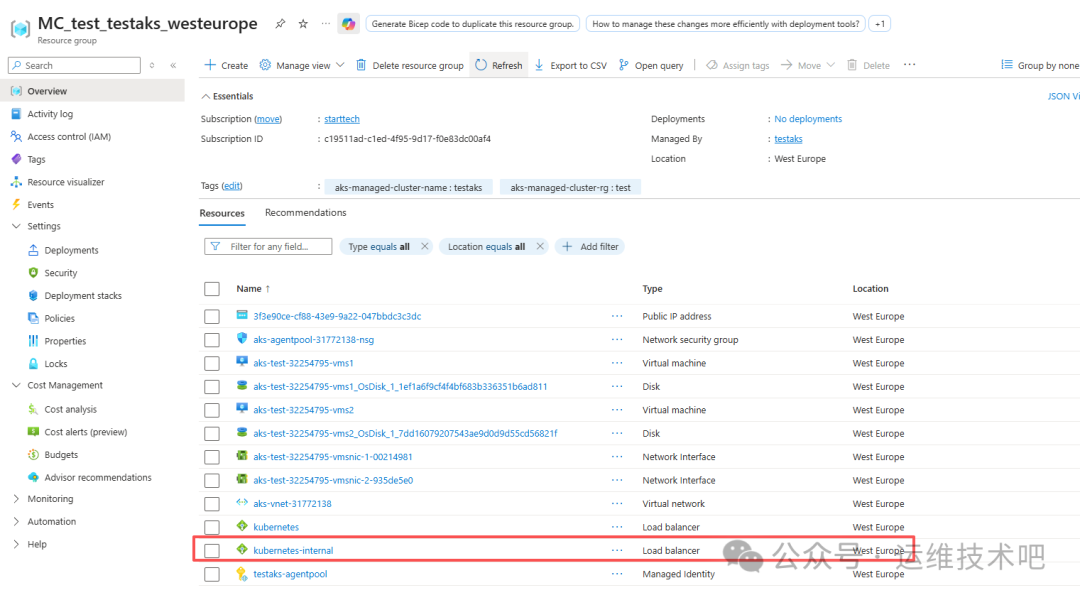
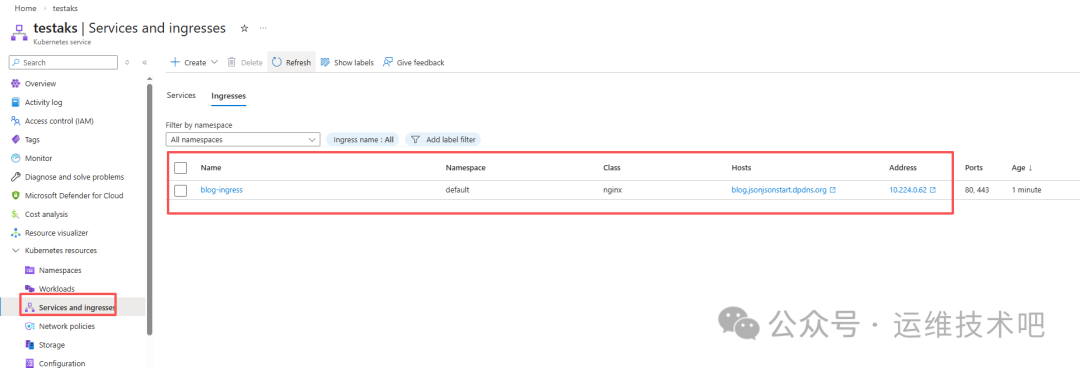
刷新后可见 External IP 已变为 Internal IP(如 10.224.0.62):
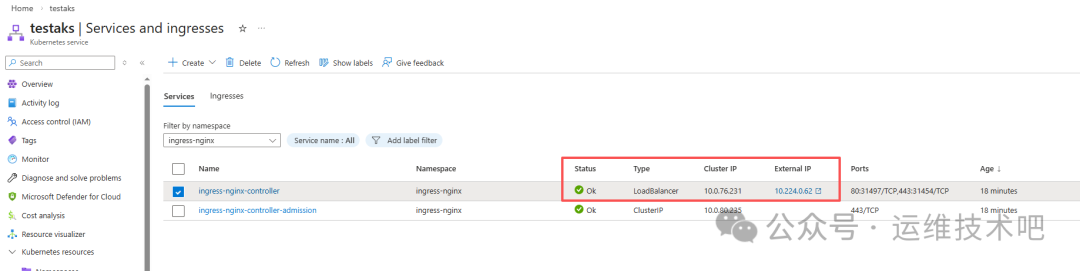
该 Internal IP 属于 MC_test_testaks_westeurope 资源组下的 kubernetes-internal 负载均衡器:
6. 部署 cert-manager + Cloudflare DNS01 实现自动证书签发
6.1 安装 cert-manager
[root@k8sworker aks]# helm repo add jetstack https://charts.jetstack.io
"jetstack" has been added to your repositories
[root@k8sworker aks]# helm install cert-manager jetstack/cert-manager --namespace cert-manager --create-namespace --version v1.14.0 --set installCRDs=true
验证安装:
[root@k8sworker aks]# kubectl get pods -n cert-manager
NAME                                       READY   STATUS    RESTARTS   AGE
cert-manager-7cd8b77b5-p2nj5               1/1     Running   0          51s
cert-manager-cainjector-86db5d9886-kmb4f   1/1     Running   0          51s
cert-manager-webhook-6d4778b87b-4ff6f      1/1     Running   0          51s
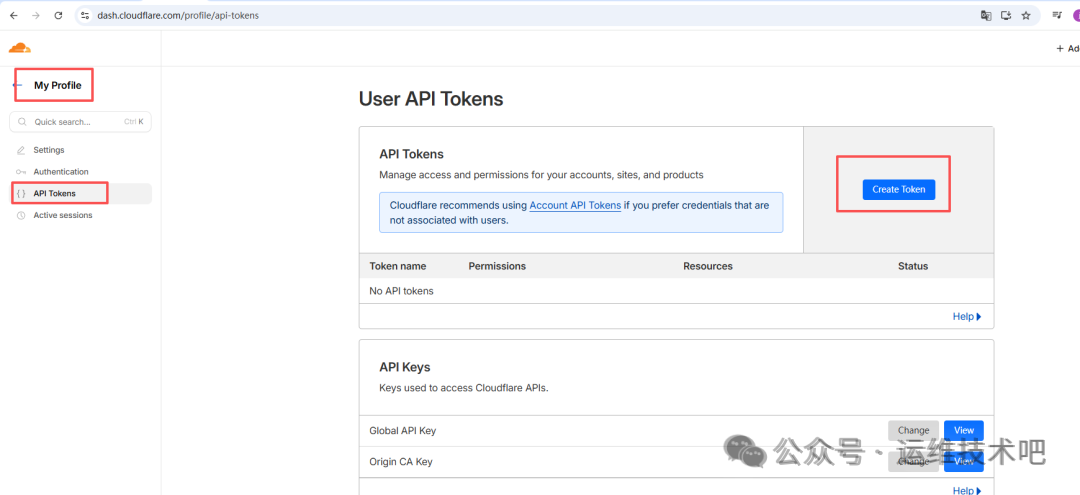
6.2 配置 Cloudflare API Token
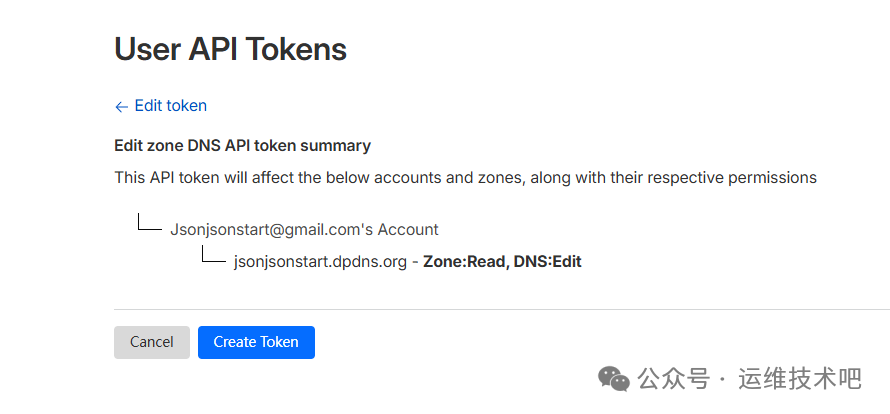
在 Cloudflare 控制台创建具有 Zone:Read 和 Zone:DNS:Edit 权限的 API Token:
创建 Kubernetes Secret:
[root@k8sworker aks]# kubectl create secret generic cloudflare-api-token --from-literal=api-token="cfut_xlaD5nCoMU7t" -n cert-manager
secret/cloudflare-api-token created
⚠️ 注意:示例 Token 不完整,实际请使用 Cloudflare 控制台生成的完整密钥。
验证 Secret:
[root@k8sworker aks]# kubectl get secret -n cert-manager
NAME                         TYPE     DATA   AGE
cert-manager-webhook-ca      Opaque   3      9m8s
cloudflare-api-token         Opaque   1      48s
sh.helm.release.v1.cert-manager.v1  helm.sh/release.v1  1  9m21s
6.3 创建 ClusterIssuer 与 Certificate
cluster-issuer.yaml:
apiVersion: cert-manager.io/v1
kind: ClusterIssuer
metadata:
  name: letsencrypt-cloudflare
spec:
  acme:
    server: https://acme-v02.api.letsencrypt.org/directory
    email: jsonjsonstart@gmail.com
    privateKeySecretRef:
      name: letsencrypt-cloudflare-account-key
    solvers:
    - dns01:
        cloudflare:
          apiTokenSecretRef:
            name: cloudflare-api-token
            key: api-token
      selector:
        dnsNames:
          - "common.jsonjsonstart.dpdns.org"
          - "blog.jsonjsonstart.dpdns.org"
[root@k8sworker aks]# kubectl apply -f cluster-issuer.yaml
clusterissuer.cert-manager.io/letsencrypt-cloudflare created
certificate.yaml:
apiVersion: cert-manager.io/v1
kind: Certificate
metadata:
  name: blog-dpdns-org
  namespace: default
spec:
  secretName: blog-dpdns-org-tls
  issuerRef:
    name: letsencrypt-cloudflare
    kind: ClusterIssuer
  dnsNames:
    - "blog.jsonjsonstart.dpdns.org"
    - "common.jsonjsonstart.dpdns.org"
[root@k8sworker aks]# kubectl apply -f certificate.yaml
certificate.cert-manager.io/blog-dpdns-org created
查看证书申请状态:
[root@k8sworker aks]# kubectl describe certificate blog-dpdns-org -n default
...
Events:
  Type    Reason      Age   From                                  Message
  Normal  Issuing     2m12s cert-manager-certificates-trigger     Issuing certificate as Secret does not exist.
  Normal  Generated   2m12s cert-manager-certificates-request-manager  Stored new private key in temporary Secret resource 'blog-dpdns-org-v1y8z'
  Normal  Requested   2m12s cert-manager-certificates-request-manager  Created new CertificateRequest resource 'blog-dpdns-org-1'
  Normal  Issuing     26s   cert-manager-certificates-issuing    The certificate has been successfully issued
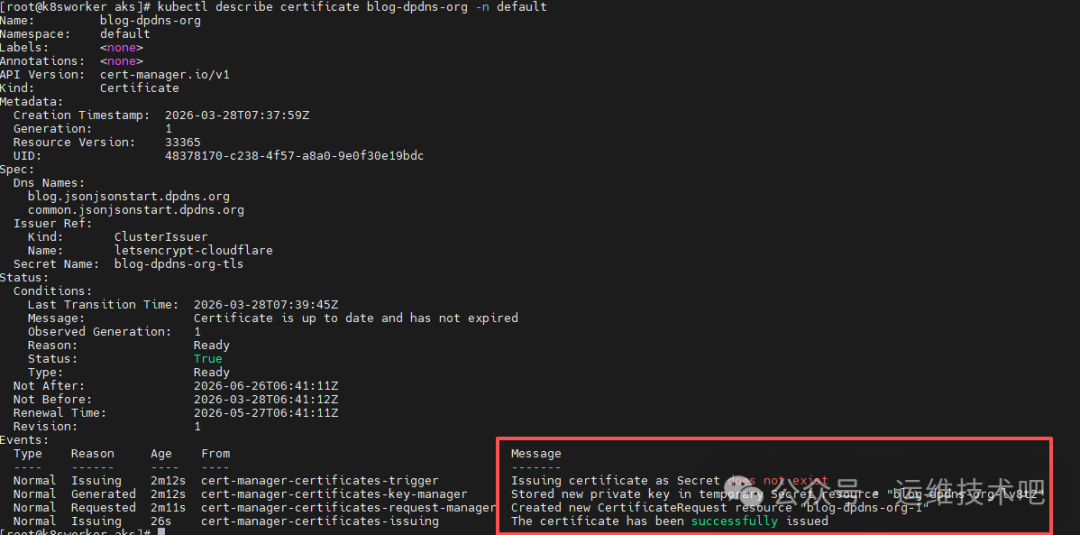
证书已成功签发,有效期至 2026年6月26日。
7. 创建 Ingress 资源并验证 TLS 终止
blog-ingress.yaml(面向 ingress-nginx):
apiVersion: networking.k8s.io/v1
kind: Ingress
metadata:
  annotations:
    kubernetes.io/ingress.class: "nginx"
    nginx.ingress.kubernetes.io/ssl-redirect: "true"
  name: blog-ingress
  namespace: default
spec:
  tls:
  - hosts:
      - blog.jsonjsonstart.dpdns.org
    secretName: blog-dpdns-org-tls
  rules:
  - host: blog.jsonjsonstart.dpdns.org
    http:
      paths:
      - path: /
        pathType: Prefix
        backend:
          service:
            name: nginx-service
            port:
              number: 80
[root@k8sworker aks]# kubectl create -f blog-ingress.yaml
Warning: annotation "kubernetes.io/ingress.class" is deprecated, please use 'spec.ingressClassName' instead
ingress.networking.k8s.io/blog-ingress created
由于 ingress-nginx Controller 使用 Internal IP,需在集群内验证 TLS:
[root@k8sworker aks]# kubectl exec -it nginx-68b45b8b47-ckzhl -- sh
sh-4.4# curl --resolve blog.jsonjsonstart.dpdns.org:443:10.224.0.62 https://blog.jsonjsonstart.dpdns.org -v
...
* Server certificate:
*  subject: CN=blog.jsonjsonstart.dpdns.org
*  start date: Mar 28 06:41:12 2026 GMT
*  expire date: Jun 26 06:41:11 2026 GMT
*  SSL certificate verify ok.
证书过期时间确认为 Jun 26 06:41:11 2026 GMT,TLS 握手成功。
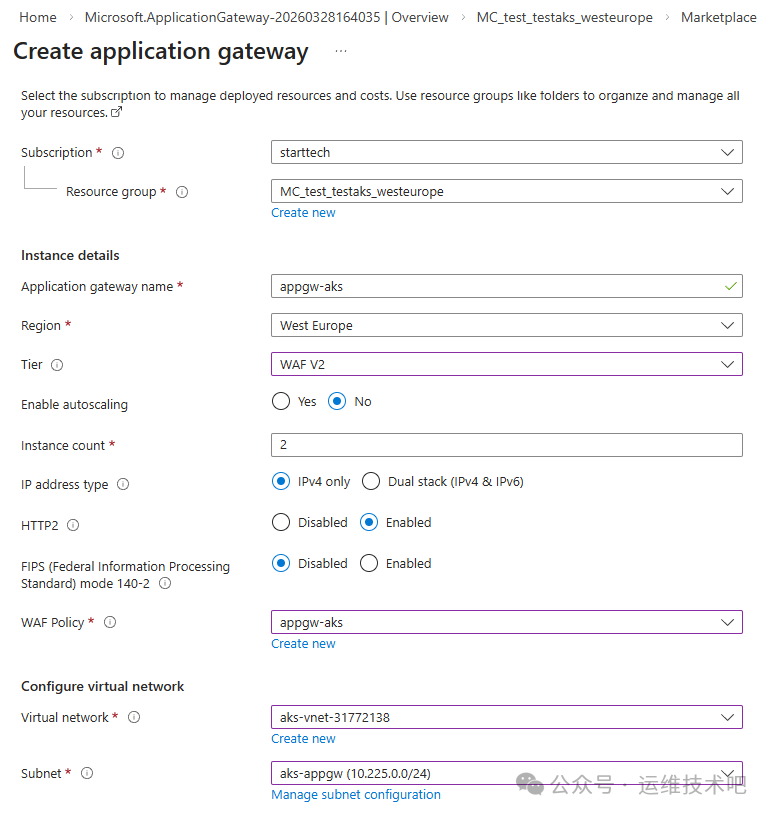
8. 创建 Application Gateway 并手动配置路由(非 AGIC)
为实现更高级的 WAF、SSL 卸载与精细化路由,我们创建独立的 Application Gateway:
- Gateway name:
appgw-aks
- Tier:
WAF V2
- Instance count:
2
- Virtual network:
aks-vnet-31772138
- Subnet:
aks-appgw(新建 /24 子网)
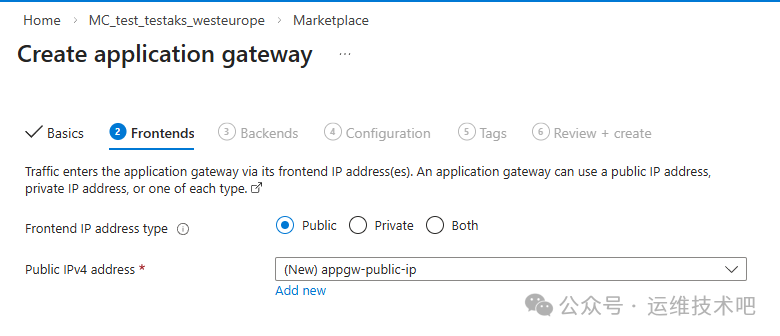
- Frontend IPs: Public (
appgw-public-ip) + Private (10.225.0.10)
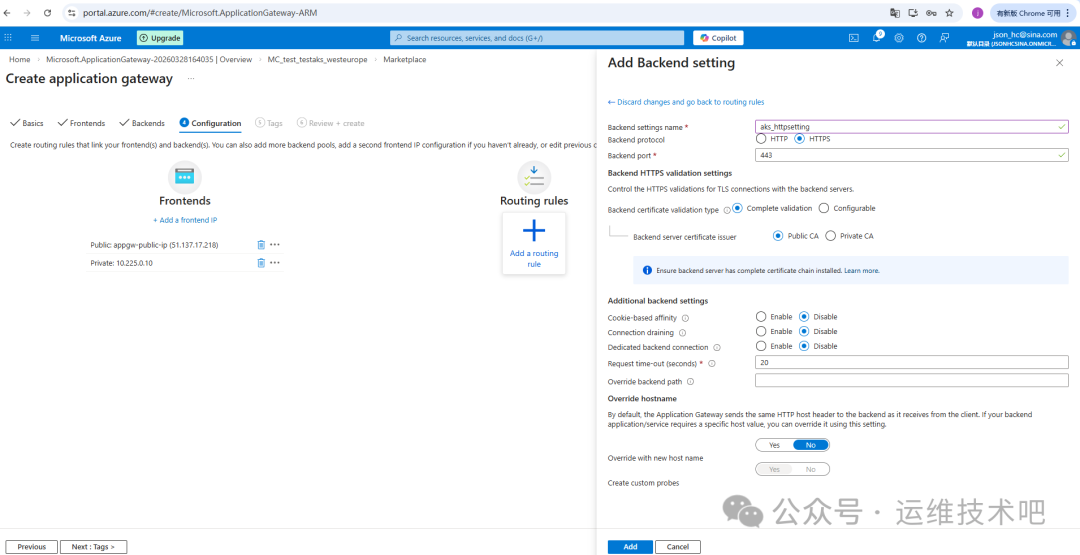
后端池指向 ingress-nginx Controller 的 Internal IP(10.224.0.62):

路由规则配置 HTTPS Listener(端口 443),绑定上传的 PFX 证书(由 cert-manager 导出):
[root@k8sworker aks]# kubectl get secret blog-dpdns-org-tls -o jsonpath='{.data.tls\.crt}' | base64 -d > cert.crt
[root@k8sworker aks]# kubectl get secret blog-dpdns-org-tls -o jsonpath='{.data.tls\.key}' | base64 -d > cert.key
[root@k8sworker aks]# openssl pkcs12 -export -out cert.pfx -inkey cert.key -in cert.crt -passout pass:password
部署完成后,Gateway 拥有 Public IP(51.137.17.218)与 Private IP(10.225.0.10),并自动创建健康探针与后端健康检查:
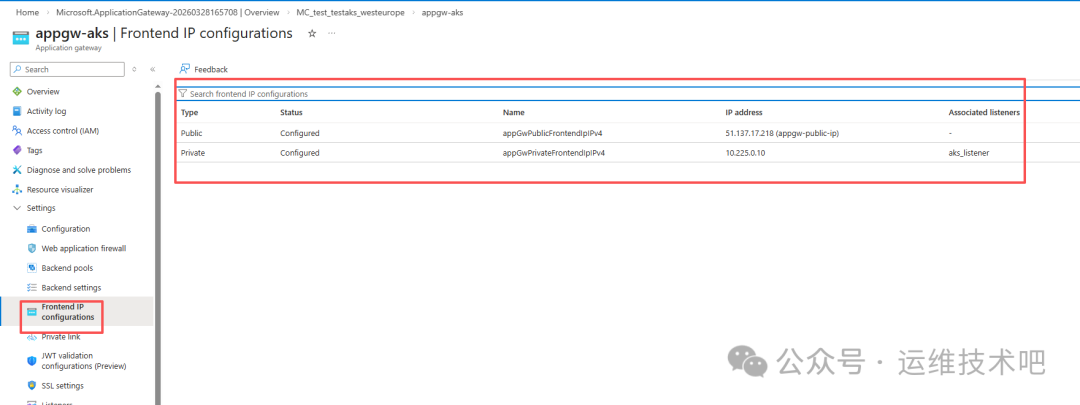
❗ 问题发现:Cloudflare 若将域名 blog.jsonjsonstart.dpdns.org 的 A 记录指向 Gateway Public IP 51.137.17.218,请求会失败——因为当前 Listener 仅绑定在 Private IP 10.225.0.10 上,Public IP 未配置任何 Listener。
9. 部署 Application Gateway Ingress Controller(AGIC)
为彻底解耦配置、实现声明式路由,我们启用官方 AGIC:
- 前提:AKS 必须启用
Azure CNI Node Subnet(已满足)
- 在 AKS 门户中,进入 Networking → Application Gateway ingress controller → Enable 即可一键部署
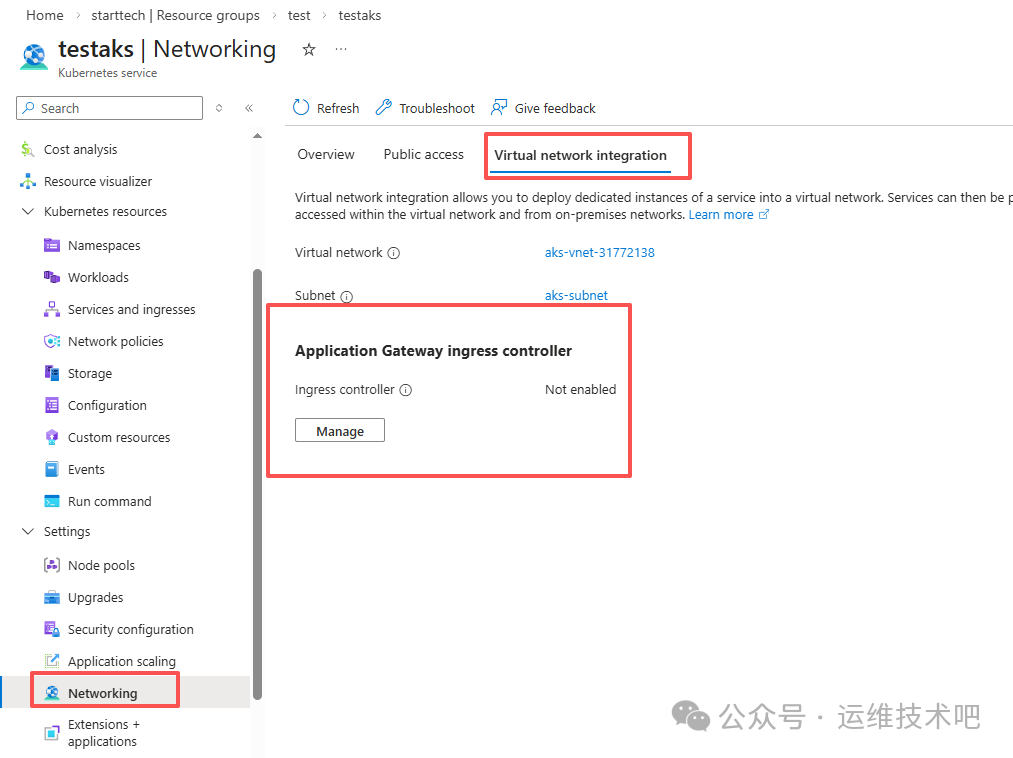
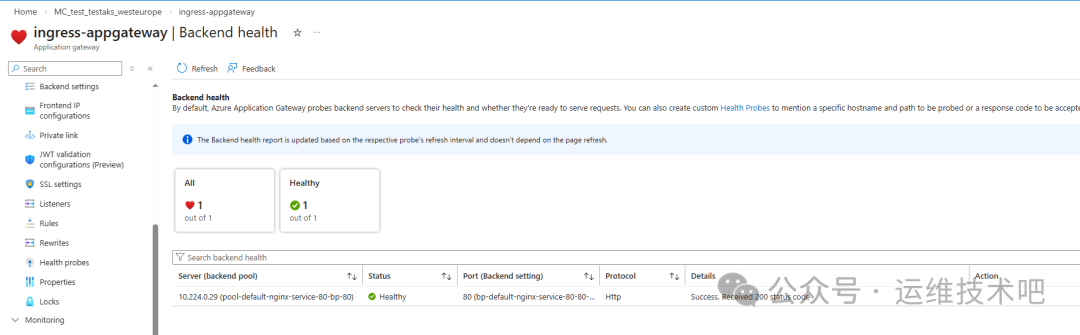
启用后,AGIC 自动创建以下资源:
- Application Gateway:
ingress-appgateway(含 Public & Private IP)
- Public IP:
ingress-appgateway-appgwip
- 托管标识:
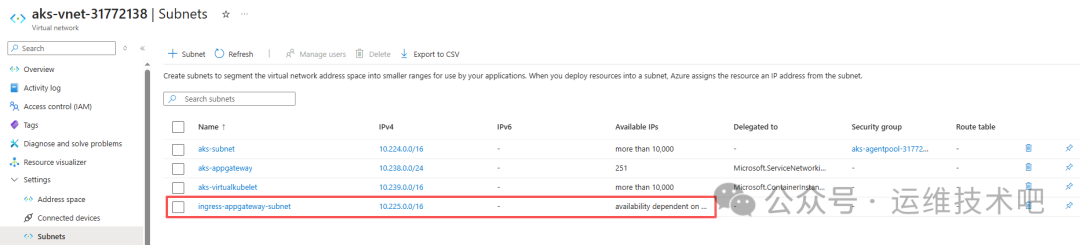
ingress-applicationgateway-testaks
- 新建子网:
ingress-appgateway-subnet(10.225.0.0/16)

AGIC 的核心优势在于:它监听 Kubernetes Ingress 资源变更,并自动同步到 Application Gateway 的 Listener、Routing Rule、Backend Pool、Health Probe 等配置,无需手动维护。
9.1 创建 AGIC 专用 Ingress
blog-ingress-agic.yaml:
# blog-ingress-agic.yaml
apiVersion: networking.k8s.io/v1
kind: Ingress
metadata:
  name: blog-ingress
  namespace: default
  annotations:
    kubernetes.io/ingress.class: azure/application-gateway
    appgw.ingress.kubernetes.io/ssl-redirect: "true"
    appgw.ingress.kubernetes.io/use-private-ip: "true"  # 强制使用 Internal IP
spec:
  tls:
  - hosts:
      - blog.jsonjsonstart.dpdns.org
    secretName: blog-dpdns-org-tls  # cert-manager 生成的证书
  rules:
  - host: blog.jsonjsonstart.dpdns.org
    http:
      paths:
      - path: /
        pathType: Prefix
        backend:
          service:
            name: nginx-service  # 你的后端 Service
            port:
              number: 80
[root@k8sworker aks]# kubectl create -f blog-ingress-agic.yaml
ingress.networking.k8s.io/blog-ingress created
AGIC 自动创建:
- Listener:
aks_listener(HTTPS:443,绑定 Private IP 10.225.0.10)
- Routing Rule:
aks_rule
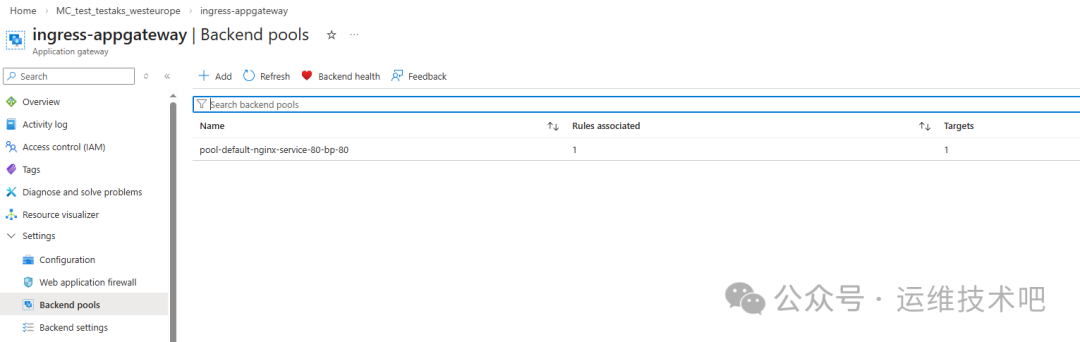
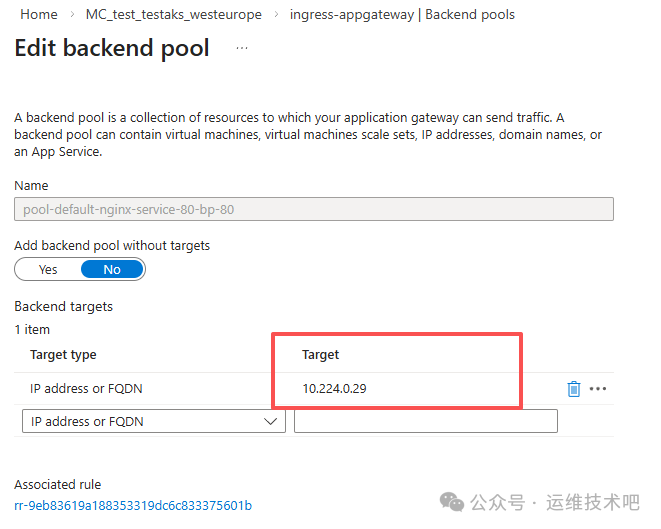
- Backend Pool:
pool-default-nginx-service-80-bp-80(指向 Pod IP 10.224.0.29)
- Health Probe:
pb-default-nginx-service-80-blog-ingress(HTTP GET /)
- TLS 证书:
cert-default-blog-odpns-org-tls(自动上传)

AGIC 的本质是“控制器”,它只负责配置同步,不参与数据平面转发。因此,当 Ingress 资源创建后,Gateway 的所有路由组件即刻就绪,且后端健康检查直接命中 Pod IP(10.224.0.29),绕过 NodePort 层,延迟更低、路径更短。
总结与架构演进建议
本文完整覆盖了 Azure AKS 生产级流量接入链路:
Client → Cloudflare DNS → Application Gateway (Public IP)
       ↓
       Application Gateway (Private IP) → AKS Ingress Controller (AGIC) → nginx-service → nginx Pod
关键结论:
- ✅ Azure CNI 是 AGIC 的硬性前提:确保 Pod IP 可被 Gateway 直接路由。
- ✅ AGIC 实现真正的 GitOps:Ingress YAML 即基础设施即代码,Gateway 配置全自动同步。
- ⚠️ Public IP 与 Listener 必须显式绑定:若需对外暴露,应在 AGIC Ingress 中移除
appgw.ingress.kubernetes.io/use-private-ip: "true",或额外配置 Public IP Listener。
- 🔐 证书全生命周期自动化:cert-manager + Cloudflare DNS01 实现零人工干预续签。
如需进一步提升可观测性与稳定性,建议结合 云栈社区 的 DevOps/SRE 实践指南,集成 Grafana、Prometheus 与 ELK Stack,构建端到端 SLO 监控体系。
 发表于 2026-3-30 02:33:16
|
查看: 165|
回复: 0
发表于 2026-3-30 02:33:16
|
查看: 165|
回复: 0
