MCP Server 是一个中间层服务器,它主要负责处理和管理 AI 模型的上下文信息,确保模型能够高效且准确地理解和响应用户请求。它作为应用程序和 AI 模型之间的桥梁,优化了信息的传递和处理过程。
根据 MCP 协议定义,Server 可以提供三种类型的标准能力:Resources、Tools 和 Prompts。每个 Server 可以同时提供这三种类型的能力,或只提供其中一种。
- Resources: 资源,类似于文件数据读取,可以是文件资源或是 API 响应返回的内容。
- Tools: 工具,即第三方服务或功能函数。通过定义 Tools,可以控制大语言模型(LLM)能够调用哪些外部功能。
- Prompts: 提示词,为用户预先定义好的、用于完成特定任务的模板。
MCP 通信方式
MCP (Model Context Protocol) 是一种为了统一大规模模型和工具间通信而设计的协议,它定义了消息格式和通信方式。MCP 协议支持多种传输机制,其中包括 stdio、Server-Sent Events (SSE) 和 Streamable HTTP。
stdio 传输方式是最简单的通信方式,通常在本地工具之间进行消息传递时使用。它利用标准输入输出(stdin/stdout)作为数据传输通道,适用于本地进程间的交互。
- 工作方式: 客户端和服务器通过标准输入输出流(
stdin/stdout)进行通信。客户端向服务器发送命令和数据,服务器执行并通过标准输出返回结果。
- 应用场景: 适用于本地开发、命令行工具、调试环境,或者模型和工具服务在同一进程内运行的情况。
Server-Sent Events(SSE)
SSE 是基于 HTTP 协议的流式传输机制,它允许服务器通过 HTTP 单向推送事件到客户端。SSE 适用于客户端需要接收服务器推送的场景,通常用于实时数据更新。许多 人工智能 应用场景如聊天对话就依赖于此类实时通信。
- 工作方式: 客户端通过
HTTP GET 请求建立与服务器的连接,服务器以流式方式持续向客户端发送数据,客户端通过解析流数据来获取实时信息。
- 应用场景: 适用于需要服务器主动推送数据的场景,如实时聊天、天气预报、新闻更新等。
Streamable HTTP
Streamable HTTP 是 MCP 协议中新引入的一种传输方式,它基于 HTTP 协议支持双向流式传输。与传统的 HTTP 请求响应模型不同,Streamable HTTP 允许服务器在一个长连接中实时向客户端推送数据,并且可以支持多个请求和响应的流式传输。
不过需要注意的是,MCP 只提供了 Streamable HTTP 协议层的支持,也就是规范了 MCP 客户端在使用 Streamable HTTP 通信时的通信规则,而并没有提供相关的 SDK 客户端。开发者在开发 Streamable HTTP 机制下的客户端和服务器时,可以使用比如 Python httpx 库进行开发。
- 工作方式: 客户端通过
HTTP POST 向服务器发送请求,并可以接收流式响应(如 JSON-RPC 响应或 SSE 流)。当请求数据较多或需要多次交互时,服务器可以通过长连接和分批推送的方式进行数据传输。
- 应用场景: 适用于需要支持高并发、低延迟通信的分布式系统,尤其是跨服务或跨网络的应用。适合高并发的场景,如实时流媒体、在线游戏、金融交易系统等。
MCP Server 实现流程
在本教程中,我们将一起实现一个类似于 MCP 官网的天气查询 MCP Server。但与官网示例不同的是,官网的天气查询仅支持美国的州市,无法查询中国城市的天气情况。因此,在本教程中,我们将使用 openweather 的免费接口,实现一个支持全球天气查询的通用 MCP 服务。
业务功能实现
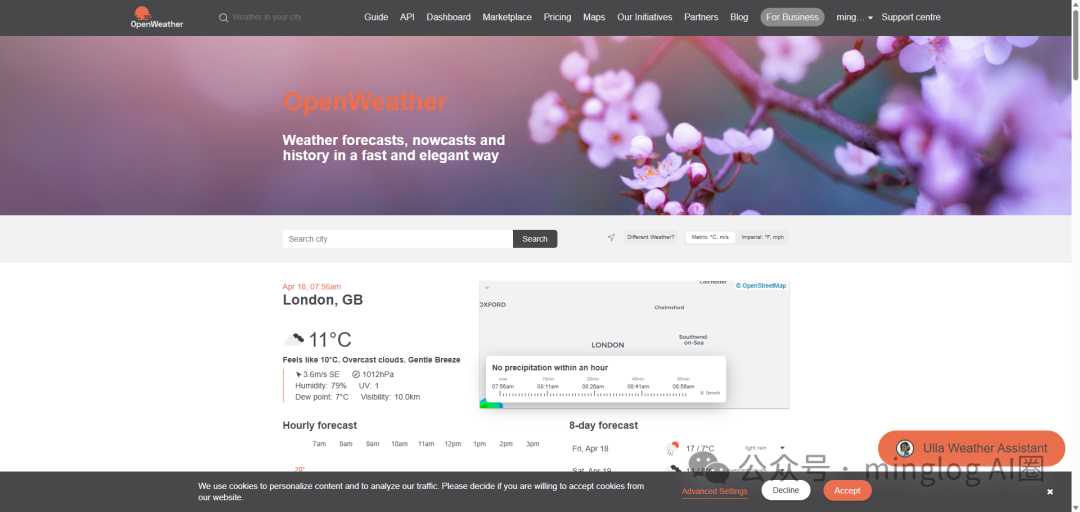
首先,进入 OpenWeather 官网,使用自己的信息注册一个账号。
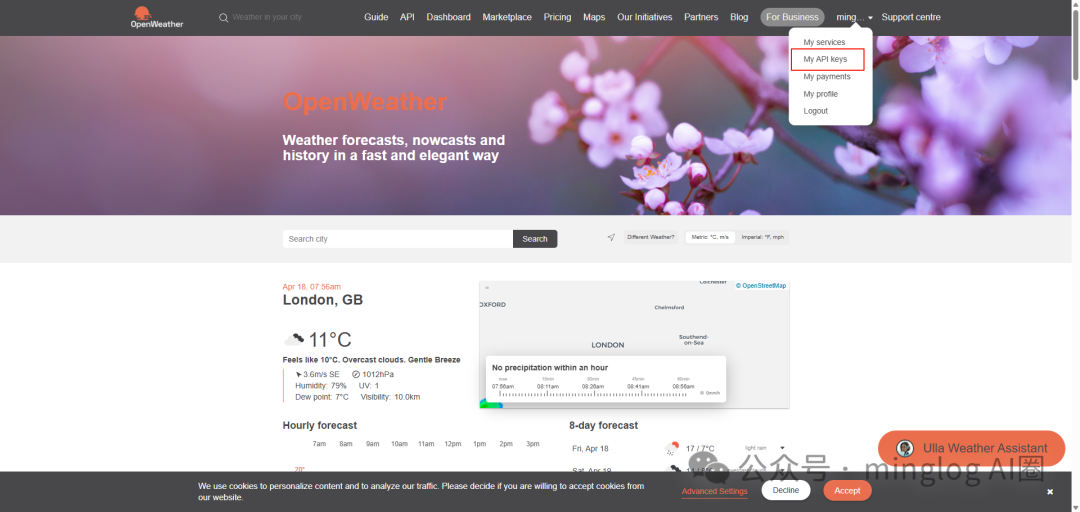
接着我们需要申请一个 API Keys,用于后期接口校验。登录后,在用户下拉菜单中找到 My API keys。
默认情况下,系统会自动生成一个 API Keys,你可以直接使用它,或者自己重新创建一个。
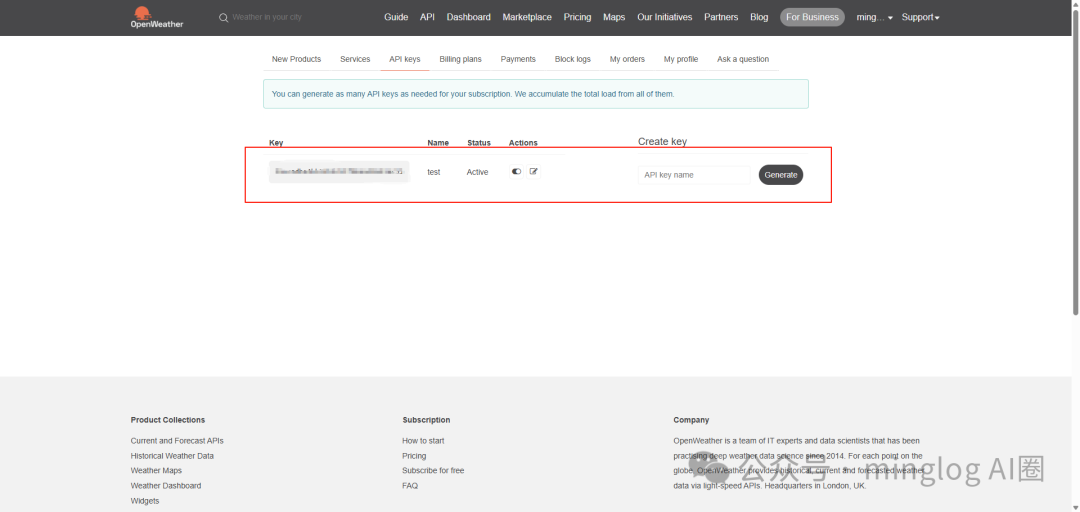
虽然两者都可以,但建议大家直接使用默认的 API Keys 即可。因为创建新的 API Keys 后,需要等待约5分钟才能生效,而默认的 API Keys 通常只需3分钟左右即可使用。
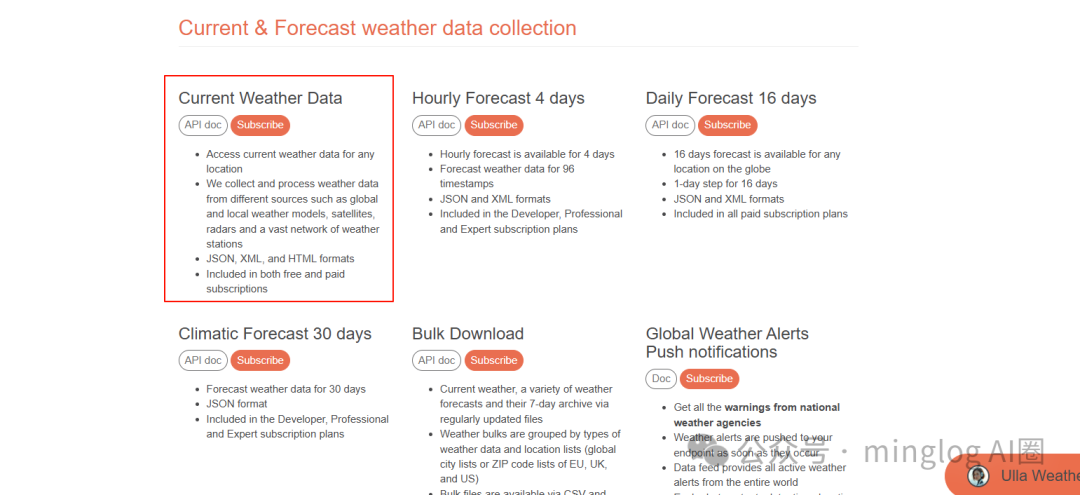
复制自己的 API Keys 后,点击顶部导航栏上的 API,开始选择自己所需的服务。
需要注意的是,OpenWeather 提供了许多天气服务,但并非所有服务都是免费的。你需要根据描述选择所需的服务。这里我们直接选择 Current Weather Data 接口,该接口是免费的。点击其对应的 API doc。
该接口支持多种请求方式,我们选择其中最常用的两种:
- 通过经纬度查询: 请求对应经纬度的当前天气情况。
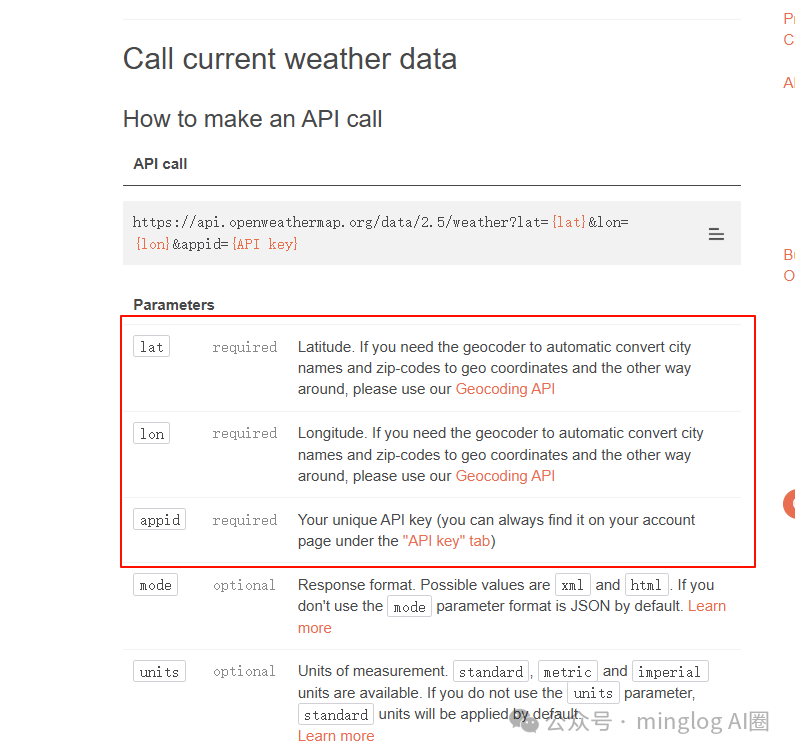
- 通过城市名称查询: 查询对应城市名称的当前天气情况。
无论是哪种请求方式,API Key 都是必填参数。
有了自己的 API Key 后,可以直接通过浏览器请求的方式,验证当前接口是否可用。直接在浏览器中输入构造好的 URL 即可。
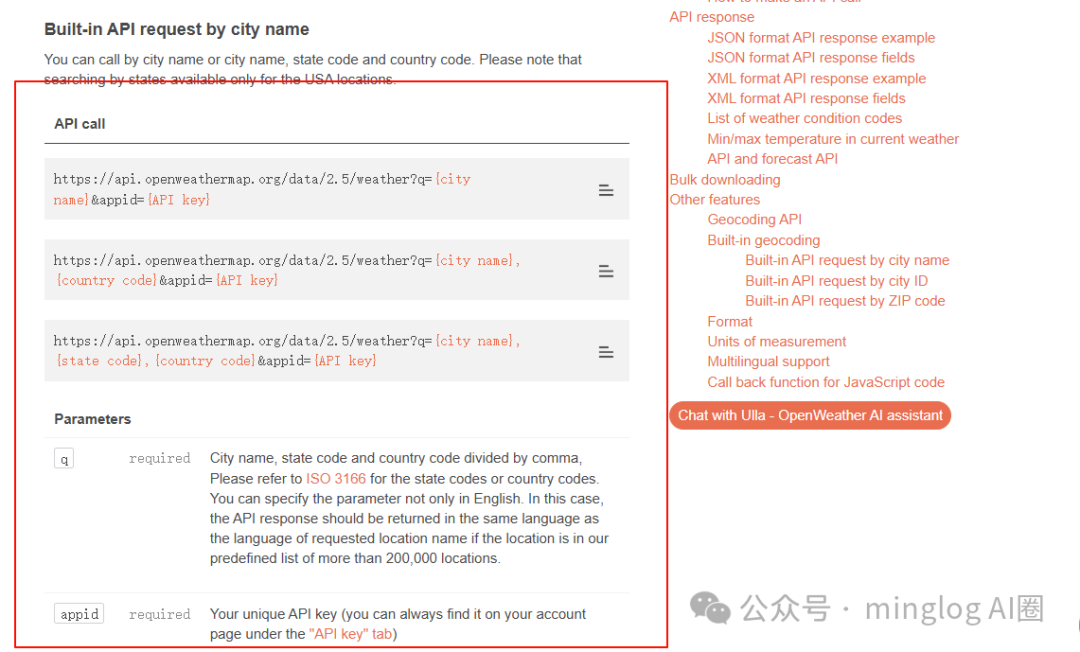
例如,通过指定城市名称为 wuhan,查询武汉对应的天气情况。
https://api.openweathermap.org/data/2.5/weather?q=wuhan&appid={你的API key}
注意:{你的API key} 需要替换为你自己的。
如果浏览器返回了结构化的 JSON 天气数据,说明接口是可用的。

如果返回错误信息,说明 API Key 未生效或填写错误。如果确认 API Key 无误,请等待几分钟后重试。
至此,我们已经知道如何通过经纬度和地名获取天气了。接下来,就是将该服务封装为 MCP Server。
MCP Server 功能编写
这里,我们首先测试 stdio 通信方式,采用在本地开启一个 MCP Server 的方式实现。
首先,使用 uv 工具(一个快速的 Python 包安装器和解析器)创建项目并安装相关依赖。假设项目放在 D 盘的根目录,在 D 盘下打开命令提示符(Windows)或终端(Linux/macOS)。
uv init weather_mcp_server -p 3.10

接着进入 uv 工程目录。
cd weather_mcp_server
然后输入以下命令,创建虚拟环境。
uv venv

激活虚拟环境。
.venv\Scripts\activate  # Windows
# 或 source .venv/bin/activate  # Linux/macOS

如果你电脑中默认激活了 Conda 的 base 虚拟环境,激活 uv 工程的虚拟环境后,可能需要执行 conda deactivate 来退出 Conda 环境,以确保使用正确的 Python 环境。
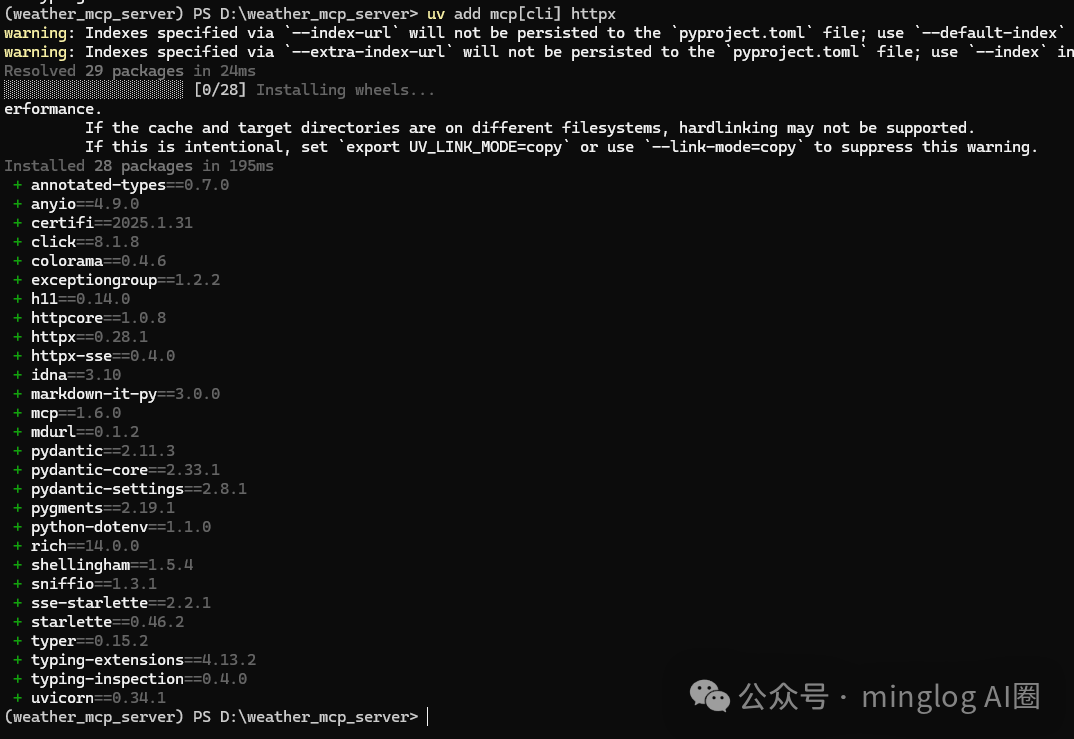
安装项目依赖。我们需要 mcp 库来构建 Server,以及 httpx 库来发起网络请求。
uv add mcp[cli] httpx
依赖准备完成后,开始编写代码。
创建 weather.py 文件,代码如下所示:
注:代码中的 {你的API KEY} 部分,请替换为你自己在 OpenWeather 获取的 API Key。
from typing import Any
import httpx
from mcp.server.fastmcp import FastMCP

# 初始化FastMCP服务器
mcp = FastMCP("weather")

# 常量
NWS_API_BASE = "https://api.openweathermap.org/data/2.5/weather"
USER_AGENT = "Mozilla/5.0 (Windows NT 10.0; Win64; x64) AppleWebKit/537.36 (KHTML, like Gecko) Chrome/135.0.0.0 Safari/537.36"

# 温度单位转换,将开尔文转化为摄氏度
def kelvin_to_celsius(kelvin: float) -> float:
    return kelvin - 273.15

async def get_weather_from_cityname(cityname: str) -> dict[str, Any] | None:
    """向openweathermap发送请求并进行适当的错误处理。"""
    headers = {
        "User-Agent": USER_AGENT,
        "Accept": "application/geo+json"
    }
    params = {
        "q": cityname,
        "appid": "{你的API KEY}"  # 请替换为你的API Key
    }
    async with httpx.AsyncClient() as client:
        try:
            response = await client.get(NWS_API_BASE, headers=headers, params=params)
            response.raise_for_status()
            return response.json()
        except Exception:
            return None

async def get_weather_from_latitude_longitude(latitude: float, longitude: float) -> dict[str, Any] | None:
    """向openweathermap发送请求并进行适当的错误处理。"""
    headers = {
        "User-Agent": USER_AGENT,
        "Accept": "application/geo+json"
    }
    params = {
        "lat": latitude,
        "lon": longitude,
        "appid": "{你的API KEY}"  # 请替换为你的API Key
    }
    async with httpx.AsyncClient() as client:
        try:
            response = await client.get(NWS_API_BASE, headers=headers, params=params)
            response.raise_for_status()
            return response.json()
        except Exception:
            return None

def format_alert(feature: dict) -> str:
    """将接口返回的天气信息进行格式化文本输出"""
    if feature["cod"] == 404:
        return "参数异常,请确认城市名称是否正确。"
    elif feature["cod"] == 401:
        return "API key 异常,请确认API key是否正确。"
    elif feature["cod"] == 200:
        return f"""
        City: {feature.get('name', 'Unknown')}
        Weather: {feature.get('weather', [{}])[0].get('description', 'Unknown')}
        Temperature: {kelvin_to_celsius(feature.get('main', {}).get('temp', 0)):.2f}°C
        Humidity: {feature.get('main', {}).get('humidity', 0)}%
        Wind Speed: {feature.get('wind', {}).get('speed', 0):.2f} m/s
        """
    else:
        return "未知错误,请稍后再试。"

@mcp.tool()
async def get_weather_from_cityname_tool(city: str) -> str:
    """Get weather information for a city.

    Args:
        city: City name (e.g., "wuhan"). For Chinese cities, please use pinyin
    """
    data = await get_weather_from_cityname(city)
    return format_alert(data)

@mcp.tool()
async def get_weather_from_latitude_longitude_tool(latitude: float, longitude: float) -> str:
    """Get weather information for a location.

    Args:
        latitude: Latitude of the location
        longitude: Longitude of the location
    """
    data = await get_weather_from_latitude_longitude(latitude, longitude)
    return format_alert(data)

if __name__ == "__main__":
    # 初始化并运行服务器
    mcp.run(transport='stdio')
在这段 Python 代码中,我们一共定义了两个 Tool:
get_weather_from_cityname_tool:通过城市名称(拼音)获取天气情况。get_weather_from_latitude_longitude_tool:通过经纬度获取天气情况。
注意,由于 MCP 协议需要使用 @mcp.tool 装饰器来标记工具函数,因此被标记的工具函数,其对应的注释务必写清楚。后续大模型(LLM)能够识别这些工具、工具如何使用以及工具的具体功能,全都是通过解析这些注释(docstring)来完成的。所以,一个好的 MCP Server,其对应的 Tool 描述也必须非常清晰准确。
MCP Server 测试
代码编辑好后,我们可以在支持 MCP 的客户端(如 Cursor、Claude Desktop 等)中测试该 MCP Server 是否可以正常提供功能并被大模型调用。
以 Cursor 为例,需要在 Cursor 的设置中配置 MCP Server。通常,配置文件位于 ~/.cursor/mcp.json(macOS/Linux)或 %APPDATA%\Cursor\mcp.json(Windows)。编辑该文件,添加以下配置:
{
  "mcpServers": {
    "weather": {
      "command": "uv",
      "args": [
        "--directory",
        "D:\\weather_mcp_server", // 这里请替换为自己的项目工程绝对路径
        "run",
        "weather.py"
      ]
    }
  }
}
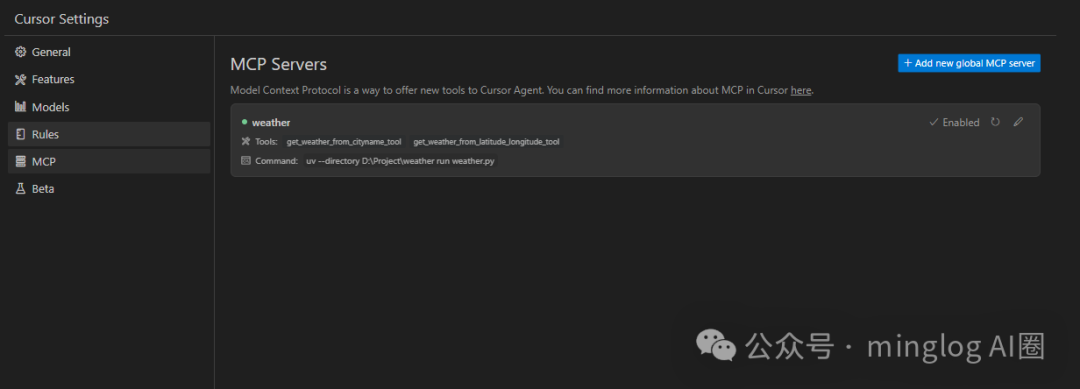
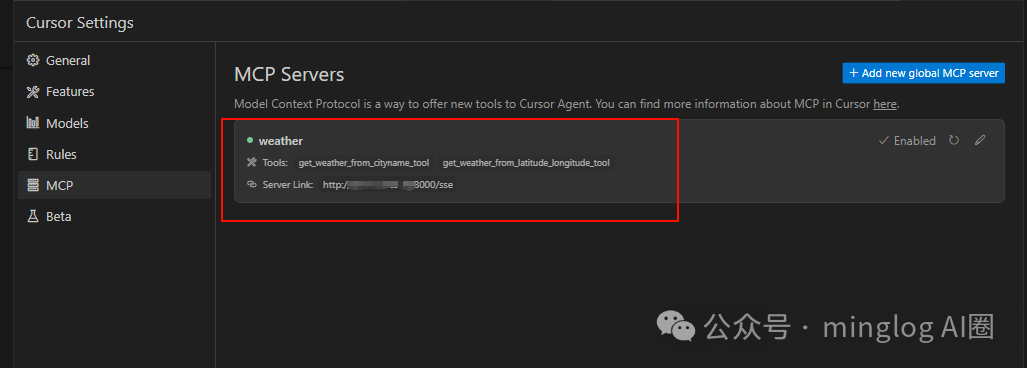
配置完成后,可以在 Cursor 的设置界面看到成功加载了我们自己编写的 weather MCP Server。
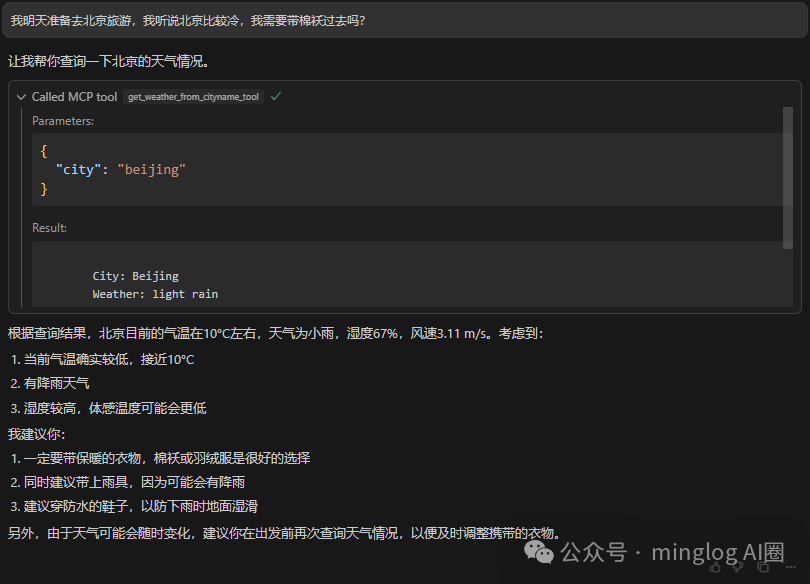
接下来,在 Cursor 的聊天对话中测试,看看是否可以调用到天气查询服务。
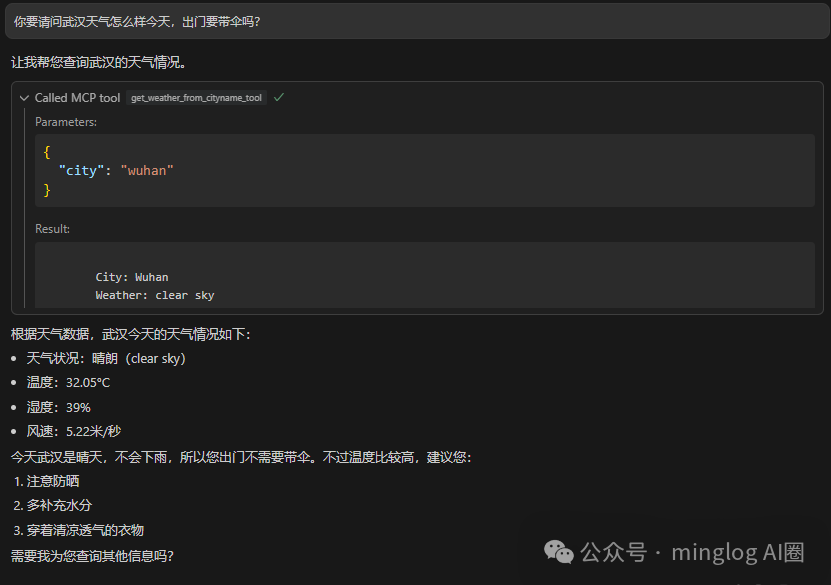
可以看到,我们自己编写的 MCP Server 已经成功被 Cursor 调用并返回了正确的天气信息。
MCP Server 发布
前面我们演示的是 stdio 方式的通信协议。这种方式本质上就是在本地运行了一个服务,然后通过 MCP Client 去调用本地服务实现的。
这种方式的缺点是,无法在不分享源代码的情况下,将自己的 MCP Server 共享给其他人使用。在企业环境中,源代码通常是核心资产,这种方式显然不可行。此时,SSE 通信方式就派上用场了。我们可以使用 SSE 的通信方式将自己的 MCP Server 部署在服务器上,这样其他所有的 MCP Client 在调用服务时,就无需在本地运行 MCP Server 的代码了。
如果希望其他所有人都可以访问你的 MCP Server,就需要将其部署到公网服务器。
在服务器上配置 Python 环境的方式与前面本地流程基本一致。我们需要按照以下方式修改代码,将其配置为 SSE 通信协议。
创建 weather_sse.py 文件,代码如下所示:
from typing import Any
import httpx
from mcp.server.fastmcp import FastMCP

# 初始化FastMCP服务器,配置SSE
mcp = FastMCP(
    name="weather",
    host="0.0.0.0",  # 监听所有网络接口
    port=8000,       # 服务端口
    description="通过城市名称(拼音)或经纬度获取天气信息",
    sse_path="/sse"  # SSE端点路径
)

# 常量
NWS_API_BASE = "https://api.openweathermap.org/data/2.5/weather"
USER_AGENT = "Mozilla/5.0 (Windows NT 10.0; Win64; x64) AppleWebKit/537.36 (KHTML, like Gecko) Chrome/135.0.0.0 Safari/537.36"

# 温度单位转换,将开尔文转化为摄氏度
def kelvin_to_celsius(kelvin: float) -> float:
    return kelvin - 273.15

async def get_weather_from_cityname(cityname: str) -> dict[str, Any] | None:
    """向openweathermap发送请求并进行适当的错误处理。"""
    headers = {
        "User-Agent": USER_AGENT,
        "Accept": "application/geo+json"
    }
    params = {
        "q": cityname,
        "appid": "{你的API KEY}"  # 请替换为你的API Key
    }
    async with httpx.AsyncClient() as client:
        try:
            response = await client.get(NWS_API_BASE, headers=headers, params=params)
            response.raise_for_status()
            return response.json()
        except Exception:
            return None

async def get_weather_from_latitude_longitude(latitude: float, longitude: float) -> dict[str, Any] | None:
    """向openweathermap发送请求并进行适当的错误处理。"""
    headers = {
        "User-Agent": USER_AGENT,
        "Accept": "application/geo+json"
    }
    params = {
        "lat": latitude,
        "lon": longitude,
        "appid": "{你的API KEY}"  # 请替换为你的API Key
    }
    async with httpx.AsyncClient() as client:
        try:
            response = await client.get(NWS_API_BASE, headers=headers, params=params)
            response.raise_for_status()
            return response.json()
        except Exception:
            return None

def format_alert(feature: dict) -> str:
    """将接口返回的天气信息进行格式化文本输出"""
    if feature["cod"] == 404:
        return "参数异常,请确认城市名称是否正确。"
    elif feature["cod"] == 401:
        return "API key 异常,请确认API key是否正确。"
    elif feature["cod"] == 200:
        return f"""
        City: {feature.get('name', 'Unknown')}
        Weather: {feature.get('weather', [{}])[0].get('description', 'Unknown')}
        Temperature: {kelvin_to_celsius(feature.get('main', {}).get('temp', 0)):.2f}°C
        Humidity: {feature.get('main', {}).get('humidity', 0)}%
        Wind Speed: {feature.get('wind', {}).get('speed', 0):.2f} m/s
        """
    else:
        return "未知错误,请稍后再试。"

@mcp.tool()
async def get_weather_from_cityname_tool(city: str) -> str:
    """Get weather information for a city.

    Args:
        city: City name (e.g., "wuhan"). For Chinese cities, please use pinyin
    """
    data = await get_weather_from_cityname(city)
    return format_alert(data)

@mcp.tool()
async def get_weather_from_latitude_longitude_tool(latitude: float, longitude: float) -> str:
    """Get weather information for a location.

    Args:
        latitude: Latitude of the location
        longitude: Longitude of the location
    """
    data = await get_weather_from_latitude_longitude(latitude, longitude)
    return format_alert(data)

if __name__ == "__main__":
    # 初始化并运行SSE服务器
    print("Starting server...")
    mcp.run(transport='sse')
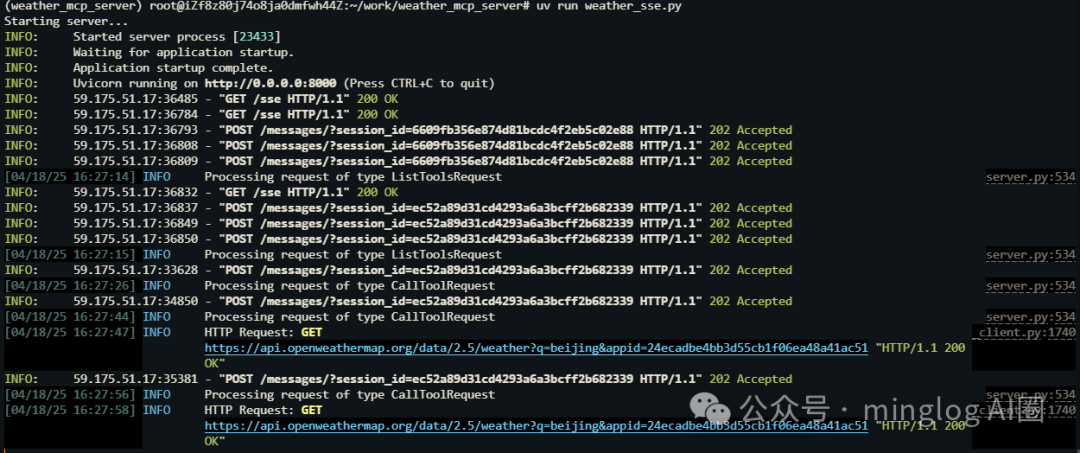
在服务器上执行该脚本,开启 MCP SSE Server。
uv run weather_sse.py
执行成功后,终端会显示服务器已启动,并监听在 http://0.0.0.0:8000。

此时,再次使用 Cursor 测试 SSE MCP Server 服务是否可以正常调用。
在 Cursor 的 MCP 配置文件中,修改配置为使用 URL 连接:
{
  "mcpServers": {
    "weather": {
      "url": "http://你的服务器公网IP:8000/sse"
    }
  }
}
配置完成后,最好重启一次 Cursor,因为前面我们加载过同名的本地 stdio 服务。
重启后,可以在 Cursor 设置中看到它已经通过 URL 正常识别到我们部署在公网的 MCP Server。
现在测试功能是否可以正常调用。
功能调用正常。同时,在服务器的终端日志中,也能看到相应的 HTTP 请求和调用 OpenWeather API 的记录,这证明了我们完成了一次完整的 开源实战:从零构建并部署了一个可对外提供服务的 MCP Server。
通过这个实战项目,你已经掌握了 MCP Server 的核心概念、两种主流通信方式的实现,以及如何将一个本地工具部署为可远程访问的 AI 能力扩展。你可以在此基础上,探索为 MCP Server 添加更多工具或资源,构建更强大的 AI 应用生态。欢迎在 云栈社区 分享你的实践经验和遇到的问题。
 发表于 2026-4-8 04:35:57
|
查看: 145|
回复: 0
发表于 2026-4-8 04:35:57
|
查看: 145|
回复: 0
