Flutter 和 Dart 团队又一次向 AI 领域迈出了坚实的一步。继 Flutter MCP、GenUI、Plugin Assets AI 和 Flutter Skills 之后,Genkit 现在也正式支持 Dart 了。这对 Flutter 开发者来说,最大的意义在于什么呢?
使用 Dart 语言的 Flutter 开发者,现在可以原生实现一整套 AI 编排框架了。它能够适配不同的模型和本地运行场景,并提供 Agent 工作流、工具调用以及 RAG 等核心能力。
一个成熟的 AI 应用,远不止发起一次 LLM 请求那么简单。它往往涉及 Prompt 管理、工具调用、RAG、工作流编排、调试、监控和部署等一系列复杂场景的组合。而 Genkit 提供的,正是解决这类生产级需求的能力。
genkit-dart 的核心目标,就是将组织大语言模型的能力工程化。
在常规的 AI 开发流程中,开发者通常需要自己从头实现:
- Prompt 组织与版本管理
- 多步骤 AI 工作流
- 工具调用(function calling)
- RAG(检索增强生成)
- LLM provider 管理
- 链路追踪与调试
- 生产环境部署
Genkit 把这些分散的能力整合进了一个统一的框架里。说白了,它就是 AI 应用的运行时与编排框架:
Frontend (Web / Mobile / Flutter)
        ↓
Genkit Runtime
        ↓
LLM / Tools / Vector DB
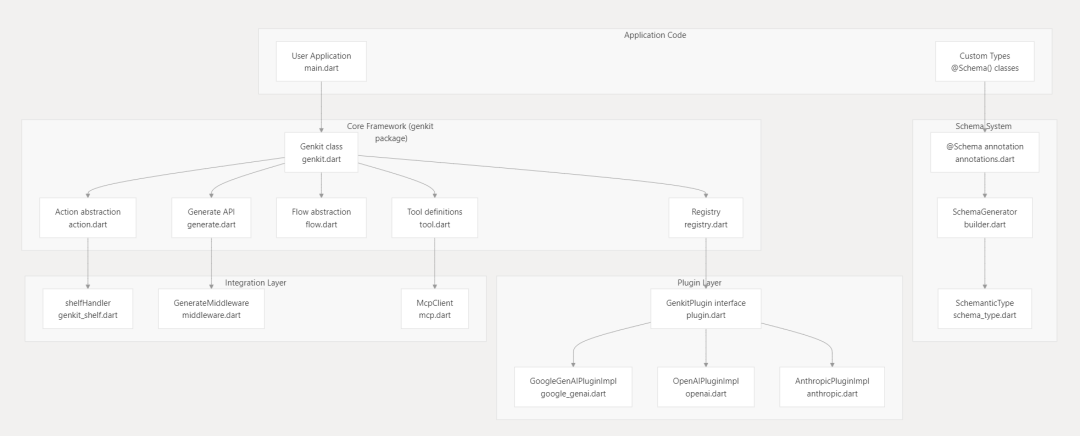
genkit-dart 的整体架构可以用下面这张图来概括:
以前,如果你想做一个能同时支持 OpenAI、Gemini 和 Claude 的 AI 应用,要么在本地为每种模型写不同的调用方式,要么在服务端搞一层独立的适配器。有了 Genkit,事情就简单多了:
import 'package:genkit/genkit.dart';
import 'package:genkit_google_genai/genkit_google_genai.dart';
import 'package:genkit_anthropic/genkit_anthropic.dart';

void main() async {
  // Initialize Genkit with plugins
  final ai = Genkit(plugins: [
    googleAI(),
    anthropic(),
  ]);

  // Call Google Gemini
  final geminiResponse = await ai.generate(
    model: googleAI.gemini('gemini-3.1-pro-preview'),
    prompt: 'Hello from Gemini',
  );

  // Call Anthropic Claude
  final claudeResponse = await ai.generate(
    model: anthropic.model('claude-opus-4.6'),
    prompt: 'Hello from Claude',
  );
}
在 Genkit 的世界里,整个 AI 流程就是一个 Flow,可以理解为一条现成的 AI 管线。你可以用 Genkit 将 AI 逻辑封装成能测试、能观察、还能独立部署的函数。比如下面这个感觉:
import 'package:genkit/genkit.dart';
import 'package:genkit_google_genai/genkit_google_genai.dart';
import 'package:schemantic/schemantic.dart';

part 'travel_flow.g.dart';

// Define flow input schema with schemantic
@Schema()
abstract class $TripRequest{
  String get destination;
  int get days;
}

// Define tool input schema
@Schema()
abstract class $WeatherRequest{
  @Field(description: 'The city name')
  String get city;
}

void main() async {
  // Initialize Genkit and register the Google AI plugin
  final ai = Genkit(plugins: [googleAI()]);

  // Define a tool the model can invoke to fetch live data
  ai.defineTool(
    name: 'fetchWeather',
    description: 'Retrieves the current weather forecast for a given city',
    inputSchema: WeatherRequest.$schema,
    fn: (request, _) async => request.city.toLowerCase() == 'seattle' ? 'Rainy' : 'Sunny',
  );

  // Construct a strongly-typed, observable flow
  final tripPlannerFlow = ai.defineFlow(
    name: 'planTrip',
    inputSchema: TripRequest.$schema,
    outputSchema: .string(),
    fn: (request, _) async {
      // Generate content using the model and tool
      final response = await ai.generate(
        model: googleAI.gemini('gemini-3.1-pro-preview'),
        prompt: 'Build a ${request.days}-day travel itinerary for ${request.destination}. '
            'Make sure to check the weather forecast first to suggest appropriate activities.',
        toolNames: ['fetchWeather'],
      );

      return response.text;
    },
  );

  // Run the flow
  final itinerary = await tripPlannerFlow(
    TripRequest(destination: 'Seattle', days: 3)
  );
  print(itinerary);
}
Genkit 提供的核心能力主要有这么几个:
- Prompt 管理:在 Genkit 中,Prompt 是被当作结构化资源来对待的。开发者可以把 prompt 定义在独立文件里,并支持参数化、类型校验和版本管理。
// 基本 Prompt 定义
serverAi.definePrompt<PromptInput>(
  name: 'echoPrompt',
  description: 'Returns a simple prompt with one user message.',
  inputSchema: PromptInput.$schema,
  fn: (input, _) async {
    return GenerateActionOptions(
      messages: [
        Message(
          role: Role.user,
          content: [TextPart(text: 'prompt says: ${input.input}')],
        ),
      ],
    );
  },
);

// 获取远程 Prompt
final prompts = await client.getActivePrompts(clientAi);
final prompt = prompts.firstWhere(
  (p) => p.name == 'example-client/echoPrompt',
);
final request = await prompt.call({'input': 'hello'});
- 工具调用与 Agent 能力:Genkit 内置了对 LLM 工具调用的支持,本身就是个 Agent 开发框架。通过
Action 和 Tool 的抽象,你可以定义一系列函数,比如查数据库、发邮件或搜索网页,模型就能根据用户的意图,自主决定什么时候调用哪些工具。
@Schema()
abstract class $WeatherInput{
  String get location;
}

final weatherTool = ai.defineTool(
  name: 'getWeather',
  description: 'Gets the current weather for a location',
  inputSchema: WeatherInput.$schema,
  fn: (input, _) async {
    // 调用天气 API
    return 'Weather in ${input.location}: 72°F and sunny';
  },
);

genkit.defineTool(
  name: 'transferFunds',
  description: 'Transfers funds between accounts. Requires user approval.',
  inputSchema: .map(.string(), .string()),
  fn: (input, context) async {
    final from = input['from'];
    final to = input['to'];
    return 'SUCCESS: Transferred funds from $from to $to';
  },
);
- RAG 支持:Genkit 原生内置了 RAG 管线,涵盖向量嵌入、向量搜索和检索流水线的完整流程。
// 在 agentic_patterns 应用中定义 RAG 流程
final agenticRagFlow = defineAgenticRagFlow(ai, geminiFlash);

// 使用示例
final result = await agenticRagFlow(AgenticRagInput(question: question));

final embeddings = await ai.embedMany(
  documents: [
    DocumentData(content: [TextPart(text: 'Hello world')]),
  ],
  embedder: googleAI.textEmbedding('text-embedding-004'),
);

print(embeddings.first.embedding);
- 统一模型接口:它提供了连接不同模型 Provider 的抽象层,你不但能调用远程模型,也能很方便地适配本地模型场景。
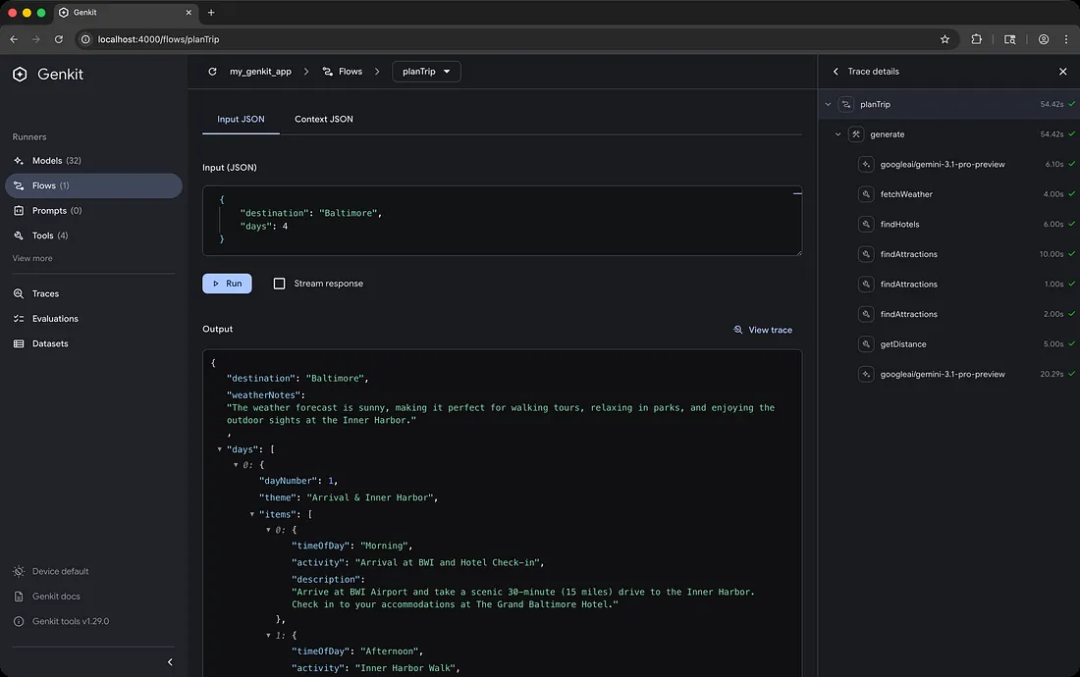
- 可观测性与调试:Genkit 提供了一个非常完整的 Dev UI,让你能一目了然地看到 Prompt、Flow 执行追踪、Token 消耗、延迟以及 LLM 的响应。
- 人机交互的中断机制:这个设计专门服务于需要人工介入的场景,它支持流程暂停并等待外部输入。
@Schema()
abstract class $AskUserInput{
  String get question;
}

// 在工具中触发中断
fn: (input, context) async {
  context.interrupt({'question': input.question});
  // 等待外部输入后继续执行
}
借助 Genkit,你可以完全定制自己的 Flow。一个 Flow 可以包含多步推理、多次工具调用以及复杂的逻辑分支,这其实就是构建 Agent 的基石。换句话说:
使用 Genkit + Flutter,你就能让 AI + Agent 在不同平台上一次性完成落地。
/// 编排 flow
ai.defineFlow(
  name: 'weatherFlow',
  inputSchema: .string(defaultValue: 'What is the weather like in Boston?'),
  outputSchema: .string(),
  fn: (prompt, context) async {
    final response = await ai.generate(
      model: googleAI.gemini('gemini-3-flash-preview'),
      prompt: prompt,
      toolNames: ['getWeather'],
    );
    return response.text;
  },
);

final streamStory = ai.defineFlow(
  name: 'streamStory',
  inputSchema: .string(),
  outputSchema: .string(),
  streamSchema: .string(),
  fn: (topic, context) async {
    final stream = ai.generateStream(
      model: googleAI.gemini('gemini-2.5-flash'),
      prompt: 'Write a story about $topic',
    );

    await for (final chunk in stream) {
      context.sendChunk(chunk.text);
    }
    return 'Story complete';
  },
);

// Flow 是一种 Action
final flow = Flow(name: 'myFlow', fn: ..., actionType: 'flow');
registry.register(flow);  // 存储在 _actions['flow']['myFlow']

// Tool 也是一种 Action
final tool = Tool(name: 'myTool', fn: ..., actionType: 'tool');
registry.register(tool);  // 存储在 _actions['tool']['myTool']

// 查找已注册的工具
final tool = await genkit.registry.lookupAction('tool', 'testTool');

// 查找已注册的流程
final flow = await genkit.registry.lookupAction('flow', 'testFlow');

/// Action 调用
final remoteAction = defineRemoteAction(
  url: 'http://localhost:3400/my-flow',
  inputSchema: .string(),
  outputSchema: .string(),
);

final response = await remoteAction(input: 'Hello from Dart!');
所以说,genkit-dart 正是通过可观察的 Flows 和统一的模型抽象层,让 AI 开发变得更像我们熟悉的传统软件工程。
我们来简单总结一下。在 Genkit 里,它主要定义了 AI 应用的几大基础构建块:
- Actions & Flows:这是 Genkit 的核心抽象。
Flow 是一个可追踪、能观测的工作流单元。通过 Flow 封装的 AI 逻辑,可以自动生成追踪数据,方便你在 Genkit 开发 UI 里调试。不管是 Flow 还是 Tool,本质上都是一种可被调用的 Action。
- Registry:它通过单例模式,统一管理所有的模型、工具、索引器等资源。
- Model 抽象层:它定义了统一的
GenerateRequest 和 GenerateResponse 接口,让你可以在不改动业务逻辑的情况下,通过配置轻松切换底层模型,比如从 Gemini 换到 OpenAI。
- Tooling (工具调用):它封装了函数调用,允许大模型直接调用你本地的 Dart 代码。
除此之外,Genkit 还自带了丰富的插件体系,方便用户进行第三方集成:
- 模型支持:
genkit_google_genai (Gemini), genkit_vertexai, genkit_openai, genkit_anthropic (Claude)
- Web 服务:
genkit_shelf 支持将 AI 流程直接挂载到 Dart 的标准 Web 服务器 shelf 上,作为 API 对外服务。
- 生态适配:
genkit_firebase_ai 提供了与 Firebase 生态的深度集成,这对移动端开发者尤其友好。
最值得一提的是,packages/genkit_mcp 同样实现了 MCP 协议。并且,packages/genkit_middleware 文件系统中间件还提供了诸如存储、审核或重试等支持:
final ai = Genkit(
  plugins: [
    googleAI(),
    RetryPlugin(), // Required for retry middleware
  ],
);

final response = await ai.generate(
  model: googleAI.gemini('gemini-2.5-flash'),
  prompt: 'Reliable request',
  use: [
    retry(
      maxRetries: 3,
      retryModel: true, // Retry model validation errors (default: true)
      retryTools: false, // Retry tool execution errors (default: false)
      statuses: [StatusCodes.UNAVAILABLE], // Retry only on specific errors
    ),
  ],
);
在 Demo 里的 agentic_patterns 还展示了如何构建 RAG 系统,实现更专业的智能体场景,比如迭代细化逻辑:让模型生成内容后,通过另一个 Action 进行自我纠错。
final iterativeRefinementFlow = defineIterativeRefinementFlow(
    ai,
    geminiFlash,
  );
final storyWriterFlow = defineStoryWriterFlow(ai, geminiFlash);
final marketingCopyFlow = defineMarketingCopyFlow(ai, geminiFlash);
final routerFlow = defineRouterFlow(ai, geminiFlash);
final toolCallingFlow = defineToolCallingFlow(ai, geminiFlash);
final researchAgent = defineResearchAgent(ai, geminiFlash);
final agenticRagFlow = defineAgenticRagFlow(ai, geminiFlash);
final statefulChatFlow = defineStatefulChatFlow(ai, geminiFlash);
final imageGeneratorFlow = defineImageGeneratorFlow(ai, geminiFlash);

Flow<IterativeRefinementInput, String, void, void>
defineIterativeRefinementFlow(Genkit ai, ModelRef geminiFlash) {
  return ai.defineFlow(
    name: 'iterativeRefinementFlow',
    inputSchema: IterativeRefinementInput.$schema,
    outputSchema: .string(),
    fn: (input, _) async {
      var content = '';
      var feedback = '';
      var attempts = 0;

      // Step 1: Generate the initial draft
      final draftResponse = await ai.generate(
        model: geminiFlash,
        prompt:
            'Write a short, single-paragraph blog post about: ${input.topic}.',
      );
      content = draftResponse.text;

      // Step 2: Iteratively refine the content
      while (attempts < 3) {
        attempts++;

        // The "Evaluator" provides feedback
        final evaluationResponse = await ai.generate(
          model: geminiFlash,
          prompt:
              'Critique the following blog post. Is it clear, concise, and engaging? Provide specific feedback for improvement. Post: "$content"',
          outputSchema: Evaluation.$schema,
        );

        final evaluation = evaluationResponse.output;
        if (evaluation == null) {
          throw Exception('Failed to evaluate content.');
        }

        if (evaluation.satisfied) {
          break; // Exit loop if content is good enough
        }

        feedback = evaluation.critique;

        // The "Optimizer" refines the content based on feedback
        final optimizationResponse = await ai.generate(
          model: geminiFlash,
          prompt:
              'Revise the following blog post based on the feedback provided.\nPost: "$content"\nFeedback: "$feedback"',
        );
        content = optimizationResponse.text;
      }

      return content;
    },
  );
}
更重要的是,虽然 Genkit 是 Google 开发的,并且与 Firebase 集成度很高(例如 genkit_firebase_ai),但它的设计是完全解耦的:
genkit_shelf 包允许你使用标准的 Dart Web 框架 shelf 来运行 AI 逻辑,完全不依赖 Firebase。- 你可以接入
genkit_openai、genkit_anthropic 等非 Google 的模型插件,把应用部署在任何支持 Dart 运行时的环境里。
更有趣的是,你可以在 Flutter App 中直接使用 Genkit 执行 AI 逻辑,调用本地模型;也可以把 Flutter App 作为客户端,去调用远端的 Genkit 服务。而远端的 Genkit 服务可以用 Python、TS、Go 甚至 Dart 来写:

最后别忘了,虽然 Genkit 仅直接提供了对 OpenAI、Claude、Gemini 等部分 Provider 的支持,但借助 OpenAI 协议兼容,你完全可以将 DeepSeek 、豆包、Qwen 等模型也纳入其中。例如:
final ai = Genkit(
  plugins: [
    // DeepSeek 集成
    openAI(
      name: 'deepseek',
      apiKey: Platform.environment['DEEPSEEK_API_KEY'],
      baseUrl: 'https://api.deepseek.com',
    ),
    // 豆包集成
    openAI(
      name: 'doubao',
      apiKey: Platform.environment['DOUBAO_API_KEY'],
      baseUrl: 'https://ark.cn-beijing.volces.com/api/v3',
    ),
  ],
);
当然,对于那些没有兼容协议的模型,你就需要自己动手实现一个 GenkitPlugin 了。
总而言之,Genkit Dart 的发布对 Flutter 生态来说是 AI 时代一次极其重要的能力补强。它使得 Flutter 能够迅速在多平台上实现 Agent 能力,进一步放大了 Flutter 的跨平台优势。
那么,你觉得 GenKit 对你来说会有用吗?
相关链接:
https://blog.dart.dev/announcing-genkit-dart-build-full-stack-ai-apps-with-dart-and-flutter-2a5c90a27aab
https://github.com/genkit-ai/genkit-dart
 发表于 2026-5-2 21:46:15
|
查看: 127|
回复: 0
发表于 2026-5-2 21:46:15
|
查看: 127|
回复: 0
