在当今高并发的互联网应用中,缓存已成为提升系统性能不可或缺的关键技术。本文将从零开始,带你系统学习Caffeine这款高性能的Java缓存框架,并通过详尽的代码示例和实战案例,掌握其核心原理与高级应用,助你构建高效、稳定的缓存层。
1. Caffeine简介
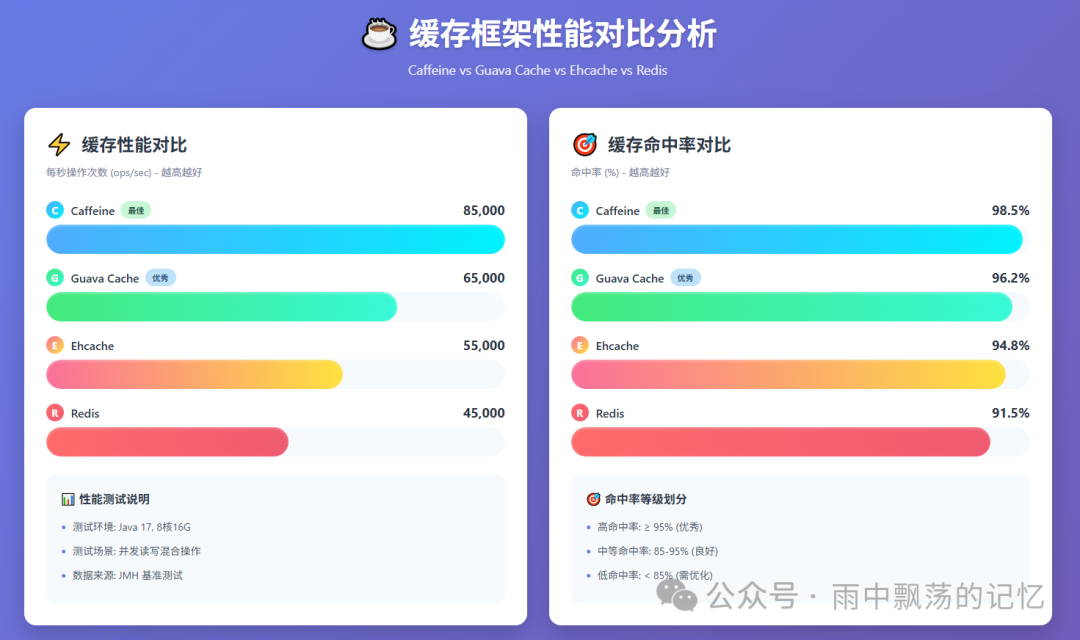
Caffeine 是一个由 Google 开发并开源的高性能 Java 缓存库,在众多性能基准测试中表现卓越,常被认为是 Java 缓存领域的标杆。
为什么选择 Caffeine 呢?
- 高性能:它采用了如 Window TinyLFU 等先进算法,实现了卓越的读写性能。
- 功能丰富:支持多种过期策略、异步加载、统计信息、事件监听等高级特性。
- 线程安全:内置优秀的并发控制机制,保证了高并发场景下的数据安全与性能。
- 易于使用:API 设计简洁直观,学习和集成成本低。
- 社区活跃:项目持续维护更新,生态完善。
架构设计
Caffeine 的核心架构主要包含以下几个层次:
- 缓存容器:底层使用改进的 ConcurrentHashMap 作为数据存储结构。
- 访问策略:采用创新的 Window TinyLFU 算法进行访问频率统计,相比传统 LRU/LFU 能更好地适应访问模式变化。
- 淘汰策略:结合时间窗口和访问频率的混合淘汰策略,智能管理缓存容量。
- 事件机制:提供完整的监听器接口,支持缓存项的创建、更新、移除等事件。
2. 快速入门
Maven 依赖
首先,在你的项目中引入 Caffeine 的 Maven 依赖。
<dependency>
    <groupId>com.github.ben-manes.caffeine</groupId>
    <artifactId>caffeine</artifactId>
    <version>3.1.8</version>
</dependency>
基础使用示例
让我们从一个最简单的例子开始,了解如何创建和使用一个基础的缓存。
import com.github.benmanes.caffeine.cache.Cache;
import com.github.benmanes.caffeine.cache.Caffeine;
import java.util.concurrent.TimeUnit;

public class BasicCacheExample {
    public static void main(String[] args) {
        // 创建缓存
        Cache<String, String> cache = Caffeine.newBuilder()
            .maximumSize(1000) // 最大缓存数量
            .expireAfterWrite(10, TimeUnit.MINUTES) // 写入后10分钟过期
            .build();

        // 存储数据
        cache.put("key1", "value1");

        // 获取数据(如果不存在则返回null)
        String value = cache.getIfPresent("key1");
        System.out.println("缓存值: " + value);

        // 获取或计算(如果不存在则通过函数加载)
        String value2 = cache.get("key2", k -> "defaultValue");
        System.out.println("缓存值: " + value2);

        // 移除数据
        cache.invalidate("key1");
    }
}
3. 核心概念
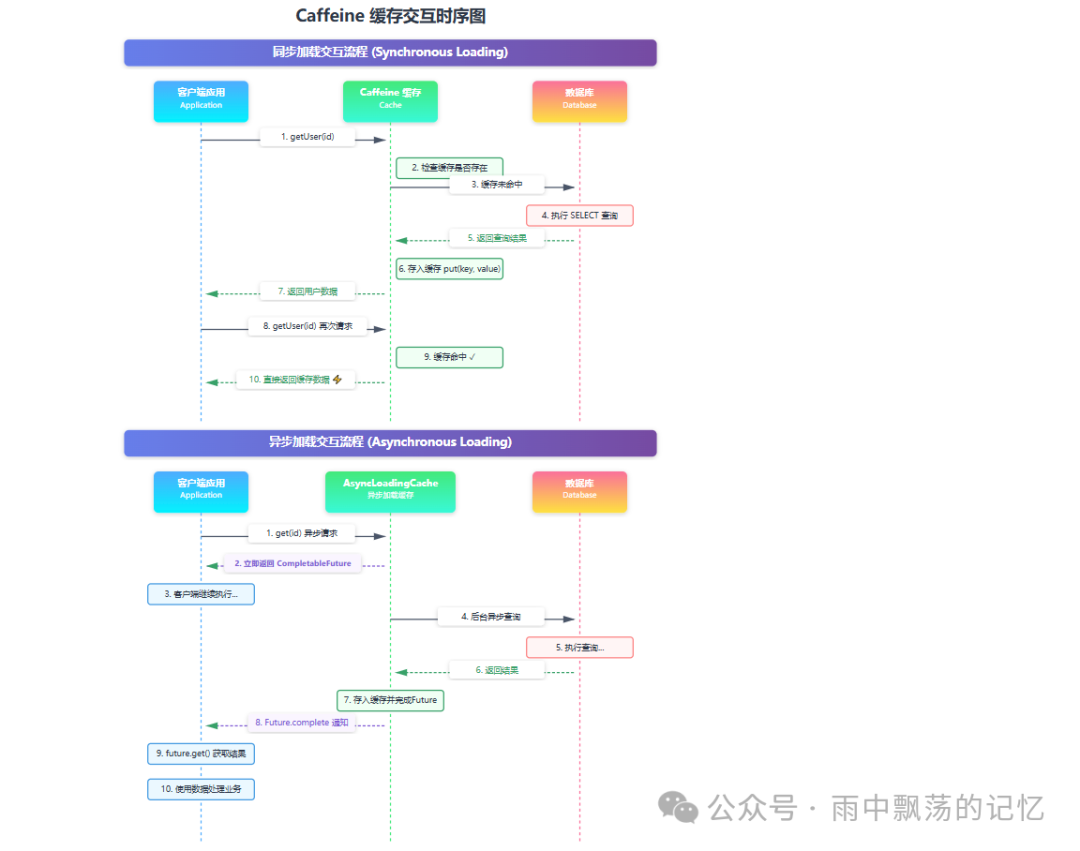
3.1 Cache vs LoadingCache vs AsyncLoadingCache
Caffeine 提供了三种主要的缓存接口以满足不同场景:
- Cache:最基础的缓存接口,需要手动调用
put 方法存储数据。
- LoadingCache:继承自 Cache,内置了同步加载器 (
CacheLoader),当缓存未命中时自动同步加载数据。
- AsyncLoadingCache:提供异步加载能力,当缓存未命中时,返回一个
CompletableFuture,数据加载在后台完成,不阻塞调用线程。
3.2 过期策略
Caffeine 提供了灵活的数据过期机制,你可以根据写入时间、访问时间或自定义逻辑来设置。
Caffeine.newBuilder()
    .expireAfterWrite(10, TimeUnit.MINUTES) // 写入后过期
    .expireAfterAccess(5, TimeUnit.MINUTES)  // 最后访问后过期
    .expireAfter(30, TimeUnit.MINUTES);       // 自定义过期逻辑(需实现Expiry接口)
3.3 淘汰策略
当缓存达到容量上限时,需要通过淘汰策略来移除部分数据。Caffeine 支持基于大小、权重和引用类型的淘汰。
Caffeine.newBuilder()
    .maximumSize(1000)         // 基于条目数量限制
    .maximumWeight(10000)      // 基于权重限制(需提供Weigher)
    .weakKeys()               // 键使用弱引用(允许被GC)
    .weakValues()             // 值使用弱引用
    .softValues();            // 值使用软引用(内存不足时被GC)
4. 高级特性

4.1 异步加载
对于加载成本较高的数据,使用 AsyncLoadingCache 可以避免线程阻塞,极大提升系统的响应能力和吞吐量。在构建现代高并发应用时,这通常是提升性能的有效手段。
AsyncLoadingCache<String, User> asyncCache = Caffeine.newBuilder()
    .maximumSize(1000)
    .expireAfterWrite(10, TimeUnit.MINUTES)
    .buildAsync(key -> loadUserFromDatabase(key));

// 异步获取,立即返回Future,不阻塞
CompletableFuture<User> userFuture = asyncCache.get("user1");
userFuture.thenAccept(user -> {
    System.out.println("获取用户: " + user.getName());
});
4.2 事件监听
通过 RemovalListener,你可以监听缓存项的移除事件,并执行相应的清理或日志记录操作。
Cache<String, String> cache = Caffeine.newBuilder()
    .maximumSize(1000)
    .removalListener((key, value, cause) -> {
        System.out.println("缓存移除: " + key + " -> " + value + ", 原因: " + cause);
    })
    .build();
4.3 统计信息
启用统计功能可以帮助你监控缓存的使用效率,为调优提供数据支持。
Cache<String, String> cache = Caffeine.newBuilder()
    .maximumSize(1000)
    .recordStats() // 启用统计
    .build();

// 使用缓存...
cache.put("key1", "value1");
cache.getIfPresent("key1");

// 获取统计信息
CacheStats stats = cache.stats();
System.out.println("命中率: " + stats.hitRate());
System.out.println("平均加载时间: " + stats.averageLoadPenalty());
System.out.println("总请求数: " + stats.requestCount());
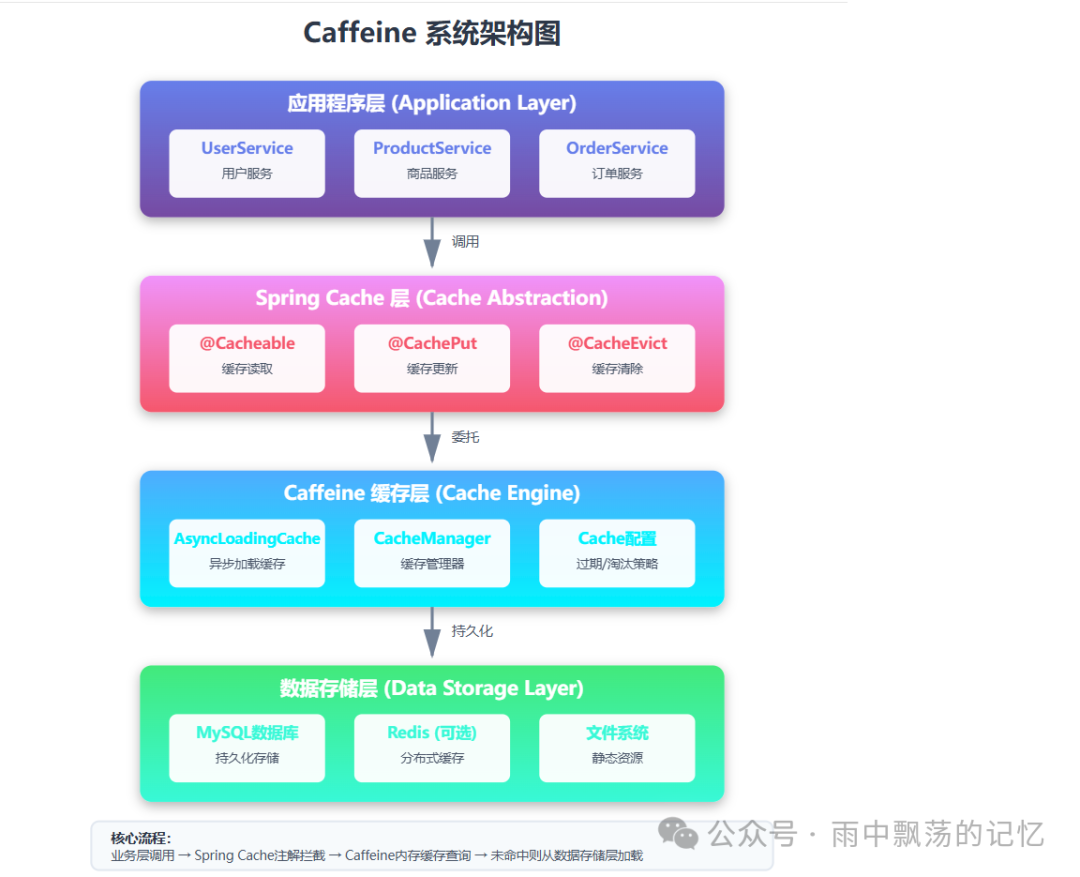
5. Spring Boot 集成
将 Caffeine 与 Spring Boot 的缓存抽象层集成,可以让我们通过简单的注解来管理缓存,极大地提升开发效率。
5.1 添加依赖
除了 Caffeine 本身,还需要 Spring Boot 的缓存启动器。
<dependency>
    <groupId>org.springframework.boot</groupId>
    <artifactId>spring-boot-starter-cache</artifactId>
</dependency>
<dependency>
    <groupId>com.github.ben-manes.caffeine</groupId>
    <artifactId>caffeine</artifactId>
</dependency>
5.2 配置类
创建一个配置类,定义 Caffeine 作为 Spring 的缓存管理器。
import com.github.ben-manes.caffeine.cache.Caffeine;
import org.springframework.cache.CacheManager;
import org.springframework.cache.annotation.EnableCaching;
import org.springframework.cache.caffeine.CaffeineCacheManager;
import org.springframework.context.annotation.Bean;
import org.springframework.context.annotation.Configuration;
import java.util.concurrent.TimeUnit;

@Configuration
@EnableCaching
public class CacheConfig {

    @Bean
    public CacheManager cacheManager() {
        CaffeineCacheManager cacheManager = new CaffeineCacheManager();
        cacheManager.setCaffeine(caffeineCacheBuilder());
        return cacheManager;
    }

    private Caffeine<Object, Object> caffeineCacheBuilder() {
        return Caffeine.newBuilder()
                .initialCapacity(100)
                .maximumSize(1000)
                .expireAfterWrite(10, TimeUnit.MINUTES)
                .recordStats();
    }
}
5.3 使用注解
在 Service 层的方法上使用 @Cacheable, @CachePut, @CacheEvict 注解,即可轻松实现缓存逻辑。
package com.example.caffeine.demo.service;

import com.example.caffeine.demo.model.User;
import org.springframework.cache.annotation.CacheEvict;
import org.springframework.cache.annotation.CachePut;
import org.springframework.cache.annotation.Cacheable;
import org.springframework.stereotype.Service;

import java.util.*;
import java.util.concurrent.ConcurrentHashMap;
import java.util.concurrent.TimeUnit;

@Service
public class UserService {

    // 模拟数据库存储
    private final Map<Long, User> userMap = new ConcurrentHashMap<>();

    public UserService() {
        // 初始化一些测试数据
        userMap.put(1L, new User(1L, "张三", "zhangsan@example.com", "13800138000"));
        userMap.put(2L, new User(2L, "李四", "lisi@example.com", "13900139000"));
        userMap.put(3L, new User(3L, "王五", "wangwu@example.com", "13700137000"));
    }

    /**
     * 获取用户信息(带缓存)
     * @param userId 用户ID
     * @return 用户信息
     */
    @Cacheable(value = "users", key = "#userId")
    public User getUserById(Long userId) {
        // 模拟数据库查询耗时
        try {
            TimeUnit.MILLISECONDS.sleep(100);
        } catch (InterruptedException e) {
            Thread.currentThread().interrupt();
        }

        User user = userMap.get(userId);
        if (user == null) {
            throw new RuntimeException("用户不存在: " + userId);
        }
        return user;
    }

    /**
     * 获取所有用户信息
     */
    @Cacheable(value = "users", key = "'all'")
    public List<User> getAllUsers() {
        // 模拟数据库查询耗时
        try {
            TimeUnit.MILLISECONDS.sleep(200);
        } catch (InterruptedException e) {
            Thread.currentThread().interrupt();
        }

        return new ArrayList<>(userMap.values());
    }

    /**
     * 创建用户
     */
    @CachePut(value = "users", key = "#user.id")
    public User createUser(User user) {
        userMap.put(user.getId(), user);
        return user;
    }

    /**
     * 删除用户
     */
    @CacheEvict(value = "users", key = "#userId")
    public void deleteUser(Long userId) {
        User removed = userMap.remove(userId);
        if (removed == null) {
            throw new RuntimeException("用户不存在: " + userId);
        }
    }

    /**
     * 批量获取用户信息
     */
    @Cacheable(value = "users", key = "'batch:' + #userIds.hashCode()")
    public Map<Long, User> batchGetUsers(Set<Long> userIds) {
        // 模拟批量查询耗时
        try {
            TimeUnit.MILLISECONDS.sleep(150);
        } catch (InterruptedException e) {
            Thread.currentThread().interrupt();
        }

        Map<Long, User> result = new HashMap<>();
        for (Long userId : userIds) {
            User user = userMap.get(userId);
            if (user != null) {
                result.put(userId, user);
            }
        }
        return result;
    }

    /**
     * 清空所有缓存
     */
    @CacheEvict(value = "users", allEntries = true)
    public void clearAllCache() {
        System.out.println("清空所有用户缓存");
    }
}
6. 生产环境最佳实践
6.1 缓存雪崩与击穿
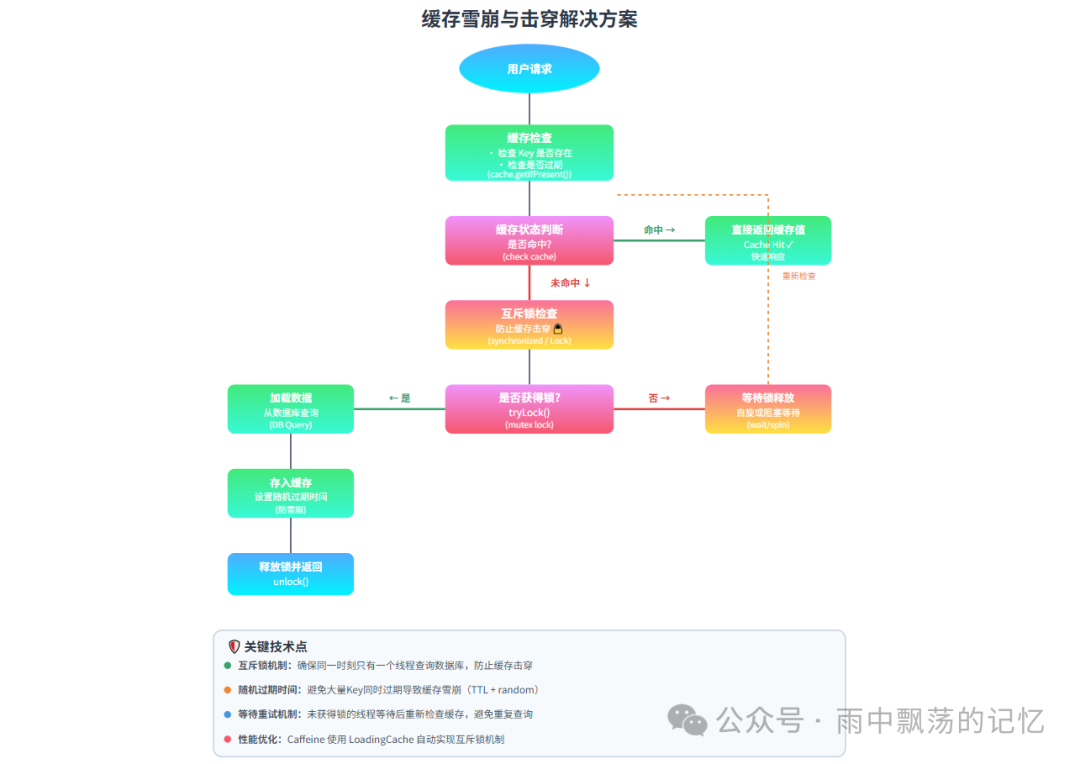
缓存雪崩 指大量缓存数据在同一时间过期,导致所有请求直接打到数据库。
缓存击穿 指某个热点 Key 过期瞬间,大量并发请求同时无法命中缓存,直接查询数据库。
解决方案:
-
设置随机过期时间:避免大量 Key 同时失效。
Caffeine.newBuilder()
    .expireAfterWrite(10 + new Random().nextInt(5), TimeUnit.MINUTES);
-
使用互斥锁:防止缓存击穿,同一 Key 只允许一个线程查询数据库。
private final Lock lock = new ReentrantLock();

public User getUserWithLock(Long id) {
    User user = cache.getIfPresent(id);
    if (user != null) {
        return user;
    }

    lock.lock();
    try {
        // 双重检查
        user = cache.getIfPresent(id);
        if (user != null) {
            return user;
        }

        user = userRepository.findById(id);
        cache.put(id, user);
        return user;
    } finally {
        lock.unlock();
    }
}
-
利用 Caffeine 的异步加载:其内置机制能天然地防止击穿。
AsyncLoadingCache<Long, User> asyncCache = Caffeine.newBuilder()
    .maximumSize(1000)
    .expireAfterWrite(10, TimeUnit.MINUTES)
    .buildAsync(key -> loadUserFromDatabase(key));

public User getUser(Long id) {
    return asyncCache.get(id).join();
}
6.2 缓存预热
在应用启动时,主动将热点数据加载到缓存中,可以避免上线初期大量缓存未命中导致的性能问题。
package com.example.caffeine.demo.cache;

import com.example.caffeine.demo.model.User;
import com.example.caffeine.demo.service.UserService;
import lombok.extern.slf4j.Slf4j;
import org.springframework.beans.factory.annotation.Autowired;
import org.springframework.boot.CommandLineRunner;
import org.springframework.stereotype.Component;

import java.util.*;
import java.util.concurrent.CompletableFuture;
import java.util.concurrent.ExecutorService;
import java.util.concurrent.Executors;
import java.util.concurrent.TimeUnit;
import java.util.stream.Collectors;

@Slf4j
@Component
public class CacheWarmupRunner implements CommandLineRunner {

    @Autowired
    private UserService userService;

    // 预热配置(可外置到配置文件中)
    private static class WarmupConfig {
        private static final List<Long> HOT_USER_IDS = Arrays.asList(1L, 2L, 3L, 4L, 5L);
        private static final int BATCH_SIZE = 3;
        private static final int THREAD_POOL_SIZE = 2;
        private static final boolean ASYNC_WARMUP = true;
    }

    @Override
    public void run(String... args) throws Exception {
        log.info("开始执行缓存预热...");
        long startTime = System.currentTimeMillis();

        if (WarmupConfig.ASYNC_WARMUP) {
            // 异步预热
            asyncWarmup();
        } else {
            // 同步预热
            syncWarmup();
        }

        long endTime = System.currentTimeMillis();
        log.info("缓存预热完成!耗时: {} ms", endTime - startTime);
    }

    // 同步预热逻辑
    private void syncWarmup() {
        log.info("使用同步方式预热缓存...");
        for (Long userId : WarmupConfig.HOT_USER_IDS) {
            warmupSingleUser(userId);
        }
        // 也可预热所有用户:userService.getAllUsers();
    }

    // 异步预热逻辑
    private void asyncWarmup() {
        log.info("使用异步方式预热缓存...");
        ExecutorService executor = Executors.newFixedThreadPool(WarmupConfig.THREAD_POOL_SIZE);

        List<CompletableFuture<Void>> futures = WarmupConfig.HOT_USER_IDS.stream()
            .map(userId -> CompletableFuture.runAsync(() -> warmupSingleUser(userId), executor))
            .collect(Collectors.toList());

        CompletableFuture.allOf(futures.toArray(new CompletableFuture[0]))
            .whenComplete((result, ex) -> {
                if (ex != null) {
                    log.error("部分预热任务失败", ex);
                } else {
                    log.info("所有预热任务完成");
                }
                executor.shutdown();
            })
            .join();
    }

    private void warmupSingleUser(Long userId) {
        log.info("预热用户: {}", userId);
        try {
            User user = userService.getUserById(userId);
            log.debug("用户 {} 基本信息预热完成", userId);
        } catch (Exception e) {
            log.error("预热用户 {} 失败: {}", userId, e.getMessage());
        }
    }
}
6.3 缓存监控
在生产环境中,对缓存的命中率、加载时间、大小等指标进行监控至关重要。Caffeine 的 recordStats() 功能为此提供了基础。
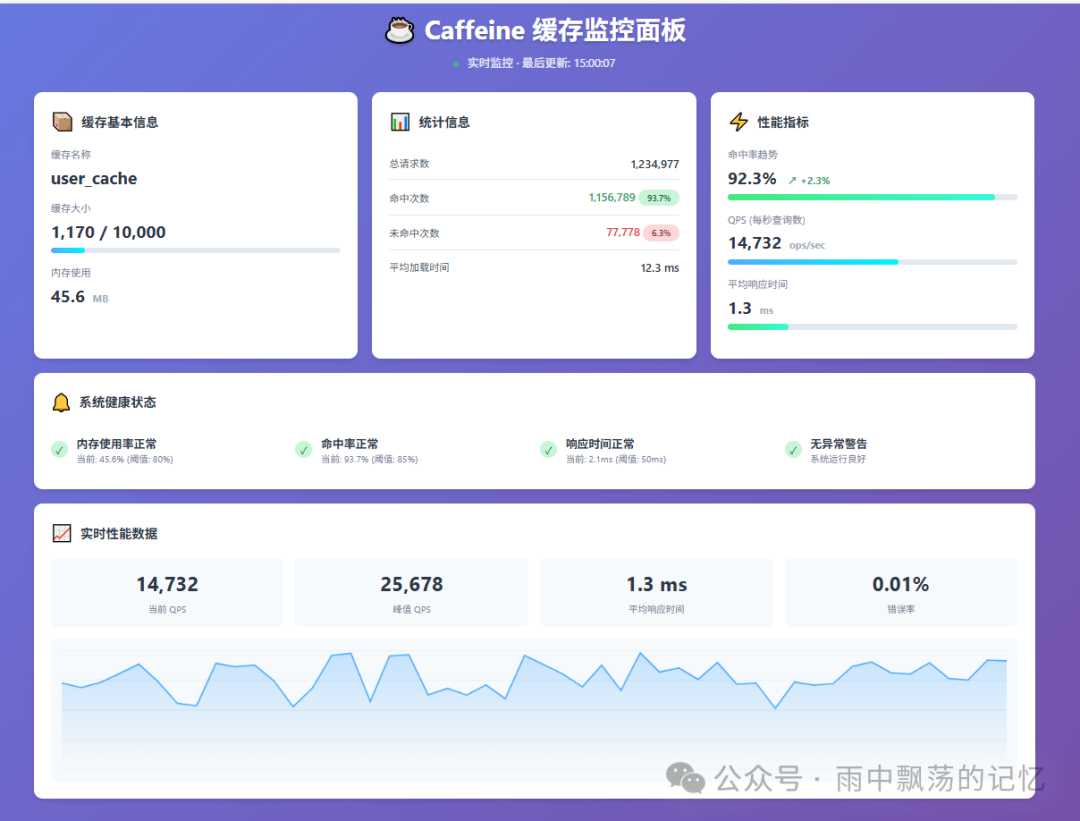
你可以通过暴露 HTTP 端点或集成到现有监控系统(如 Prometheus)来展示这些指标。
// 示例:通过Spring Boot Actuator或自定义端点暴露统计信息
@RestController
@RequestMapping("/cache")
public class CacheMonitorController {

    @Autowired
    private CacheManager cacheManager;

    @GetMapping("/stats/{cacheName}")
    public ResponseEntity<Map<String, Object>> getCacheStat(@PathVariable String cacheName) {
        org.springframework.cache.Cache springCache = cacheManager.getCache(cacheName);
        if (springCache == null) {
            return ResponseEntity.notFound().build();
        }

        Object nativeCache = springCache.getNativeCache();
        if (nativeCache instanceof Cache) {
            Cache<?, ?> cache = (Cache<?, ?>) nativeCache;
            CacheStats stats = cache.stats();

            Map<String, Object> result = new HashMap<>();
            result.put("cacheName", cacheName);
            result.put("estimatedSize", cache.estimatedSize());
            result.put("hitRate", stats.hitRate());
            result.put("requestCount", stats.requestCount());
            result.put("averageLoadPenalty", stats.averageLoadPenalty());
            result.put("evictionCount", stats.evictionCount());
            // ... 添加更多指标

            return ResponseEntity.ok(result);
        }
        return ResponseEntity.badRequest().body(Collections.singletonMap("error", "Unsupported cache type"));
    }
}
7. 性能优化技巧
7.1 批量加载优化
当需要查询多个 Key 时,使用 getAll 方法配合批量加载函数,比循环调用 get 更高效,能减少网络或数据库的往返次数。
public class BatchUserService {

    private final AsyncLoadingCache<Long, User> userCache;

    public BatchUserService() {
        this.userCache = Caffeine.newBuilder()
            .maximumSize(1000)
            .expireAfterWrite(10, TimeUnit.MINUTES)
            .buildAsync(this::batchLoadUsers); // 传入批量加载函数
    }

    private Map<Long, User> batchLoadUsers(Set<Long> userIds) {
        if (userIds.isEmpty()) {
            return Collections.emptyMap();
        }
        // 这里执行一次批量数据库查询
        List<User> users = userRepository.findAllById(userIds);
        return users.stream()
            .collect(Collectors.toMap(User::getId, user -> user));
    }

    public Map<Long, User> getUsers(Set<Long> userIds) {
        // 批量获取,内部会优化调用 batchLoadUsers
        return userCache.getAll(userIds).join();
    }
}
8. 实战案例:用户信息缓存服务
下面是一个更贴近实际业务的、功能完善的缓存服务类示例。
import com.github.benmanes.caffeine.cache.Cache;
import com.github.benmanes.caffeine.cache.Caffeine;
import org.springframework.stereotype.Service;

import java.util.concurrent.TimeUnit;
import java.util.function.Function;
import java.util.stream.Collectors;

@Service
public class UserInfoCacheService {

    private final Cache<Long, UserInfo> userInfoCache;

    public UserInfoCacheService() {
        this.userInfoCache = Caffeine.newBuilder()
            .maximumSize(10000)
            .expireAfterWrite(30, TimeUnit.MINUTES)
            .expireAfterAccess(10, TimeUnit.MINUTES)
            .recordStats()
            .build();
    }

    /**
     * 获取用户信息
     */
    public UserInfo getUserInfo(Long userId) {
        return userInfoCache.get(userId, this::loadUserInfoFromDB);
    }

    /**
     * 批量获取用户信息
     */
    public Map<Long, UserInfo> batchGetUserInfo(Set<Long> userIds) {
        return userInfoCache.getAll(userIds, this::batchLoadUserInfoFromDB);
    }

    /**
     * 更新用户信息
     */
    public void updateUserInfo(Long userId, UserInfo userInfo) {
        userInfoCache.put(userId, userInfo);
    }

    /**
     * 删除用户信息
     */
    public void removeUserInfo(Long userId) {
        userInfoCache.invalidate(userId);
    }

    /**
     * 获取缓存统计
     */
    public CacheStats getCacheStats() {
        return userInfoCache.stats();
    }

    // ... loadUserInfoFromDB 和 batchLoadUserInfoFromDB 实现 ...
}
9. 总结
Caffeine 凭借其卓越的性能、丰富的功能特性和简洁的 API 设计,无疑是 Java 生态中本地缓存的最佳选择之一。无论是作为简单的内存缓存,还是与 Spring Boot 深度集成,它都能显著提升应用性能。
掌握其核心概念、高级特性以及生产环境的最佳实践(如防雪崩击穿、预热、监控),能够帮助我们在实际项目中构建出高效、稳定、可观测的缓存层,从容应对高并发挑战。如果你想深入探讨更多Java性能优化或System Design相关话题,欢迎在云栈社区与其他开发者交流分享。同时,研究像 Caffeine 这样的热门开源项目的源码与设计思想,也是提升自身技术深度的绝佳途径。
 发表于 2026-1-18 00:37:30
|
查看: 152|
回复: 0
发表于 2026-1-18 00:37:30
|
查看: 152|
回复: 0
