最近在团队中遇到一个关于设计模式使用的小插曲。一位同事在实现一个导入功能时,选择了使用责任链模式,但最终代码量庞大且bug频出,未能达到预期的简洁和清晰。实际上,对于那个特定的导入场景,模板方法模式或许是更合适的选择。这不禁让人思考:学好设计模式固然重要,但切忌为了使用而使用,让一个原本百来行就能搞定的功能膨胀到数千行。今天,我们就来深入探讨一下责任链设计模式,看看它如何优雅地解决一类特定问题。
什么是责任链模式?
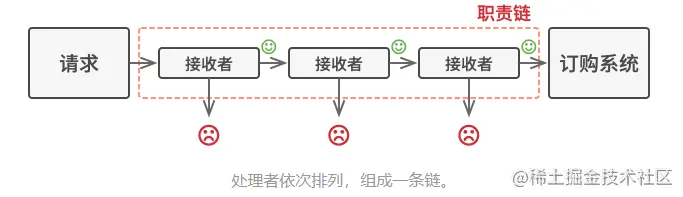
责任链模式是一种行为设计模式,它允许你将请求沿着一条处理者链进行传递。每个处理者接收到请求后,可以选择自己处理,也可以将其传递给链中的下一个处理者。这种模式将请求的发送者与接收者解耦,并允许多个对象都有机会处理请求。
责任链的典型使用场景
责任链模式在软件开发中有不少用武之地:
- 多条件流程判断:例如权限控制,需要依次校验多个条件。
- ERP系统流程审批:如报销流程,需要经过项目经理、部门经理、总经理等多级审批。
- Java Web过滤器:
Servlet Filter 的底层实现机制就是责任链模式。
如果不使用设计模式,当处理逻辑变得复杂或需求变更时,代码很容易变得臃肿且难以维护。下面我们通过一个例子来感受一下。
反例:多层嵌套的if-else地狱
假设我们有一个闯关游戏,进入下一关的条件是上一关的分数达标:
- 游戏共有3关。
- 进入第二关需要第一关得分 >= 80。
- 进入第三关需要第二关得分 >= 90。
新手可能会写出这样的代码:
//第一关
public class FirstPassHandler {
    public int handler(){
        System.out.println("第一关-->FirstPassHandler");
        return 80;
    }
}

//第二关
public class SecondPassHandler {
    public int handler(){
        System.out.println("第二关-->SecondPassHandler");
        return 90;
    }
}

//第三关
public class ThirdPassHandler {
    public int handler(){
        System.out.println("第三关-->ThirdPassHandler,这是最后一关啦");
        return 95;
    }
}

//客户端
public class HandlerClient {
    public static void main(String[] args){

        FirstPassHandler firstPassHandler = new FirstPassHandler();//第一关
        SecondPassHandler secondPassHandler = new SecondPassHandler();//第二关
        ThirdPassHandler thirdPassHandler = new ThirdPassHandler();//第三关

        int firstScore = firstPassHandler.handler();
        //第一关的分数大于等于80则进入第二关
        if(firstScore >= 80){
            int secondScore = secondPassHandler.handler();
            //第二关的分数大于等于90则进入第二关
            if(secondScore >= 90){
                thirdPassHandler.handler();
            }
        }
    }
}
试想,如果这个游戏有100关,代码会变成什么样子?
if(第1关通过){
    // 第2关 游戏
    if(第2关通过){
        // 第3关 游戏
        if(第3关通过){
            // 第4关 游戏
            if(第4关通过){
                // 第5关 游戏
                if(第5关通过){
                    // 第6关 游戏
                    if(第6关通过){
                        //...
                    }
                }
            }
        }
    }
}
这种“箭头型”代码(金字塔型嵌套)不仅冗余,而且当需要调整关卡顺序或增减关卡时,改动成本高、风险大,是典型的糟糕实现。
初步改造:引入链式调用
如何解决?我们可以将每一关“连接”起来,形成一个链条。第一关通过后自动进入第二关,第二关通过后进入第三关,以此类推。这样客户端就不再需要冗长的多重if判断。
public class FirstPassHandler {
    /**
     * 第一关的下一关是 第二关
     */
    private SecondPassHandler secondPassHandler;

    public void setSecondPassHandler(SecondPassHandler secondPassHandler){
        this.secondPassHandler = secondPassHandler;
    }

    //本关卡游戏得分
    private int play(){
        return 80;
    }

    public int handler(){
        System.out.println("第一关-->FirstPassHandler");
        if(play() >= 80){
            //分数>=80 并且存在下一关才进入下一关
            if(this.secondPassHandler != null){
                return this.secondPassHandler.handler();
            }
        }

        return 80;
    }
}

public class SecondPassHandler {

    /**
     * 第二关的下一关是 第三关
     */
    private ThirdPassHandler thirdPassHandler;

    public void setThirdPassHandler(ThirdPassHandler thirdPassHandler){
        this.thirdPassHandler = thirdPassHandler;
    }

    //本关卡游戏得分
    private int play(){
        return 90;
    }

    public int handler(){
        System.out.println("第二关-->SecondPassHandler");

        if(play() >= 90){
            //分数>=90 并且存在下一关才进入下一关
            if(this.thirdPassHandler != null){
                return this.thirdPassHandler.handler();
            }
        }

        return 90;
    }
}

public class ThirdPassHandler {

    //本关卡游戏得分
    private int play(){
        return 95;
    }

    /**
     * 这是最后一关,因此没有下一关
     */
    public int handler(){
        System.out.println("第三关-->ThirdPassHandler,这是最后一关啦");
        return play();
    }
}

public class HandlerClient {
    public static void main(String[] args){

        FirstPassHandler firstPassHandler = new FirstPassHandler();//第一关
        SecondPassHandler secondPassHandler = new SecondPassHandler();//第二关
        ThirdPassHandler thirdPassHandler = new ThirdPassHandler();//第三关

        firstPassHandler.setSecondPassHandler(secondPassHandler);//第一关的下一关是第二关
        secondPassHandler.setThirdPassHandler(thirdPassHandler);//第二关的下一关是第三关

        //说明:因为第三关是最后一关,因此没有下一关
        //开始调用第一关 每一个关卡是否进入下一关卡 在每个关卡中判断
        firstPassHandler.handler();

    }
}
现有模式的缺点
虽然初步实现了链式调用,但当前方案仍有明显不足:
- 耦合性强:每个关卡中持有的“下一关”成员变量类型都不相同(
FirstPassHandler持有SecondPassHandler),导致构建链条非常不方便,扩展性差。
- 职责不统一:每个关卡类没有统一的抽象,难以进行统一管理和扩展。
标准责任链改造
为了解决上述问题,我们可以抽象出一个处理器父类(或接口),让所有具体关卡都继承或实现它。这就是标准的责任链模式。
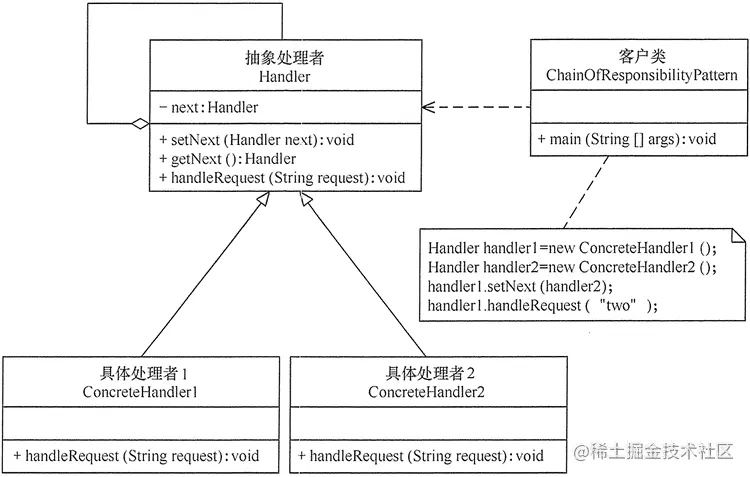
首先,了解责任链模式的三个核心角色:
- 抽象处理者(Handler):定义处理请求的接口,通常包含一个设置后继者的方法和一个处理请求的抽象方法。
- 具体处理者(Concrete Handler):实现抽象处理者的接口,负责判断并处理请求,或将其传递给后继者。
- 客户类(Client):创建处理链,并向链头的处理者提交请求。
让我们用标准模式重构闯关游戏:
public abstract class AbstractHandler {

    /**
     * 下一关用当前抽象类来接收
     */
    protected AbstractHandler next;

    public void setNext(AbstractHandler next){
        this.next = next;
    }

    public abstract int handler();
}

public class FirstPassHandler extends AbstractHandler{

    private int play(){
        return 80;
    }

    @Override
    public int handler(){
        System.out.println("第一关-->FirstPassHandler");
        int score = play();
        if(score >= 80){
            //分数>=80 并且存在下一关才进入下一关
            if(this.next != null){
                return this.next.handler();
            }
        }
        return score;
    }
}

public class SecondPassHandler extends AbstractHandler{

    private int play(){
        return 90;
    }

    public int handler(){
        System.out.println("第二关-->SecondPassHandler");

        int score = play();
        if(score >= 90){
            //分数>=90 并且存在下一关才进入下一关
            if(this.next != null){
                return this.next.handler();
            }
        }

        return score;
    }
}

public class ThirdPassHandler extends AbstractHandler{

    private int play(){
        return 95;
    }

    public int handler(){
        System.out.println("第三关-->ThirdPassHandler");
        int score = play();
        if(score >= 95){
            //分数>=95 并且存在下一关才进入下一关
            if(this.next != null){
                return this.next.handler();
            }
        }
        return score;
    }
}

public class HandlerClient {
    public static void main(String[] args){

        FirstPassHandler firstPassHandler = new FirstPassHandler();//第一关
        SecondPassHandler secondPassHandler = new SecondPassHandler();//第二关
        ThirdPassHandler thirdPassHandler = new ThirdPassHandler();//第三关

        // 和上面没有更改的客户端代码相比,只有这里的set方法发生变化,其他都是一样的
        firstPassHandler.setNext(secondPassHandler);//第一关的下一关是第二关
        secondPassHandler.setNext(thirdPassHandler);//第二关的下一关是第三关

        //说明:因为第三关是最后一关,因此没有下一关

        //从第一个关卡开始
        firstPassHandler.handler();

    }
}
现在,所有关卡处理器都继承自同一个抽象类,通过setNext方法可以灵活地组合成任何顺序的处理链,扩展性大大增强。
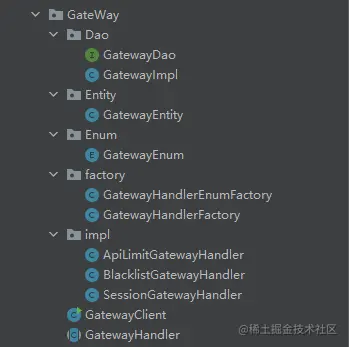
进阶:使用工厂与枚举实现动态配置
更进一步,我们可以将处理链的配置关系外化,例如维护在配置文件或枚举中。这样可以在不修改代码的情况下,动态调整处理链。以下是一个使用枚举和工厂模式动态构建责任链模式的简化示例。
public enum GatewayEnum {
    // handlerId, 拦截者名称,全限定类名,preHandlerId,nextHandlerId
    API_HANDLER(new GatewayEntity(1, "api接口限流", "cn.dgut.design.chain_of_responsibility.GateWay.impl.ApiLimitGatewayHandler", null, 2)),
    BLACKLIST_HANDLER(new GatewayEntity(2, "黑名单拦截", "cn.dgut.design.chain_of_responsibility.GateWay.impl.BlacklistGatewayHandler", 1, 3)),
    SESSION_HANDLER(new GatewayEntity(3, "用户会话拦截", "cn.dgut.design.chain_of_responsibility.GateWay.impl.SessionGatewayHandler", 2, null)),
    ;

    GatewayEntity gatewayEntity;

    public GatewayEntity getGatewayEntity(){
        return gatewayEntity;
    }

    GatewayEnum(GatewayEntity gatewayEntity) {
        this.gatewayEntity = gatewayEntity;
    }
}

public class GatewayEntity {

    private String name;

    private String conference;

    private Integer handlerId;

    private Integer preHandlerId;

    private Integer nextHandlerId;

    // Getter and Setter 省略
}

public interface GatewayDao {

    /**
     * 根据 handlerId 获取配置项
     * @param handlerId
     * @return
     */
    GatewayEntity getGatewayEntity(Integer handlerId);

    /**
     * 获取第一个处理者
     * @return
     */
    GatewayEntity getFirstGatewayEntity();
}

public class GatewayImpl implements GatewayDao {

    /**
     * 初始化,将枚举中配置的handler初始化到map中,方便获取
     */
    private static Map<Integer, GatewayEntity> gatewayEntityMap = new HashMap<>();

    static {
        GatewayEnum[] values = GatewayEnum.values();
        for (GatewayEnum value : values) {
            GatewayEntity gatewayEntity = value.getGatewayEntity();
            gatewayEntityMap.put(gatewayEntity.getHandlerId(), gatewayEntity);
        }
    }

    @Override
    public GatewayEntity getGatewayEntity(Integer handlerId){
        return gatewayEntityMap.get(handlerId);
    }

    @Override
    public GatewayEntity getFirstGatewayEntity(){
        for (Map.Entry<Integer, GatewayEntity> entry : gatewayEntityMap.entrySet()) {
            GatewayEntity value = entry.getValue();
            //  没有上一个handler的就是第一个
            if (value.getPreHandlerId() == null) {
                return value;
            }
        }
        return null;
    }
}

public class GatewayHandlerEnumFactory {

    private static GatewayDao gatewayDao = new GatewayImpl();

    // 提供静态方法,获取第一个handler
    public static GatewayHandler getFirstGatewayHandler(){

        GatewayEntity firstGatewayEntity = gatewayDao.getFirstGatewayEntity();
        GatewayHandler firstGatewayHandler = newGatewayHandler(firstGatewayEntity);
        if (firstGatewayHandler == null) {
            return null;
        }

        GatewayEntity tempGatewayEntity = firstGatewayEntity;
        Integer nextHandlerId = null;
        GatewayHandler tempGatewayHandler = firstGatewayHandler;
        // 迭代遍历所有handler,以及将它们链接起来
        while ((nextHandlerId = tempGatewayEntity.getNextHandlerId()) != null) {
            GatewayEntity gatewayEntity = gatewayDao.getGatewayEntity(nextHandlerId);
            GatewayHandler gatewayHandler = newGatewayHandler(gatewayEntity);
            tempGatewayHandler.setNext(gatewayHandler);
            tempGatewayHandler = gatewayHandler;
            tempGatewayEntity = gatewayEntity;
        }
        // 返回第一个handler
        return firstGatewayHandler;
    }

    /**
     * 反射实体化具体的处理者
     * @param firstGatewayEntity
     * @return
     */
    private static GatewayHandler newGatewayHandler(GatewayEntity firstGatewayEntity){
        // 获取全限定类名
        String className = firstGatewayEntity.getConference();
        try {
            // 根据全限定类名,加载并初始化该类,即会初始化该类的静态段
            Class<?> clazz = Class.forName(className);
            return (GatewayHandler) clazz.newInstance();
        } catch (ClassNotFoundException | IllegalAccessException | InstantiationException e) {
            e.printStackTrace();
        }
        return null;
    }
}

public class GetewayClient {
    public static void main(String[] args){
        GetewayHandler firstGetewayHandler = GetewayHandlerEnumFactory.getFirstGetewayHandler();
        firstGetewayHandler.service();
    }
}
通过这种配置化的方式,责任链的组成顺序完全由枚举(GatewayEnum)中的数据驱动,新增或调整处理器只需修改配置,符合开闭原则,极大地提升了系统的灵活性和可维护性。
结语
设计模式是软件架构艺术的重要组成部分,责任链模式只是其中之一。它擅长处理需要经过多个对象校验或处理的流水线式场景,能有效避免复杂的条件分支语句,使代码结构更清晰、更易于扩展。然而,正如开篇案例所示,选择恰当的模式至关重要。希望本文能帮助你理解责任链模式的核心思想与实战应用。设计模式的学习之路漫漫,让我们一起在云栈社区持续交流,共同精进。
 发表于 2026-1-24 09:18:30
|
查看: 321|
回复: 0
发表于 2026-1-24 09:18:30
|
查看: 321|
回复: 0
