来源:juejin.cn/post/7582156410320371722
下面是我在实际使用 Nginx 过程中,发现并总结的四个值得注意的问题,分享出来,希望能帮助大家更好地理解和运用 Nginx。
问题一:路径代理的“/”陷阱与 location 匹配的奥义
先看下面两组配置的细微差别。
第一组:proxy_pass 指令后的斜杠。
# 配置一
location /test {
  proxy_pass 'http://192.186.0.1:8080';
}

# 配置二
location /test {
  proxy_pass 'http://192.186.0.1:8080/';
}
仔细观察,唯一的区别在于 proxy_pass 指令后面的代理地址是否以斜杠 / 结尾。
那么,它们会产生什么不同效果呢?
假设请求的后端接口是 /test/file/getList,这两个配置会产生截然不同的请求结果:
http://192.186.0.1:8080/test/file/getList (配置一的结果)http://192.186.0.1:8080/file/getList (配置二的结果)
区别就在于:proxy_pass 后面地址的末尾是否有 /。如果有 /,则表示去除 location 匹配到的路径前缀(这里是 /test);如果没有,则保留该前缀。
实际上,我并不十分推荐这种通过代理地址末尾加不加 / 来控制是否去除前缀的写法。虽然简洁,但对于不熟悉 Nginx 的同学来说,容易造成困惑。
我推荐下面这种更清晰的替代写法,可读性更好:
# 推荐的替代写法
location /test {
  rewrite ^/test/(.*)$ /$1 break;
  proxy_pass 'http://192.186.0.1:8080';
}
通过 rewrite 指令,我们能清晰地看到路径前缀是如何被去除的。简单来说:决定 proxy_pass 后面的地址是否带 /,取决于后端接口是否需要 /test 这个路径。如果后端接口本身包含该路径,代理地址就不应以 / 结尾;如果 /test 是前端为做反向代理拦截而添加的,后端并无此路径,那么代理地址就应该以 / 结尾。
接下来,我们再看第二组区别:location 指令后的斜杠。
# 配置一
location /test {
  proxy_pass 'http://192.186.0.1:8080';
}

# 配置二
location /test/ {
  proxy_pass 'http://192.186.0.1:8080';
}
这次的区别在于 location 指令后面是否直接跟了斜杠 /。那么,这两者有什么区别呢?
答案是:有区别!区别在于匹配规则不同。
/test 是前缀匹配,表示匹配以 /test 开头的所有路径,例如 /test/file/getList、/test123 都会被匹配到。/test/ 是更精确的匹配,表示只匹配以 /test/ 开头的路径,例如 /test/file/getList 会被匹配到,但是 /test123、/test 不会被匹配到。
我们可以通过下表来更直观地看清区别:
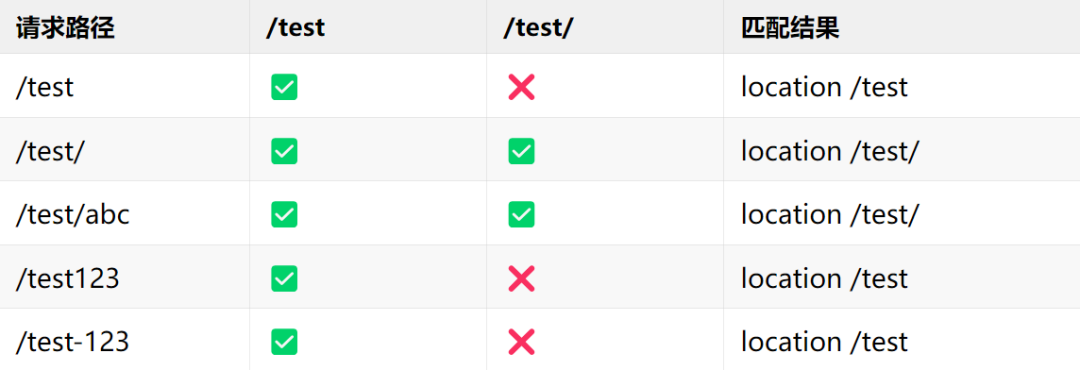
如果你仔细观察上表,会发现一个问题:/test/ 和 /test/abc 这两个请求路径,同时被 location /test 和 location /test/ 两个配置都匹配到了。那么,Nginx 会如何选择呢?
答案是:会选择 location /test/。
这个问题正好引出了 Nginx 的 location 匹配优先级 问题。借此机会,我们来详细梳理一下 Nginx 的 location 匹配规则。
为了方便记忆,有个口诀:
等号精确第一名
波浪前缀挡正则
正则排队按顺序
普通前缀取最长
解释:
- 等号 (
=) 精确匹配:优先级最高。
- 前缀优先匹配 (
^~):能“挡住”后面定义的正则匹配,直接命中,提升性能。
- *正则匹配 (
~ 区分大小写, `~` 不区分大小写):按照它们在配置文件中出现的顺序**进行匹配,先到先得。
- 普通前缀匹配 (无符号):按照 最长前缀匹配 原则。
说实话,这个口诀我也记不全,现在也不是背八股文的时代了。遇到具体问题,直接咨询 AI 或者让智能助手帮我修改 nginx.conf 文件,效率更高。不过,理解其背后的原理依然非常重要。
下面通过一个综合性的电商网站 Nginx 配置案例,来帮助大家更好地理解这些规则。
server {
    listen 80;
    server_name shop.example.com;
    root /var/www/shop;

    # ==========================================
    # 1. 精确匹配 (=) - 最高优先级
    # ==========================================
    location = / {
        return 200 "欢迎来到首页 [精确匹配 =]";
        add_header Content-Type text/plain;
    }
    location = /robots.txt {
        return 200 "User-agent: *\nDisallow: /admin/";
        add_header Content-Type text/plain;
    }
    location = /favicon.ico {
        log_not_found off;
        access_log off;
        expires 30d;
    }

    # ==========================================
    # 2. 前缀优先匹配 (^~) - 阻止正则匹配
    # ==========================================
    location ^~ /static/ {
        alias /var/www/shop/static/;
        expires 30d;
        add_header Cache-Control "public, immutable";
        return 200 "静态资源目录 [前缀优先 ^~]";
    }
    location ^~ /uploads/ {
        alias /var/www/shop/uploads/;
        expires 7d;
        return 200 "上传文件目录 [前缀优先 ^~]";
    }
    location ^~ /. {
        deny all;
        return 403 "禁止访问隐藏文件 [前缀优先 ^~]";
    }

    # ==========================================
    # 3. 正则匹配 (~ ~*) - 按顺序匹配
    # ==========================================
    location ~ \.(jpg|jpeg|png|gif|webp|svg|ico)$ {
        expires 30d;
        add_header Cache-Control "public";
        return 200 "图片文件 [正则匹配 ~]";
    }
    location ~* \.(css|js)$ {
        expires 7d;
        add_header Cache-Control "public";
        return 200 "CSS/JS文件 [正则不区分大小写 ~*]";
    }
    location ~* \.(ttf|woff|woff2|eot)$ {
        expires 365d;
        add_header Cache-Control "public, immutable";
        add_header Access-Control-Allow-Origin *;
        return 200 "字体文件 [正则不区分大小写 ~*]";
    }
    location ~ \.php$ {
        # fastcgi_pass unix:/var/run/php-fpm.sock;
        # fastcgi_index index.php;
        return 200 "PHP文件处理 [正则匹配 ~]";
    }
    location ~ \.(bak|backup|old|tmp)$ {
        deny all;
        return 403 "禁止访问备份文件 [正则匹配 ~]";
    }

    # ==========================================
    # 4. 普通前缀匹配 - 最长匹配原则
    # ==========================================
    location /api/v2/ {
        proxy_pass http://backend_v2;
        return 200 "API v2接口 [普通前缀,更长]";
    }
    location /api/v1/ {
        proxy_pass http://backend_v1;
        return 200 "API v1接口 [普通前缀,较短]";
    }
    location /api/ {
        proxy_pass http://backend;
        return 200 "API通用接口 [普通前缀,最短]";
    }
    location /product/ {
        try_files $uri $uri/ /product/index.html;
        return 200 "商品详情页 [普通前缀]";
    }
    location /user/ {
        try_files $uri $uri/ /user/index.html;
        return 200 "用户中心 [普通前缀]";
    }
    location /admin/ {
        auth_basic "Admin Area";
        auth_basic_user_file /etc/nginx/.htpasswd;
        return 200 "管理后台 [普通前缀]";
    }

    # ==========================================
    # 5. 通用匹配 - 兜底规则
    # ==========================================
    location / {
        try_files $uri $uri/ /index.html;
        return 200 "通用匹配 [兜底规则]";
    }
}
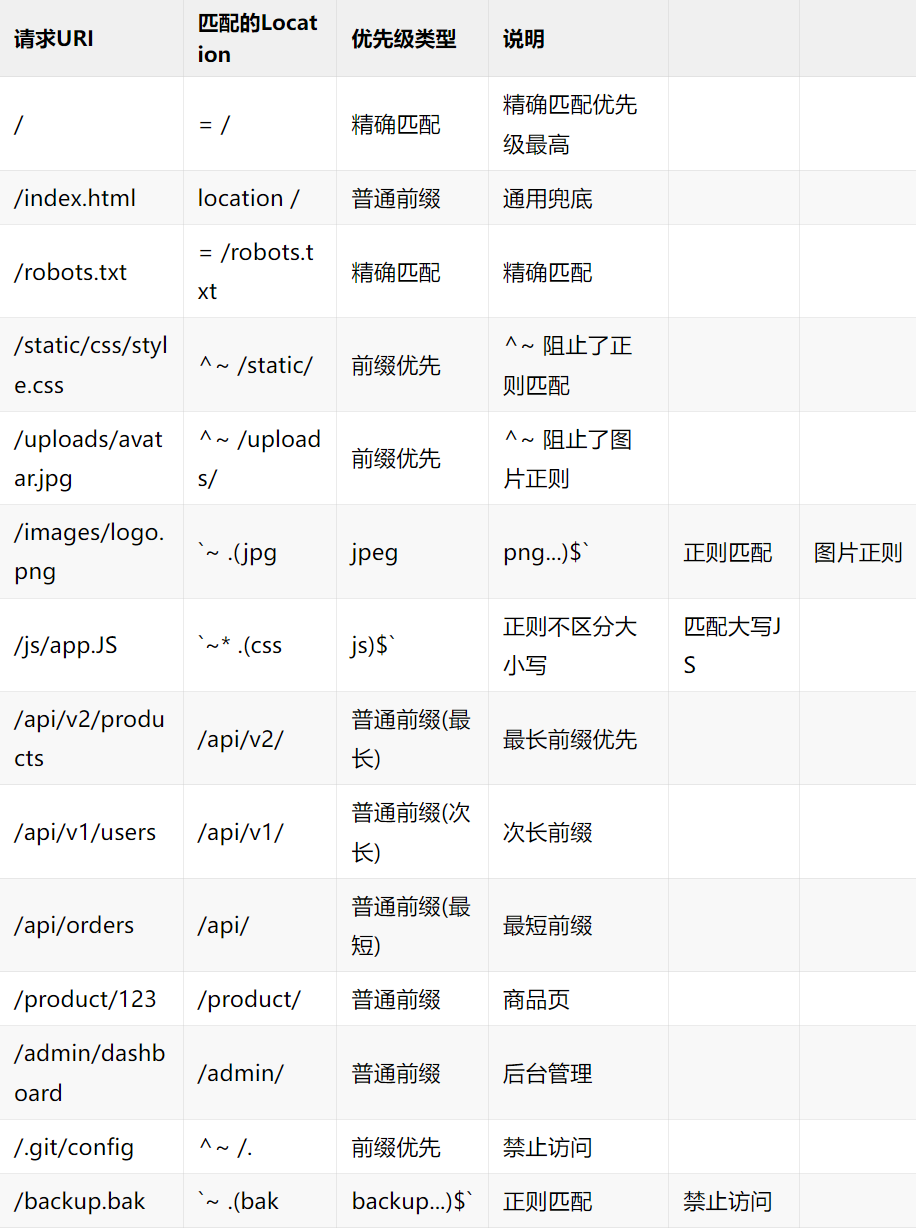
针对上面的配置,不同请求 URI 的匹配结果可以参考下表:
第一个问题及其延伸就到这里,我们继续看第二个问题。
问题二:nginx -s reload vs systemctl reload nginx,优雅重启选哪个?
先看下面两个常用的 Nginx 重载配置命令:
# 命令一
nginx -s reload

# 命令二
systemctl reload nginx
上面两个命令都可以重载 Nginx 服务,使新配置生效。但你想过它们之间有什么区别吗?哪个用起来更“优雅”?
答案:有区别!区别在于命令的执行方式和适用场景。
nginx -s reload
这是 Nginx 自带的信号控制命令:
- 直接向 Nginx 主进程发送
reload 信号。
- 优雅重启:不会中断现有连接,平滑加载新配置。
- 需要
nginx 命令在系统的 PATH 环境变量中,或者使用完整路径(如 /usr/sbin/nginx -s reload)。
- 这是 Nginx 原生的重启方式。
systemctl reload nginx
这是通过 systemd 系统服务管理器来执行的命令:
- 通过
systemd 管理 Nginx 服务。
- 同样会执行优雅重启,平滑加载新配置。
- 需要系统为
systemd 环境,适用于使用 systemd 管理服务的现代 Linux 发行版(如 CentOS 7/8, RHEL 7/8, Ubuntu 16.04+)。这也是现代 Linux 系统的推荐方式。
简单对比其他相关命令:
nginx -s stop 等价 systemctl stop nginxnginx -s quit 等价 systemctl stop nginx (也是优雅停止)nginx -t (测试配置语法) - 这个没有直接的 systemctl 对应命令
systemctl 下相关常用命令:
# 设置开机自启
systemctl enable nginx

# 启动服务
systemctl start nginx

# 检查服务状态
systemctl status nginx

# 停止服务
systemctl stop nginx

# 重启服务(会中断连接)
systemctl restart nginx

# 平滑重载配置(不中断服务)-- 对应 nginx -s reload
systemctl reload nginx

# 检查配置文件语法(这是调用nginx二进制文件的功能)
nginx -t
在服务器上,一个优雅且安全的操作组合通常是:
# 1. 先测试配置语法是否正确
nginx -t

# 2. 如果配置正确,再使用systemd平滑重载
systemctl reload nginx

# 3. 检查服务状态
systemctl status nginx

# 4. 如果systemctl命令失败或不存在,再回退到直接方式
sudo nginx -s reload
总结: 我们不能只知道这两个命令都能用,却不关心它们的区别。对于使用现代 Linux 发行版(带 systemd)的服务器,推荐优先使用 systemctl 来管理 Nginx 服务,因为这是系统管理服务的标准方式,更规范。在本地开发环境或者没有 systemd 的环境下,则可以使用 nginx -s reload 这种直接方式。
问题三:离线环境如何安装 Nginx?
我们通常接触的都是可以联网的服务器,直接用包管理器安装 Nginx 即可。以 Ubuntu/Debian 为例:
# 更新包列表
sudo apt update
# 安装 Nginx
sudo apt install nginx
# 启动 Nginx
sudo systemctl start nginx
# 设置开机自启
sudo systemctl enable nginx
但是,如果遇到一台无法连接外网的服务器,该如何安装 Nginx 呢?由于服务器可能有不同的 CPU 架构(如 x86_64, ARM64),需要准备对应的安装包。
方案一:使用官方预编译包
首先,查看服务器的架构信息:
# 查看当前系统架构
uname -m
# 输出示例:
# x86_64    -> Intel/AMD 64位
# aarch64   -> ARM 64位
# armv7l    -> ARM 32位

# 查看系统发行版和版本
cat /etc/os-release
然后,从 Nginx 官网或其他可信源下载对应系统和架构的预编译包。
对于 x86_64 架构 (CentOS/RHEL 7 示例):
wget http://nginx.org/packages/centos/7/x86_64/RPMS/nginx-1.24.0-1.el7.ngx.x86_64.rpm
对于 ARM64 架构 (Ubuntu 22.04 示例):
wget http://nginx.org/packages/ubuntu/pool/nginx/n/nginx/nginx_1.24.0-1~jammy_arm64.deb
将下载好的包上传到离线服务器,然后使用对应包管理工具安装:
# 对于 RPM 包 (CentOS/RHEL/Fedora)
cd /tmp
sudo rpm -ivh nginx-*.rpm

# 对于 DEB 包 (Ubuntu/Debian)
cd /tmp
sudo dpkg -i nginx-*.deb
安装完成后,启动并验证服务:
sudo systemctl start nginx      # 启动
sudo systemctl enable nginx     # 开机自启
sudo systemctl status nginx     # 查看状态

nginx -v                       # 查看版本
curl http://localhost          # 测试访问
方案二:源码编译安装
这种方式一般不推荐,除非有特殊需求(如需要集成特定第三方模块或使用最新特性)。源码编译过程相对复杂,涉及解决依赖、配置编译选项、make && make install 等步骤。通常这类任务更适合交给对此有经验的后端或运维工程师处理。
问题四:如何配置 Nginx 正确部署 WebAssembly (WASM) 应用?
当你使用 Unity 3D 等引擎开发并导出 WebAssembly 项目后,使用 Nginx 部署时,可能会遇到如下错误:
Failed to load module script: The server responded with a non-JavaScript MIME type of "application/wasm".
或者提示 content-type ... not ... wasm。
这通常是因为 Nginx 没有正确配置 application/wasm 的 MIME 类型,导致浏览器无法识别 WASM 文件。
要正确部署 WASM 应用,需要进行以下两部分配置:
第一部分:配置正确的 MIME 类型
进入 Nginx 的安装目录,找到 mime.types 文件(通常在 /etc/nginx/mime.types 或 /usr/local/nginx/conf/mime.types),在其中添加或确保包含以下配置:
application/wasm wasm;
第二部分:针对 WASM 应用的特殊 Nginx 配置
以下是一个可直接使用或参考的完整配置示例,你只需要修改服务器名、文件根目录等参数即可。
server {
    listen 80;
    server_name your-domain.com;  # 修改为你的域名或IP

    # Unity WebGL 构建文件的根目录
    root /var/www/unity-webgl;
    index index.html;

    charset utf-8;

    # ========== MIME 类型配置(核心部分) ==========
    # WASM文件(未压缩)
    location ~ \.wasm$ {
        types {
            application/wasm wasm;
        }
        add_header Cache-Control "public, max-age=31536000, immutable";
        add_header Access-Control-Allow-Origin *;
    }
    # WASM文件(Gzip压缩)
    location ~ \.wasm\.gz$ {
        add_header Content-Encoding gzip;
        add_header Content-Type application/wasm;
        add_header Cache-Control "public, max-age=31536000, immutable";
        add_header Access-Control-Allow-Origin *;
    }
    # WASM文件(Brotli压缩)
    location ~ \.wasm\.br$ {
        add_header Content-Encoding br;
        add_header Content-Type application/wasm;
        add_header Cache-Control "public, max-age=31536000, immutable";
        add_header Access-Control-Allow-Origin *;
    }

    # Data文件(Unity资源文件,配置类似)
    location ~ \.data$ {
        types {
            application/octet-stream data;
        }
        add_header Cache-Control "public, max-age=31536000, immutable";
    }
    location ~ \.data\.gz$ {
        add_header Content-Encoding gzip;
        add_header Content-Type application/octet-stream;
        add_header Cache-Control "public, max-age=31536000, immutable";
    }
    location ~ \.data\.br$ {
        add_header Content-Encoding br;
        add_header Content-Type application/octet-stream;
        add_header Cache-Control "public, max-age=31536000, immutable";
    }

    # JavaScript 文件
    location ~ \.js$ {
        types {
            application/javascript js;
        }
        add_header Cache-Control "public, max-age=31536000, immutable";
    }
    location ~ \.js\.gz$ {
        add_header Content-Encoding gzip;
        add_header Content-Type application/javascript;
        add_header Cache-Control "public, max-age=31536000, immutable";
    }
    location ~ \.js\.br$ {
        add_header Content-Encoding br;
        add_header Content-Type application/javascript;
        add_header Cache-Control "public, max-age=31536000, immutable";
    }

    # Framework、Loader JS 和 Symbols JSON 文件(配置示例,可根据需要调整)
    location ~ \.framework\.js(\.gz|\.br)?$ {
        if ($uri ~ \.gz$) {
            add_header Content-Encoding gzip;
        }
        if ($uri ~ \.br$) {
            add_header Content-Encoding br;
        }
        add_header Content-Type application/javascript;
        add_header Cache-Control "public, max-age=31536000, immutable";
    }
    # ... 类似配置可以继续为 .loader.js, .symbols.json 添加

    # ========== 静态资源缓存配置 ==========
    location /StreamingAssets/ {
        add_header Cache-Control "public, max-age=31536000, immutable";
    }
    location /Build/ {
        add_header Cache-Control "public, max-age=31536000, immutable";
    }
    location /TemplateData/ {
        add_header Cache-Control "public, max-age=86400";
    }

    # 图片、CSS文件
    location ~* \.(jpg|jpeg|png|gif|ico|svg)$ {
        add_header Cache-Control "public, max-age=2592000";
    }
    location ~* \.css$ {
        add_header Content-Type text/css;
        add_header Cache-Control "public, max-age=2592000";
    }

    # ========== HTML 文件(不缓存,确保更新生效) ==========
    location ~ \.html$ {
        add_header Cache-Control "no-cache, no-store, must-revalidate";
        add_header Pragma "no-cache";
        add_header Expires "0";
    }

    # 根路径兜底规则
    location / {
        try_files $uri $uri/ /index.html;
    }

    # ========== 性能优化:Gzip 压缩 ==========
    gzip on;
    gzip_vary on;
    gzip_proxied any;
    gzip_comp_level 6;
    gzip_min_length 1024;
    gzip_types
        text/plain
        text/css
        text/xml
        text/javascript
        application/json
        application/javascript
        application/x-javascript
        application/xml
        application/xml+rss
        application/wasm
        application/octet-stream;

    # ========== 安全配置 ==========
    # 禁止访问隐藏文件
    location ~ /\. {
        deny all;
    }
    # 禁止访问临时/备份文件
    location ~ ~$ {
        deny all;
    }
    # 添加安全响应头
    add_header X-XSS-Protection "1; mode=block";
    add_header X-Content-Type-Options "nosniff";
    add_header X-Frame-Options "SAMEORIGIN";
}
总结:配置 WASM 应用的核心要点
- MIME 类型是基础:必须在
mime.types 文件中添加 application/wasm wasm;,这是浏览器识别 WASM 文件的前提。
- 详细的文件类型处理:在
nginx.conf 中,需要为 WASM (.wasm)、Data (.data)、JS (.js) 等文件分别配置未压缩及压缩版本(gzip/br)的处理规则,正确设置 Content-Type 和 Content-Encoding 响应头。
- 合理的缓存策略:为静态资源(如 StreamingAssets、Build 目录)设置长时间的缓存(
immutable),提升重复访问速度。而为 HTML 文件禁用缓存,确保用户总能获取到最新版本。
- 性能与安全:开启 Gzip 压缩提升传输效率,并添加基本的安全响应头(如 XSS 防护、禁止内容嗅探等)来加固服务器。
在云栈社区的运维 & 测试板块,你可以找到更多关于服务器配置、性能优化和稳定性保障的深度讨论与最佳实践。希望这四个从实战中总结出的 Nginx 问题,能帮助你在配置和管理 Web 服务器时更加得心应手。
 发表于 2026-3-14 03:29:26
|
查看: 115|
回复: 0
发表于 2026-3-14 03:29:26
|
查看: 115|
回复: 0
