本文将在第一个cuDNN程序(LeNet识别MNIST)的基础上进行升级,使用C++和cuDNN库改造网络,实现对CIFAR-10数据集的训练与测试,并成功将准确率提升至60%以上。
环境与目标
本次实验在以下环境中进行:
- 操作系统: Windows 10 专业版
- 开发工具: Visual Studio 2015 (C++)
- 硬件: NVIDIA GeForce GTX 1060 (6GB)
- 计算平台: CUDA 9.0, cuDNN 7.1.4
核心目标有两个:
- 加载CIFAR-10的RGB三通道图像数据。
- 修改LeNet网络架构,使其输入通道数从1(MNIST灰度图)变为3(CIFAR-10彩色图)。
一、CIFAR-10 数据加载类
我们需要重写数据加载部分,以读取CIFAR-10的二进制格式文件。数据集包含50000张训练图和10000张测试图,每张图是32x32像素的RGB图像。
首先定义数据样本和数据集类的基本结构:
struct cifar10Samlpe
{
    cifar10Samlpe(const std::vector<float>& image_, const unsigned char &label_) :image(image_), label(label_) {}
    std::vector<float> image; // 32*32*3
    unsigned char label;
};

class cifar10Dataset {
public:
    cifar10Dataset(const std::string &image_file, const std::string &label_file) {
        load_images(image_file);
        if (images.size() != labels.size()) {
            throw std::runtime_error("Number of images and labels mismatch");
        }
        indices.resize(images.size());
        for (size_t i = 0; i<indices.size(); i++)
            indices[i] = i;
    }
    // ... 其他成员函数(next_batch, size等)
private:
    std::vector<std::vector<float>> images;
    std::vector<unsigned char> labels;
    std::vector<size_t> indices;
    size_t current_idx = 0;
    void load_images(const std::string &path) {
        // 数据加载实现
    }
};
关键的 load_images 函数需要按顺序读取每个二进制文件(data_batch_1.bin 到 data_batch_5.bin)。每个样本的存储格式为:1字节的标签,接着是3072字节的图像数据(顺序为红色通道、绿色通道、蓝色通道)。
以下是加载第一个训练批次的代码示例:
void load_images(const std::string &path) {
    FILE* mnist_file = NULL;
    int num = 50000; int rows = 32; int cols = 32;
    images.resize(num, std::vector<float>(rows * cols * 3)); // 注意:3通道
    labels.resize(num);
    unsigned char label;
    unsigned char image_buffer[32 * 32];

    // 加载 data_batch_1.bin (样本0-9999)
    int err = fopen_s(&mnist_file, "c:\\data_batch_1.bin", "rb");
    if (mnist_file != NULL) {
        for (int i = 0; i < 10000; i++) {
            fread((char*)&label, sizeof(label), 1, mnist_file);
            labels[i] = label;

            // 读取蓝色通道(B)
            fread(image_buffer, 1, 32*32, mnist_file);
            for (int j = 0; j <32; j++) {
                for (int k = 0; k < 32; k++) {
                    int shuffle_index = j * 32 + k;
                    images[i][shuffle_index] = image_buffer[shuffle_index] / 255.0f;
                }
            }
            // 读取绿色通道(G)
            fread(image_buffer, 1, 32 * 32, mnist_file);
            for (int j = 0; j <32; j++) {
                for (int k = 0; k < 32; k++) {
                    int shuffle_index = j * 32 + k;
                    images[i][shuffle_index + 32*32] = image_buffer[shuffle_index] / 255.0f;
                }
            }
            // 读取红色通道(R)
            fread(image_buffer, 1, 32 * 32, mnist_file);
            for (int j = 0; j <32; j++) {
                for (int k = 0; k < 32; k++) {
                    int shuffle_index = j * 32 + k;
                    images[i][shuffle_index + 32 * 32 * 2] = image_buffer[shuffle_index] / 255.0f;
                }
            }
        }
        fclose(mnist_file);
    }
    // ... 类似地加载 data_batch_2.bin 到 data_batch_5.bin (样本10000-49999)
}
需要注意的是,对于人工智能和图像处理任务,Python生态中的TensorFlow或PyTorch通常有更便捷的数据加载工具,但在C++底层实现中,我们需要手动处理这些二进制格式。
我们还需要一个类似的 cifar10DatasetTEST 类来加载测试集 test_batch.bin。
二、网络架构(LeNet)的关键修改
网络类 LeNet 的构造函数需要修改,将第一层卷积的输入通道数从1改为3,这是本次改造最核心的一步。
class LeNet :public Layer {
public:
    LeNet(cublasHandle_t &cublas_, cudnnHandle_t &cudnn_, int batch_) :cublas(cublas_), cudnn(cudnn_), batch(batch_) {
        // 关键修改:第一层Conv2D输入通道数从1改为3
        layers.emplace_back(std::make_shared<Conv2D>(cudnn, batch, 3, 12, 32, 32, 3));
        layers.emplace_back(std::make_shared<ReLU>(cudnn, batch, 12, 30, 30));
        layers.emplace_back(std::make_shared<Conv2D>(cudnn, batch, 12, 12, 30, 30, 3));
        layers.emplace_back(std::make_shared<ReLU>(cudnn, batch, 12, 28, 28));
        layers.emplace_back(std::make_shared<MaxPool2D>(cudnn, batch, 12, 28, 28, 2, 2, 0, 2));
        // ... 后续层定义保持不变
        layers.emplace_back(std::make_shared<Linear>(cublas, batch, 24 * 5 * 5, 120));
        layers.emplace_back(std::make_shared<ReLU>(cudnn, batch, 120, 1, 1));
        layers.emplace_back(std::make_shared<Linear>(cublas, batch, 120, 84));
        layers.emplace_back(std::make_shared<ReLU>(cudnn, batch, 84, 1, 1));
        layers.emplace_back(std::make_shared<Linear>(cublas, batch, 84, 10));

        // 为输入和梯度分配GPU内存时,尺寸需匹配 3*32*32
        cudaMalloc(&output, batch * 10 * sizeof(float));
        cudaMalloc(&grad_input, batch * 3 * 32 * 32 * sizeof(float));
    }
    // ... forward, backward 等其他函数
private:
    // ... 成员变量
};
此外,在 forward 和 backward 函数中,涉及数据拷贝的地方也要确保尺寸计算正确,与 3 * 32 * 32 相匹配。
三、训练与测试函数调整
训练和测试函数中,设备内存分配和数据拷贝的维度都需要从 1*28*28 (MNIST) 调整为 3*32*32 (CIFAR-10)。
训练函数 train 的关键修改点:
// 分配输入内存:batch_size * 3通道 * 32高 * 32宽
cudaMalloc(&d_inputs, batch_size * 32*32 *3 * sizeof(float));
...
// 拷贝数据时,偏移量计算要包含3个通道
cudaMemcpy(d_inputs + batch_idx * 32*32 * 3,
           batch[batch_idx].image.data(),
           32 * 32 * 3 * sizeof(float),
           cudaMemcpyHostToDevice);
测试函数 test 也需进行类似的维度调整。
四、主函数与训练策略
在主函数中,我们初始化数据集和网络,并进行多轮训练。为了提高准确率,我们采用了一个简单的学习率衰减策略:如果当前轮次的测试分数低于历史最佳分数,则略微降低学习率。
int main() {
    cifar10Dataset Datasets = cifar10Dataset{ "c:\\data_batch_1.bin", "c:\\data_batch_1.bin" };
    cifar10DatasetTEST DatasetsTest = cifar10DatasetTEST{ "c:\\test_batch.bin", "c:\\test_batch.bin" };

    // 初始化CUDA、cuBLAS、cuDNN上下文及流
    cudaSetDevice(0);
    cudaStream_t stream;
    cudaStreamCreate(&stream);
    cublasHandle_t cublas;
    cudnnHandle_t cudnn;
    cublasCreate(&cublas);
    cudnnCreate(&cudnn);

    int batch_size = 10;
    float lr = 0.01f;
    float best_score = 0.0f;

    LeNet LeNet_net(cublas, cudnn, batch_size);

    for (int epoch = 0; epoch < 40; epoch++) {
        train(5000, batch_size, lr, LeNet_net, 0, stream, Datasets);
        float current_score = test(LeNet_net, stream, DatasetsTest);

        if (current_score > best_score) {
            best_score = current_score;
        } else {
            // 测试分数未提升,降低学习率
            lr = lr - 0.01f / 25;
        }
        std::cout << "learn rate " << lr << std::endl;
    }

    // 释放资源
    cublasDestroy(cublas);
    cudnnDestroy(cudnn);
    cudaStreamDestroy(stream);
    return 0;
}
这种在后端服务或高性能计算任务中常见的“训练-评估-调整”循环,体现了通过程序逻辑自动优化模型参数的思路。
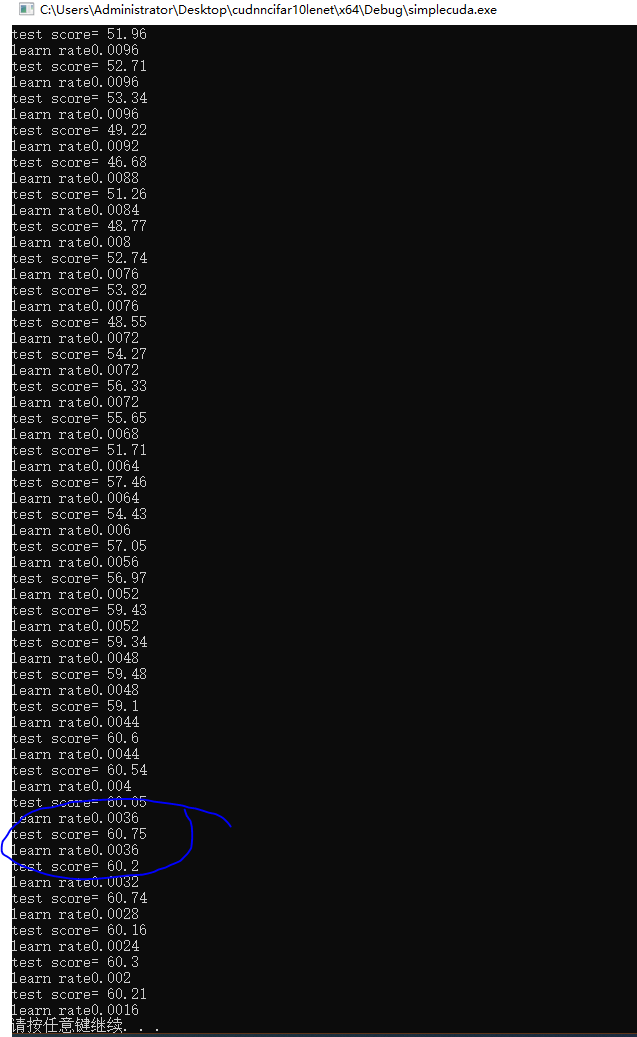
五、运行结果
经过40轮训练,并配合动态调整学习率,程序成功运行,CIFAR-10测试集的准确率突破了60%。下图展示了训练过程中部分轮次的测试分数(test score)和对应的学习率(learn rate)变化。
总结
本次实践成功地将基于cuDNN的LeNet网络从MNIST迁移到了CIFAR-10数据集。主要工作量集中在数据加载和网络输入层的适配。虽然目前60%的准确率相较于CPU版本的71%还有差距,且远低于现代深度学习模型在此数据集上的表现,但这个过程巩固了使用cuDNN进行C++ 深度学习编程的基础流程。通过调整网络结构、超参数以及引入更先进的正则化方法,仍有进一步的提升空间。使用GPU(cuDNN)进行训练相比CPU确实带来了显著的加速,后续通过优化代码和熟悉更高级的cuDNN API,可以进一步提升开发效率和模型性能。
 发表于 2025-12-14 05:55:01
|
查看: 267|
回复: 0
发表于 2025-12-14 05:55:01
|
查看: 267|
回复: 0
