在日常 Java 开发中,Spring Boot 早已成为事实上的标配框架。但如果仔细回想一下面试经历,涉及 Spring Boot 的面试题其实寥寥无几。本质上,Spring Boot 还是当年 SSM 那一套,只不过通过各种 starter 把繁琐的配置过程简化了而已,底层机制并没有脱离 Spring 框架。所以很多与 Spring Boot 相关的问题,追根溯源还是要回到 Spring 源码中去寻找答案。
当然,这并不意味着 Spring Boot 本身没有值得深挖的经典问题。其中有一个高频面试题就是:Spring Boot 的自动化配置到底是怎么实现的?今天这篇文章就把这个问题的脉络从头到尾捋一遍。
此前也陆续聊过一些零散的相关内容,还带大家一起自定义过一个 starter,所以这篇文章里一些过于基础的细节不再展开,重点关注自动化配置的整体流程。
1. @SpringBootApplication
分析 Spring Boot 自动化配置,必须从项目启动类上的 @SpringBootApplication 开始说起。这是整个 Spring Boot 世界的入口,先来看这个注解的源码:
@Target(ElementType.TYPE)
@Retention(RetentionPolicy.RUNTIME)
@Documented
@Inherited
@SpringBootConfiguration
@EnableAutoConfiguration
@ComponentScan(excludeFilters = { @Filter(type = FilterType.CUSTOM, classes = TypeExcludeFilter.class),
@Filter(type = FilterType.CUSTOM, classes = AutoConfigurationExcludeFilter.class) })
public @interface SpringBootApplication {

}
可以看到,@SpringBootApplication 把多个常用注解组合在了一起,其中:
- 前四个是元注解,本文不展开讨论。
- 第五个
@SpringBootConfiguration 是一个支持配置类的注解,这里也不展开。
- 第六个
@EnableAutoConfiguration 表示开启自动化配置,这也是本文要重点分析的对象。
- 第七个
@ComponentScan 是包扫描注解。为什么 Spring Boot 项目中的 Bean 只要位置放对了就能被自动扫描到?幕后功臣就是它。
别看这里注解数量不少,实际上真正由 Spring Boot 提供的只有两个:@SpringBootConfiguration 和 @EnableAutoConfiguration。其余注解早在 Spring Boot 出现之前就已经存在多年了。
2. @EnableAutoConfiguration
接下来看看 @EnableAutoConfiguration 是如何实现自动化配置的。
@Target(ElementType.TYPE)
@Retention(RetentionPolicy.RUNTIME)
@Documented
@Inherited
@AutoConfigurationPackage
@Import(AutoConfigurationImportSelector.class)
public @interface EnableAutoConfiguration {

}
这个注解里起关键作用的就两样东西:
@AutoConfigurationPackage:表示自动扫描各种第三方注解。这个注解的具体作用此前已经讨论过,可以参考 @AutoConfigurationPackage 和 @ComponentScan 有何区别? 这篇文章。@Import 导入的则是 AutoConfigurationImportSelector 配置类,这个配置类负责去加载各种自动化配置候选。
3. AutoConfigurationImportSelector
AutoConfigurationImportSelector 类中的方法比较多,入口是 process 方法,我们就从这里开始看:
@Override
public void process(AnnotationMetadata annotationMetadata, DeferredImportSelector deferredImportSelector) {
  Assert.state(deferredImportSelector instanceof AutoConfigurationImportSelector,
    () -> String.format("Only %s implementations are supported, got %s",
      AutoConfigurationImportSelector.class.getSimpleName(),
      deferredImportSelector.getClass().getName()));
  AutoConfigurationEntry autoConfigurationEntry = ((AutoConfigurationImportSelector) deferredImportSelector)
    .getAutoConfigurationEntry(annotationMetadata);
  this.autoConfigurationEntries.add(autoConfigurationEntry);
  for (String importClassName : autoConfigurationEntry.getConfigurations()) {
    this.entries.putIfAbsent(importClassName, annotationMetadata);
  }
}
从类名就能看出来,与自动化配置直接相关的数据是由 AutoConfigurationEntry autoConfigurationEntry = ((AutoConfigurationImportSelector) deferredImportSelector).getAutoConfigurationEntry(annotationMetadata); 这一行加载的。
这个 getAutoConfigurationEntry 方法实际上就是当前类提供的方法,继续往下看:
protected AutoConfigurationEntry getAutoConfigurationEntry(AnnotationMetadata annotationMetadata) {
  if (!isEnabled(annotationMetadata)) {
    return EMPTY_ENTRY;
  }
  AnnotationAttributes attributes = getAttributes(annotationMetadata);
  List<String> configurations = getCandidateConfigurations(annotationMetadata, attributes);
  configurations = removeDuplicates(configurations);
  Set<String> exclusions = getExclusions(annotationMetadata, attributes);
  checkExcludedClasses(configurations, exclusions);
  configurations.removeAll(exclusions);
  configurations = getConfigurationClassFilter().filter(configurations);
  fireAutoConfigurationImportEvents(configurations, exclusions);
  return new AutoConfigurationEntry(configurations, exclusions);
}
这里的源码命名质量相当高,基本都能做到见名知意。日常开发中,这种命名思路很值得借鉴。接下来逐一分析其中的关键方法。
3.1 isEnabled
首先调用 isEnabled 方法判断自动化配置是否开启。这主要是因为,即使项目中引入了 spring-boot-starter-xxx,也可以通过在 application.properties 中配置 spring.boot.enableautoconfiguration=false 来关闭所有自动化配置。
相关源码如下:
protected boolean isEnabled(AnnotationMetadata metadata) {
  if (getClass() == AutoConfigurationImportSelector.class) {
    return getEnvironment().getProperty(EnableAutoConfiguration.ENABLED_OVERRIDE_PROPERTY, Boolean.class, true);
  }
  return true;
}
3.2 getCandidateConfigurations
接下来调用 getCandidateConfigurations 方法获取所有候选的自动化配置类。这些候选来源主要有两个地方:
- 在自定义 starter 的开发中,需要在
classpath:/META-INF/spring.factories 中定义出所有自动化配置类,这是来源之一。
- Spring Boot 自带的自动化配置类,位于
spring-boot-autoconfigure-3.0.6.jar!/META-INF/spring/org.springframework.boot.autoconfigure.AutoConfiguration.imports 文件中。
相关源码如下:
protected List<String> getCandidateConfigurations(AnnotationMetadata metadata, AnnotationAttributes attributes) {
  List<String> configurations = new ArrayList<>(
    SpringFactoriesLoader.loadFactoryNames(getSpringFactoriesLoaderFactoryClass(), getBeanClassLoader()));
  ImportCandidates.load(AutoConfiguration.class, getBeanClassLoader()).forEach(configurations::add);
  Assert.notEmpty(configurations,
    "No auto configuration classes found in META-INF/spring.factories nor in META-INF/spring/org.springframework.boot.autoconfigure.AutoConfiguration.imports. If you "
      + "are using a custom packaging, make sure that file is correct.");
  return configurations;
}
加载到的自动化配置类全路径被存入 configurations 对象,这个对象里的数据有两个获取渠道:
- 调用
SpringFactoriesLoader.loadFactoryNames 方法获取。这个方法本身比较简单,本质上就是去加载 META-INF/spring.factories 文件,该文件中定义了大量的自动化配置类全路径。
- 调用
ImportCandidates.load 方法,加载 spring-boot-autoconfigure-3.0.6.jar!/META-INF/spring/org.springframework.boot.autoconfigure.AutoConfiguration.imports 文件中的自动化配置类。
如果两个地方都没有加载到任何自动化配置类,就会直接抛出异常。
3.3 removeDuplicates
removeDuplicates 方法的作用是移除候选自动化配置类中重复的项。这里的去重思路很有代表性——用一个 LinkedHashSet 中转一下就完事了。源码如下:
protected final <T> List<T> removeDuplicates(List<T> list) {
  return new ArrayList<>(new LinkedHashSet<>(list));
}
从这个细节也能看出,标准库的数据结构在实际开发中往往能带来非常简洁的解法。
3.4 getExclusions
getExclusions 方法用于获取所有需要被排除的自动化配置类。这些排除项可以从三个地方获得:
- 当前注解的
exclude 属性。
- 当前注解的
excludeName 属性。
application.properties 配置文件中的 spring.autoconfigure.exclude 属性。
来看相关源码:
protected Set<String> getExclusions(AnnotationMetadata metadata, AnnotationAttributes attributes) {
  Set<String> excluded = new LinkedHashSet<>();
  excluded.addAll(asList(attributes, "exclude"));
  excluded.addAll(asList(attributes, "excludeName"));
  excluded.addAll(getExcludeAutoConfigurationsProperty());
  return excluded;
}
代码逻辑与上面的三个来源一一对应。
3.5 checkExcludedClasses
这个方法的职责是校验所有被排除的类是否合法。由于 Spring Boot 中的自动化配置类可以自定义,并不需要统一实现某个接口或继承某个类,所以在写排除项时,类名写错了编译阶段是发现不了的。比如下面这种:
@SpringBootApplication(exclude = HelloController.class)
public class App {
    public static void main(String[] args) {
        SpringApplication.run(App.class, args);
    }
}
由于 HelloController 并不是一个自动化配置类,所以项目启动时就会报错,错误日志大致如下:

这个异常来自哪里?答案就在 checkExcludedClasses 方法中:
private void checkExcludedClasses(List<String> configurations, Set<String> exclusions) {
  List<String> invalidExcludes = new ArrayList<>(exclusions.size());
  for (String exclusion : exclusions) {
    if (ClassUtils.isPresent(exclusion, getClass().getClassLoader()) && !configurations.contains(exclusion)) {
      invalidExcludes.add(exclusion);
    }
  }
  if (!invalidExcludes.isEmpty()) {
    handleInvalidExcludes(invalidExcludes);
  }
}

protected void handleInvalidExcludes(List<String> invalidExcludes) {
  StringBuilder message = new StringBuilder();
  for (String exclude : invalidExcludes) {
    message.append("\t- ").append(exclude).append(String.format("%n"));
  }
  throw new IllegalStateException(String.format(
    "The following classes could not be excluded because they are not auto-configuration classes:%n%s",
    message));
}
在 checkExcludedClasses 方法中,首先会找出所有存在于当前 classpath 下、却不包含在 configurations 中的被排除类。因为 configurations 中存放的是所有合法的自动化配置类,所以那些不在其中的类都是有问题的,会被收集到 invalidExcludes 变量中,随后进行额外处理。所谓额外处理,就是调用 handleInvalidExcludes 方法抛出异常。前面截图中的报错正是从这里来的。
3.6 removeAll
这个方法只干一件事:从 configurations 中移除那些被排除的自动化配置类。configurations 本身是 List 集合,exclusions 是 Set 集合,所以直接调用 removeAll 即可完成。
3.7 filter
到了这一步,所有候选自动化配置类都已经加载进来了,但并不是每个都会生效。是否生效,还要看项目里是否真的引用了相关依赖。举个例子,当前加载的列表里其实包含 RedisAutoConfiguration,它负责 Redis 的自动装配。但因为项目里没有用 Redis,这个自动化配置类最终并不会生效。这个过程正是由 getConfigurationClassFilter().filter(configurations); 完成的。
在展开之前,先了解一个预备知识:
由于项目中的自动化配置类数量众多,每个自动化配置类都会依赖其他类——只有当所依赖的类存在时,配置类才会生效。这一系列依赖关系,全部记录在 spring-boot-autoconfigure-3.0.6.jar!/META-INF/spring-autoconfigure-metadata.properties 文件中。举个例子:
org.springframework.boot.autoconfigure.amqp.RabbitAnnotationDrivenConfiguration.ConditionalOnClass=org.springframework.amqp.rabbit.annotation.EnableRabbit
这表示 RabbitAnnotationDrivenConfiguration 类要生效,必须存在一个前置条件:当前项目 classpath 下要能加载到 org.springframework.amqp.rabbit.annotation.EnableRabbit 这个类。
再看 RabbitAnnotationDrivenConfiguration 类的注解:
@Configuration(proxyBeanMethods = false)
@ConditionalOnClass(EnableRabbit.class)
class RabbitAnnotationDrivenConfiguration {

}
类上的条件与配置文件中的内容完全一致。
搞清楚了预备知识,后面的内容就好理解了。
先看 getConfigurationClassFilter 方法,它的作用是获取所有过滤器:
private ConfigurationClassFilter getConfigurationClassFilter() {
  if (this.configurationClassFilter == null) {
    List<AutoConfigurationImportFilter> filters = getAutoConfigurationImportFilters();
    for (AutoConfigurationImportFilter filter : filters) {
      invokeAwareMethods(filter);
    }
    this.configurationClassFilter = new ConfigurationClassFilter(this.beanClassLoader, filters);
  }
  return this.configurationClassFilter;
}
可以看到,这里获取到的过滤器都属于 AutoConfigurationImportFilter 类型,而这种类型的过滤器只有三个实例,架构图如下:
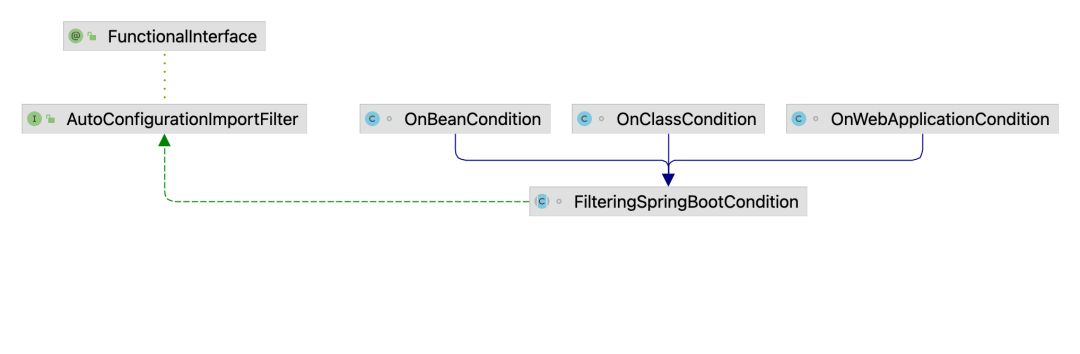
从这三个实例的名字就能大致看出各自的作用:
OnClassCondition:对应条件注解 @ConditionalOnClass 的判定逻辑,用来判断当前 classpath 下是否存在某个类。OnWebApplicationCondition:对应 @ConditionalOnWebApplication 的判定逻辑,用来判断当前运行环境是否是一个 Web 环境。OnBeanCondition:对应 @ConditionalOnBean 的判定逻辑,用来判断当前容器中是否存在某个 Bean。
上面获取到的三个 AutoConfigurationImportFilter 过滤器,就是这三兄弟。接下来执行 filter 方法:
List<String> filter(List<String> configurations) {
  long startTime = System.nanoTime();
  String[] candidates = StringUtils.toStringArray(configurations);
  boolean skipped = false;
  for (AutoConfigurationImportFilter filter : this.filters) {
    boolean[] match = filter.match(candidates, this.autoConfigurationMetadata);
    for (int i = 0; i < match.length; i++) {
      if (!match[i]) {
        candidates[i] = null;
        skipped = true;
      }
    }
  }
  if (!skipped) {
    return configurations;
  }
  List<String> result = new ArrayList<>(candidates.length);
  for (String candidate : candidates) {
    if (candidate != null) {
      result.add(candidate);
    }
  }
  return result;
}
这里会遍历这三个过滤器,分别调用各自的 match 方法,与 144 个自动化配置类进行匹配。如果某个自动化配置类所需的条件全部满足,则 match 数组对应位置为 true;否则为 false。
之后遍历 match 数组,将不满足条件的自动化配置类置为 null,最后再把所有的 null 移除掉。
经过这一轮过滤,剩下的就是真正需要进行自动化配置的类了。
最后一句 fireAutoConfigurationImportEvents 是触发自动化配置类导入事件,这个没有太多可说的。
当这些自动化配置类加载进来之后,接下来就轮到各种条件注解来决定它们是否真正生效了。这部分逻辑相对简单,此前在视频中也多次演示过,这里就不再赘述。
总体来看,Spring Boot 自动化配置的加载链路可以归纳为:先收集候选配置,再去重、排除、校验,最后通过条件过滤器筛选出真正生效的配置类。对这个话题感兴趣的读者,也欢迎到 云栈社区 与更多 Java 开发者一起交流探讨。
 发表于 1 小时前
|
查看: 4|
回复: 0
发表于 1 小时前
|
查看: 4|
回复: 0

