MyBatis 是一款基于 Java 的持久层框架,内部封装了 JDBC 操作数据库的大量繁琐细节,开发者可以把注意力集中在 SQL 语句本身。后期再结合 Spring 框架做依赖注入,还能进一步减少操作数据库的样板代码,提升开发效率。
MyBatis 既支持通过 XML 方式配置 SQL 语句,也支持注解方式编写 SQL。具体采用哪种方式,通常取决于公司的开发规范。我的建议是两种方式都掌握,实际用起来都不复杂。
MyBatis 官方文档地址:https://mybatis.org/mybatis-3/zh/sqlmap-xml.html
本文主要记录 MyBatis 使用 XML 配置 SQL 实现数据库操作的完整过程,文末会提供源码。
一、导入 jar 包
先创建一个 Maven 项目,在 pom.xml 中引入 4 个依赖:
当时我在 pom.xml 里配置的都是对应版本的最新 jar 包,具体如下:
<!--导入 mysql 的 jar 包-->
<dependency>
    <groupId>mysql</groupId>
    <artifactId>mysql-connector-java</artifactId>
    <version>8.0.28</version>
</dependency>
<!--导入 mybatis 的 jar 包-->
<dependency>
    <groupId>org.mybatis</groupId>
    <artifactId>mybatis</artifactId>
    <version>3.5.9</version>
</dependency>
<!--导入 log4j 的 jar 包-->
<!--主要是为了查看 mybatis 生成的最终 sql 语句-->
<dependency>
    <groupId>log4j</groupId>
    <artifactId>log4j</artifactId>
    <version>1.2.17</version>
</dependency>
<!--导入 junit 的 jar 包-->
<!--方便编写测试方法,对 mybatis 操作数据库进行测试-->
<dependency>
    <groupId>junit</groupId>
    <artifactId>junit</artifactId>
    <version>4.13.2</version>
    <scope>test</scope>
</dependency>
依赖配置好之后,打开右侧的 Maven 窗口刷新,Maven 会自动下载所需的 jar 文件。
二、搭建整个项目工程
整个项目的结构和内容如下图所示:
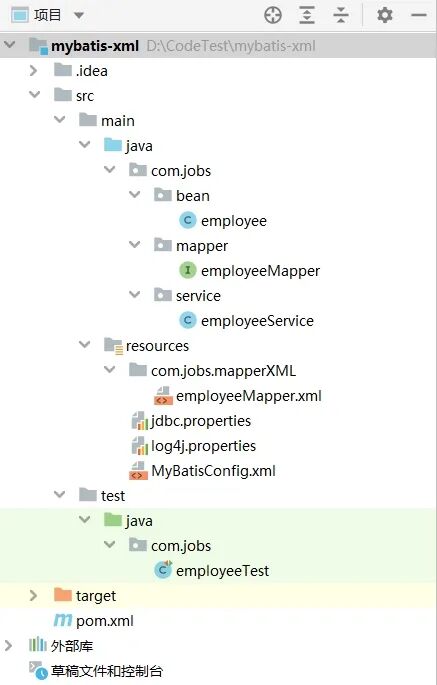
项目结构简单说明一下:
com.jobs.bean 包:存放实体类com.jobs.mapper 包:存放 MyBatis 操作数据库的接口com.jobs.service 包:存放使用 MyBatis 类库操作数据的业务方法
resources 目录下的配置文件:
com.jobs.mapperXML/employeeMapper.xml:对应 com.jobs.mapper 包下接口的 SQL 语句配置文件jdbc.properties:数据库连接参数log4j.properties:log4j 日志输出参数MyBatisConfig.xml:MyBatis 的核心配置文件
test 目录下的文件:
com.jobs.employeeTest:专门编写 JUnit 单元测试方法,用来验证 MyBatis 环境是否搭建成功
三、编写配置文件内容
jdbc.properties 用于配置数据库连接信息:
driver=com.mysql.jdbc.Driver
url=jdbc:mysql://localhost:3306/testdb
username=root
password=123456
log4j.properties 用于配置控制台日志输出:
# 输出 debug 以上的所有类型的日志信息(DEBUG INFO WARN ERROR FATAL)
# stdout 配置项的名称(表明使用下面的 log4j.appender.stdout 对应的配置)
log4j.rootLogger=DEBUG, stdout
# log4j.appender.stdout 配置的是控制台输出
log4j.appender.stdout=org.apache.log4j.ConsoleAppender
# 该项配置表示要自定义日志显示的格式
log4j.appender.stdout.layout=org.apache.log4j.PatternLayout
# 自定义日志显示格式:
# %p 表示输出每条日志的级别信息(DEBUG INFO WARN ERROR FATAL)
# %t 表示输出产生日志的线程的名称
# %m 表示输出具体的日志信息
# %n 表示根据当前操作系统类型,输出一个回车换行
log4j.appender.stdout.layout.ConversionPattern=%p [%t] - %m%n
MyBatisConfig.xml 文件是 MyBatis 的核心配置文件,配置内容如下:
<?xml version="1.0" encoding="UTF-8" ?>
<!--引入MyBatis 的 DTD 约束-->
<!DOCTYPE configuration PUBLIC
    "-//mybatis.org//DTD Config 3.0//EN"
    "http://mybatis.org/dtd/mybatis-3-config.dtd">
<configuration>
    <!--引入数据库连接的配置文件-->
    <properties resource="jdbc.properties"/>
    <!--引入 log4j 日志,方便查看运行过程中所生成的 sql 语句-->
    <settings>
        <setting name="logImpl" value="log4j"/>
    </settings>
    <!--为实体类 bean 起别名,这样就可以在 SQL 配置文件中直接使用 bean 的类名代替全限定类名-->
    <typeAliases>
        <!--如果实体类 bean 比较少的话,可以采用 typeAlias 逐个配置-->
        <!--<typeAlias type="com.jobs.bean.employee" alias="employee"/>-->
        <!--绝大多数情况下,都是直接配置实体类 bean 所在的包,这样包下所有的实体类都自动配置-->
        <package name="com.jobs.bean"/>
    </typeAliases>
    <!--environments 配置数据库环境,环境可以有多个。default 属性指定使用的是哪个-->
    <environments default="mysql">
        <!--environment配置数据库环境,id属性唯一标识-->
        <environment id="mysql">
            <!--transactionManager 事务管理,这里采用 JDBC 默认的事务-->
            <transactionManager type="JDBC"></transactionManager>
            <!--dataSource 数据源信息,这里采用连接池-->
            <dataSource type="POOLED">
                <!--通过引入的 jdbc.properties 文件中的 key 获取数据库连接的配置信息-->
                <property name="driver" value="${driver}" />
                <property name="url" value="${url}" />
                <property name="username" value="${username}" />
                <property name="password" value="${password}" />
            </dataSource>
        </environment>
    </environments>
    <!-- mappers 引入操作数据库的接口映射配置文件 -->
    <mappers>
        <!-- 如果有多个接口映射配置文件,可以添加多个 mapper 配置-->
        <mapper resource="com/jobs/mapperXML/employeeMapper.xml"/>
    </mappers>
</configuration>
四、数据库表和实体类
在 MySQL 中创建 testdb 数据库,并创建一张 employee 表:
-- 创建数据库
CREATE DATABASE IF NOT EXISTS `testdb`;
USE `testdb`;
-- 创建表
CREATE TABLE IF NOT EXISTS `employee` (
  `e_id` int(11) NOT NULL AUTO_INCREMENT,
  `e_name` varchar(50) DEFAULT NULL,
  `e_age` int(11) DEFAULT NULL,
  PRIMARY KEY (`e_id`)
) ENGINE=InnoDB AUTO_INCREMENT=7 DEFAULT CHARSET=utf8;
-- 向表中添加数据
INSERT INTO `employee` (`e_id`, `e_name`, `e_age`)
VALUES(1, '侯胖胖', 25),(2, '杨磅磅', 23),
      (3, '李吨吨', 33),(4, '任肥肥', 35),(5, '乔豆豆', 32);
com.jobs.bean.employee 实体类如下。这里故意让实体类字段与数据库字段名称不一致,后面用 resultMap 做映射:
package com.jobs.bean;

public class employee {
    // 主键 id
    private Integer id;
    // 姓名
    private String name;
    // 年龄
    private Integer age;

    public employee() {
    }

    public employee(Integer id, String name, Integer age) {
        this.id = id;
        this.name = name;
        this.age = age;
    }

    public Integer getId() {
        return id;
    }

    public void setId(Integer id) {
        this.id = id;
    }

    public String getName() {
        return name;
    }

    public void setName(String name) {
        this.name = name;
    }

    public Integer getAge() {
        return age;
    }

    public void setAge(Integer age) {
        this.age = age;
    }

    // 方便将员工信息在控制台打印出来查看
    @Override
    public String toString() {
        return "employee{" +
                "id=" + id +
                ", name='" + name + '\'' +
                ", age=" + age +
                '}';
    }
}
五、Mapper 接口和 SQL 配置
这里采用 MyBatis 的动态代理开发方式实现持久层,这也是目前企业开发的主流方式。
Mapper 接口:操作数据库的接口文件Mapper.xml:为 Mapper 接口中的每个方法配置具体要执行的 SQL 语句
Mapper 接口 和 Mapper.xml 必须遵守以下开发规范:
Mapper.xml 文件中的 namespace 与 Mapper 接口的全限定名相同Mapper 接口方法名和 Mapper.xml 中定义的每个 statement 的 id 相同Mapper 接口方法的输入参数类型和 Mapper.xml 中定义的每个 SQL 的 parameterType 类型相同Mapper 接口方法的输出参数类型和 Mapper.xml 中定义的每个 SQL 的 resultType 类型相同- 如果 SQL 语句返回的字段名称与实体类的字段名称不一致,可以通过
resultMap 配置两者之间的字段对应关系
com.jobs.mapper.employeeMapper 接口内容如下:
package com.jobs.mapper;

import com.jobs.bean.employee;

import java.util.List;

public interface employeeMapper {
    // 查询全部
    List<employee> selectAll();
    // 根据 id 查询
    employee selectById(Integer id);
    // 新增数据
    Integer insert(employee ele);
    // 修改数据
    Integer update(employee ele);
    // 删除数据
    Integer delete(Integer id);
    // 根据条件查询
    List<employee> selectCondition(employee ele);
    // 根据多个 id 查询
    List<employee> selectByIds(List<Integer> ids);
}
对应的 resources/com/jobs/mapperXML/employeeMapper.xml 内容如下:
<?xml version="1.0" encoding="UTF-8" ?>
<!--MyBatis的DTD约束-->
<!DOCTYPE mapper
        PUBLIC "-//mybatis.org//DTD Mapper 3.0//EN"
        "http://mybatis.org/dtd/mybatis-3-mapper.dtd">
<!--namespace 名称空间,必须配置为 Mapper 接口的全限定名-->
<mapper namespace="com.jobs.mapper.employeeMapper">

    <!--由于【数据库字段】与【bean实体类字段】不一致,
        因此这里需要配置【数据库字段】和【bean实体类字段】的对应关系-->
    <resultMap id="employee_map" type="employee">
        <id column="e_id" property="id" />
        <result column="e_name" property="name" />
        <result column="e_age" property="age" />
    </resultMap>

    <!--配置公用的 SQL 语句,方便下面进行引用-->
    <sql id="select">SELECT e_id,e_name,e_age FROM employee</sql>

    <!--查询全部,这里的 id 必须与 Mapper 接口中的对应的方法名称完全相同-->
    <!--resultMap 表示将查询结果中每条记录,封装成 employee_map 所对应的 employee 实体对象-->
    <select id="selectAll" resultMap="employee_map">
        <!--引用上面配置的公用 SQL 语句-->
        <include refid="select"/> order by e_id;
    </select>

    <!--根据 id 查询,parameterType 表示传入的参数类型-->
    <select id="selectById" resultMap="employee_map" parameterType="int">
        <include refid="select"/> WHERE e_id = #{id}
    </select>

    <!--新增数据,由于在 Mybatis 的核心配置文件,已经配置了 bean 的别名即为类名
        因此这里可以直接使用 bean 的类名作为参数类型-->
    <insert id="insert" parameterType="employee">
        insert into employee(e_id,e_name,e_age) VALUES (#{id},#{name},#{age})
    </insert>

    <!--修改数据-->
    <update id="update" parameterType="employee">
        UPDATE employee SET e_name = #{name},e_age = #{age} WHERE e_id = #{id}
    </update>

    <!--删除数据-->
    <delete id="delete" parameterType="int">
        DELETE FROM employee WHERE e_id = #{id}
    </delete>

    <!--根据条件查询-->
    <select id="selectCondition" resultMap="employee_map" parameterType="employee">
        <include refid="select"/>
        <where>
            <!--根据条件,动态拼接SQL语句-->
            <if test="id != null">
                e_id = #{id}
            </if>
            <if test="name != null">
                AND e_name like CONCAT('%',#{name},'%')
            </if>
            <if test="age != null">
                AND e_age = #{age}
            </if>
        </where>
        order by e_id desc
    </select>

    <!--根据多个 id 查询-->
    <select id="selectByIds" resultMap="employee_map" parameterType="list">
        <include refid="select"/>
        <where>
            <!--通过循环拼接 SQL 语句-->
            <foreach collection="list" open="e_id IN (" close=")" item="id" separator=",">
                #{id}
            </foreach>
        </where>
    </select>

</mapper>
六、编写 Service 方法访问数据库
Service 里的方法定义可以与 Mapper 接口中的方法不一样,这里为了便于演示,就保持一致了。com.jobs.service.employeeService 内容如下:
package com.jobs.service;

import com.jobs.bean.employee;
import com.jobs.mapper.employeeMapper;
import org.apache.ibatis.io.Resources;
import org.apache.ibatis.session.SqlSession;
import org.apache.ibatis.session.SqlSessionFactory;
import org.apache.ibatis.session.SqlSessionFactoryBuilder;

import java.io.IOException;
import java.io.InputStream;
import java.util.List;

public class employeeService {

    // 查询所有
    public List<employee> selectAll() {
        List<employee> list = null;
        SqlSession sqlSession = null;
        InputStream is = null;
        try {
            // 加载核心配置文件
            is = Resources.getResourceAsStream("MyBatisConfig.xml");
            // 获取 SqlSession 工厂对象
            SqlSessionFactory sqlSessionFactory = new SqlSessionFactoryBuilder().build(is);
            // 通过工厂对象获取 SqlSession 对象,openSession 的参数为 true 表示自动提交事务
            // 对于增删改操作,如果 openSession 为 false,
            // 在程序代码最后需要通过 sqlSession.commit() 提交事务,才能使写操作生效
            sqlSession = sqlSessionFactory.openSession(true);
            // 通过动态代理获取 mapper 接口的实现类对象
            employeeMapper mapper = sqlSession.getMapper(employeeMapper.class);
            // 调用接口方法
            list = mapper.selectAll();
        } catch (Exception e) {
            e.printStackTrace();
        } finally {
            if (sqlSession != null) {
                sqlSession.close();
            }
            if (is != null) {
                try {
                    is.close();
                } catch (IOException e) {
                    e.printStackTrace();
                }
            }
        }
        return list;
    }

    // 根据 id 查询单个员工
    public employee selectById(Integer id) {
        employee ele = null;
        SqlSession sqlSession = null;
        InputStream is = null;
        try {
            is = Resources.getResourceAsStream("MyBatisConfig.xml");
            SqlSessionFactory sqlSessionFactory = new SqlSessionFactoryBuilder().build(is);
            sqlSession = sqlSessionFactory.openSession(true);
            employeeMapper mapper = sqlSession.getMapper(employeeMapper.class);
            ele = mapper.selectById(id);
        } catch (Exception e) {
            e.printStackTrace();
        } finally {
            if (sqlSession != null) {
                sqlSession.close();
            }
            if (is != null) {
                try {
                    is.close();
                } catch (IOException e) {
                    e.printStackTrace();
                }
            }
        }
        return ele;
    }

    // 新增
    public Integer insert(employee ele) {
        Integer result = null;
        SqlSession sqlSession = null;
        InputStream is = null;
        try {
            is = Resources.getResourceAsStream("MyBatisConfig.xml");
            SqlSessionFactory sqlSessionFactory = new SqlSessionFactoryBuilder().build(is);
            sqlSession = sqlSessionFactory.openSession(true);
            employeeMapper mapper = sqlSession.getMapper(employeeMapper.class);
            result = mapper.insert(ele);
        } catch (Exception e) {
            e.printStackTrace();
        } finally {
            if (sqlSession != null) {
                sqlSession.close();
            }
            if (is != null) {
                try {
                    is.close();
                } catch (IOException e) {
                    e.printStackTrace();
                }
            }
        }
        return result;
    }

    // 修改
    public Integer update(employee ele) {
        Integer result = null;
        SqlSession sqlSession = null;
        InputStream is = null;
        try {
            is = Resources.getResourceAsStream("MyBatisConfig.xml");
            SqlSessionFactory sqlSessionFactory = new SqlSessionFactoryBuilder().build(is);
            sqlSession = sqlSessionFactory.openSession(true);
            employeeMapper mapper = sqlSession.getMapper(employeeMapper.class);
            result = mapper.update(ele);
        } catch (Exception e) {
            e.printStackTrace();
        } finally {
            // 释放资源
            if (sqlSession != null) {
                sqlSession.close();
            }
            if (is != null) {
                try {
                    is.close();
                } catch (IOException e) {
                    e.printStackTrace();
                }
            }
        }
        return result;
    }

    // 删除
    public Integer delete(Integer id) {
        Integer result = null;
        SqlSession sqlSession = null;
        InputStream is = null;
        try {
            is = Resources.getResourceAsStream("MyBatisConfig.xml");
            SqlSessionFactory sqlSessionFactory = new SqlSessionFactoryBuilder().build(is);
            sqlSession = sqlSessionFactory.openSession(true);
            employeeMapper mapper = sqlSession.getMapper(employeeMapper.class);
            result = mapper.delete(id);
        } catch (Exception e) {
            e.printStackTrace();
        } finally {
            if (sqlSession != null) {
                sqlSession.close();
            }
            if (is != null) {
                try {
                    is.close();
                } catch (IOException e) {
                    e.printStackTrace();
                }
            }
        }
        return result;
    }

    // 根据条件查询
    public List<employee> selectCondition(employee ele) {
        List<employee> list = null;
        SqlSession sqlSession = null;
        InputStream is = null;
        try {
            is = Resources.getResourceAsStream("MyBatisConfig.xml");
            SqlSessionFactory sqlSessionFactory = new SqlSessionFactoryBuilder().build(is);
            sqlSession = sqlSessionFactory.openSession(true);
            employeeMapper mapper = sqlSession.getMapper(employeeMapper.class);
            list = mapper.selectCondition(ele);
        } catch (Exception e) {
            e.printStackTrace();
        } finally {
            if (sqlSession != null) {
                sqlSession.close();
            }
            if (is != null) {
                try {
                    is.close();
                } catch (IOException e) {
                    e.printStackTrace();
                }
            }
        }
        return list;
    }

    // 根据多个 id 查询
    public List<employee> selectByIds(List<Integer> ids) {
        List<employee> list = null;
        SqlSession sqlSession = null;
        InputStream is = null;
        try {
            is = Resources.getResourceAsStream("MyBatisConfig.xml");
            SqlSessionFactory sqlSessionFactory = new SqlSessionFactoryBuilder().build(is);
            sqlSession = sqlSessionFactory.openSession(true);
            employeeMapper mapper = sqlSession.getMapper(employeeMapper.class);
            list = mapper.selectByIds(ids);
        } catch (Exception e) {
            e.printStackTrace();
        } finally {
            if (sqlSession != null) {
                sqlSession.close();
            }
            if (is != null) {
                try {
                    is.close();
                } catch (IOException e) {
                    e.printStackTrace();
                }
            }
        }
        return list;
    }
}
上面代码里重复逻辑确实不少,有兴趣的话可以自行封装。其实也没有太大封装必要,后续用 Spring 集成 MyBatis 之后,这些样板代码基本就不需要手写了。
七、使用 JUnit 测试验证
com.jobs.employeeTest 类的测试方法如下:
package com.jobs;

import com.jobs.bean.employee;
import com.jobs.service.employeeService;
import org.junit.Test;

import java.util.ArrayList;
import java.util.List;

public class employeeTest {

    private employeeService service = new employeeService();

    // 查询全部测试
    @Test
    public void selectAll() {
        List<employee> elist = service.selectAll();
        for (employee ele : elist) {
            System.out.println(ele);
        }
    }

    // 根据 id 查询测试
    @Test
    public void selectById() {
        employee ele = service.selectById(3);
        System.out.println(ele);
    }

    // 新增测试
    @Test
    public void insert() {
        employee ele = new employee(6, "任天蓬", 26);
        Integer result = service.insert(ele);
        System.out.println(result);
    }

    // 修改测试
    @Test
    public void update() {
        employee ele = new employee(6, "任天蓬", 16);
        Integer result = service.update(ele);
        System.out.println(result);
    }

    // 根据条件动态生成 SQL 语句查询测试
    @Test
    public void selectCondition() {
        // 可以同时启用多个条件,根据条件动态拼接 SQL 语句
        employee ele = new employee();
        // ele.setId(4); // 通过 id 查询
        ele.setName("任"); // 通过姓名模糊查询
        // ele.setAge(35); // 通过年龄查询
        List<employee> elelist = service.selectCondition(ele);
        for (employee empl : elelist) {
            System.out.println(empl);
        }
    }

    // 根据多个 id 查询测试
    @Test
    public void selectByIds() {
        ArrayList<Integer> ids = new ArrayList<>(List.of(1, 2, 3));
        List<employee> elelist = service.selectByIds(ids);
        for (employee empl : elelist) {
            System.out.println(empl);
        }
    }

    // 删除测试
    @Test
    public void delete() {
        Integer result = service.delete(6);
        System.out.println(result);
    }
}
到这里,MyBatis 使用 XML 方式配置 SQL 的完整流程就介绍完了。以上代码结构也可以作为后续接入 Spring 环境的参考,更多 Java 技术笔记欢迎到云栈社区交流分享。
 发表于 昨天 03:02
|
查看: 8|
回复: 0
发表于 昨天 03:02
|
查看: 8|
回复: 0

