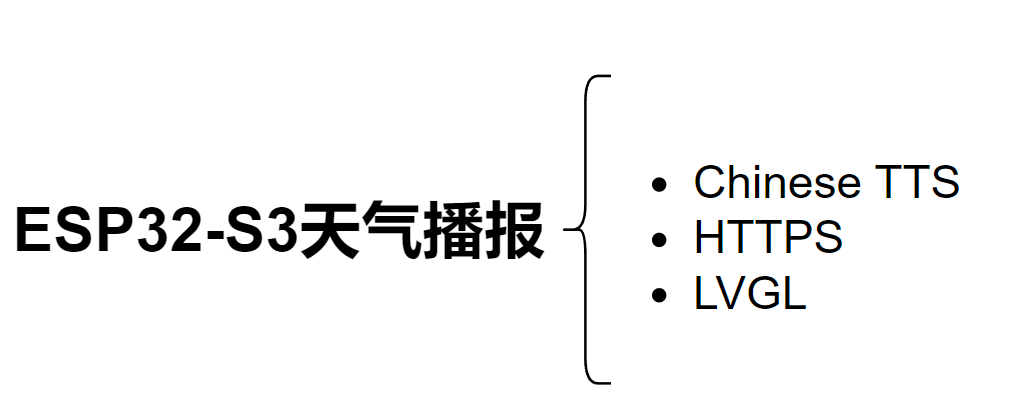
本文基于 ESP32-S3-BOX-Lite,完整实现了一个支持 WiFi 联网、HTTPS 获取天气、TTS 中文语音播报以及 LVGL 图形界面显示的天气播报终端。从 ESP-IDF 环境搭建、SDK 版本踩坑,到 TTS 语音数据分区、HTTPS + JSON 解析,再到 LVGL 界面模拟与移植,完整记录了一次真实的 ESP-IDF 项目实践过程。
项目要求
- 要使用ESP32的WIFI和TTS功能;
- 要能够播报天气;
- 界面显示。
设计思路
ESP32-S3是乐鑫推出的一款高性能且支持WIFI和BLE的单片机,并且乐鑫官方在github上提供了非常多的应用例程。像本项目中所需要的WIFI联网和TTS功能,以及获取天气信息,这些都是有提供的。可以说我所需要做的就是将这些例程组合起来。
- 获取ESP-BOX SDK:https://github.com/espressif/esp-box
- 先调通TTS功能,参考官方示例chinese_tts:https://github.com/espressif/esp-skainet/blob/master/examples/chinese_tts/main/main.c
- 再调通WIFI联网获取天气信息。参考
../esp-idf/examples/protocols/https_request 该示例。
- 最后再使用LVGL做一些简单的显示,先用Visual Studio 2022模拟器做界面 VS模拟器:https://github.com/lvgl/lv_port_pc_visual_studio
实现过程
1.准备工作
主要从ESP-IDF环境搭建到ESP-BOX示例编译下载。
(1)准备WSL2环境
依据微软官方安装过程 (https://learn.microsoft.com/zh-cn/windows/wsl/install),一步一步准备。但WSL2存在无法直接连接USB的缺点,需要通过USB IPD从WIN上进行USB转发,至此LINUX基础环境已准备好。
(2)获取ESP-IDF环境
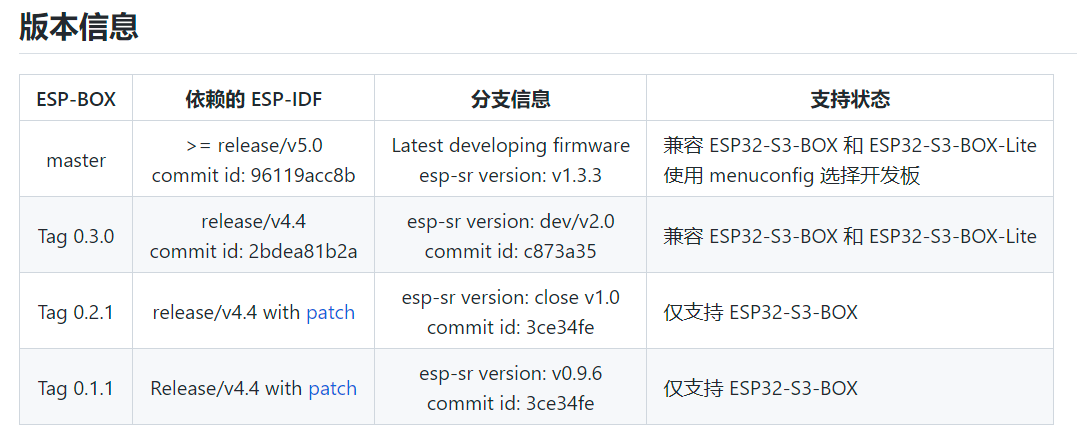
依据ESP-IDF编程指南 (https://docs.espressif.com/projects/esp-idf/zh-cn/v4.0/get-started/index.html),此处需要注意我们的ESP-BOX-LITE只能使用ESP-IDF V4.4版本。
mkdir -p ~/esp
cd ~/esp
git clone -b release/v4.4 --recursive https://github.com/espressif/esp-idf.git
我刚开始直接下载了最新版,也可以通过GIT进行版本切换。
cd $IDF_PATH
git fetch
git checkout vX.Y.Z
git submodule update --init --recursive
但切换完了之后会出现python环境与ESP-IDF版本不匹配的问题解决办法 (https://blog.csdn.net/LSQ_L/article/details/114656528) 为删除 ./.espressif/python_env 文件夹,再重新执行 ./install.sh 即可解决。
(3)获取ESP32-S3-BOX-lite仓库SDK
git clone -b v0.3.0 --recursive https://github.com/espressif/esp-box.git
注意不要直接下载源码压缩包,因为SDK中有很多子仓库依赖。
然后编译例程
. $HOME/esp/esp-idf/export.sh
cd examples/factory_demo
idf.py build flash monitor
默认下载波特率为115200,为了更快下载可以更改波特率 idf.py -p ttyUSB0 flash -b 921600。
2.理解ESP-IDF工程文件结构
以ESP-BOX的SDK为例进行分析
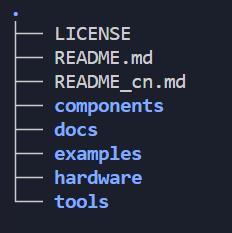
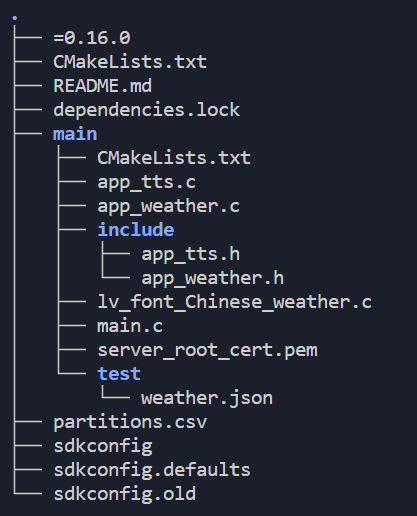
前面的图是SDK目录,后面的图是工程目录。可见工程目录很简单,所需要的其他公共代码都在component中,极大的避免了重复,减少了占用大小。那他的工程又是怎么实现组件包含编译呢?这就归功于他的管理工具 CMake 了。先看下工程的CMake文件CMakeList.txt是什么样的。
# The following lines of boilerplate have to be in your project‘s
# CMakeLists in this exact order for cmake to work correctly
cmake_minimum_required(VERSION 3.5)
include($ENV{IDF_PATH}/tools/cmake/project.cmake)
set(EXTRA_COMPONENT_DIRS
    ../../components
    # $ENV{IDF_PATH}/examples/common_components/led_strip
    ${SKAINET_PATH}/components
    ${SKAINET_PATH}/components/esp-sr
    $ENV{IDF_PATH}/examples/common_components/protocol_examples_common
    $ENV{IDF_PATH}/examples/common_components/json
    )
add_compile_options(-fdiagnostics-color=always)
project(ee_tasks)
从这里面我们可以看到清晰的组件文件包含,是不是很酷,后面需要什么组件,直接在这里包含就行了。
再看main文件夹下面的cmake。
idf_component_register(
    SRCS
        "main.c"
        "app_tts.c"
        "app_weather.c"
        "lv_font_Chinese_weather.c"
    INCLUDE_DIRS
        # “.”
        "include"
    EMBED_TXTFILES server_root_cert.pem
        )

set(voice_data_image ${PROJECT_DIR}/../../components/esp-sr/esp-tts/esp_tts_chinese/esp_tts_voice_data_xiaole.dat)
add_custom_target(voice_data ALL DEPENDS ${voice_data_image})
add_dependencies(flash voice_data)

partition_table_get_partition_info(size "--partition-name voice_data" "size")
partition_table_get_partition_info(offset "--partition-name voice_data" "offset")
if("${size}" AND "${offset}")
    esptool_py_flash_to_partition(flash “voice_data" "${voice_data_image}")
else()
    set(message "Failed to find model in partition table file"
                "Please add a line(Name=voice_data, Type=data, Size=3890K) to the partition file.")
前面部分就是工程的源文件和头文件的包含,后面 voice_data_image 是TTS部分的语音文字库。CMake构建工具让工程管理变得非常清晰。
3.TTS移植与实现
先看板子上的音频codec电路:
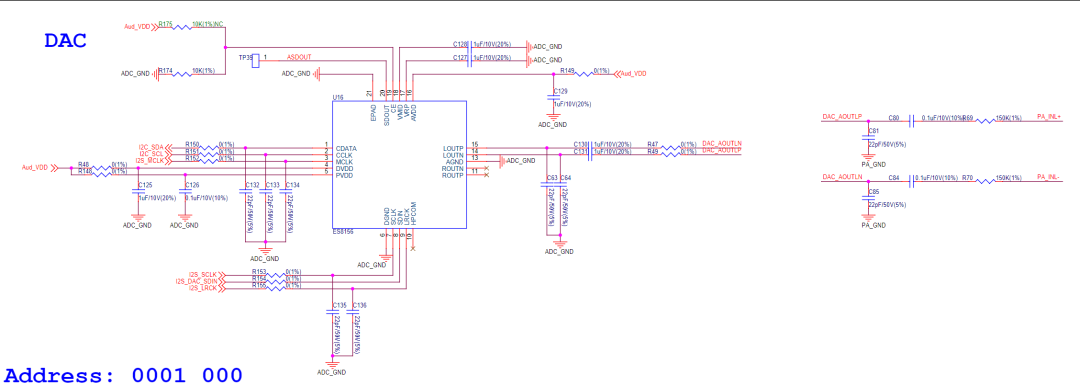
使用的是ES8156,使用I2S(一种专用的音频数据传输协议)驱动,目前我对该协议的理解还只是简单的主时钟、位时钟和位数据。等后面用FPGA实现一遍这个协议来理解。
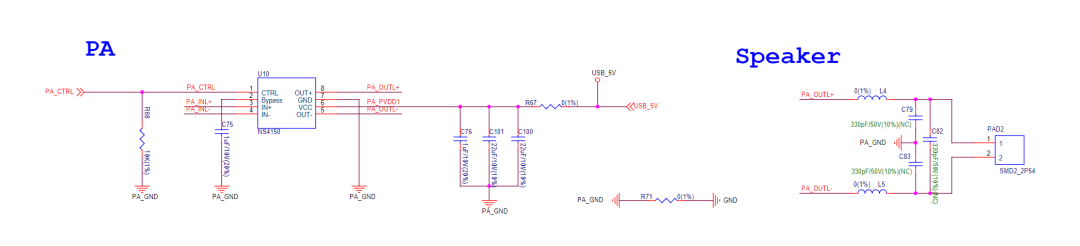 这部分就是简单的用于驱动喇叭的功放电路。
codec的驱动部分在板子的初始化中已经实现,目前是可以直接用I2S传数据了。
bsp_codec_set_voice_volume(80);
i2s_set_clk(I2S_NUM_0, 16000, 16, 1);
const esp_partition_t *part = esp_partition_find_first(ESP_PARTITION_TYPE_DATA, ESP_PARTITION_SUBTYPE_DATA_FAT, “voice_data”);
if (part == 0)
printf("Couldn't find voice data partition!\n");
else
printf("voice_data paration size:%d\n", part->size);
spi_flash_mmap_handle_t mmap;
uint16_t *voicedata;
esp_err_t err = esp_partition_mmap(part, 0, 3 * 1024 * 1024, SPI_FLASH_MMAP_DATA, (const void **)&voicedata, &mmap);
if (err != ESP_OK) {
printf("Couldn't map voice data partition!\n");
}
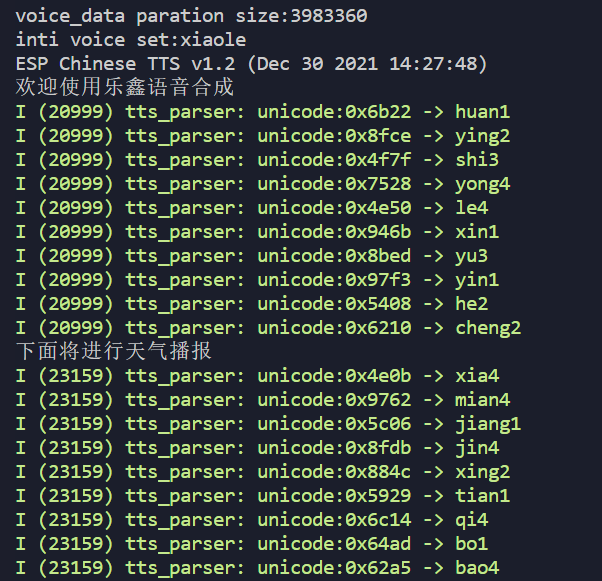
esp_tts_voice_t *voice = esp_tts_voice_set_init(&esp_tts_voice_xiaole, voicedata);
esp_tts_handle_t *tts_handle=esp_tts_create(voice);
char *text = “欢迎使用乐鑫语音合成”;
printf("%s\n", text);
if (esp_tts_parse_chinese(tts_handle, text))
{ // parse text into pinyin list
int len[1] = {0};
size_t i2s_bytes_written=0;
do
{
short *data = esp_tts_stream_play(tts_handle, len, 3); // streaming synthesis
i2s_write(I2S_NUM_0,data,len[0] *2,&i2s_bytes_written,portMAX_DELAY);
} while (len[0] > 0);
// sp_tts_stream_reset(tts_handle);
i2s_zero_dma_buffer(I2S_NUM_0);
}
其中的 voicedata 是一同烧录到flash中的,但我刚将TTS移植过来时发现不管我怎么调整 esp_tts_stream_play() 函数中的播报速度,实际ESP播报的速度都是很快。后来对比factory_demo后发现,使用前需要设置I2S_CLK,于是在调用 i2s_set_clk(I2S_NUM_0, 16000, 16, 1); 后,播放速度正常了。将这部分跑通后,剩下的就只是组合传入的中文了。
4.天气信息的获取
我使用的是心知天气的接口 (https://seniverse.yuque.com/hyper_data/api_v3/sdnhw8#frqMc),使用https就可以很方便的获取天气的JSON数据。
ESP32的https请求见 ../esp-idf/examples/protocols/https_request 其中的readme.md有详细说明如何使用。
其中需要注意的地方是下面这里。
/* Initialize NVS. */
    esp_err_t err = nvs_flash_init();
    if (err == ESP_ERR_NVS_NO_FREE_PAGES || err == ESP_ERR_NVS_NEW_VERSION_FOUND)
    {
        ESP_ERROR_CHECK(nvs_flash_erase());
        err = nvs_flash_init();
    }
    ESP_ERROR_CHECK(err);
    ESP_ERROR_CHECK(esp_netif_init());
需要初始化NVS,开一块空间来存储联网信息。从 partions.csv 中可见。
# Name, Type, SubType, Offset, Size
nvs, data, nvs, 0x9000, 0x6000
phy_init, data, phy, 0xf000, 0x1000
factory, app, factory, 0x010000, 4M
voice_data, data, fat, 0x410000, 3890K
将https例程移植过来。
/* This helper function configures Wi-Fi or Ethernet, as selected in menuconfig.
     * Read "Establishing Wi-Fi or Ethernet Connection" section in
     * examples/protocols/README.md for more information about this function.
     */
    ESP_ERROR_CHECK(esp_event_loop_create_default());
    ESP_ERROR_CHECK(example_connect());
    ESP_LOGI(TAG, “Start https_request weather”);
    https_get_request_using_crt_bundle();
    printf("Minimum free heap size: %d bytes\n", esp_get_minimum_free_heap_size());
    ESP_LOGI(TAG, “Finish https_request weather”);
其中的 example_connect() 中会进行WIFI连接,应为我是第一次用ESP32的WIFI,所以我直接移植过来了,在 menuconfig 中配置WIFI名称和密码即可。
随后因为https返回的是一串 JSON 数据,我们需要使用 cJSON 库来进行解析。
/**
* @brief json天气数据解析
*
* @param 数据analysis_buf
* @return true or false
* **/
static bool parse_json_data(const char *analysis_buf)
{
cJSON *json_data = NULL;
json_data = cJSON_Parse(analysis_buf);
if (json_data == NULL) // 判断字段是否json格式
{
return false;
}
// ESP_LOGI(TAG, "Start parsing data");
cJSON *cjson_item = cJSON_GetObjectItem(json_data, “results”);
cJSON *cjson_results = cJSON_GetArrayItem(cjson_item, 0);
// ESP_LOGI(TAG, “getresult”);
// /* 获取天气的地址 */
cJSON *cjson_location = cJSON_GetObjectItem(cjson_results, “location”);
cJSON *cjson_location_name = cJSON_GetObjectItem(cjson_location, “name”);
// // strcpy(user_weather_info_location_name,cjson_location_name->valuestring);
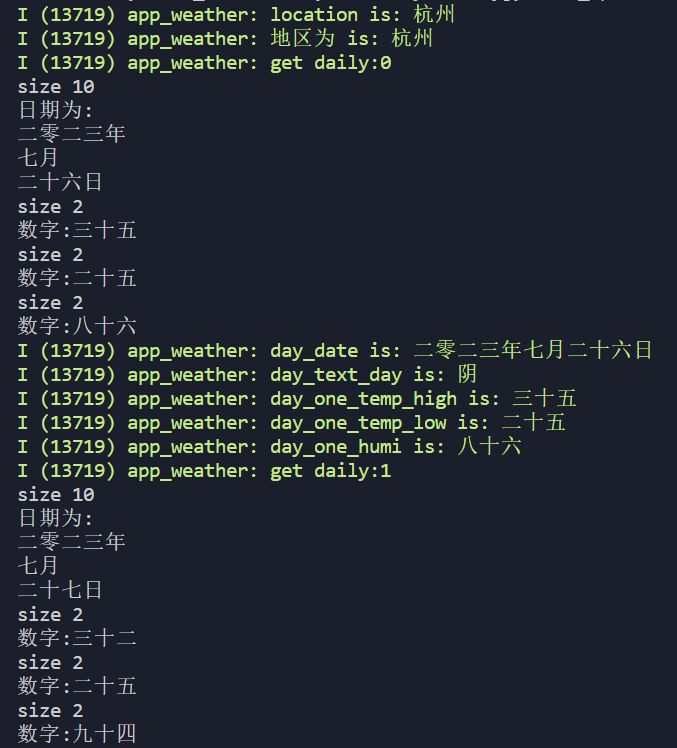
ESP_LOGI(TAG, “location is: %s”, cjson_location_name->valuestring);
strcpy(Weather_Info.location_path, cjson_location_name->valuestring);
ESP_LOGI(TAG, “地区为 is: %s”, Weather_Info.location_path);
/* 天气信息 */
cJSON *cjson_daily = cJSON_GetObjectItem(cjson_results, “daily”);
// cJSON* cjson_temperature = cJSON_GetObjectItem(cjson_now,“temperature”);
char tempProcess[12];
for (int i = 0; i < 3; i++)
{
/* 当天的天气信息 */
cJSON *cjson_daily_1 = cJSON_GetArrayItem(cjson_daily, i);
ESP_LOGI(TAG, “get daily:%d”, i);
if (0 == i)
strcpy(weather_Dis.date, cJSON_GetObjectItem(cjson_daily_1, “date”)->valuestring);
numTranChinese(cJSON_GetObjectItem(cjson_daily_1, “date”)->valuestring, Weather_Info.days[i].date);
// printf(“解析结果为:%s\n”,Weather_Info.days[i].date);
strcpy(weather_Dis.weather[i], cJSON_GetObjectItem(cjson_daily_1, “text_day”)->valuestring);
strcpy(Weather_Info.days[i].weather, cJSON_GetObjectItem(cjson_daily_1, “text_day”)->valuestring);
numTranChinese(cJSON_GetObjectItem(cjson_daily_1, “high”)->valuestring, Weather_Info.days[i].temp_high);
// printf(“解析结果为:%s\n”,Weather_Info.days[i].temp_high);
if (0 == i)
{
sprintf(tempProcess, “%s-%s”, cJSON_GetObjectItem(cjson_daily_1, “low”)->valuestring, cJSON_GetObjectItem(cjson_daily_1, “high”)->valuestring);
strcpy(weather_Dis.temp_proce, tempProcess);
}
numTranChinese(cJSON_GetObjectItem(cjson_daily_1, “low”)->valuestring, Weather_Info.days[i].temp_low);
// printf(“解析结果为:%s\n”,Weather_Info.days[i].temp_low);
if (0 == i)
strcpy(weather_Dis.humidity, cJSON_GetObjectItem(cjson_daily_1, “humidity”)->valuestring);
numTranChinese(cJSON_GetObjectItem(cjson_daily_1, “humidity”)->valuestring, Weather_Info.days[i].humidity);
// printf(“解析结果为:%s\n”,Weather_Info.days[i].humidity);
ESP_LOGI(TAG, “day_date is: %s”, Weather_Info.days[i].date);
ESP_LOGI(TAG, “day_text_day is: %s”, Weather_Info.days[i].weather);
ESP_LOGI(TAG, “day_one_temp_high is: %s”, Weather_Info.days[i].temp_high);
ESP_LOGI(TAG, “day_one_temp_low is: %s”, Weather_Info.days[i].temp_low);
ESP_LOGI(TAG, “day_one_humi is: %s”, Weather_Info.days[i].humidity);
}
return true;
}
因为很多数据都是阿拉伯数字,直接传给tts无法解析,所以还需要进行转换。
void numTranChinese(char *str1, char *str2)
{
    char *chinese_n[] = {“零”, “一”, “二”, “三”, “四”, “五”, “六”, “七”, “八”, “九”, “十”};
    printf("size %d\n", strlen(str1));
    if (2 == strlen(str1))
    {
        printf(“数字:%s%s%s\n”, chinese_n[str1[0] - ‘0’], chinese_n[10], chinese_n[str1[1] - ‘0’]);
        sprintf(str2, “%s%s%s”, chinese_n[str1[0] - ‘0’], chinese_n[10], chinese_n[str1[1] - ‘0’]);
    }
    else if (4 == strlen(str1))
    {
        printf(“数字:%s%s点%s\n”, chinese_n[str1[0] - ‘0’], chinese_n[10], chinese_n[str1[1] - ‘0’]);
        sprintf(str2, “%s%s%s点%s”, chinese_n[str1[0] - ‘0’], chinese_n[10], chinese_n[str1[1] - ‘0’], chinese_n[str1[3] - ‘0’]);
    }
    else if (10 == strlen(str1))
    {
        printf(“日期为:\n%s%s%s%s年\n”, chinese_n[str1[0] - ‘0’], chinese_n[str1[1] - ‘0’], chinese_n[str1[2] - ‘0’], chinese_n[str1[3] - ‘0’]);
        strcat(str2, chinese_n[str1[0] - ‘0’]);
        strcat(str2, chinese_n[str1[1] - ‘0’]);
        strcat(str2, chinese_n[str1[2] - ‘0’]);
        strcat(str2, chinese_n[str1[3] - ‘0’]);
        strcat(str2, “年”);
        if (str1[5] == ‘0’)
        {
            printf("%s月\n", chinese_n[str1[6] - ‘0’]);
            strcat(str2, chinese_n[str1[6] - ‘0’]);
        }
        else
        {
            printf("%s%s月\n", chinese_n[10], chinese_n[str1[6] - ‘0’]);
            strcat(str2, chinese_n[10]);
            strcat(str2, chinese_n[str1[6] - ‘0’]);
        }
        strcat(str2, “月”);
        if (str1[8] == ‘0’)
        {
            strcat(str2, chinese_n[str1[9] - ‘0’]);
        }
        else
        {
            printf("%s%s%s日\n", chinese_n[str1[8] - ‘0’], chinese_n[10], chinese_n[str1[9] - ‘0’]);
            strcat(str2, chinese_n[str1[8] - ‘0’]);
            strcat(str2, chinese_n[10]);
            strcat(str2, chinese_n[str1[9] - ‘0’]);
        }
        strcat(str2, “日”);
    }
}
为了方便天气数据管理,所以使用结构体进行了封装。
typedef struct weather_daily
{
    /* date */
    char date[40];
    char weather[10];
    char temp_high[10];
    char temp_low[10];
    char humidity[10];
};
typedef struct weather_Dis_t
{
    char date[12];
    char weather[3][10];
    char temp_proce[12];
    char humidity[4];
};
typedef struct Weather_Info_t
{
    /* 位置 */
    char location_path[8];
   struct weather_daily days[3];
};
这部分的实现到此结束。
5.LVGL显示
使用如下命令将lvgl全部拉取下来,然后就可以直接使用VS打开模拟器。
git clone --recurse-submodules https://github.com/lvgl/lv_sim_visual_studio.git
第一步先设置屏幕尺寸(320x240)。然后搞一个开机动画 因为LVGL方面我也是新手,也不敢多说什么。
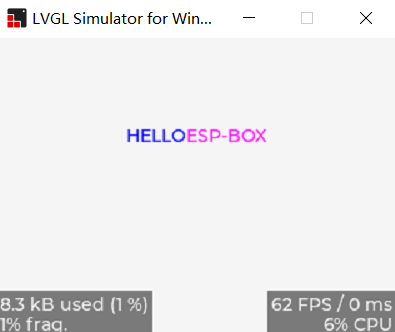
不过要学习的话看官方那个demo文档 (https://docs.lvgl.io/master/examples.html#get-started) 绝对可行(我就是这么学的)。中文字体需要自己用LVGL字体转换工具转换成C文件。
lv_obj_t *label = lv_label_create(lv_scr_act());
    lv_obj_set_style_text_align(label, LV_TEXT_ALIGN_CENTER, 0);
    lv_obj_align(label, LV_ALIGN_CENTER, 0, 0);
    lv_label_set_recolor(label, true); // 颜色重绘
    // lv_obj_set_style_text_font(label, &chinese, 0);
    lv_label_set_long_mode(label, LV_LABEL_LONG_SCROLL);
    lv_label_set_text(label, “#0000ff HELLO##ff00ff ESP-BOX#”);
    lv_anim_t afont;
    lv_anim_init(&afont);
    lv_anim_set_var(&afont, label);
    lv_anim_set_values(&afont, 0, 180);
    lv_anim_set_time(&afont, 1000);
    lv_anim_set_playback_delay(&afont, 800);
    lv_anim_set_playback_time(&afont, 300);
    lv_anim_set_path_cb(&afont, lv_anim_path_ease_in_out);
    lv_anim_set_exec_cb(&afont, anim_width_cb);
    lv_anim_set_ready_cb(&afont, my_anim_end_cb); /* 动画播放结束的回调函数 */
    lv_anim_start(&afont);
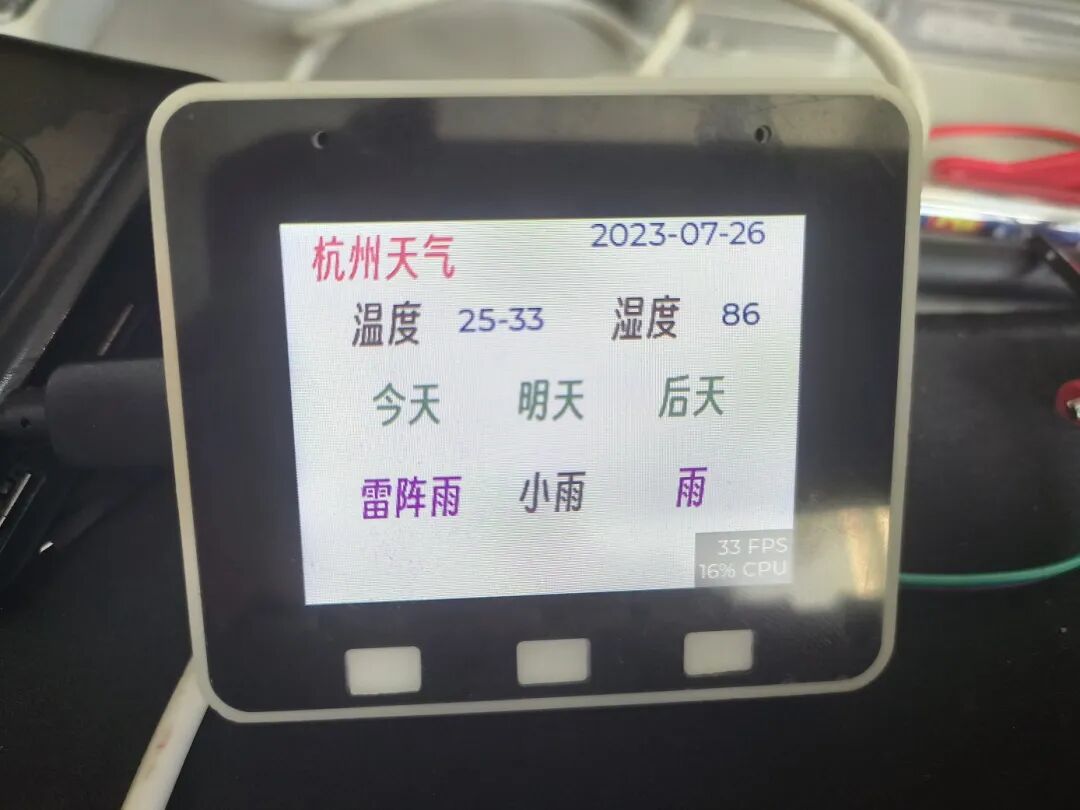
天气的简单显示如下,暂时先用文字,等熟悉了LVGL再用图片表示天气。

void LV_weather_Show(void)
{
    LV_FONT_DECLARE(lv_font_Chinese_weather);
    // lv_obj_t* label = lv_label_create(lv_scr_act());
    /*Change the active screen‘s background color*/
    lv_obj_set_style_bg_color(lv_scr_act(), lv_color_white(), LV_PART_MAIN);
    /*Create a white label, set its text and align it to the center*/
    lv_obj_t *label = lv_label_create(lv_scr_act());
    lv_label_set_text(label, “杭州天气”);
    lv_obj_set_style_text_font(label, &lv_font_Chinese_weather, LV_PART_MAIN | LV_STATE_DEFAULT);
    lv_obj_set_style_text_color(label, lv_color_hex(0xee3a57), LV_PART_MAIN | LV_STATE_DEFAULT);
    // lv_obj_set_style_text_color(lv_scr_act(), lv_color_hex(0xffffff), LV_PART_MAIN);
    lv_obj_align(label, LV_ALIGN_CENTER, -100, -100);
    lv_obj_t *label2 = lv_label_create(lv_scr_act());
    lv_label_set_text(label2, weather_Dis.date);
    lv_obj_set_style_text_font(label2, &lv_font_montserrat_20, 0);
    lv_obj_set_style_text_color(label2, lv_color_hex(0x113a99), LV_PART_MAIN | LV_STATE_DEFAULT);
    lv_obj_align(label2, LV_ALIGN_CENTER, 80, -110);
    // 时间
    lv_obj_t *label3 = lv_label_create(lv_scr_act());
    lv_label_set_text(label3, “今天”);
    lv_obj_set_style_text_font(label3, &lv_font_Chinese_weather, LV_PART_MAIN | LV_STATE_DEFAULT);
    lv_obj_set_style_text_color(label3, lv_color_hex(0x457757), LV_PART_MAIN | LV_STATE_DEFAULT);
    // lv_obj_set_style_text_color(lv_scr_act(), lv_color_hex(0xffffff), LV_PART_MAIN);
    lv_obj_align(label3, LV_ALIGN_CENTER, -90, -10);
    lv_obj_t *label4 = lv_label_create(lv_scr_act());
    lv_label_set_text(label4, “明天”);
    lv_obj_set_style_text_font(label4, &lv_font_Chinese_weather, LV_PART_MAIN | LV_STATE_DEFAULT);
    lv_obj_set_style_text_color(label4, lv_color_hex(0x457757), LV_PART_MAIN | LV_STATE_DEFAULT);
    // lv_obj_set_style_text_color(lv_scr_act(), lv_color_hex(0xffffff), LV_PART_MAIN);
    lv_obj_align(label4, LV_ALIGN_CENTER, 0, -10);
    lv_obj_t *label5 = lv_label_create(lv_scr_act());
    lv_label_set_text(label5, “后天”);
    lv_obj_set_style_text_font(label5, &lv_font_Chinese_weather, LV_PART_MAIN | LV_STATE_DEFAULT);
    lv_obj_set_style_text_color(label5, lv_color_hex(0x457757), LV_PART_MAIN | LV_STATE_DEFAULT);
    // lv_obj_set_style_text_color(lv_scr_act(), lv_color_hex(0xffffff), LV_PART_MAIN);
    lv_obj_align(label5, LV_ALIGN_CENTER, 90, -10);
    // 天气
    lv_obj_t *label6 = lv_label_create(lv_scr_act());
    lv_label_set_text(label6, weather_Dis.weather[0]);
    lv_obj_set_style_text_font(label6, &lv_font_Chinese_weather, LV_PART_MAIN | LV_STATE_DEFAULT);
    lv_obj_set_style_text_color(label6, lv_color_hex(0xa228b7), LV_PART_MAIN | LV_STATE_DEFAULT);
    // lv_obj_set_style_text_color(lv_scr_act(), lv_color_hex(0xffffff), LV_PART_MAIN);
    lv_obj_align(label6, LV_ALIGN_CENTER, -90, 50);
    lv_obj_t *label7 = lv_label_create(lv_scr_act());
    lv_label_set_text(label7, weather_Dis.weather[1]);
    lv_obj_set_style_text_font(label7, &lv_font_Chinese_weather, LV_PART_MAIN | LV_STATE_DEFAULT);
    lv_obj_set_style_text_color(label6, lv_color_hex(0xa228b7), LV_PART_MAIN | LV_STATE_DEFAULT);
    // lv_obj_set_style_text_color(lv_scr_act(), lv_color_hex(0xffffff), LV_PART_MAIN);
    lv_obj_align(label7, LV_ALIGN_CENTER, 0, 50);
    lv_obj_t *label8 = lv_label_create(lv_scr_act());
    lv_label_set_text(label8, weather_Dis.weather[2]);
    lv_obj_set_style_text_font(label8, &lv_font_Chinese_weather, LV_PART_MAIN | LV_STATE_DEFAULT);
    lv_obj_set_style_text_color(label8, lv_color_hex(0xa228b7), LV_PART_MAIN | LV_STATE_DEFAULT);
    // lv_obj_set_style_text_color(lv_scr_act(), lv_color_hex(0xffffff), LV_PART_MAIN);
    lv_obj_align(label8, LV_ALIGN_CENTER, 90, 50);
    // 温度
    lv_obj_t *label9 = lv_label_create(lv_scr_act());
    lv_label_set_text(label9, “温度”);
    lv_obj_set_style_text_font(label9, &lv_font_Chinese_weather, LV_PART_MAIN | LV_STATE_DEFAULT);
    lv_obj_set_style_text_color(label9, lv_color_hex(0x351919), LV_PART_MAIN | LV_STATE_DEFAULT);
    // lv_obj_set_style_text_color(lv_scr_act(), lv_color_hex(0xffffff), LV_PART_MAIN);
    lv_obj_align(label9, LV_ALIGN_CENTER, -100, -60);
    lv_obj_t *temperature = lv_label_create(lv_scr_act());
    lv_label_set_text(temperature, weather_Dis.temp_proce);
    lv_obj_set_style_text_font(temperature, &lv_font_montserrat_20, 0);
    lv_obj_set_style_text_color(temperature, lv_color_hex(0x113a99), LV_PART_MAIN | LV_STATE_./imageDEFAULT);
    // lv_obj_set_style_text_color(lv_scr_act(), lv_color_hex(0xffffff), LV_PART_MAIN);
    lv_obj_align(temperature, LV_ALIGN_CENTER, -30, -60);
    // 湿度
    lv_obj_t *label10 = lv_label_create(lv_scr_act());
    lv_label_set_text(label10, “湿度”);
    lv_obj_set_style_text_font(label10, &lv_font_Chinese_weather, LV_PART_MAIN | LV_STATE_DEFAULT);
    lv_obj_set_style_text_color(label10, lv_color_hex(0x351919), LV_PART_MAIN | LV_STATE_DEFAULT);
    lv_obj_align(label10, LV_ALIGN_CENTER, 60, -60);
    lv_obj_t *humity = lv_label_create(lv_scr_act());
    lv_label_set_text(humity, weather_Dis.humidity);
    lv_obj_set_style_text_font(humity, &lv_font_montserrat_20, 0);
    lv_obj_set_style_text_color(humity, lv_color_hex(0x113a99), LV_PART_MAIN | LV_STATE_DEFAULT);
    lv_obj_align(humity, LV_ALIGN_CENTER, 120, -60);
}
6.整体流程梳理
整个软件流程实现如下:

整体还是比较简单的,做的大部分工作只是在现有的程序上进行拼凑。
效果展示和遇到的问题
效果展示:
- wifi连接
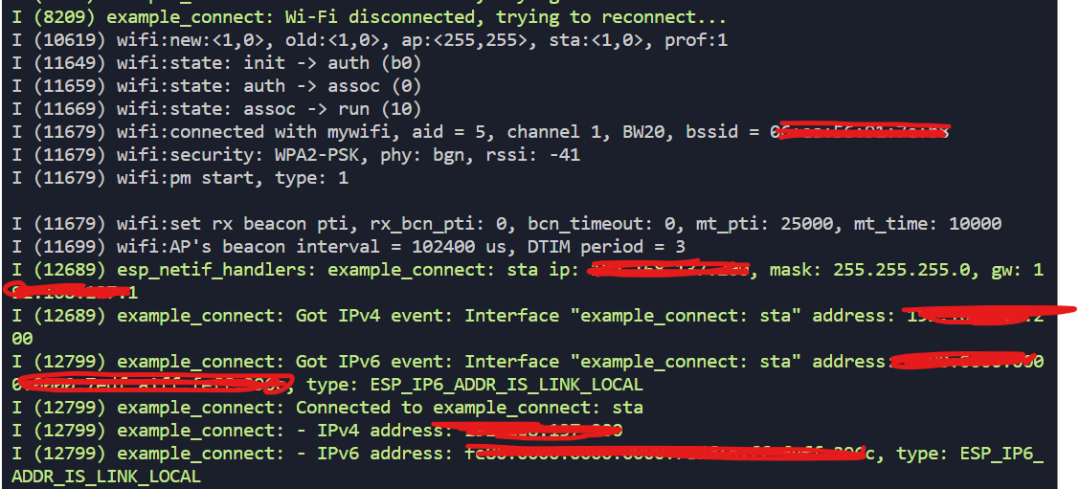
- https数据获取
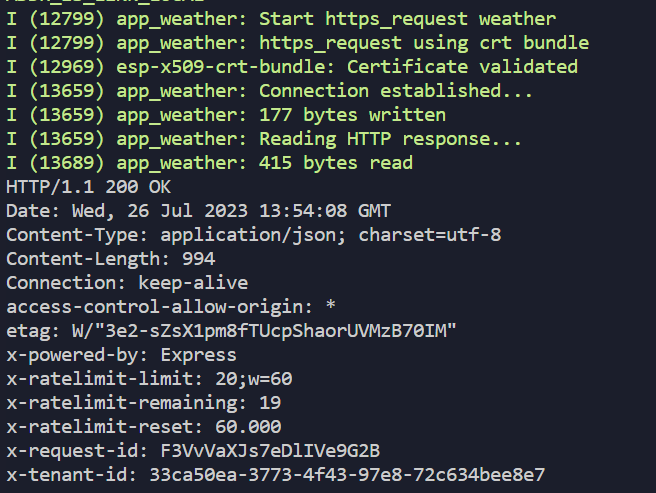
- json原始数据

- 解析后的数据
- TTS效果
- 实际运行
问题:
- 效果显示较慢,没有在播报前就显示天气,这部分应该是因为我没有给LVGL显示开一个独立的线程,整个程序只有一个循环,导致屏幕信息没有及时刷新出来。
- 界面显示过于简单、再加上些图片和动画显示可能会更好。
- WIFI连接没有彻底搞懂,争取下次自己写WIFI连接。
- 没有语音请求然后播报,不够优雅~
感想与未来计划
如果没有这次活动,我还不知道什么时候才会真正的使用ESP-IDF进行ESP32的开发,算是一次大的进步。还有这次终于真正的用上了自己写的LVGL界面,之前都只是做下移植,然后跑下DEMO,就放下了。
目前手上这个ESP-BOX-LITE的外设还是挺多的,后面可以好好玩下其他功能,以及虽然官方开源了ChatGPT的demo,但是并没有适配lite,可以争取下给移植到lite上。
 发表于 2025-12-18 01:49:23
|
查看: 283|
回复: 0
发表于 2025-12-18 01:49:23
|
查看: 283|
回复: 0
