在 Android 开发中,使用 SQLite 进行本地数据存储是一种常见需求。为了简化数据库操作,社区诞生了许多 ORM 框架。Room 作为 Android JetPack 组件库的一部分,由 Google 官方推出,提供了一套抽象层来更高效地访问 SQLite 数据库。
一、理解 Room 与 ORM
ORM 即“对象关系映射”,它的主要作用是在面向对象的编程语言(如Java/Kotlin)与关系型数据库之间建立一座桥梁。Room 与其他 ORM 库(如 ORMLite、GreenDao)目标一致,但作为官方组件,其与 Android 架构的融合度更高,是目前进行本地持久化开发的推荐选择。
二、Room 核心组件与应用架构
Room 包含三个核心注解组件,理解它们的关系是使用的关键。
1. 核心组件
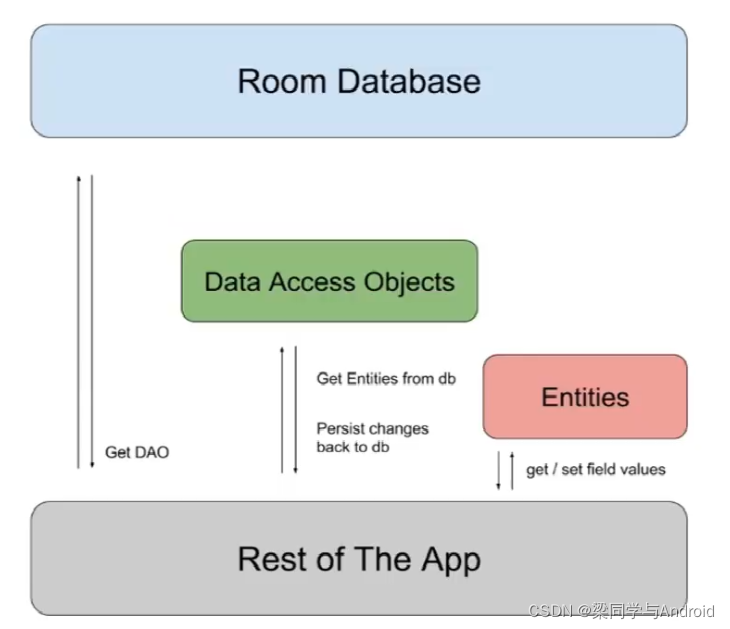
@Entity: 标注在数据模型类上,对应数据库中的一张表。@Dao: 标注在数据访问对象接口上,包含一系列增删改查的方法。@Database: 标注在继承自 RoomDatabase 的抽象类上,作为数据库的入口点。
2. 组件关系
下图清晰地展示了 Room 架构中三大组件如何协同工作,将对象操作映射为数据库操作。
三、增删改查实战:构建一个学生管理应用
下面我们通过一个完整的学生信息管理示例,演示 Room 的基本使用。首先,在 build.gradle 文件中添加依赖。
// Room 依赖
implementation "androidx.room:room-runtime:2.2.5"
annotationProcessor "androidx.room:room-compiler:2.2.5"
步骤 1:设计界面 (XML)
一个简单的界面,包含四个操作按钮和一个用于展示数据的列表。
activity_main.xml:
<?xml version="1.0" encoding="utf-8"?>
<androidx.constraintlayout.widget.ConstraintLayout xmlns:android="http://schemas.android.com/apk/res/android"
    xmlns:app="http://schemas.android.com/apk/res-auto"
    xmlns:tools="http://schemas.android.com/tools"
    android:layout_width="match_parent"
    android:layout_height="match_parent"
    tools:context=".MainActivity">

    <Button
        android:id="@+id/button7"
        android:layout_width="wrap_content"
        android:layout_height="wrap_content"
        android:onClick="mInsert"
        android:text="增加"
        ... />

    <Button
        android:id="@+id/button8"
        android:layout_width="wrap_content"
        android:layout_height="wrap_content"
        android:onClick="mUpdate"
        android:text="修改"
        ... />

    <Button
        android:id="@+id/button9"
        android:layout_width="wrap_content"
        android:layout_height="wrap_content"
        android:onClick="mDelete"
        android:text="删除"
        ... />

    <Button
        android:id="@+id/button10"
        android:layout_width="wrap_content"
        android:layout_height="wrap_content"
        android:onClick="mQuery"
        android:text="查询"
        ... />

    <androidx.recyclerview.widget.RecyclerView
        android:id="@+id/rv_01"
        android:layout_width="match_parent"
        android:layout_height="0dp"
        app:layout_constraintTop_toTopOf="@+id/guideline3"
        app:layout_constraintBottom_toBottomOf="parent" />
</androidx.constraintlayout.widget.ConstraintLayout>
item.xml (列表项布局):
<?xml version="1.0" encoding="utf-8"?>
<androidx.constraintlayout.widget.ConstraintLayout ...>
    <TextView android:id="@+id/tvId" ... />
    <TextView android:id="@+id/name" ... />
    <TextView android:id="@+id/age" ... />
</androidx.constraintlayout.widget.ConstraintLayout>
步骤 2:定义实体类 (Entity)
创建一个 Student 类,使用 @Entity 注解将其映射到名为 “student” 的数据库表。
Student.java:
@Entity(tableName = "student")
public class Student {
    @PrimaryKey(autoGenerate = true)
    @ColumnInfo(name = "id", typeAffinity = ColumnInfo.INTEGER)
    public int id;

    @ColumnInfo(name = "name", typeAffinity = ColumnInfo.TEXT)
    public String name;

    @ColumnInfo(name = "age", typeAffinity = ColumnInfo.INTEGER)
    public int age;

    // 主构造器
    public Student(int id, String name, int age) {
        this.id = id;
        this.name = name;
        this.age = age;
    }

    // 用于插入的构造器(忽略id,由数据库自增生成)
    @Ignore
    public Student(String name, int age) {
        this.name = name;
        this.age = age;
    }

    // 用于按ID删除的构造器
    @Ignore
    public Student(int id) {
        this.id = id;
    }
}
步骤 3:创建数据访问对象 (Dao)
定义一个包含增删改查方法的接口,Room 会在编译时自动生成其实现。
StudentDao.java:
@Dao
public interface StudentDao {
    @Insert
    void insertStudent(Student... students); // 插入一个或多个学生

    @Delete
    void deleteStudent(Student... students);

    @Update
    void updateStudent(Student... students);

    @Query("SELECT * FROM student")
    List<Student> getAllStudent();

    @Query("SELECT * FROM student WHERE id = :id")
    List<Student> getStudentById(Integer id);
}
步骤 4:创建数据库 (Database)
创建一个抽象类继承 RoomDatabase,并声明获取 Dao 的抽象方法。
MyDataBase.java:
@Database(entities = {Student.class}, version = 1, exportSchema = false)
public abstract class MyDataBase extends RoomDatabase {

    private static final String DATABASE_NAME = "my_db.db";
    private static MyDataBase mInstance;

    // 单例模式获取数据库实例
    public static synchronized MyDataBase getInstance(Context context) {
        if(mInstance == null) {
            mInstance = Room.databaseBuilder(context.getApplicationContext(),
                                            MyDataBase.class,
                                            DATABASE_NAME)
                    // .allowMainThreadQueries() // 默认不允许在主线程操作,需要时打开
                    .build();
        }
        return mInstance;
    }
    public abstract StudentDao getStudentDao();
}
步骤 5:实现 Activity 逻辑
在主活动中初始化数据库和列表,并通过 AsyncTask 在后台线程执行数据库操作,这是处理 数据库/中间件 操作以避免阻塞UI线程的常见做法。
MainActivity.java (核心部分):
public class MainActivity extends AppCompatActivity {
    private StudentRecycleViewAdapter adapter;
    private StudentDao studentDao;

    @Override
    protected void onCreate(Bundle savedInstanceState) {
        super.onCreate(savedInstanceState);
        setContentView(R.layout.activity_main);

        RecyclerView recyclerView = findViewById(R.id.rv_01);
        adapter = new StudentRecycleViewAdapter(new ArrayList<>());
        recyclerView.setLayoutManager(new LinearLayoutManager(this));
        recyclerView.setAdapter(adapter);

        // 获取数据库和Dao实例
        MyDataBase myDataBase = MyDataBase.getInstance(this);
        studentDao = myDataBase.getStudentDao();
    }

    // 增加
    public void mInsert(View view) {
        Student s1 = new Student("Jack", 20);
        Student s2 = new Student("Rose", 22);
        new InsertStudentTask(studentDao).execute(s1, s2);
    }

    // 删除 (根据ID删除)
    public void mDelete(View view) {
        Student s1 = new Student(1); // 删除id为1的记录
        new DeleteStudentTask(studentDao).execute(s1);
    }

    // 修改
    public void mUpdate(View view) {
        Student s1 = new Student(3, "LiangShuPeng", 21); // 更新id为3的记录
        new UpdateStudentTask(studentDao).execute(s1);
    }

    // 查询
    public void mQuery(View view) {
        new GetAllStudentTask(studentDao, adapter).execute();
    }

    // 以下是用于执行数据库操作的异步任务类...
    // InsertStudentTask, DeleteStudentTask, UpdateStudentTask, GetAllStudentTask
}
注:为保持简洁,AsyncTask 内部类及 RecyclerView.Adapter 的完整代码已在上文提供。
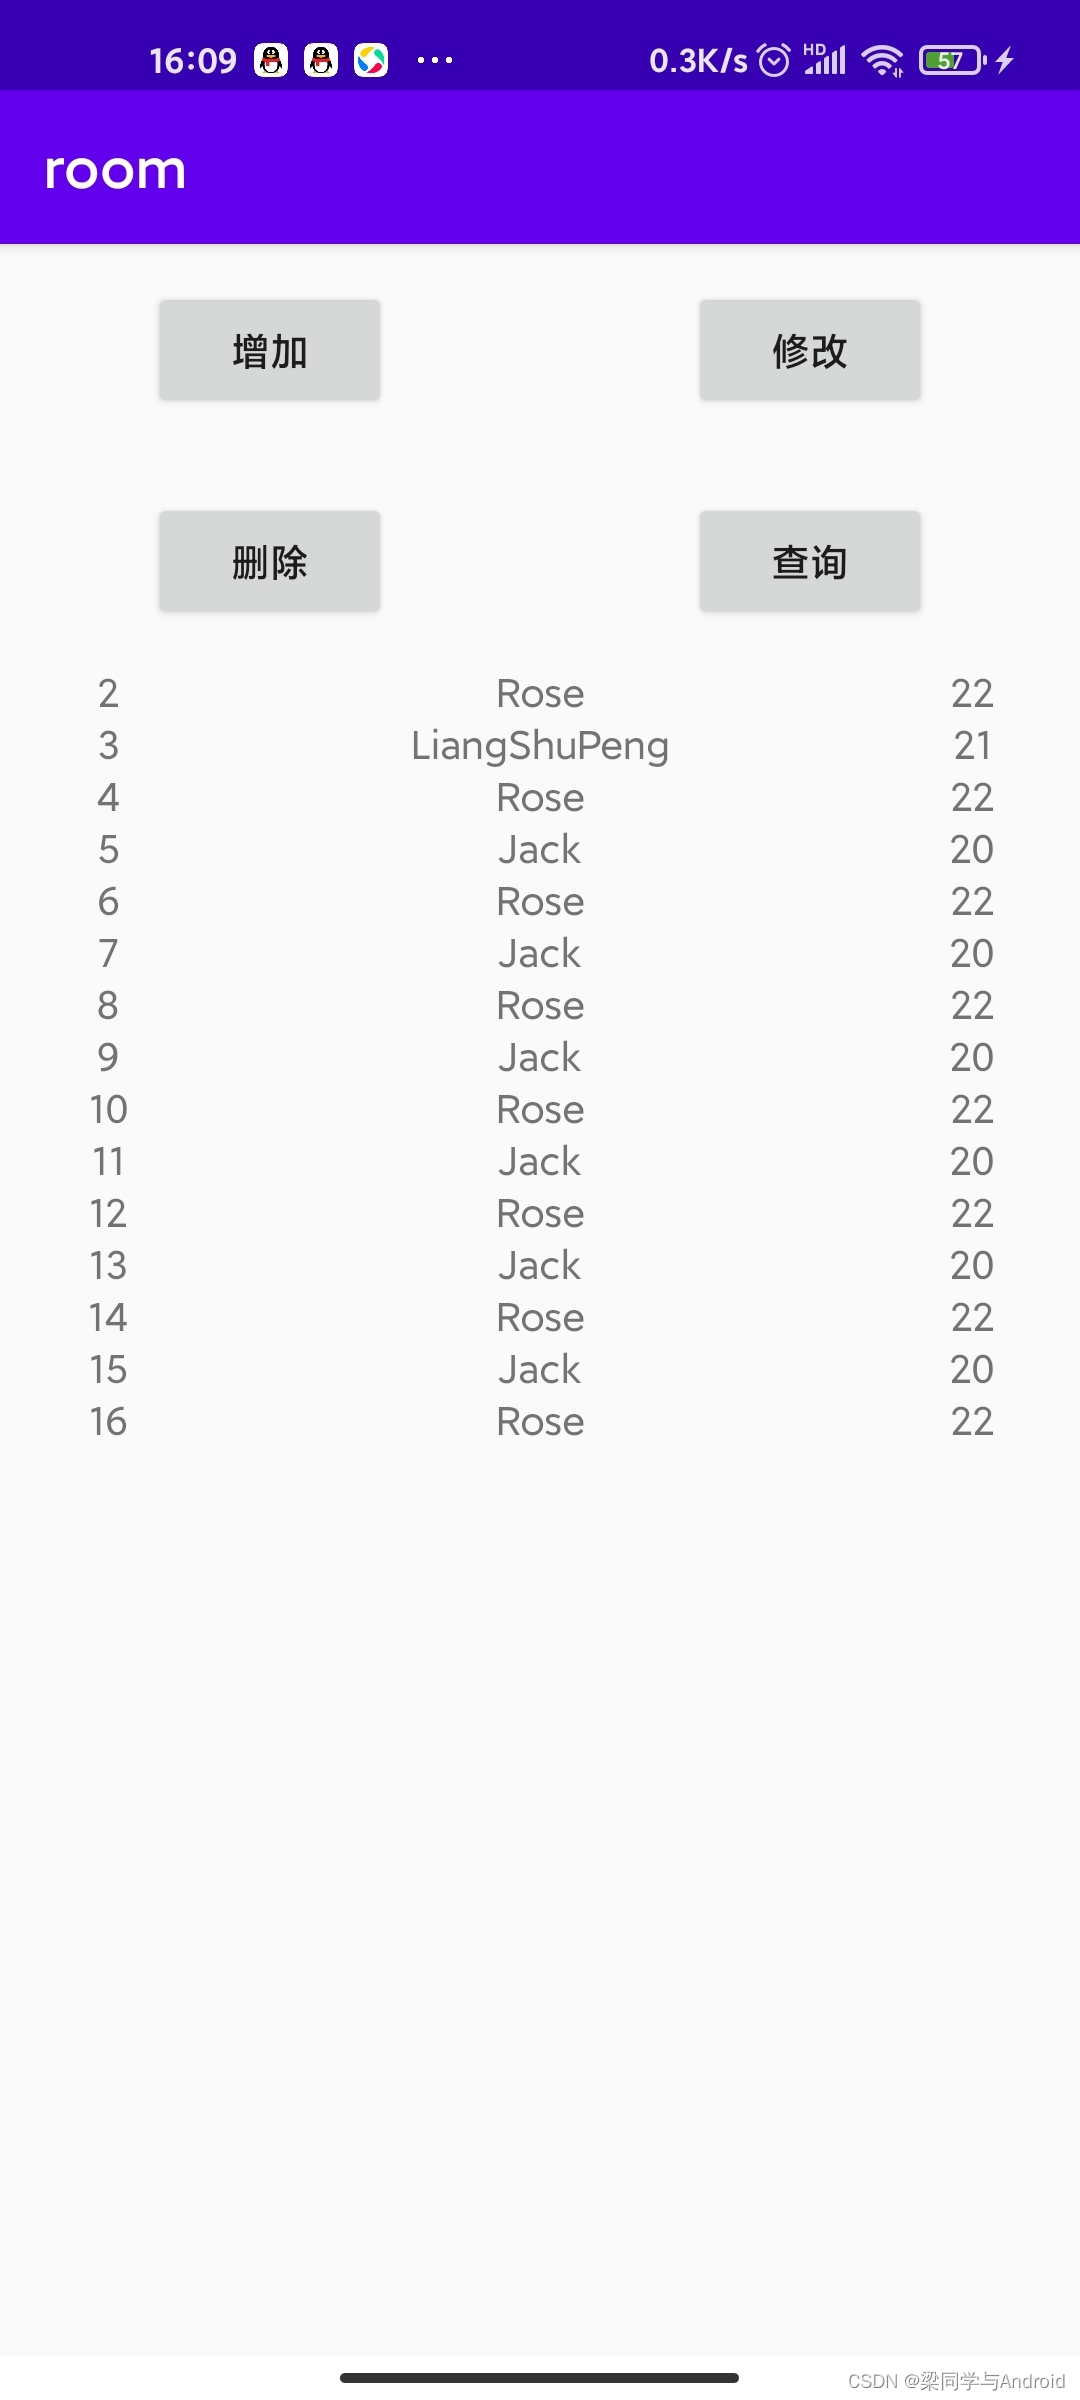
最终效果
完成以上步骤后,运行应用。点击“增加”、“修改”、“删除”、“查询”按钮,即可对本地数据库进行完整的 CRUD 操作,数据变化会实时反映在下方列表中。
通过本教程,你可以掌握使用 Android JetPack Room 组件进行本地数据库开发的基本流程。Room 的强大之处在于其简洁的注解和编译时检查,能有效减少样板代码和运行时错误,是开发现代 Android 应用不可或缺的持久化解决方案。
 发表于 2025-12-27 10:05:53
|
查看: 169|
回复: 0
发表于 2025-12-27 10:05:53
|
查看: 169|
回复: 0
