Stressapptest(Stressful Application Test)是一款用于模拟高负载环境的压力测试工具。它通过执行大量计算、数据处理和内存操作,来测试系统在多线程并发任务下的性能与稳定性。
主要命令行参数
工具通过一系列参数来控制测试行为,以下是一些核心参数:
-s:设置测试运行的秒数。-m:指定内存复制线程(Memory Copy)的数量。-i:指定内存反转线程(Invert Copy)的数量。-c:启用CRC校验(Data Check)。-C:指定CPU压力测试线程的数量。-M:设置测试使用的内存大小(单位:兆字节)。注意,若设置值超过系统可用内存,进程可能会被终止。- 其他参数可参考源码文件
sat.cc。
一个典型的使用示例如下:
./stressapptest -s 86400 -m 4 -i 4 -c 4 -C 4 -M xxx
官网提供的示例如下:
# 分配256MB内存,运行8个“预热复制”线程和8个CPU负载线程,运行20秒后退出。
./stressapptest -s 20 -M 256 -m 8 -C 8 -W
# 运行2个文件IO线程,并自动检测内存大小和核心数以选择分配的内存和内存复制线程数。
./stressapptest -f /tmp/file1 -f /tmp/file2
如何将 stressapptest 加入编译系统
在不同平台的Android系统源码中,可以通过修改编译配置文件来集成此工具。
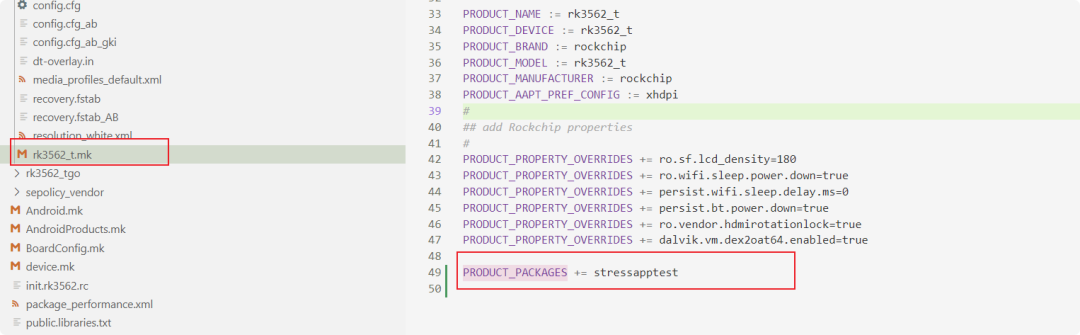
图1:在RK3562平台的Makefile中添加stressapptest编译项
APK调用方法
如果希望在Android应用中进行压力测试,可以将stressapptest可执行文件打包进APK并调用。
加载并拷贝stressapptest文件
首先需要将存放在Assets目录下的可执行文件复制到设备的数据目录,并赋予执行权限。以下是一个示例方法:
private boolean copyBin(String name) {
    File desFile = new File("/data/", name);
    Log.i(TAG, "copyBin, desFile: " + desFile.toString());
    // 从源码的assets的bin目录下,复制到/data/目录下,通常需要系统级应用权限
    if (copyAssetFile("bin/" + name ,desFile )) {
        // 授予文件执行权限
        ShellUtils.CommandResult result2 = ShellUtils.execCmd(
            "chmod 777 /data/" + name,
            true
        );
        Log.i(TAG, "copyBin, chmod result: " + result2.toString());
        return result2.result >= 0 && TextUtils.isEmpty(result2.errorMsg);
    }
    return false;
}

/**
 * Execute the command.
 *
 * @param command  The command.
 * @param isRooted True to use root, false otherwise.
 * @return the single {@link CommandResult} instance
 */
public static CommandResult execCmd(final String command, final boolean isRooted) {
    return execCmd(new String[]{command}, isRooted, true);
}

/**
 * Execute the command.
 *
 * @param commands        The commands.
 * @param isRooted        True to use root, false otherwise.
 * @param isNeedResultMsg True to return the message of result, false otherwise.
 * @return the single {@link CommandResult} instance
 */
public static CommandResult execCmd(final String[] commands,
                                    final boolean isRooted,
                                    final boolean isNeedResultMsg) {
    int result = -1;
    if (commands == null || commands.length == 0) {
        return new CommandResult(result, "", "");
    }
    Process process = null;
    BufferedReader successResult = null;
    BufferedReader errorResult = null;
    StringBuilder successMsg = null;
    StringBuilder errorMsg = null;
    DataOutputStream os = null;
    try {
        process = Runtime.getRuntime().exec(isRooted ? "su" : "sh");
        os = new DataOutputStream(process.getOutputStream());
        for (String command : commands) {
            if (command == null) continue;
            os.write(command.getBytes());
            os.writeBytes(LINE_SEP);
            os.flush();
        }
        os.writeBytes("exit" + LINE_SEP);
        os.flush();
        result = process.waitFor();
        if (isNeedResultMsg) {
            successMsg = new StringBuilder();
            errorMsg = new StringBuilder();
            successResult = new BufferedReader(
                new InputStreamReader(process.getInputStream(), "UTF-8")
            );
            errorResult = new BufferedReader(
                new InputStreamReader(process.getErrorStream(), "UTF-8")
            );
            String line;
            if ((line = successResult.readLine()) != null) {
                successMsg.append(line);
                while ((line = successResult.readLine()) != null) {
                    successMsg.append(LINE_SEP).append(line);
                }
            }
            if ((line = errorResult.readLine()) != null) {
                errorMsg.append(line);
                while ((line = errorResult.readLine()) != null) {
                    errorMsg.append(LINE_SEP).append(line);
                }
            }
        }
    } catch (Exception e) {
        e.printStackTrace();
    } finally {
        try {
            if (os != null) {
                os.close();
            }
        } catch (IOException e) {
            e.printStackTrace();
        }
        try {
            if (successResult != null) {
                successResult.close();
            }
        } catch (IOException e) {
            e.printStackTrace();
        }
        try {
            if (errorResult != null) {
                errorResult.close();
            }
        } catch (IOException e) {
            e.printStackTrace();
        }
        if (process != null) {
            process.destroy();
        }
    }
    return new CommandResult(
        result,
        successMsg == null ? "" : successMsg.toString(),
        errorMsg == null ? "" : errorMsg.toString()
    );
}

/**
 * The result of command.
 */
public static class CommandResult {
    public int result;
    public String successMsg;
    public String errorMsg;

    public CommandResult(final int result, final String successMsg, final String errorMsg) {
        this.result = result;
        this.successMsg = successMsg;
        this.errorMsg = errorMsg;
    }

    @Override
    public String toString() {
        return "result: " + result + "\n" +
               "successMsg: " + successMsg + "\n" +
               "errorMsg: " + errorMsg;
    }
}
调用执行
文件准备就绪后,可以在子线程中执行stressapptest命令。
private Runnable mStressAppTestRunnable = new Runnable() {
    @Override
    public void run() {
        Log.i(TAG, "stressapptest run...");
        DataOutputStream dos = null;
        try {
            Process process = Runtime.getRuntime().exec("su");
            dos = new DataOutputStream(process.getOutputStream());
            // 构造命令,例如运行指定时间,使用4个反转线程和4个CPU压力线程等
            String command = "/data/" + STRESS_APP_TEST + "  -s " + (mTargetTime - 10)
                    + " -i 4 -C 4 -W --stop_on_errors -M " + sMemory + "\n";
            dos.write(command.getBytes(Charset.forName("utf-8")));
            dos.flush();
            // 读取并输出测试日志
            String line;
            BufferedReader bufferedReader = new BufferedReader(
                new InputStreamReader(process.getInputStream()));
            while (isRunning() && (line = bufferedReader.readLine()) != null) {
                Log.i(TAG, "stressapptest: " + line);
                Message msg = new Message();
                msg.what = COMMAND_UPDATE_LOG;
                msg.obj = line;
                mHandler.sendMessage(msg); // 通过handler将数据发送出去
            }
            dos.writeBytes("exit\n");
            dos.flush();
            Log.w(TAG, "stressapptest exit.");
        } catch (IOException e) {
            Log.e(TAG, e.getMessage(), e);
        } finally {
            try {
                if (dos != null) {
                    dos.close();
                }
            } catch (IOException e) {
                Log.e(TAG, e.getMessage(), e);
            }
        }
    }
};
stressapptest 源码分析
stressapptest的代码结构清晰,是学习系统级C++压力测试实现的良好材料。
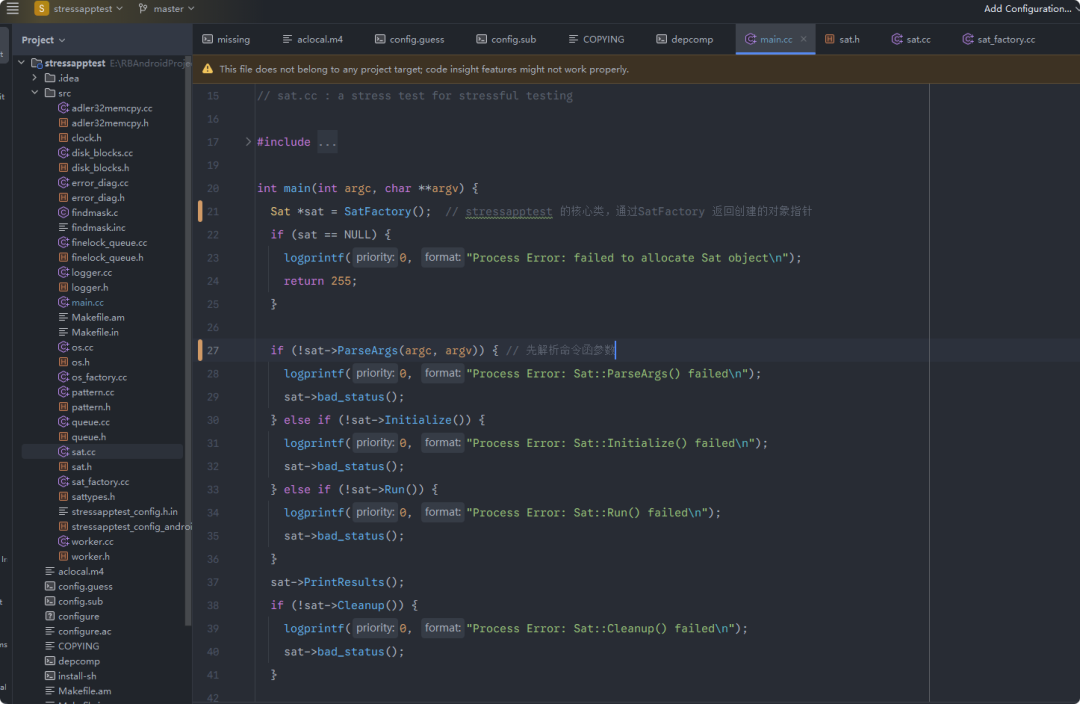
图2:stressapptest项目在IDE中的源码文件结构
入口函数
程序入口main函数逻辑清晰,遵循典型的初始化-运行-清理流程:
int main(int argc, char **argv) {
    Sat *sat = SatFactory(); // 核心类,通过工厂函数创建
    if (sat == NULL) {
        logprintf(0, "Process Error: failed to allocate Sat object\n");
        return 255;
    }
    // 解析命令行参数
    if (!sat->ParseArgs(argc, argv)) {
        logprintf(0, "Process Error: Sat::ParseArgs() failed\n");
        sat->bad_status();
    } else if (!sat->Initialize()) { // 执行初始化
        logprintf(0, "Process Error: Sat::Initialize() failed\n");
        sat->bad_status();
    } else if (!sat->Run()) { // 运行压力测试
        logprintf(0, "Process Error: Sat::Run() failed\n");
        sat->bad_status();
    }
    // 打印测试结果
    sat->PrintResults();
    // 释放资源
    if (!sat->Cleanup()) {
        logprintf(0, "Process Error: Sat::Cleanup() failed\n");
        sat->bad_status();
    }

    int retval;
    // 根据状态返回结果
    if (sat->status() != 0) {
        logprintf(0, "Process Error: Fatal issue encountered. See above logs for "
                     "details.\n");
        retval = 1;
    } else if (sat->errors() != 0) {
        retval = 1;
    } else {
        retval = 0;
    }
    // 释放Sat对象内存
    delete sat;
    return retval;
}
Sat 类
main函数中初始化的Sat类是工具的核心,其创建通过简单的工厂函数完成:
Sat *SatFactory() {
    return new Sat();
}
该类主要职责包括:
- 流程控制:解析参数、初始化、运行测试、打印结果、清理资源。
- 线程管理:包含初始化线程、创建线程、等待线程结束和分析报告的函数。
- 资源管理:数据成员用于保存配置参数、控制标志、内存和测试配置、资源及结果。
- 多线程压力测试:利用pthreads库,包含针对内存、文件IO、网络IO、磁盘IO、CPU压力及缓存一致性等不同类型测试的特定方法。
- 页面队列管理:使用队列结构管理内存页,支持单锁(SAT_ONELOCK)和细粒度锁(SAT_FINELOCK)两种并发模式,以平衡性能与线程安全。
- 单锁模式:使用全局唯一锁保护整个队列,简单但高并发下可能成为性能瓶颈。
- 细锁模式:对队列中的元素或子结构单独加锁,允许多线程并发访问不同部分,提高性能。
// 用于页面队列实现模式切换的枚举
enum PageQueueType { SAT_ONELOCK, SAT_FINELOCK };
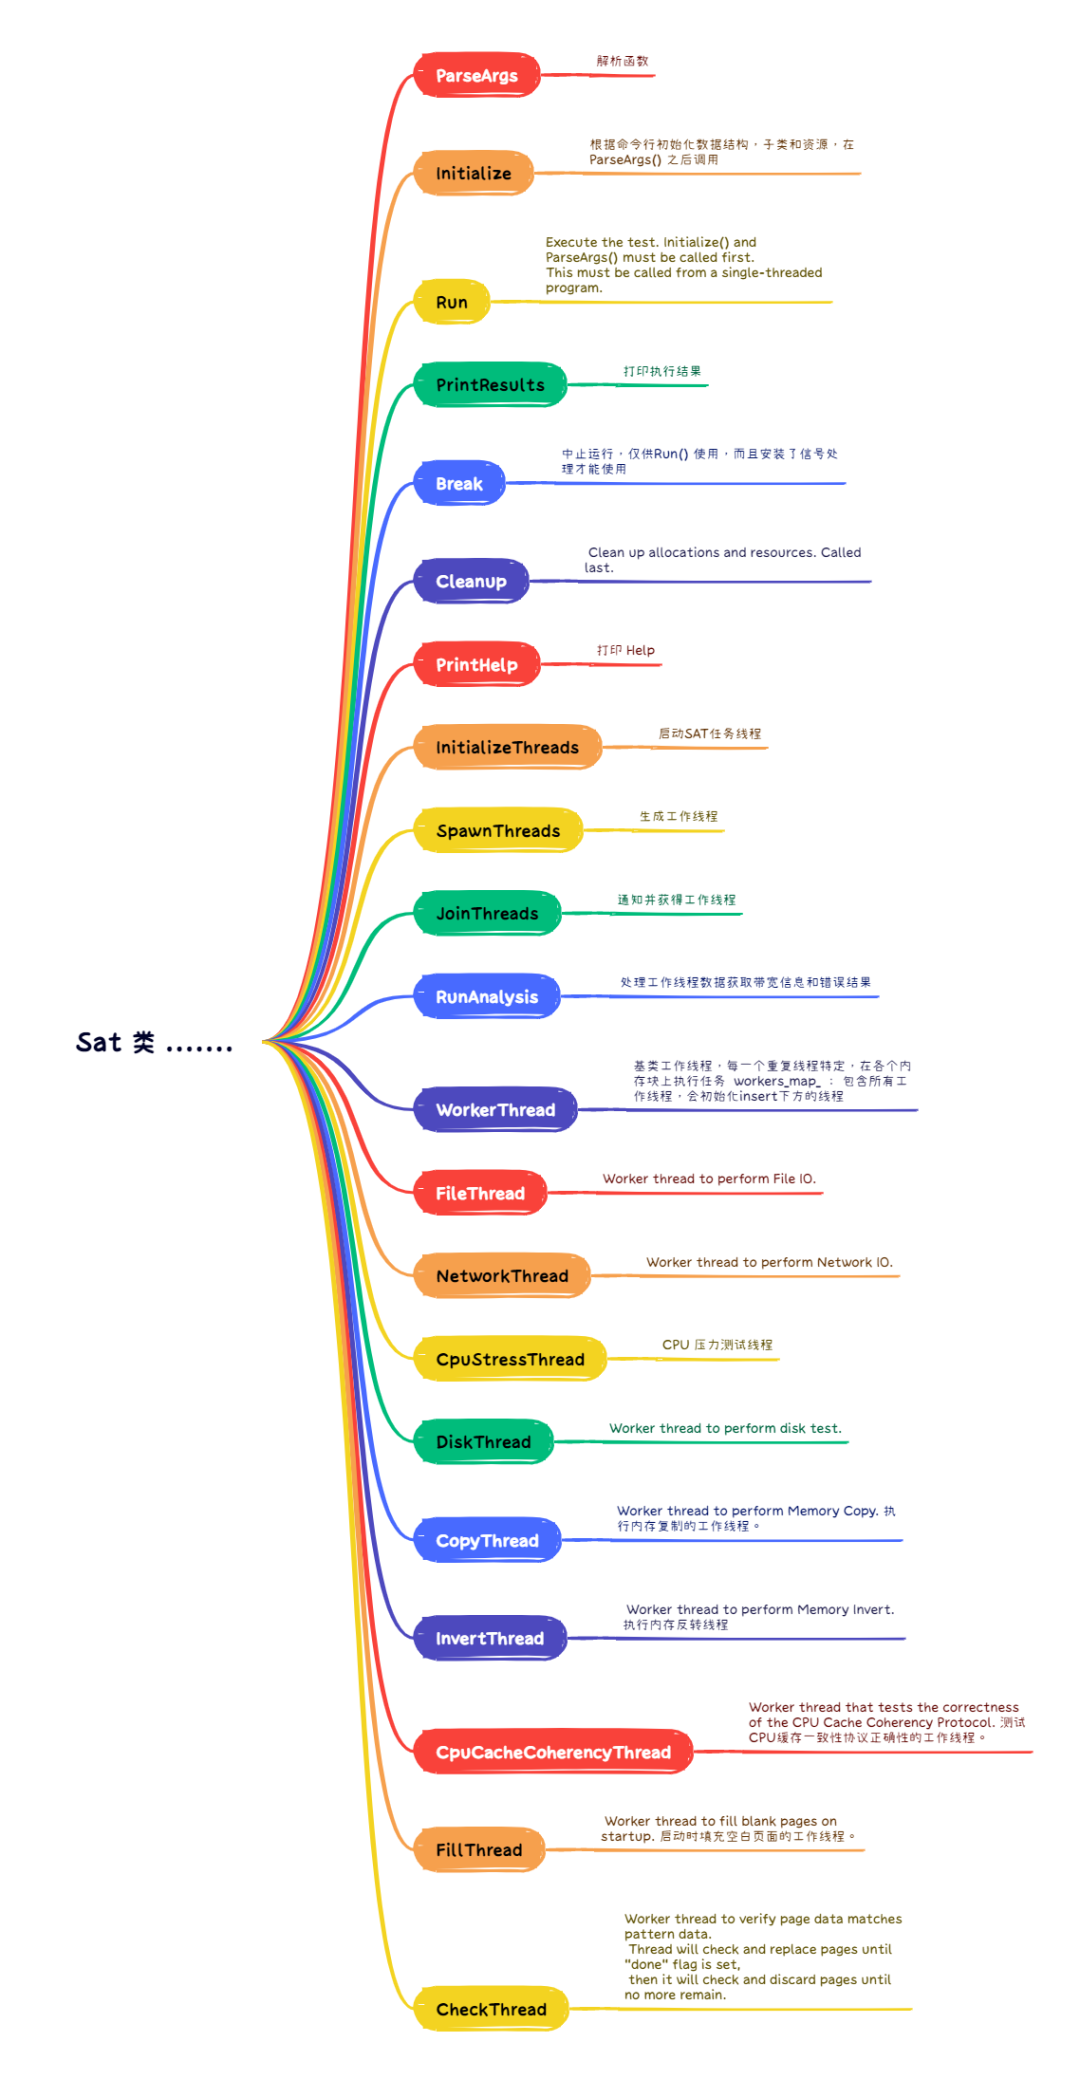
图3:Sat类的主要功能模块与线程类型思维导图
CPU 压测原理
CPU压力测试的核心是通过多线程并发执行计算密集型任务。用户通过-C参数指定线程数,工具使用pthread_create()创建对应数量的线程。每个线程执行的任务旨在最大化CPU利用率,例如进行浮点数数组的滑动平均计算:
// 通用的CPU压力工作负载,适用于任何CPU/平台。
// 浮点数组滑动平均计算。
bool OsLayer::CpuStressWorkload() {
    double float_arr[100];
    double sum = 0;
#ifdef HAVE_RAND_R
    unsigned int seed = 12345;
#endif

    // 用随机数初始化数组。
    for (int i = 0; i < 100; i++) {
#ifdef HAVE_RAND_R
        float_arr[i] = rand_r(&seed); //生成随机数
        if (rand_r(&seed) % 2)
            float_arr[i] *= -1.0;
#else
        srand(time(NULL));
        float_arr[i] = rand();  // NOLINT
        if (rand() % 2)         // NOLINT
            float_arr[i] *= -1.0;
#endif
    }

    // 计算滑动平均。通过频繁修改数组元素来加大计算量。
    for (int i = 0; i < 100000000; i++) {
        float_arr[i % 100] =
            (float_arr[i % 100] + float_arr[(i + 1) % 100] +
             float_arr[(i + 99) % 100]) / 3;
        sum += float_arr[i % 100];
    }

    // 防止循环被编译器优化掉的打印语句。
    if (sum == 0.0)
        logprintf(12, "Log: I'm Feeling Lucky!\n");
    return true;
}
DDR 压测原理
DDR内存压力测试主要通过对内存进行高强度的分配、访问和读写操作来实现,旨在测试内存带宽、延迟和稳定性。这类运维 & 测试对于确保服务器和嵌入式设备长期运行的可靠性至关重要。
- 内存分配:通过
-M参数分配指定大小的内存,由AllocateMemory()函数调用系统接口完成。
// 分配测试所需的内存
bool Sat::AllocateMemory() {
    bool result = os_->AllocateTestMem(size_, paddr_base_);
    if (!result) {
        logprintf(0, "Process Error: failed to allocate memory\n");
        bad_status();
        return false;
    }
    return true;
}
- 内存读写操作:在分配的内存区域进行密集访问,模式包括:
开源地址与参考资料
想要了解更多关于系统稳定性测试、性能调优的实践与讨论,欢迎访问 云栈社区 的对应板块。
参考资料
- CPU-BPU-DDR 压力测试: _https://developer.d-robotics.cc/rdk_doc/en/rdk_s/Advanced_development/linux_development/hardware_unit_test/bpu_cpu_ddr_stress_
 发表于 2025-12-30 04:02:02
|
查看: 225|
回复: 0
发表于 2025-12-30 04:02:02
|
查看: 225|
回复: 0
