在之前的技术分享中,我们深入剖析了大模型执行 Function Calling 的底层原理,并通过原生 HTTP 协议进行了实现。虽然这有助于理解细节,但实现过程略显繁琐。
那么,对于 Java 开发者而言,是否存在更简洁、优雅的实现方式呢?答案是肯定的。得益于 Spring 生态的强大整合能力,Spring AI 项目提供了出色的封装。无论是通过 @Tool 注解,还是构建 Function 对象,都能让工具调用的实现变得异常简单。
本文将通过一个具体示例,展示如何快速上手。
环境要求
- JDK >= 17
- Spring Boot: 3.4.x 或 3.5.x
项目依赖
首先,在你的 Maven pom.xml 文件中添加必要的依赖项。
<?xml version="1.0" encoding="UTF-8"?>
<project xmlns="http://maven.apache.org/POM/4.0.0"
         xmlns:xsi="http://www.w3.org/2001/XMLSchema-instance"
         xsi:schemaLocation="http://maven.apache.org/POM/4.0.0 http://maven.apache.org/xsd/maven-4.0.0.xsd">
    <modelVersion>4.0.0</modelVersion>

    <groupId>org.example</groupId>
    <artifactId>spring-ai-function-call</artifactId>
    <version>1.0-SNAPSHOT</version>

    <properties>
        <maven.compiler.source>17</maven.compiler.source>
        <maven.compiler.target>17</maven.compiler.target>
        <project.build.sourceEncoding>UTF-8</project.build.sourceEncoding>
    </properties>
    <dependencies>
        <dependency>
            <groupId>org.springframework.boot</groupId>
            <artifactId>spring-boot-starter-web</artifactId>
        </dependency>

        <dependency>
            <groupId>org.springframework.boot</groupId>
            <artifactId>spring-boot-starter-actuator</artifactId>
        </dependency>

        <dependency>
            <groupId>org.springframework.ai</groupId>
            <artifactId>spring-ai-starter-model-openai</artifactId>
        </dependency>

        <dependency>
            <groupId>org.springframework.boot</groupId>
            <artifactId>spring-boot-starter-test</artifactId>
            <scope>test</scope>
        </dependency>
    </dependencies>

    <dependencyManagement>
        <dependencies>
            <dependency>
                <groupId>org.springframework.ai</groupId>
                <artifactId>spring-ai-bom</artifactId>
                <version>1.0.0</version>
                <type>pom</type>
                <scope>import</scope>
            </dependency>

            <dependency>
                <groupId>org.springframework.boot</groupId>
                <artifactId>spring-boot-starter-web</artifactId>
                <version>3.5.7</version>
            </dependency>

            <dependency>
                <groupId>org.springframework.boot</groupId>
                <artifactId>spring-boot-starter-test</artifactId>
                <version>3.5.7</version>
            </dependency>

            <dependency>
                <groupId>org.springframework.boot</groupId>
                <artifactId>spring-boot-starter-actuator</artifactId>
                <version>3.5.7</version>
            </dependency>
        </dependencies>
    </dependencyManagement>

</project>
定义工具方法
接下来,我们创建一个工具类,其中包含一个获取当前日期时间的方法。使用 @Tool 注解来声明这是一个可供 AI 模型调用的工具。
package org.example.fc;

import java.time.LocalDateTime;

import org.slf4j.Logger;
import org.slf4j.LoggerFactory;
import org.springframework.ai.tool.annotation.Tool;
import org.springframework.context.i18n.LocaleContextHolder;

public class DateTimeTools {
    private static Logger LOGGER = LoggerFactory.getLogger(DateTimeTools.class);

    @Tool(description = "Get the current date and time in the user's timezone")
    String getCurrentDateTime() {
        LOGGER.info("call getCurrentDateTime");
        return LocalDateTime.now().atZone(LocaleContextHolder.getTimeZone().toZoneId()).toString();
    }
}
服务层:集成工具调用
创建一个聊天服务,在构建 ChatClient 时将我们定义的工具实例注册进去。
package org.example.service;

import org.example.fc.DateTimeTools;
import org.springframework.ai.chat.client.ChatClient;
import org.springframework.stereotype.Service;

@Service
public class ChatService {
    private final ChatClient chatClient;

    public ChatService(ChatClient.Builder builder) {
        chatClient = builder.build();
    }

    public String chat(String query) {
        return chatClient.prompt()
                .user(query)
                .tools(new DateTimeTools())
                .call()
                .content();
    }
}
测试与验证
现在,我们可以通过一个简单的接口调用来测试功能是否正常。例如,向服务提问:“你好,请问今天的日期是多少呢”。
服务成功返回了包含当前日期时间的回答。
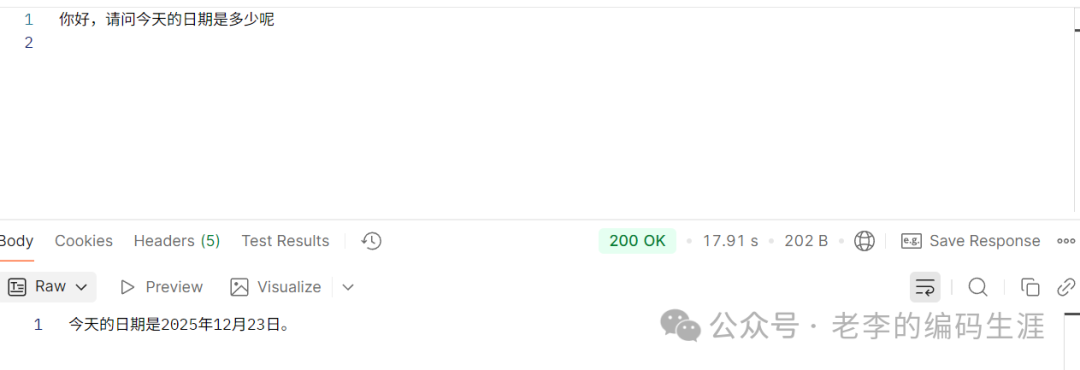
图1:通过对话成功调用工具并返回日期信息
同时,查看应用日志,可以清晰看到工具方法被成功调用的记录。这证明了 Spring AI 的 @Tool 注解已经自动完成了函数描述的封装、大模型决策以及实际方法执行的全过程。

图2:后端日志显示 getCurrentDateTime 工具被成功调用
通过这个简单的例子,我们可以看到,相比于手动处理 HTTP 请求和响应,利用 Spring AI 框架能够极大地简化 Function Calling 的开发流程,让开发者更专注于业务逻辑本身。想要了解更多关于 Spring Boot 和现代 Java 开发实践,欢迎访问 云栈社区 的 Java 技术板块进行深入交流。 |  发表于 2025-12-30 16:21:35
|
查看: 280|
回复: 0
发表于 2025-12-30 16:21:35
|
查看: 280|
回复: 0
