深夜的服务器日志不再需要人工值守,一切按预定计划自动执行——这就是Spring定时任务赋予现代应用的智能节律。
在当今的Java后端开发中,定时任务是许多应用不可或缺的一部分。从数据备份、报表生成到缓存刷新,定时任务保证了系统的自动化和持续运行。随着Spring Boot 3.x和云原生架构的普及,定时任务的使用方式也在不断演进。
01 定时任务的应用场景
现代后端系统中的定时任务无处不在,它们像是系统的“生物钟”,按照预定节律执行各种维护性、业务性操作。
数据维护类任务是最常见的应用场景:每日凌晨清理临时数据、每周归档历史记录、每月生成统计报表。金融系统中,定时任务在交易日结束后自动结算;电商平台中,定时任务释放超时未支付的订单。
缓存与状态同步任务保证系统高效运行:定期刷新热点数据到缓存、同步分布式系统的配置状态、检查服务健康度并发送警报。
业务处理任务自动化核心流程:定时扫描待处理队列、批量发送通知消息、周期性执行对账操作。
在微服务架构下,定时任务的设计更加复杂,需要考虑分布式环境下的幂等性、执行时间的错峰分配以及故障恢复机制。
02 @Scheduled注解详解
Spring框架通过@Scheduled注解提供了简洁而强大的定时任务支持。这个注解可以标记在方法上,使其按照指定规则周期性执行。
基本用法
import org.springframework.scheduling.annotation.Scheduled;
import org.springframework.stereotype.Component;

@Component
public class ReportGenerationTask {

    // 每天凌晨1点执行
    @Scheduled(cron = "0 0 1 * * ?")
    public void generateDailyReport() {
        log.info("开始生成每日报表...");
        // 报表生成逻辑
    }

    // 固定速率:每30秒执行一次
    @Scheduled(fixedRate = 30000)
    public void refreshCache() {
        log.info("刷新缓存数据...");
        // 缓存刷新逻辑
    }

    // 固定延迟:上次执行完成后延迟5秒再执行
    @Scheduled(fixedDelay = 5000)
    public void syncData() {
        log.info("同步数据到外部系统...");
        // 数据同步逻辑
    }

    // 初始延迟:应用启动后延迟10秒开始执行,然后每2分钟执行一次
    @Scheduled(initialDelay = 10000, fixedRate = 120000)
    public void healthCheck() {
        log.info("执行系统健康检查...");
        // 健康检查逻辑
    }
}
启用定时任务支持
要使用@Scheduled注解,必须在配置类上添加@EnableScheduling:
import org.springframework.scheduling.annotation.EnableScheduling;
import org.springframework.boot.SpringApplication;
import org.springframework.boot.autoconfigure.SpringBootApplication;

@SpringBootApplication
@EnableScheduling
public class Application {
    public static void main(String[] args) {
        SpringApplication.run(Application.class, args);
    }
}
在Spring Boot 3.x中,定时任务的基础设施得到了进一步优化,特别是在响应式编程和虚拟线程支持方面。结合Project Loom的虚拟线程特性,可以更高效地处理大量并发定时任务,这对于构建高并发应用至关重要:
import org.springframework.scheduling.annotation.Async;
import org.springframework.scheduling.annotation.Scheduled;

@Component
public class ConcurrentTask {

    @Async // 使用虚拟线程执行
    @Scheduled(fixedRate = 1000)
    public void highConcurrencyTask() {
        // 适用于I/O密集型定时任务
        fetchExternalData();
        processAsync();
    }
}
03 Cron表达式完全解析
Cron表达式是定义定时任务执行时间的强大工具,由6或7个字段组成(秒 分 时 日 月 周 年),每个字段都有特定的取值范围和特殊字符。
Cron表达式结构
┌───────────── 秒 (0-59)
│ ┌───────────── 分钟 (0-59)
│ │ ┌───────────── 小时 (0-23)
│ │ │ ┌───────────── 日 (1-31)
│ │ │ │ ┌───────────── 月 (1-12 或 JAN-DEC)
│ │ │ │ │ ┌───────────── 星期 (0-7 或 SUN-SAT,0和7都表示周日)
│ │ │ │ │ │
│ │ │ │ │ │
* * * * * *
常用表达式示例
@Component
public class CronExampleTask {

    // 每5分钟执行一次
    @Scheduled(cron = "0 */5 * * * ?")
    public void everyFiveMinutes() {
        // 业务逻辑
    }

    // 工作日上午9点到下午6点,每小时执行一次
    @Scheduled(cron = "0 0 9-18 ? * MON-FRI")
    public void businessHoursTask() {
        // 业务逻辑
    }

    // 每月1号凌晨2点执行
    @Scheduled(cron = "0 0 2 1 * ?")
    public void monthlyTask() {
        // 业务逻辑
    }

    // 每周一、三、五上午10:30执行
    @Scheduled(cron = "0 30 10 ? * MON,WED,FRI")
    public void weeklyTask() {
        // 业务逻辑
    }

    // 复杂示例:工作日下午3点到5点,每15分钟执行一次
    @Scheduled(cron = "0 */15 15-17 ? * MON-FRI")
    public void complexSchedule() {
        // 业务逻辑
    }
}
特殊字符详解
*:每单位时间(如每分钟、每小时)?:日或星期字段的无特定值(两者互斥)-:范围(如10-12表示10、11、12),:列举多个值(如MON,WED,FRI表示周一、三、五)/:增量值(如0/15表示从0开始每15单位)L:最后一天或最后一周几W:最近工作日#:月的第几个星期几
Spring Boot 3.x中的Cron增强
Spring Boot 3.x对Cron表达式的处理更加严格和一致:
@Component
public class SpringBoot3CronTask {

    // Spring Boot 3.x支持更精确的秒级调度
    @Scheduled(cron = "*/10 * * * * ?") // 每10秒执行
    public void preciseSecondTask() {
        // 适用于需要精确时间控制的场景
    }

    // 支持宏表达式(Spring特有)
    @Scheduled(cron = "@hourly") // 每小时执行,等同于 "0 0 * * * ?"
    public void hourlyTask() {
        // 业务逻辑
    }

    @Scheduled(cron = "@daily")  // 每天午夜执行,等同于 "0 0 0 * * ?"
    public void dailyTask() {
        // 业务逻辑
    }
}
Spring Boot 3.x支持的宏表达式包括:@yearly、@annually、@monthly、@weekly、@daily、@hourly、@midnight。
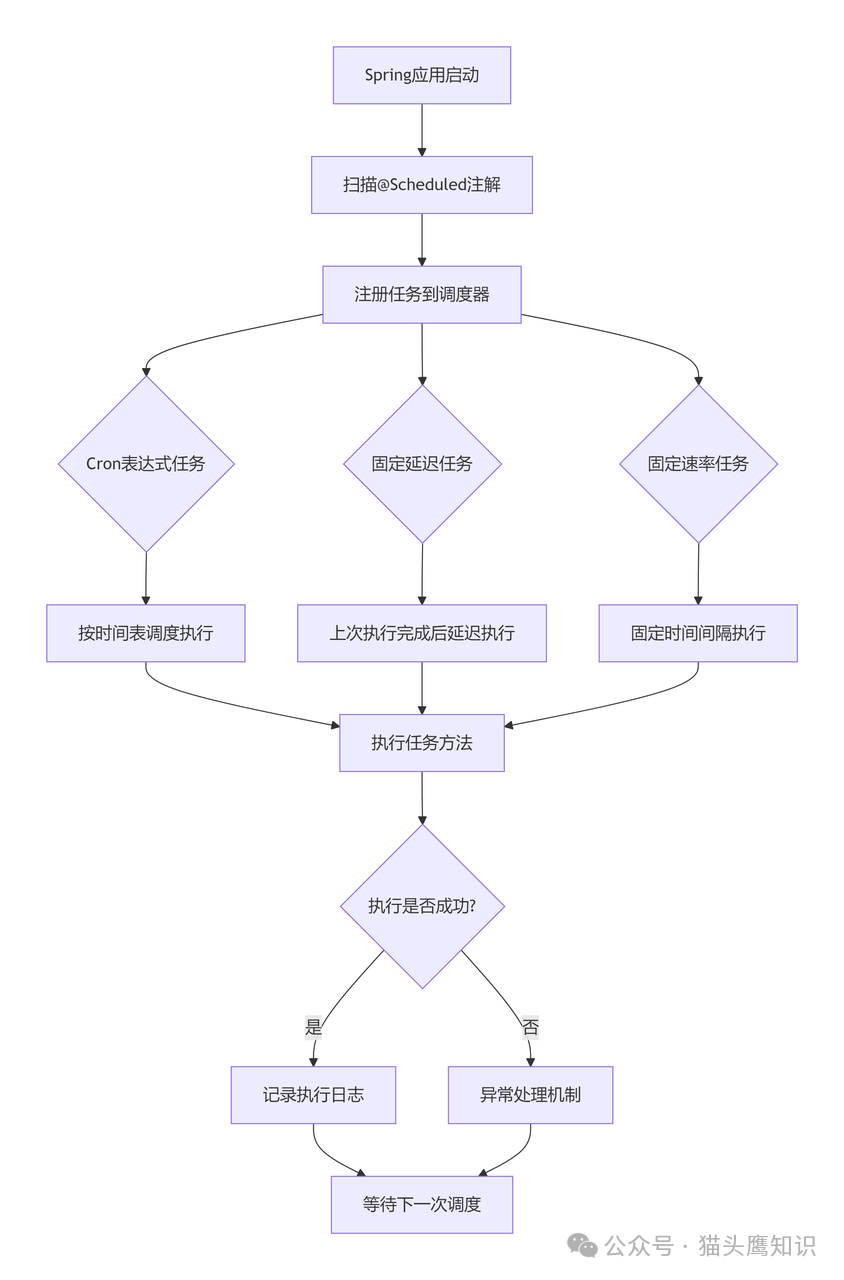
下面是Spring定时任务执行流程的完整示意图:
04 固定延迟与固定速率对比
理解fixedDelay与fixedRate的区别对于设计可靠的定时任务至关重要。
fixedDelay:上次执行完成后延迟
@Component
public class FixedDelayExample {

    private final AtomicInteger counter = new AtomicInteger(0);

    @Scheduled(fixedDelay = 5000) // 每次执行完成后等待5秒
    public void processWithFixedDelay() {
        int executionNumber = counter.incrementAndGet();
        log.info("固定延迟任务开始执行 #{}", executionNumber);

        // 模拟执行时间 2-8秒随机
        long executionTime = 2000 + (long) (Math.random() * 6000);
        try {
            Thread.sleep(executionTime);
        } catch (InterruptedException e) {
            Thread.currentThread().interrupt();
        }

        log.info("固定延迟任务执行完成 #{}, 耗时: {}ms",
                 executionNumber, executionTime);
    }
}
执行模式:A执行开始 → A执行完成 → 等待5秒 → B执行开始
fixedRate:固定时间间隔执行
@Component
public class FixedRateExample {

    private final AtomicInteger counter = new AtomicInteger(0);

    @Scheduled(fixedRate = 5000) // 每5秒执行一次
    public void processWithFixedRate() {
        int executionNumber = counter.incrementAndGet();
        log.info("固定速率任务开始执行 #{}", executionNumber);

        // 模拟执行时间 2-8秒随机
        long executionTime = 2000 + (long) (Math.random() * 6000);
        try {
            Thread.sleep(executionTime);
        } catch (InterruptedException e) {
            Thread.currentThread().interrupt();
        }

        log.info("固定速率任务执行完成 #{}, 耗时: {}ms",
                 executionNumber, executionTime);
    }
}
执行模式:A执行开始 → 5秒后 → B执行开始(无论A是否完成)
选择策略
- 使用
fixedDelay当:任务执行时间不确定,需要保证任务间有固定间隔,避免重叠执行。
- 使用
fixedRate当:需要严格按时间点执行,可以接受可能的并发执行。
- 使用
initialDelay:为应用启动留出初始化时间,避免立即执行任务。
05 定时任务的配置与管理
配置外部化
将Cron表达式外部化到配置文件中,使调度策略可以在不修改代码的情况下调整:
# application.yml
scheduling:
  tasks:
    report:
      cron: "0 0 2 * * ?" # 每天凌晨2点
      enabled: true
    cleanup:
      cron: "0 0 4 * * ?" # 每天凌晨4点
      enabled: true
    sync:
      cron: "0 */30 * * * ?" # 每30分钟
      enabled: false
@Component
@ConditionalOnProperty(name = "scheduling.tasks.report.enabled",
                       havingValue = "true")
public class ExternalizedConfigTask {

    @Value("${scheduling.tasks.report.cron}")
    private String reportCron;

    @Scheduled(cron = "${scheduling.tasks.report.cron}")
    public void generateReport() {
        log.info("使用外部化配置执行报表生成,Cron表达式: {}", reportCron);
        // 报表生成逻辑
    }
}
多任务调度策略
在复杂的应用中,需要合理安排多个定时任务的执行顺序和时间,避免资源竞争,这属于Java高并发编程中的经典问题:
@Configuration
@EnableScheduling
public class SchedulingConfig implements SchedulingConfigurer {

    @Value("${thread.pool.size:10}")
    private int threadPoolSize;

    @Override
    public void configureTasks(ScheduledTaskRegistrar taskRegistrar) {
        ThreadPoolTaskScheduler taskScheduler = new ThreadPoolTaskScheduler();
        taskScheduler.setPoolSize(threadPoolSize);
        taskScheduler.setThreadNamePrefix("scheduled-task-");
        taskScheduler.setAwaitTerminationSeconds(60);
        taskScheduler.setWaitForTasksToCompleteOnShutdown(true);
        taskScheduler.setErrorHandler(this::handleTaskError);
        taskScheduler.initialize();

        taskRegistrar.setTaskScheduler(taskScheduler);
    }

    private void handleTaskError(Throwable t) {
        log.error("定时任务执行出错", t);
        // 发送告警、记录错误指标等
    }
}
任务监控与管理
Spring Boot Actuator提供了定时任务的监控端点:
# application.yml
management:
  endpoints:
    web:
      exposure:
        include: health,info,scheduledtasks
  endpoint:
    scheduledtasks:
      enabled: true
@RestController
@RequestMapping("/api/tasks")
public class TaskManagementController {

    @Autowired
    private ScheduledTaskRegistrar taskRegistrar;

    @GetMapping("/scheduled")
    public Map<String, Object> getScheduledTasks() {
        Map<String, Object> result = new HashMap<>();

        // 获取所有定时任务信息
        List<ScheduledTask> tasks = taskRegistrar.getScheduledTasks();
        List<Map<String, String>> taskList = new ArrayList<>();

        for (ScheduledTask task : tasks) {
            Map<String, String> taskInfo = new HashMap<>();
            taskInfo.put("taskName", task.toString());
            taskInfo.put("status", "ACTIVE");
            // 可以添加更多任务信息
            taskList.add(taskInfo);
        }

        result.put("tasks", taskList);
        result.put("count", taskList.size());
        result.put("timestamp", LocalDateTime.now().toString());

        return result;
    }

    @PostMapping("/{taskName}/pause")
    public ResponseEntity<String> pauseTask(@PathVariable String taskName) {
        // 实现任务暂停逻辑
        return ResponseEntity.ok("任务已暂停");
    }

    @PostMapping("/{taskName}/resume")
    public ResponseEntity<String> resumeTask(@PathVariable String taskName) {
        // 实现任务恢复逻辑
        return ResponseEntity.ok("任务已恢复");
    }
}
06 实战案例:电商订单超时处理系统
下面是一个完整的实战案例,展示如何设计一个可靠的订单超时处理系统,其中涉及大量的数据库操作:
@Component
@Slf4j
public class OrderTimeoutProcessor {

    @Autowired
    private OrderService orderService;

    @Autowired
    private NotificationService notificationService;

    @Autowired
    private MetricsService metricsService;

    // 每30秒扫描一次待支付订单
    @Scheduled(cron = "*/30 * * * * ?")
    @Transactional(propagation = Propagation.REQUIRES_NEW)
    public void processTimeoutOrders() {
        log.info("开始扫描超时未支付订单...");

        long startTime = System.currentTimeMillis();
        int processedCount = 0;
        int successCount = 0;

        try {
            // 1. 查询超时订单(超过30分钟未支付)
            LocalDateTime timeoutThreshold = LocalDateTime.now()
                .minusMinutes(30);
            List<Order> timeoutOrders = orderService
                .findOrdersByStatusAndTime(
                    OrderStatus.PENDING_PAYMENT,
                    timeoutThreshold
                );

            processedCount = timeoutOrders.size();

            // 2. 批量处理超时订单
            for (Order order : timeoutOrders) {
                try {
                    processSingleOrder(order);
                    successCount++;
                } catch (Exception e) {
                    log.error("处理订单超时失败,订单ID: {}", order.getId(), e);
                    // 记录失败但不中断其他订单处理
                }
            }

            // 3. 记录指标
            long duration = System.currentTimeMillis() - startTime;
            metricsService.recordTimer(
                "order.timeout.processing.duration",
                duration
            );
            metricsService.recordCounter(
                "order.timeout.processing.count",
                processedCount
            );
            metricsService.recordCounter(
                "order.timeout.processing.success",
                successCount
            );

            log.info("超时订单处理完成,共处理: {},成功: {},耗时: {}ms",
                    processedCount, successCount, duration);

        } catch (Exception e) {
            log.error("订单超时处理任务执行失败", e);
            metricsService.recordCounter("order.timeout.processing.error", 1);
        }
    }

    private void processSingleOrder(Order order) {
        // 1. 更新订单状态为超时关闭
        order.setStatus(OrderStatus.TIMEOUT_CLOSED);
        order.setCloseTime(LocalDateTime.now());
        order.setCloseReason("支付超时");
        orderService.saveOrder(order);

        // 2. 释放库存
        orderService.releaseStock(order);

        // 3. 发送通知(异步执行)
        notificationService.sendOrderTimeoutNotification(order);

        // 4. 记录操作日志
        orderService.logOrderOperation(
            order.getId(),
            "SYSTEM",
            "ORDER_TIMEOUT",
            "订单支付超时,系统自动关闭"
        );
    }

    // 每天晚上23:30执行,清理历史数据
    @Scheduled(cron = "0 30 23 * * ?")
    public void cleanupTimeoutOrders() {
        log.info("开始清理历史超时订单数据...");

        // 清理90天前的超时订单记录
        LocalDateTime cutoffDate = LocalDateTime.now().minusDays(90);
        int deletedCount = orderService
            .deleteOldTimeoutOrders(cutoffDate);

        log.info("历史超时订单清理完成,共删除: {} 条记录", deletedCount);
    }
}
高级特性:分布式定时任务协调
在微服务环境中,需要确保定时任务在多个实例中不会重复执行:
@Component
@ConditionalOnProperty(name = "distributed.scheduling.enabled",
                       havingValue = "true")
public class DistributedScheduledTask {

    @Autowired
    private DistributedLockService lockService;

    @Scheduled(cron = "0 */5 * * * ?")
    public void distributedCleanupTask() {
        String lockKey = "task:distributedCleanup";
        String instanceId = getInstanceId();

        // 尝试获取分布式锁,有效期10分钟
        boolean lockAcquired = lockService.tryLock(
            lockKey,
            instanceId,
            10,
            TimeUnit.MINUTES
        );

        if (!lockAcquired) {
            log.debug("未获取到锁,跳过本次执行");
            return;
        }

        try {
            log.info("实例 {} 获取到锁,开始执行分布式清理任务", instanceId);
            // 执行需要分布式协调的任务逻辑
            performCleanup();
        } finally {
            // 任务完成后释放锁
            lockService.releaseLock(lockKey, instanceId);
            log.info("实例 {} 释放锁,任务执行完成", instanceId);
        }
    }

    private String getInstanceId() {
        // 获取当前实例标识
        return InetAddress.getLocalHost().getHostName() +
               ":" + ServerPortUtils.getPort();
    }

    private void performCleanup() {
        // 分布式清理逻辑
    }
}
07 最佳实践与常见陷阱
最佳实践
- 任务幂等性设计:确保任务可以安全地重复执行,使用数据库乐观锁或状态机保证。
- 异常处理机制:记录详细日志,设置合理的重试策略,避免任务失败导致调度阻塞。
- 资源限制:控制任务并发度,避免对数据库或外部服务造成过大压力。
- 监控告警:集成Micrometer指标,设置关键任务的执行成功率和时长告警。
- 配置灵活性:将调度策略外部化,支持动态调整。
常见陷阱与解决方案
-
任务执行时间过长:导致后续任务延迟
@Scheduled(fixedDelay = 5000)
public void longRunningTask() {
    CompletableFuture.runAsync(() -> {
        // 长时间执行逻辑
    });
}
-
任务异常导致调度停止:需要捕获所有异常
@Scheduled(cron = "0 * * * * ?")
public void safeTask() {
    try {
        // 业务逻辑
    } catch (Exception e) {
        log.error("任务执行失败", e);
        // 记录指标,但不抛出异常
    }
}
-
数据库连接耗尽:使用独立的事务上下文
@Transactional(propagation = Propagation.NOT_SUPPORTED)
@Scheduled(fixedRate = 10000)
public void heavyDatabaseTask() {
    // 大量数据库操作
}
08 云原生时代的定时任务
随着云原生架构的普及,定时任务也在向新的形态演进。
Kubernetes原生调度
对于Spring Boot 3.x应用,可以考虑使用Kubernetes CronJob替代应用级定时任务,这是云原生架构下的常见实践:
# kubernetes-cronjob.yaml
apiVersion: batch/v1
kind: CronJob
metadata:
  name: report-generator
spec:
  schedule: "0 2 * * *"  # 每天凌晨2点
  jobTemplate:
    spec:
      template:
        spec:
          containers:
          - name: report-app
            image: myapp:latest
            command: ["java", "-jar", "app.jar", "--spring.profiles.active=k8s"]
          restartPolicy: OnFailure
事件驱动架构集成
将定时任务与事件驱动架构结合,提高系统解耦度:
@Component
public class EventDrivenScheduler {

    @Autowired
    private ApplicationEventPublisher eventPublisher;

    @Scheduled(cron = "0 0 9 * * ?")
    public void triggerDailyEvent() {
        log.info("发布每日定时事件");
        eventPublisher.publishEvent(
            new DailyScheduledEvent(
                LocalDate.now(),
                "DAILY_REPORT_TRIGGER"
            )
        );
    }
}

@Component
@Slf4j
public class DailyEventListener {

    @EventListener
    @Async
    public void handleDailyEvent(DailyScheduledEvent event) {
        log.info("处理每日定时事件: {}", event.getEventType());
        // 异步处理事件
    }
}
从简单的@Scheduled注解到复杂的分布式任务协调,Spring定时任务框架已经发展成熟。在云原生时代,定时任务不再是简单的周期性代码执行,而是系统自动化、智能化的重要组成部分。
优秀的定时任务设计就像精心编排的交响乐,每个任务在正确的时间奏响正确的音符,共同维持系统的和谐运行。想了解更多企业级架构设计与实战技巧,欢迎访问云栈社区,与更多开发者交流学习。
 发表于 2026-1-21 03:17:57
|
查看: 150|
回复: 0
发表于 2026-1-21 03:17:57
|
查看: 150|
回复: 0
