在当今的服务器开发中,采用 SpringBoot3.x + MyBatisPlus + Druid 来构建多数据源配置几乎已成为一种标准实践。Druid本身也支持多数据源,但 MyBatis Plus 团队提供了一个独立的多数据源管理组件,它对部分功能进行了重写,因此配置方式与原生Druid有所不同。如果你选择了MyBatis Plus的动态数据源方案,可能会在配置文件中发现一个“小坑”:配置Druid监控相关的参数时,IDE往往不会给出任何提示,这容易让人误以为该方案不支持这些功能。最近在新项目中实际配置了一遍,在此将关键步骤记录下来,希望能帮到有同样需求的开发者。
添加Maven依赖
首先,需要在项目的 pom.xml 文件中引入必要的依赖。
<!-- 阿里数据库连接池 -->
        <!-- https://mvnrepository.com/artifact/com.alibaba/druid-spring-boot-3-starter -->
        <dependency>
            <groupId>com.alibaba</groupId>
            <artifactId>druid-spring-boot-3-starter</artifactId>
            <version>1.2.22</version>
        </dependency>

        <dependency>
            <groupId>com.baomidou</groupId>
            <artifactId>mybatis-plus-boot-starter</artifactId>
            <version>3.5.5</version>
            <exclusions>
                <exclusion>
                    <groupId>org.mybatis</groupId>
                    <artifactId>mybatis-spring</artifactId>
                </exclusion>
            </exclusions>
        </dependency>

        <dependency>
            <groupId>org.mybatis</groupId>
            <artifactId>mybatis-spring</artifactId>
            <version>3.0.3</version>
        </dependency>
        <dependency>
            <groupId>com.baomidou</groupId>
            <artifactId>mybatis-plus-annotation</artifactId>
            <version>3.5.5</version>
        </dependency>

        <!-- https://mvnrepository.com/artifact/mysql/mysql-connector-java -->
        <dependency>
            <groupId>mysql</groupId>
            <artifactId>mysql-connector-java</artifactId>
            <version>8.0.33</version>
        </dependency>
        <!-- mybatis plus的动态数据源 -->
        <dependency>
            <groupId>com.baomidou</groupId>
            <artifactId>dynamic-datasource-spring-boot3-starter</artifactId>
            <version>4.2.0</version>
        </dependency>
理解自动配置与排除冲突
MyBatis Plus 多数据源功能的自动装配核心类是 DynamicDataSourceAutoConfiguration。
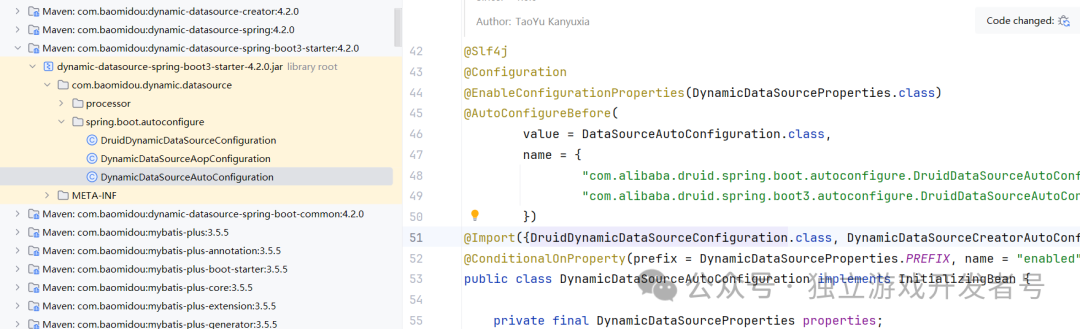
这个配置类中通过 @Import 注解引入了阿里的 Druid 配置类,实际上是复用了其功能:
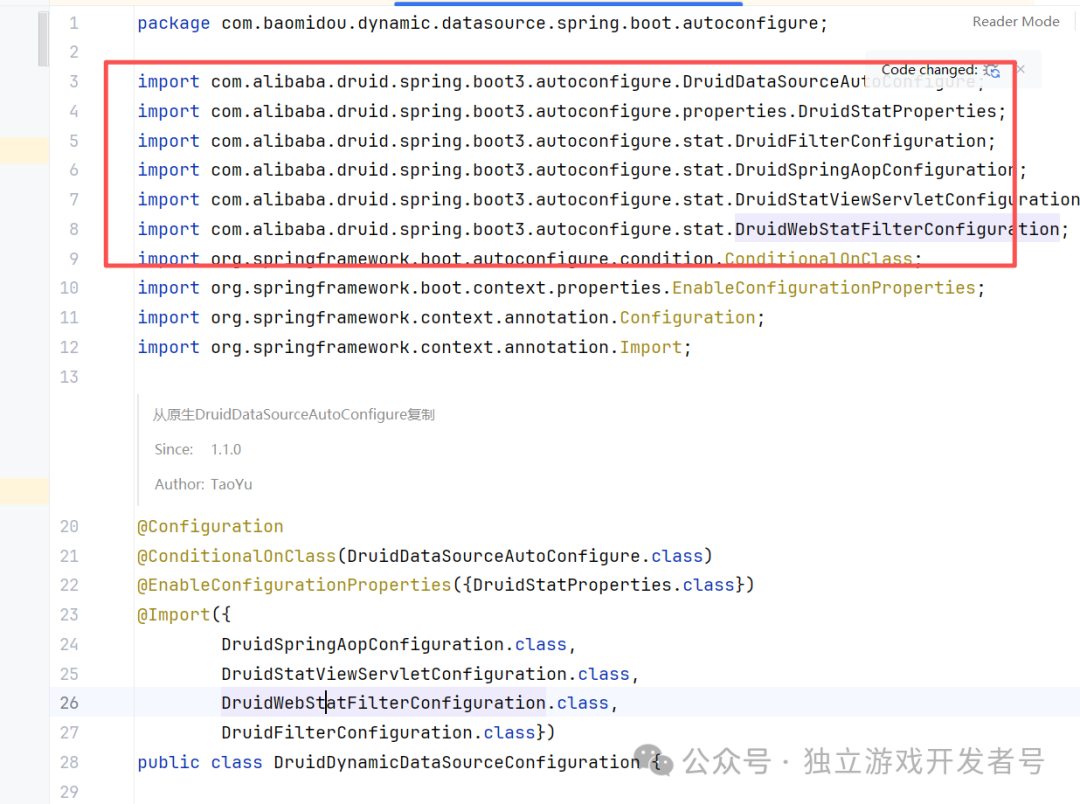
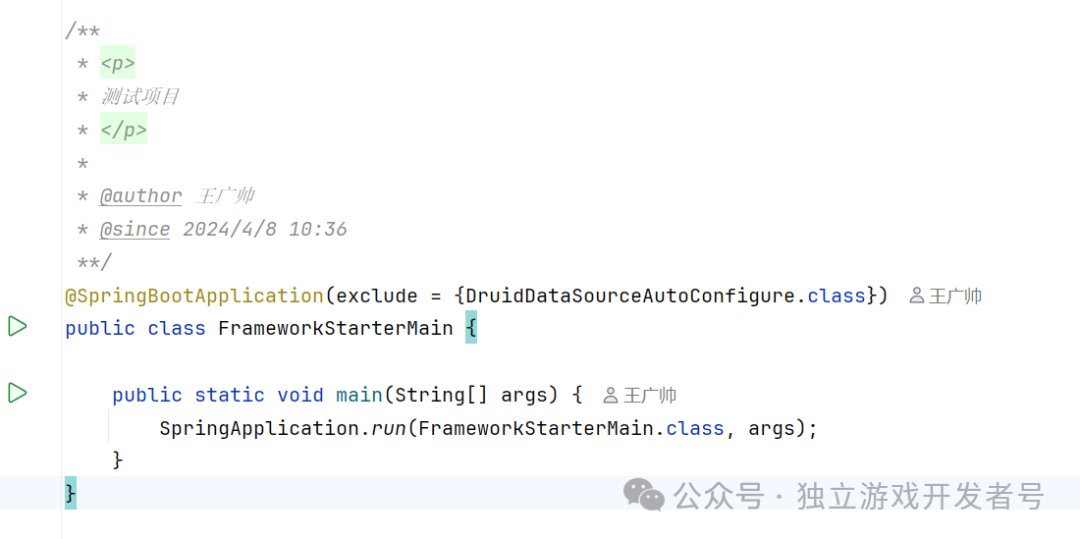
由于此时项目中同时存在原生 Druid 的自动配置类和 MyBatis Plus 引入的配置类,为了避免冲突,我们需要在应用启动时排除掉原生的 DruidDataSourceAutoConfigure。
关键配置文件详解
接下来是配置的重头戏。在 application.yml 中,我们需要正确配置数据源和 Druid 监控。注意,在 spring.datasource.druid 下的监控配置,IDE可能不会提示,但它是有效的。
# 数据源配置
spring:
  data:
    redis:
      host: 192.168.3.102
      port: 6379
      password: 123456
  datasource:
    druid:
      filter:
        stat:
          enabled: true
      # 开启druid的sql统计及监控,注意这里配置的时候idea不会提示,估计是因为是去掉阿里数据源的问题
      stat-view-servlet:
        enabled: true
        url-pattern: /druid/*
        # 控制台管理用户名和密码,记得生产环境的时候,此接口最好是在安全的环境中访问
        login-username: admin
        login-password: 123456
        reset-enable: false
        allow: 192.168.3.25,127.0.0.1  # 允许访问的ip白名单
      web-stat-filter:
        enabled: true
        url-pattern: /*

    type: com.alibaba.druid.pool.DruidDataSource
    driverClassName: com.mysql.cj.jdbc.Driver
    dynamic:
      primary: master
      lazy: false
      datasource:
        # 主库数据源
        master:
          url: jdbc:mysql://192.168.3.102:3306/ciyan_mmo?useUnicode=true&characterEncoding=utf8&zeroDateTimeBehavior=convertToNull&useSSL=true&serverTimezone=GMT%2B8
          username: root
          password: 123456
        # 从库数据源
        #        slave:
        #          url:
        #          username:
        #          password:
      druid:
        # 初始连接数
        initialSize: 5
        # 最小连接池数量
        minIdle: 10
        # 最大连接池数量
        maxActive: 20
        # 配置获取连接等待超时的时间
        maxWait: 60000
        # 配置连接超时时间
        connectTimeout: 30000
        # 配置网络超时时间
        socketTimeout: 60000
        # 配置间隔多久才进行一次检测,检测需要关闭的空闲连接,单位是毫秒
        timeBetweenEvictionRunsMillis: 60000
        # 配置一个连接在池中最小生存的时间,单位是毫秒
        minEvictableIdleTimeMillis: 300000
        # 配置一个连接在池中最大生存的时间,单位是毫秒
        maxEvictableIdleTimeMillis: 900000
        # 配置检测连接是否有效
        validationQuery: SELECT 1 FROM DUAL
        testWhileIdle: true
        testOnBorrow: false
        testOnReturn: false
        filters: stat,wall
访问监控页面与常见问题
服务启动后,就可以通过浏览器访问 Druid 的监控页面了,地址是:http://127.0.0.1:9901/druid/login.html (端口请替换为你项目的实际 Web 服务端口)。
如果你访问 login.html 时页面一片空白,服务器没有返回响应内容,那很可能是你自定义的过滤器“拦截”了这次请求。例如,如果你使用了 ContentCachingResponseWrapper 来包装响应,但在过滤器链的最后没有调用 copyBodyToResponse() 方法,就会导致这种情况。正确的写法示例如下:
package cn.jw.starter.web.core.filters;

import java.io.IOException;
import java.nio.charset.StandardCharsets;
import java.util.Objects;

import org.springframework.web.filter.OncePerRequestFilter;
import org.springframework.web.util.ContentCachingRequestWrapper;
import org.springframework.web.util.ContentCachingResponseWrapper;
import org.springframework.web.util.WebUtils;

import cn.hutool.extra.spring.SpringUtil;
import cn.jw.starter.web.core.properties.JwWebProperties;
import jakarta.servlet.FilterChain;
import jakarta.servlet.ServletException;
import jakarta.servlet.http.HttpServletRequest;
import jakarta.servlet.http.HttpServletResponse;

/**
 * 缓存请求消息的filter,
 *
 * @author 王广帅
 * @since 2024/4/3 20:31
 */
public class CacheRequestBodyFilter extends OncePerRequestFilter {

    @Override
    protected boolean shouldNotFilter(HttpServletRequest request) throws ServletException {
        String uri = request.getRequestURI();
        // 静态资源都不要走这个过滤
        if (uri.endsWith(".html") || uri.endsWith(".js") || uri.endsWith(".css") || uri.endsWith(".ico")) {
            return true;
        }
        JwWebProperties jwWebProperties = SpringUtil.getBean(JwWebProperties.class);
        if (jwWebProperties.getIgnoreCacheBodyUriList().contains(uri)) {
            return true;
        }
        return super.shouldNotFilter(request);
    }

    @Override
    protected void doFilterInternal(HttpServletRequest request, HttpServletResponse response, FilterChain filterChain)
        throws ServletException, IOException {
        logger.debug("先走一步");
        if (request.getContentLength() > 0 && !(request instanceof ContentCachingRequestWrapper)) {
            request = new ContentCachingRequestWrapper(request);
            request.setCharacterEncoding(StandardCharsets.UTF_8.displayName());
        }
        if (!(response instanceof ContentCachingResponseWrapper)) {
            response = new ContentCachingResponseWrapper(response);
            response.setCharacterEncoding(StandardCharsets.UTF_8.displayName());
        }
        filterChain.doFilter(request, response);
        updateResponse(response);
    }

    /**
     * 更新响应(不操作这一步,会导致接口响应空白)
     *
     * @param response
     *            响应对象
     * @throws IOException
     *             /
     */
    private void updateResponse(HttpServletResponse response) throws IOException {
        ContentCachingResponseWrapper responseWrapper =
            WebUtils.getNativeResponse(response, ContentCachingResponseWrapper.class);
        if (responseWrapper != null) {
            Objects.requireNonNull(responseWrapper).copyBodyToResponse();
        }
    }
}
这里有个容易混淆的点:我曾误将 updateResponse 的逻辑写在 HandlerInterceptor 的实现类中。但需要注意的是,HandlerInterceptor 主要拦截 Controller 层的请求,而 Druid 监控页面的请求是直接访问 Servlet 的,不会经过 HandlerInterceptor,因此过滤器才是正确的位置。
看文章累了,来修个仙吧!
希望这篇关于 SpringBoot3 整合 MyBatis Plus 多数据源与开启 Druid 监控的实战记录能对你有所帮助。如果你在 Java 后端开发中遇到其他架构或数据库相关的问题,欢迎到 云栈社区 与其他开发者一起交流探讨。
 发表于 2026-2-9 04:36:42
|
查看: 256|
回复: 0
发表于 2026-2-9 04:36:42
|
查看: 256|
回复: 0
