Model Context Protocol (MCP) 是一个开放标准,旨在为 LLM 提供一个清晰、统一的方式来发现和调用外部工具。它让你省去编写自定义解析器和维护脆弱胶水代码的麻烦,本身就是一个非常实用的协议。
许多 MCP 教程一上来就搬出 JSON-RPC 规范和传输层协议,把简单的事情复杂化了。实际上,使用 MCP 就像构建 Web 应用不必去研读 HTTP 规范一样,无需深究其内部协议构造。你真正需要掌握的核心概念只有三个,花上 15 分钟足矣。
三个核心概念
MCP 的核心架构围绕三样东西展开:
Server(服务器):对外暴露工具的服务端,本质上是一个 Python 脚本。它的作用是声明“这些函数可以被 LLM 调用”,运行后便开始监听请求。
Tool(工具):你希望 LLM 能够使用的函数。它可以是任何功能:查询天气、访问数据库或发送邮件。这与编写普通的 Python 函数几乎没有区别,你只需要加上一个装饰器,剩下的就交给 MCP 框架来处理。
Client(客户端):连接 Server 并调用其工具的客户端。在生产环境中,客户端通常就是你的 LLM 应用本身。在测试阶段,你可以直接使用 FastMCP 框架自带的客户端,开箱即用。
简单来说,Server 暴露工具,Client 发现并调用工具。传输方式、JSON-RPC 细节、能力协商等都属于实现细节,在上生产环境之前完全可以不用操心。
步骤 1:安装 FastMCP
FastMCP 是一个让 MCP 变得简单易用的 Python 框架。安装它只需要一条命令,无需任何额外配置。
pip install fastmcp
提示:本教程为简化流程,未使用虚拟环境。但在实际生产开发中,强烈建议使用虚拟环境来管理依赖。
步骤 2:创建你的第一个 Server
新建一个名为 my_server.py 的文件,并写入以下代码:
from fastmcp import FastMCP

# 使用一个名称来初始化服务器
mcp = FastMCP("my-first-server")

# 使用 @mcp.tool 装饰器定义一个工具
@mcp.tool
def get_weather(city: str) -> dict:
    """Get the current weather for a city."""
    # 在生产环境中,这里应该调用真实的天气API
    # 目前,我们先返回模拟数据
    weather_data = {
        "new york": {"temp": 72, "condition": "sunny"},
        "london": {"temp": 59, "condition": "cloudy"},
        "tokyo": {"temp": 68, "condition": "rainy"},
    }

    city_lower = city.lower()
    if city_lower in weather_data:
        return {"city": city, **weather_data[city_lower]}
    else:
        return {"city": city, "temp": 70, "condition": "unknown"}

# 运行服务器
if __name__ == "__main__":
    mcp.run(transport="stdio")
代码解析:
FastMCP("my-first-server") 创建了一个带有标识名称的服务器实例。@mcp.tool 装饰器将普通 Python 函数注册为 MCP 工具。函数的文档字符串(docstring)会成为工具的描述,LLM 正是依靠这个描述来判断何时调用该工具。- 类型提示(如
city: str 和 -> dict)用于告知 MCP 框架输入和输出的数据类型。
mcp.run(transport="stdio") 中的 transport="stdio" 表示通过标准输入/输出进行通信,这对于本地测试来说已经足够。
至此,你的 Server 就编写完成了,实际功能代码仅15行左右。
步骤 3:编写一个 Client 进行测试
现在,我们创建一个测试客户端来验证 Server 是否正常工作。新建一个 test_client.py 文件:
import asyncio
from fastmcp import Client

async def main():
    # 将客户端指向你的服务器文件
    client = Client("my_server.py")

    # 使用 async with 自动管理连接生命周期
    async with client:
        # 列出服务器中所有可用的工具
        tools = await client.list_tools()
        print("Available tools:")
        for tool in tools:
            print(f"  - {tool.name}: {tool.description}")

        print("\n" + "="*50 + "\n")

        # 调用天气查询工具
        result = await client.call_tool(
            "get_weather",
            {"city": "Tokyo"}
        )
        print(f"Weather result: {result}")

if __name__ == "__main__":
    asyncio.run(main())
代码解析:
Client("my_server.py") 指定了要连接的 Server 脚本路径。async with client: 上下文管理器会自动处理连接的建立和关闭。list_tools() 方法用于动态发现 Server 暴露的所有工具,这是 MCP 的核心能力之一。call_tool("get_weather", {"city": "Tokyo"}) 用于调用具体的工具并传入参数。
步骤 4:运行并查看结果
在终端中执行你的测试客户端:
python test_client.py
你应该能看到类似下面的输出:
Available tools:
  - get_weather: Get the current weather for a city.

==================================================

Weather result: {'city': 'Tokyo', 'temp': 68, 'condition': 'rainy'}
恭喜!你已经成功搭建了一个 MCP Server,并且客户端也顺利调用了它提供的工具。
步骤 5:轻松扩展更多工具
MCP 的一大优势在于极低的扩展成本。让我们为 Server 再添加两个工具,看看它是多么简单。
修改 my_server.py 文件,增加新的工具函数:
from fastmcp import FastMCP
from datetime import datetime

mcp = FastMCP("my-first-server")

@mcp.tool
def get_weather(city: str) -> dict:
    """Get the current weather for a city."""
    weather_data = {
        "new york": {"temp": 72, "condition": "sunny"},
        "london": {"temp": 59, "condition": "cloudy"},
        "tokyo": {"temp": 68, "condition": "rainy"},
    }
    city_lower = city.lower()
    if city_lower in weather_data:
        return {"city": city, **weather_data[city_lower]}
    return {"city": city, "temp": 70, "condition": "unknown"}

@mcp.tool
def get_time(timezone: str = "UTC") -> str:
    """Get the current time in a specified timezone."""
    # 简化版 - 生产环境中建议使用 pytz 或 zoneinfo
    return f"Current time ({timezone}): {datetime.now().strftime('%H:%M:%S')}"

@mcp.tool
def calculate(expression: str) -> dict:
    """Safely evaluate a mathematical expression."""
    try:
        # 仅允许安全的数学运算字符
        allowed_chars = set("0123456789+-*/.() ")
        if not all(c in allowed_chars for c in expression):
            return {"error": "Invalid characters in expression"}

        result = eval(expression)  # 因为已验证输入,所以使用eval是安全的
        return {"expression": expression, "result": result}
    except Exception as e:
        return {"error": str(e)}

if __name__ == "__main__":
    mcp.run(transport="stdio")
再次运行 test_client.py,你会发现三个工具都被自动发现了,无需任何额外的配置或路由代码。
Available tools:
  - get_weather: Get the current weather for a city.
  - get_time: Get the current time in a specified timezone.
  - calculate: Safely evaluate a mathematical expression.
最后一步:接入真正的 LLM 框架
前面编写的 Client 仅用于测试。在生产环境中,LLM 框架(如 Claude、GPT 等)本身将充当 Client 的角色。整个 人工智能 应用的调用流程概念上如下图所示:
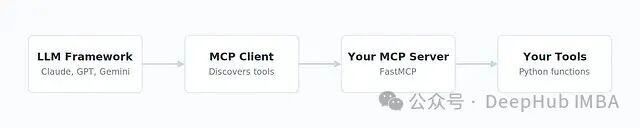
MCP 如何连接你的 LLM 与外部工具:框架调用客户端,客户端发现并调用你服务器中的工具。
你之前编写的 Server 端代码完全不需要改动,这正是 MCP 的核心价值所在——工具只需编写一次,任何兼容 MCP 协议的客户端都能直接使用。
当需要进行生产部署时,你需要将 Server 的传输方式从 stdio 切换为 http,以便通过网络进行远程调用:
if __name__ == "__main__":
    mcp.run(transport="http", host="0.0.0.0", port=8000)
这样,你的 MCP Server 就会作为一个 HTTP 服务端点运行在 http://0.0.0.0:8000,允许远程客户端进行连接。
总结
现在,你已经拥有了一个可以实际运行的 MCP Server,整个过程大约只用了 15 分钟。下一步,就是将它接入到真实的 LLM 应用中,去解决一些实际的问题。MCP 协议极大地简化了 LLM 与外部工具的集成,希望这篇指南能帮助你快速上手。
探索更多技术实践与深度讨论,欢迎访问 云栈社区,与广大开发者共同学习成长。
 发表于 2026-2-16 03:36:13
|
查看: 340|
回复: 0
发表于 2026-2-16 03:36:13
|
查看: 340|
回复: 0
