当我们需要为特定硬件项目(如基于 NVIDIA Jetson 的开发)准备图像数据时,手动搜索和保存图片费时费力。利用 PowerShell 编写自动化脚本,可以高效地从搜索引擎批量抓取相关图片,快速构建本地数据集。以下是一个实用的脚本实现。
脚本编写与配置
首先,我们将完整的脚本代码保存到本地。打开 PowerShell ISE 或任意文本编辑器,创建并保存以下脚本内容。该脚本定义了搜索关键词、保存路径,并实现了网络请求、图片链接解析与下载功能。
$SavePath = "D:\yolo_data_model"
$TargetCount = 200
$SearchKeywords = @(
    "Jetson Orin Nano Super Kit board",
    "Jetson Orin Nano Super developer kit",
    "NVIDIA Jetson Orin Nano Super module",
    "Jetson Orin Nano Super PCB",
    "Jetson Orin Nano Super hardware"
)

if (-not (Test-Path $SavePath)) {
    New-Item -ItemType Directory -Path $SavePath -Force | Out-Null
    Write-Host "[OK] 已创建目录: $SavePath" -ForegroundColor Green
} else {
    Write-Host "[OK] 目录已存在: $SavePath" -ForegroundColor Green
}

$Headers = @{
    "User-Agent" = "Mozilla/5.0 (Windows NT 10.0; Win64; x64) AppleWebKit/537.36 (KHTML, like Gecko) Chrome/120.0.0.0 Safari/537.36"
    "Accept" = "text/html,application/xhtml+xml,application/xml;q=0.9,image/webp,*/*;q=0.8"
    "Accept-Language" = "zh-CN,zh;q=0.9,en;q=0.8"
    "Referer" = "https://www.bing.com/"
}

$DownloadedCount = 0
$FailedCount = 0
$ImageIndex = 1
$Regex = 'murl":"(https?://[^&]+)'

Write-Host "`n[开始] 目标下载数量: $TargetCount 张" -ForegroundColor Cyan

foreach ($Keyword in $SearchKeywords) {
    if ($DownloadedCount -ge $TargetCount) { break }
    Write-Host "`n[搜索] 关键词: $Keyword" -ForegroundColor Yellow

    for ($Page = 0; $Page -le 180; $Page += 35) {
        if ($DownloadedCount -ge $TargetCount) { break }

        $EncodedKeyword = [System.Uri]::EscapeDataString($Keyword)
        $SearchUrl = "https://www.bing.com/images/search?q=$EncodedKeyword&first=$Page&count=35&tsc=ImageHoverTitle"

        try {
            $Response = Invoke-WebRequest -Uri $SearchUrl -Headers $Headers -TimeoutSec 20 -UseBasicParsing
            $RegexMatches = [regex]::Matches($Response.Content, $Regex)

            Write-Host "  [i] 本页匹配到: $($RegexMatches.Count) 个链接" -ForegroundColor DarkCyan

            if ($RegexMatches.Count -eq 0) {
                Write-Host "  [!] 本页未找到图片,跳过" -ForegroundColor DarkYellow
                break
            }

            foreach ($RegexMatch in $RegexMatches) {
                if ($DownloadedCount -ge $TargetCount) { break }

                $ImgUrl = $RegexMatch.Groups[1].Value

                # 过滤非图片链接
                if ($ImgUrl -notmatch "\.(jpg|jpeg|png|webp|bmp)") { continue }

                if ($ImgUrl -match "\.(jpg|jpeg)") { $Ext = "jpg" }
                elseif ($ImgUrl -match "\.png")    { $Ext = "png" }
                elseif ($ImgUrl -match "\.webp")   { $Ext = "webp" }
                else                               { $Ext = "jpg" }

                $FileName = "jetson_orin_nano_{0:D4}.$Ext" -f $ImageIndex
                $FilePath = Join-Path $SavePath $FileName

                try {
                    Invoke-WebRequest -Uri $ImgUrl -OutFile $FilePath -Headers $Headers -TimeoutSec 10 -UseBasicParsing
                    $FileSize = (Get-Item $FilePath).Length
                    if ($FileSize -lt 5120) {
                        Remove-Item $FilePath -Force
                        Write-Host "  [-] 文件过小跳过: $FileName" -ForegroundColor DarkGray
                        continue
                    }
                    $DownloadedCount++
                    $ImageIndex++
                    Write-Host "  [Down] ($DownloadedCount/$TargetCount) $FileName ($([math]::Round($FileSize/1KB,1)) KB)" -ForegroundColor Green
                } catch {
                    $FailedCount++
                    Write-Host "  [X] 下载失败: $($_.Exception.Message)" -ForegroundColor Red
                }

                Start-Sleep -Milliseconds 300
            }
        } catch {
            Write-Host "  [X] 搜索请求失败: $($_.Exception.Message)" -ForegroundColor Red
        }

        Start-Sleep -Seconds 2
    }
}

Write-Host "`n========================================" -ForegroundColor Cyan
Write-Host "[完成] 成功下载: $DownloadedCount 张" -ForegroundColor Green
Write-Host "[完成] 下载失败: $FailedCount 张" -ForegroundColor Red
Write-Host "[完成] 保存路径: $SavePath" -ForegroundColor White
$jpg  = (Get-ChildItem $SavePath -Filter "*.jpg"  -ErrorAction SilentlyContinue).Count
$png  = (Get-ChildItem $SavePath -Filter "*.png"  -ErrorAction SilentlyContinue).Count
$webp = (Get-ChildItem $SavePath -Filter "*.webp" -ErrorAction SilentlyContinue).Count
Write-Host "[完成] 格式统计: JPG=$jpg PNG=$png WEBP=$webp" -ForegroundColor White
Write-Host "========================================" -ForegroundColor Cyan
你可以将上述代码直接复制,保存为一个 .ps1 文件,例如 download_images.ps1。
如何执行脚本
在 PowerShell 中执行此脚本有两种简单的方法:
-
直接运行脚本文件:在保存脚本的目录下,打开 PowerShell,执行以下命令。请确保你的执行策略允许运行脚本(如以管理员身份运行 Set-ExecutionPolicy RemoteSigned)。
.\download_images.ps1
-
逐段复制执行:如果你不习惯直接运行 .ps1 文件,也可以打开一个新的 PowerShell 窗口,将上面代码块中 $SavePath = ... 开始到最后一个 Write-Host 命令结束之间的所有内容,逐行或整体复制粘贴到 PowerShell 终端中执行。
执行效果展示
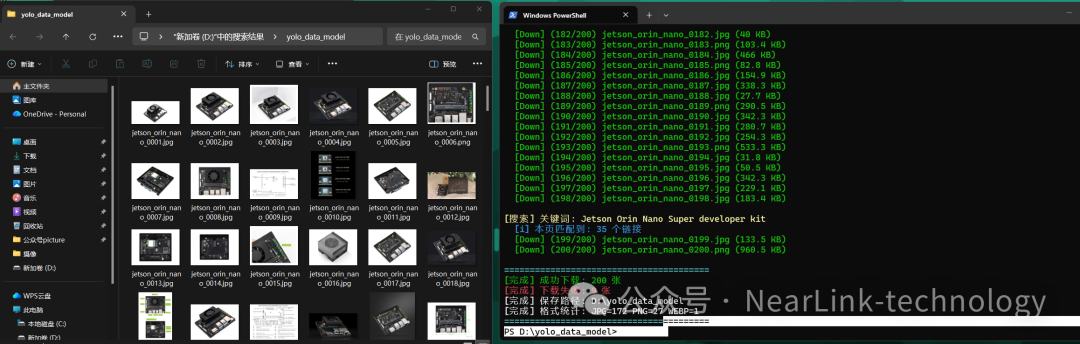
脚本运行后,终端会实时显示搜索、匹配链接和下载进度。最终会汇总下载成功的数量、失败数量以及各图片格式的统计信息。
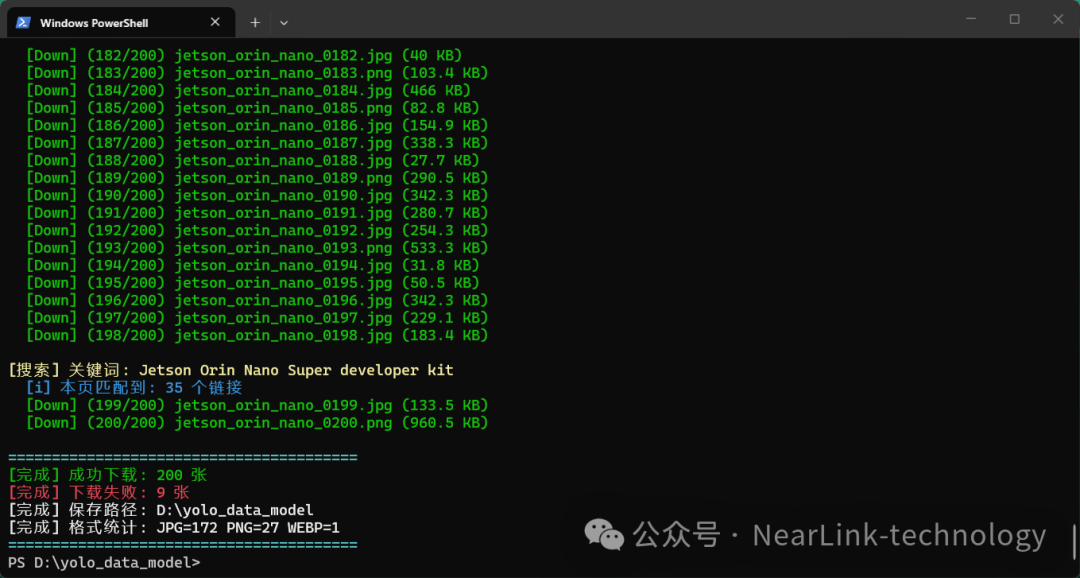
下载完成后,你可以在预设的 D:\yolo_data_model 目录(或你自定义的路径)中找到所有已下载的图片,文件会按照 jetson_orin_nano_0001.jpg 这样的格式自动命名。
脚本定制与注意事项
这个脚本的核心逻辑清晰,你可以轻松地修改它以适应不同的需求:
- 修改目标硬件:更改
$SearchKeywords 数组中的关键词,即可搜索下载其他设备(如树莓派、不同型号的 Jetson 模块)的图片。
- 调整下载数量:通过
$TargetCount 变量控制想要下载的图片总数。
- 更改保存路径:直接修改
$SavePath 的值为你想要的本地路径。
- 理解自动化逻辑:脚本包含了关键词轮询、分页请求、链接正则匹配、文件过滤(大小、格式)和简单的错误处理,形成了一个完整的自动化采集流程。
重要提示:此脚本仅用于技术学习和构建个人研究数据集。在实际使用时,请务必遵守目标网站的服务条款和 robots.txt 协议,尊重版权,并合理控制请求频率,避免对服务器造成不必要的压力。将此方法用于数据收集,可以极大提升开发和研究前期的素材准备效率。如果在编写其他运维或自动化脚本时遇到问题,欢迎在云栈社区与更多开发者交流探讨。 |  发表于 2026-4-9 05:30:30
|
查看: 142|
回复: 0
发表于 2026-4-9 05:30:30
|
查看: 142|
回复: 0
