用 Spring Boot + LangChain4j,仅需 3 个文件,就能搭建一个支持流式输出的 AI 聊天服务。本地部署 Gemma 模型,32G 显卡跑 26B 参数模型,丝滑流畅。
🤔 为什么选 LangChain4j?
如果你是一名 Java/Spring 开发者,想在项目中接入大语言模型,LangChain4j 是目前最优雅的选择之一:
- ✅ 零配置起步 — 一个
@AiService 注解搞定一切
- ✅ 原生流式输出 — 基于 Reactor
Flux,SSE 推送如丝般顺滑
- ✅ 兼容 OpenAI 协议 — 任何兼容 OpenAI API 的模型都能用
- ✅ Spring 深度集成 — 配置属性自动绑定、热刷新开箱即用
今天我们就用一套完整的代码,从零搭建一个流式 AI 聊天服务。
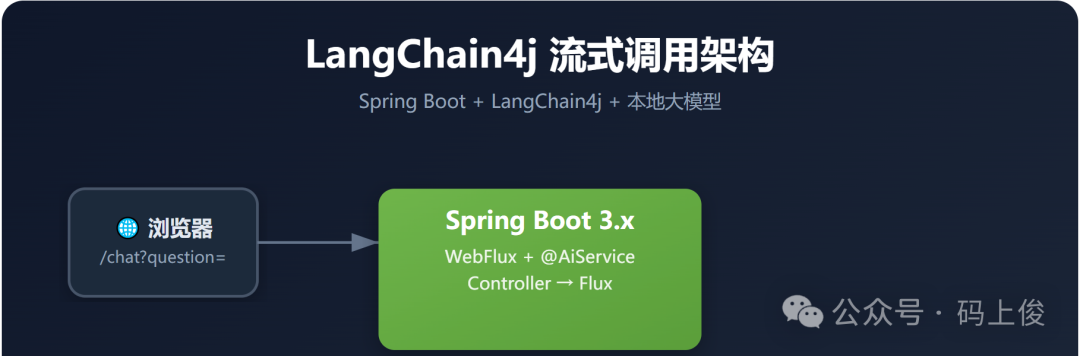
🏗️ 整体架构
┌──────────┐    HTTP GET     ┌──────────────┐    OpenAI API    ┌──────────────┐
│  浏览器   │ ──────────────→ │ Spring Boot  │ ───────────────→ │ 本地 Gemma   │
│  /chat?q │                 │ + LangChain4j│                  │ gemma-4-26b  │
└──────────┘ ←───────────────┤              │ ←─────────────── │  32G GPU     │
        Stream               │  Flux<String> │   Streaming     └──────────────┘
                             └──────────────┘
核心链路:Controller → @AiService → LangChain4j → 本地模型 API
📦 1. 配置文件(application.yml)
通过 Spring Cloud @RefreshScope 实现配置热更新,改完不用重启:
server:
  port: 8083

langchain4j:
  open-ai:
    streaming-chat-model:
      api-key: no_need      # 本地模型不需要 API Key
      model-name: gemma-4-26b-moe   # 模型名称
      base-url: http://192.168.10.102:8000/v1  # 本地模型服务地址
      log-requests: true    # 开启请求日志
      log-responses: true   # 开启响应日志
关键点:
api-key: no_need — 本地部署的模型通常不需要鉴权,随便填个值就行base-url 指向本地模型服务(如 vLLM、Ollama 等 OpenAI 兼容服务)- 开启日志方便调试,生产环境建议关闭
🔌 2. AI Service 层
这是 LangChain4j 最魔法的地方 — 只需定义接口,实现全自动生成:
package com.msj.service;

import dev.langchain4j.service.spring.AiService;
import reactor.core.publisher.Flux;

@AiService(streamingChatModel = "openAiStreamingChatModel")
public interface IChatService {

    /**
     * 与AI聊天
     * @param message 聊天的消息
     */
    Flux<String> chat(String message);
}
🤯 没有实现类? 对,不需要!LangChain4j 会在运行时自动代理这个接口:
- 扫描到
@AiService 注解
- 根据方法签名自动构建 Prompt
- 将返回值
Flux<String> 映射为流式输出
- 注入到 Spring 容器中
这就是声明式 AI 编程的魅力 — 你只需要描述“做什么”,框架负责“怎么做”。
🎮 3. Controller 层
暴露一个 SSE 端点,让前端能实时接收流式响应:
package com.msj.controller;

import com.msj.service.IChatService;
import lombok.RequiredArgsConstructor;
import org.springframework.web.bind.annotation.GetMapping;
import org.springframework.web.bind.annotation.RestController;
import reactor.core.publisher.Flux;

@RestController
@RequiredArgsConstructor
public class ChatController {

    final IChatService chatService;

    @GetMapping(value = "chat", produces = "text/plain;charset=utf-8")
    public Flux<String> chat(String question) {
        return chatService.chat(question);
    }
}
调用方式:
# 终端直接测试
curl http://localhost:8083/chat?question=你好,请用一句话介绍你自己
前端用 EventSource 或 fetch 即可实时接收每个 token:
const response = await fetch('http://localhost:8083/chat?question=你好');
const reader = response.body.getReader();
const decoder = new TextDecoder();

while (true) {
    const { done, value } = await reader.read();
    if (done) break;
    console.log(decoder.decode(value)); // 逐字输出 🎉
}
⚙️ 4. 配置属性绑定
利用 Spring Cloud 的 @RefreshScope + @ConfigurationProperties,实现配置热刷新:
package com.msj.config;

import lombok.Data;
import org.springframework.boot.context.properties.ConfigurationProperties;
import org.springframework.cloud.context.config.annotation.RefreshScope;
import org.springframework.context.annotation.Configuration;

@Data
@RefreshScope
@Configuration
@ConfigurationProperties(prefix = "langchain4j.open-ai.streaming-chat-model")
public class AiProperties {
    private String apiKey;
    private String modelName;
    private String baseUrl;
    private Boolean logRequests;
    private Boolean logResponses;
}
@RefreshScope 的好处:配置文件改了,Spring Cloud Config 推送刷新事件,不需要重启服务。
🔧 5. 模型 Bean 配置
手动构建 OpenAiStreamingChatModel,精细控制 HTTP 客户端行为:
package com.msj.config;

import dev.langchain4j.http.client.jdk.JdkHttpClient;
import dev.langchain4j.model.openai.OpenAiStreamingChatModel;
import lombok.RequiredArgsConstructor;
import org.springframework.context.annotation.Bean;
import org.springframework.context.annotation.Configuration;

import java.net.http.HttpClient;

@Configuration
@RequiredArgsConstructor
public class AiConfig {

    final AiProperties aiProperties;

    /**
     * 设置流式响应
     */
    @Bean
    public OpenAiStreamingChatModel openAiStreamingChatModel() {
        HttpClient.Builder httpClientBuilder = HttpClient.newBuilder()
            .version(HttpClient.Version.HTTP_1_1);

        return OpenAiStreamingChatModel.builder()
            .apiKey(aiProperties.getApiKey())
            .baseUrl(aiProperties.getBaseUrl())
            .modelName(aiProperties.getModelName())
            .logRequests(aiProperties.getLogRequests())
            .logResponses(aiProperties.getLogResponses())
            .httpClientBuilder(
                JdkHttpClient.builder()
                    .httpClientBuilder(httpClientBuilder))
            .build();
    }
}
为什么显式指定 HTTP/1.1?
因为某些本地模型服务(如旧版 vLLM)对 HTTP/2 支持不完善,显式降级到 HTTP/1.1 能避免连接问题。
🚀 本地模型部署建议
本文使用 gemma-4-26b-moe 模型,运行在 32G 显卡上。推荐以下部署方式:
方案一:vLLM(推荐,性能最佳)
pip install vllm
vllm serve google/gemma-4-26b-moe \
    --host 0.0.0.0 \
    --port 8000 \
    --tensor-parallel-size 1
方案二:Ollama(最简单)
ollama run gemma:26b
# 默认监听 localhost:11434,修改 base-url 即可
方案三:Text Generation Interface (TGI)
docker run --gpus all \
    -p 8000:80 \
    ghcr.io/huggingface/text-generation-inference:2.0 \
    --model-id google/gemma-4-26b-moe
📊 依赖清单
<!-- pom.xml 核心依赖 -->
<dependency>
  <groupId>dev.langchain4j</groupId>
  <artifactId>langchain4j-spring-boot-starter</artifactId>
  <version>1.0.0-beta1</version>
</dependency>

<dependency>
  <groupId>dev.langchain4j</groupId>
  <artifactId>langchain4j-open-ai-spring-boot-starter</artifactId>
  <version>1.0.0-beta1</version>
</dependency>

<dependency>
  <groupId>org.springframework.boot</groupId>
  <artifactId>spring-boot-starter-webflux</artifactId>
</dependency>

<dependency>
  <groupId>org.springframework.cloud</groupId>
  <artifactId>spring-cloud-starter</artifactId>
</dependency>
💡 进阶玩法
1. 添加 System Prompt
@AiService(
    streamingChatModel = "openAiStreamingChatModel",
    systemMessage = "你是一个专业的Java技术助手,回答简洁、准确。"
)
public interface IChatService {
    Flux<String> chat(String message);
}
2. 支持多轮对话
@AiService(streamingChatModel = "openAiStreamingChatModel")
public interface IChatService {
    Flux<String> chat(@MemoryId String sessionId, @UserMessage String message);
}
3. 添加 RAG 检索增强
@AiService(
    streamingChatModel = "openAiStreamingChatModel",
    contentRetriever = "embeddingStoreContentRetriever"
)
public interface IChatService {
    Flux<String> chat(String message);
}
🎯 总结
| 特性 |
传统方式 |
LangChain4j |
| 流式输出 |
手动处理 SSE/Chunk |
Flux<String> 一行搞定 |
| Prompt 管理 |
手动拼接 JSON |
@UserMessage 注解声明 |
| 模型切换 |
改大量代码 |
改配置文件即可 |
| 多轮对话 |
自己管理上下文 |
@MemoryId 自动管理 |
| RAG |
手写向量化+检索 |
contentRetriever 一行注入 |
核心优势就一句话:用 Spring 的方式写 AI 应用,不用学新框架。
本文代码基于 LangChain4j 1.0.0-beta1,Spring Boot 3.x。模型为本地部署的 gemma-4-26b-moe,32G 显卡。
在 云栈社区,我们持续关注后端架构与 AI 工程化的最佳实践,欢迎一起交流。
 发表于 2026-5-15 04:10:54
|
查看: 125|
回复: 0
发表于 2026-5-15 04:10:54
|
查看: 125|
回复: 0
