透视变换是计算机视觉中用于纠正视角畸变的核心技术。它通过一个3×3的变换矩阵,将图像中的一个任意四边形区域映射到另一个四边形区域。这项技术能够有效校正因拍摄角度导致的透视变形,典型应用包括将倾斜拍摄的文档“扶正”为正视图、建筑摄影的几何校正,以及在图像拼接和增强现实等领域进行视角转换。
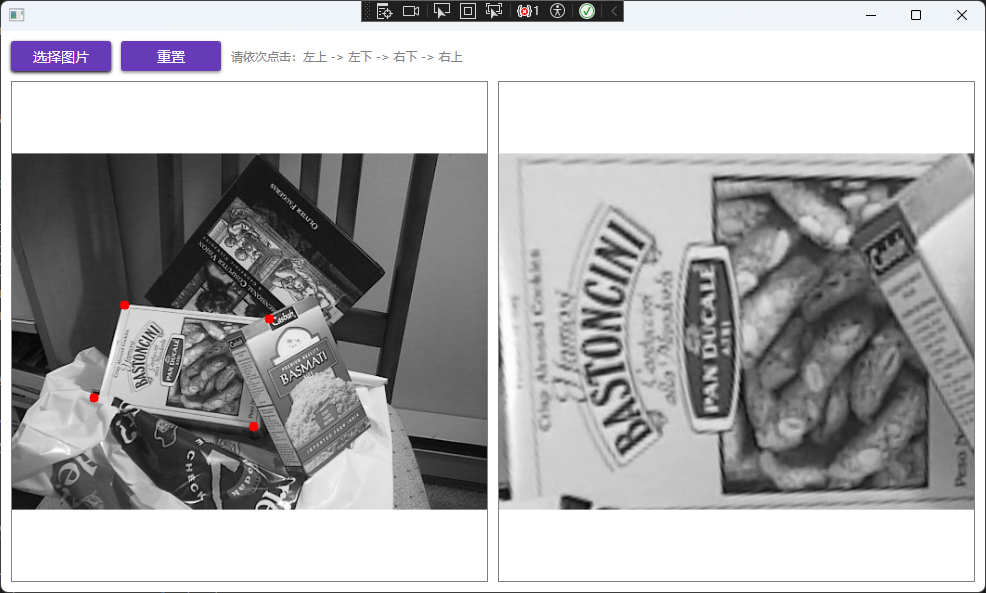
实现效果预览:
实现步骤详解
整个流程分为两步:首先在源图像上交互式地选取四个点,然后基于这四个点计算并应用透视变换。
第一步:获取并标记源图坐标点
以下代码演示了在图像控件中处理鼠标点击,将屏幕坐标转换为图像坐标,并绘制标记点的过程。此示例常用于WPF桌面应用等需要人机交互的场景。
public void HandleMouseClick(OpenCvSharp.Point position, double actualWidth, double actualHeight) {
    if (_originalMat == null) return;

    // 计算图像在控件中的缩放比例与偏移(假设为Uniform拉伸并居中)
    double imageWidth = _originalMat.Width;
    double imageHeight = _originalMat.Height;
    double scaleX = actualWidth / imageWidth;
    double scaleY = actualHeight / imageHeight;
    double scale = Math.Min(scaleX, scaleY);
    double offsetX = (actualWidth - imageWidth * scale) / 2;
    double offsetY = (actualHeight - imageHeight * scale) / 2;

    // 将控件坐标转换回图像坐标
    double imgX = (position.X - offsetX) / scale;
    double imgY = (position.Y - offsetY) / scale;

    // 确保点击位置在图像范围内
    if (imgX >= 0 && imgX < imageWidth && imgY >= 0 && imgY < imageHeight)
    {
        AddPoint((float)imgX, (float)imgY);
    }
}

private void AddPoint(float x, float y) {
    if (_points.Count >= 4) return;

    _points.Add(new Point2f(x, y));
    // 在临时图像上以红色实心圆标记点
    Cv2.Circle(_tempMat, (int)x, (int)y, 5, Scalar.Red, -1);
    DisplayImage = ConvertMatToBitmapImage(_tempMat); // 更新界面显示

    // 当收集满4个点后,自动执行变换
    if (_points.Count == 4)
    {
        PerformPerspectiveTransform();
    }
}
第二步:执行透视变换
当收集齐四个源点后,定义对应的目标点(通常为一个矩形),并调用核心函数进行变换。
private void PerformPerspectiveTransform() {
    Point2f[] srcPoints = _points.ToArray();
    // 定义目标矩形的四个顶点(例如一个640x480的矩形)
    Point2f[] dstPoints = new Point2f[]
    {
        new Point2f(0, 0),
        new Point2f(0, 480),
        new Point2f(640, 480),
        new Point2f(640, 0),
    };

    try
    {
        // 1. 计算变换矩阵
        using var matrix = Cv2.GetPerspectiveTransform(srcPoints, dstPoints);
        // 2. 创建输出图像
        using var dst = new Mat(new Size(640, 480), MatType.CV_8UC3);
        // 3. 应用透视变换
        Cv2.WarpPerspective(_originalMat, dst, matrix, dst.Size());
        ResultImage = ConvertMatToBitmapImage(dst); // 显示结果
    }
    catch (Exception ex)
    {
        MessageBox.Show($"变换失败: {ex.Message}");
    }
}
核心API解析
整个过程的核心在于 Cv2.GetPerspectiveTransform 与 Cv2.WarpPerspective 这两个函数。
1. Cv2.GetPerspectiveTransform - 计算变换矩阵
public static Mat GetPerspectiveTransform(IEnumerable<Point2f> src, IEnumerable<Point2f> dst)
- 功能:根据四对对应的点(源四边形 -> 目标四边形)计算3×3的透视变换矩阵。
- 参数说明:
src:源图像中四边形四个顶点的坐标集合(Point2f类型)。dst:目标图像中对应四边形四个顶点的坐标集合。
2. Cv2.WarpPerspective - 应用变换
public static void WarpPerspective(
    InputArray src, OutputArray dst, InputArray m, Size dsize,
    InterpolationFlags flags = InterpolationFlags.Linear,
    BorderTypes borderMode = BorderTypes.Constant,
    Scalar? borderValue = null)
- 功能:使用上一步得到的变换矩阵,将整个源图像进行透视变换,生成目标图像。
- 关键参数说明:
src:输入图像。dst:输出图像,尺寸由dsize指定。m:3×3透视变换矩阵,通常来自GetPerspectiveTransform。dsize:输出图像的大小。flags:插值方法,如线性插值(InterpolationFlags.Linear)。borderMode:处理图像边界外像素的方法。borderValue:当borderMode为Constant时使用的边界填充值。
理解并正确使用这两个函数,即可在OpenCVSharp中灵活实现各类透视变换需求。
 发表于 2025-12-22 02:23:46
|
查看: 209|
回复: 0
发表于 2025-12-22 02:23:46
|
查看: 209|
回复: 0
