工具安装与环境搭建
要在 VSCode 中进行 STM32 开发,首先需要安装必要的工具链。有多种方式可以实现。
一种高效的方法是使用 STM32CubeCLT (Command Line Tools)。这是意法半导体(STMicroelectronics)面向第三方IDE和持续集成(CI/CD)环境推出的综合工具集,非常适合在 VSCode 这类非原生ST环境中进行开发。你可以从其官方网站下载并一站式安装所需工具。
另一种更灵活的方式是直接在 VSCode 扩展商店中搜索并安装 STM32CubeIDE for Visual Studio Code 插件。这个官方插件能极大地简化 STM32 项目的创建和管理流程。
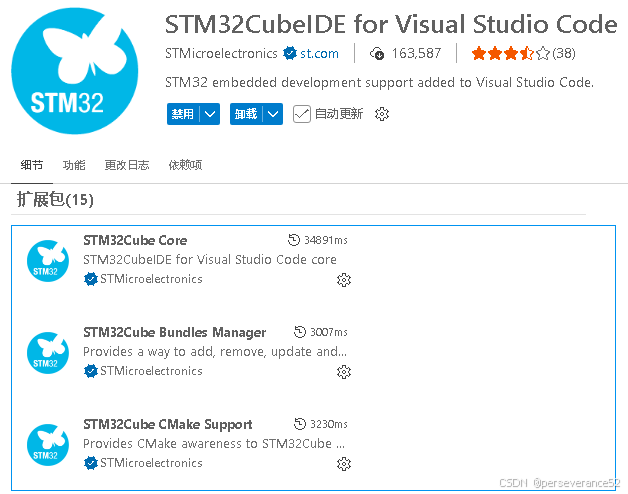 图1:在VSCode扩展商店中安装STM32CubeIDE插件
安装编译与调试工具链
编译器是嵌入式开发的基石。STM32开发主要支持 GCC 和 LLVM/Clang 两种工具链。具体选择哪个,通常与你使用的 STM32CubeMX 工程生成器配置有关。两种编译器各有优势,例如,GNU GCC for ARM 应用广泛,而 ST 官方的 Arm Clang 可能在特定芯片优化上表现更好。
安装可以通过插件内置的 Bundles Manager 来完成。
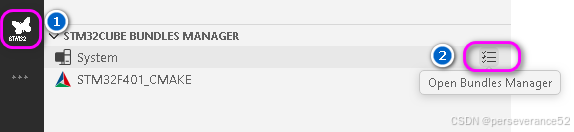 图2:打开插件中的Bundles Manager工具
在 Bundles Manager 中,你可以清晰地看到可安装的工具链列表,例如 gnu-tools-for-stm32(GCC)和 stm32clang(Clang)。选择合适的版本进行安装即可。
 图3:通过Bundles Manager选择并安装GCC或Clang工具链
调试器配置详解
配置调试器是连接硬件与开发环境的关键步骤。核心配置文件位于项目根目录的 .vscode 文件夹下,主要包括 launch.json(启动配置)和 tasks.json(任务配置)。
配置 launch.json
launch.json 文件定义了如何启动调试会话。以下是针对 ST-LINK、J-LINK 和 DAP-LINK 三种常用调试器的配置示例。
{
    "version": "0.2.0",
    "configurations": [
        {
            "name": "STM32 Debug (ST-LINK)",
            "type": "cppdbg",
            "request": "launch",
            "program": "${workspaceFolder}/build/Debug/STM32F401_CMAKE.elf",
            "args": [],
            "stopAtEntry": true,
            "cwd": "${workspaceFolder}",
            "environment": [],
            "externalConsole": false,
            "MIMode": "gdb",
            "miDebuggerPath": "arm-none-eabi-gdb",
            "debugServerPath": "openocd",
            "debugServerArgs": "-f interface/stlink.cfg -f target/stm32f4x.cfg",
            "serverStarted": "Listening on port .* for gdb connections",
            "filterStderr": true,
            "preLaunchTask": "Build Project (Debug)",
            "setupCommands": [
                {
                    "description": "Enable pretty-printing for gdb",
                    "text": "-enable-pretty-printing",
                    "ignoreFailures": true
                },
                {
                    "description": "Set Disassembly Flavor to Intel",
                    "text": "-gdb-set disassembly-flavor intel",
                    "ignoreFailures": true
                }
            ]
        },
        {
            "name": "STM32 Debug (J-LINK)",
            "type": "cppdbg",
            "request": "launch",
            "program": "${workspaceFolder}/build/Debug/STM32F401_CMAKE.elf",
            "args": [],
            "stopAtEntry": true,
            "cwd": "${workspaceFolder}",
            "environment": [],
            "externalConsole": false,
            "MIMode": "gdb",
            "miDebuggerPath": "arm-none-eabi-gdb",
            "debugServerPath": "openocd",
            "debugServerArgs": "-f interface/jlink.cfg -f target/stm32f4x.cfg -c \"adapter speed 2000\"",
            "serverStarted": "Listening on port .* for gdb connections",
            "filterStderr": true,
            "preLaunchTask": "Build Project (Debug)",
            "setupCommands": [ ... ] // 同上
        },
        {
            "name": "STM32 Debug (DAP-LINK)",
            "type": "cppdbg",
            "request": "launch",
            "program": "${workspaceFolder}/build/Debug/STM32F401_CMAKE.elf",
            "args": [],
            "stopAtEntry": true,
            "cwd": "${workspaceFolder}",
            "environment": [],
            "externalConsole": false,
            "MIMode": "gdb",
            "miDebuggerPath": "arm-none-eabi-gdb",
            "debugServerPath": "openocd",
            "debugServerArgs": "-f interface/cmsis-dap.cfg -c \"adapter speed 2000\" -f target/stm32f4x.cfg",
            "serverStarted": "Listening on port .* for gdb connections",
            "filterStderr": true,
            "preLaunchTask": "Build Project (Debug)",
            "setupCommands": [ ... ] // 同上
        }
    ]
}
配置完成后,在VSCode的调试侧边栏或运行菜单中,就能看到对应的调试选项。
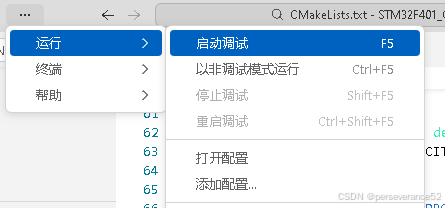 图4:VSCode运行菜单中的调试选项
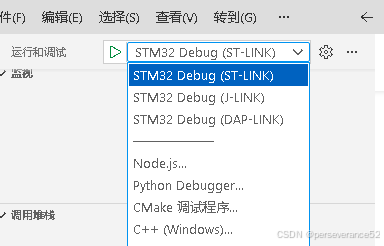 图5:选择配置好的调试器(如ST-LINK)
配置 tasks.json
tasks.json 文件定义了构建、烧录、调试后台启动等一系列自动化任务。一个配置完善的任务文件能极大提升开发效率。以下是包含多种功能的任务配置示例:
{
    "version": "2.0.0",
    "tasks": [
        {
            "label": "Build Project (Debug)",
            "type": "shell",
            "command": "cmake",
            "args": [ "--build", "build/Debug", "--target", "all" ],
            "group": "build",
            "problemMatcher": [ "$gcc" ]
        },
        {
            "label": "Flash with ST-LINK",
            "type": "shell",
            "command": "openocd",
            "args": [
                "-f", "interface/stlink.cfg",
                "-f", "target/stm32f4x.cfg",
                "-c", "program build/Release/STM32F401_CMAKE.elf verify reset exit"
            ],
            "group": "build",
            "dependsOn": "Build Project (Release)"
        },
        {
            "label": "Debug with ST-LINK (GDB)",
            "type": "shell",
            "command": "openocd",
            "args": [ "-f", "interface/stlink.cfg", "-f", "target/stm32f4x.cfg" ],
            "group": "none",
            "isBackground": true
        }
        // ... 更多任务(如J-LINK, DAP-LINK的烧录、调试、连接测试等)
    ]
}
配置好 tasks.json 后,VSCode 状态栏通常会显示快捷按钮,方便一键执行编译、烧录等操作,这类似于现代化前端工程化中的快捷脚本。
 图6:配置任务后状态栏出现的快捷操作按钮
STM32CubeMX 工程配置要点
使用 STM32CubeMX 初始化工程时,有两个关键设置会影响 VSCode 中的开发流程。
- 工程输出类型:务必选择 CMake 工程,这是 VSCode 配合插件进行构建的基础。
- 编译器选择:根据你在 Bundles Manager 中安装的工具链,选择对应的
GCC 或 ST Arm Clang 编译器。
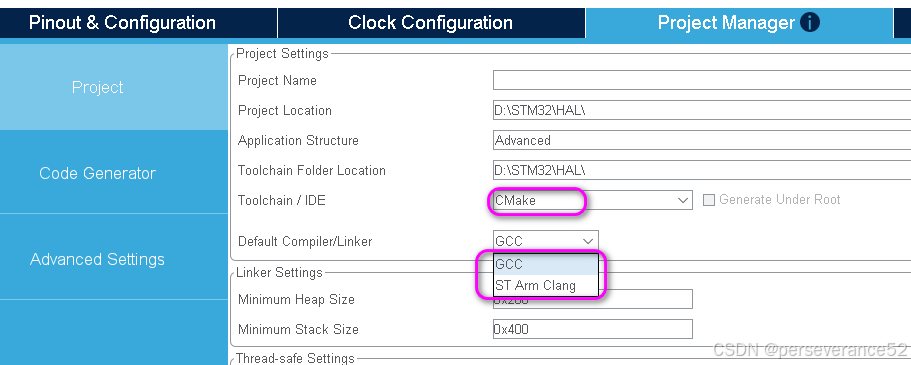 图7:在STM32CubeMX中配置工程为CMake并选择编译器
烧录与调试实战
必备插件
进行 ARM Cortex-M 内核调试,Cortex-Debug 是 VSCode 中一个非常强大且几乎必备的插件,它能提供更好的寄存器、内存视图和断点管理。
烧录方式
- 使用配置好的任务(推荐):如果已按照上述步骤配置好
tasks.json,点击状态栏对应的调试器按钮(如“Flash with ST-LINK”)即可一键完成编译和烧录。
- 使用调试功能:按
F5 或点击“启动调试”,这会执行 launch.json 中的配置,先构建项目,然后连接调试器并暂停在程序入口。
- 命令行烧录:你也可以在终端中直接使用 OpenOCD 命令进行烧录,这在自动化脚本中很有用。掌握命令行操作也是运维与DevOps的基础技能之一。
# J-Link 烧录命令示例
openocd -f interface/jlink.cfg -f target/stm32f4x.cfg -c "adapter speed 2000" -c "program build/Release/STM32F401_CMAKE.elf verify reset exit"

# ST-LINK 烧录命令示例
openocd -f interface/stlink.cfg -f target/stm32f4x.cfg -c "program build/Release/STM32F401_CMAKE.elf verify reset exit"
自动化脚本示例
你可以编写 Shell 或 Batch 脚本来自动检测连接的调试器并烧录,这提升了工作效率。例如,一个简单的 run.sh 脚本:
#!/bin/bash
echo "Detecting debugger type..."

# 尝试检测DAP-LINK
if openocd -f interface/cmsis-dap.cfg -c "shutdown" &>/dev/null; then
    echo "DAP-LINK detected, flashing..."
    openocd -f interface/cmsis-dap.cfg -f target/stm32f4x.cfg -c "adapter speed 2000" -c "program build/Release/STM32F401_CMAKE.elf verify reset exit"
# 尝试检测ST-LINK
elif openocd -f interface/stlink.cfg -c "shutdown" &>/dev/null; then
    echo "ST-LINK detected, flashing..."
    openocd -f interface/stlink.cfg -f target/stm32f4x.cfg -c "program build/Release/STM32F401_CMAKE.elf verify reset exit"
else
    echo "No supported debugger detected."
    exit 1
fi
类似地,你可以用 Windows 批处理文件实现。学习编写这类自动化脚本,也是掌握Python等脚本语言用于提升效率的前奏。
进阶配置技巧
生成 .bin 和 .hex 文件
默认 CMake 构建只生成 .elf 文件。为了得到更通用的 .bin 或 .hex 烧录文件,需要在项目的 CMakeLists.txt 中添加构建后指令。
# 添加生成bin文件的构建后命令
add_custom_command(TARGET ${CMAKE_PROJECT_NAME} POST_BUILD
    COMMAND ${CMAKE_OBJCOPY} -O binary $<TARGET_FILE:${CMAKE_PROJECT_NAME}> ${CMAKE_PROJECT_NAME}.bin
    COMMENT "生成bin文件"
    VERBATIM
)

# 添加生成hex文件的构建后命令
add_custom_command(TARGET ${CMAKE_PROJECT_NAME} POST_BUILD
    COMMAND ${CMAKE_OBJCOPY} -O ihex $<TARGET_FILE:${CMAKE_PROJECT_NAME}> ${CMAKE_PROJECT_NAME}.hex
    COMMENT "生成hex文件"
    VERBATIM
)
J-Link 调试器驱动说明
当使用 OpenOCD 配合 J-Link 调试器时,可能需要将其驱动程序从默认的 Segger 驱动更改为 WinUSB 或 libusb 驱动,以便 OpenOCD 能够识别。
可以使用 UsbDriverTool 或 Zadig 工具来完成驱动更换。其中 UsbDriverTool 的优点是能更方便地恢复原有驱动。
 图8:使用USB驱动工具(如UsbDriverTool)更改J-Link的驱动类型
注意:如果你需要在 Keil MDK 等原生 Segger 环境切换使用 J-Link,则需要将驱动恢复回原来的 Segger 驱动。
 发表于 2025-12-24 15:16:30
|
查看: 316|
回复: 0
发表于 2025-12-24 15:16:30
|
查看: 316|
回复: 0
