上一次分享的嵌入式 Linux 代码片段反响不错,应大家要求,今天再整理一组我在项目中高频使用的实用代码。这次聚焦于结构体内存分析、文件读写通用封装、终端进度条显示以及 core dump 调试使能,旨在提升日常开发的效率与调试的便捷性。
本文代码均在 Linux 环境下使用 GCC 编译器验证通过。
终端进度条实现
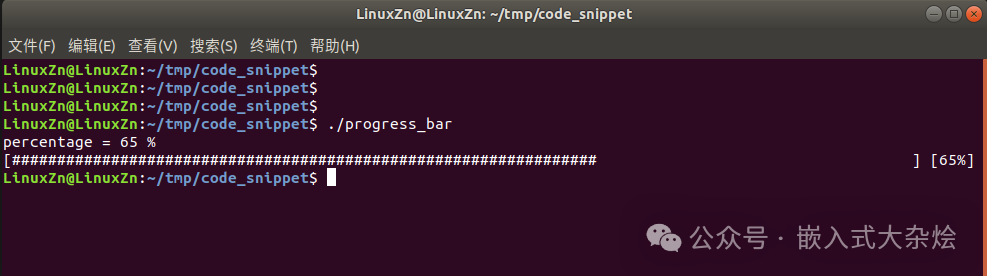
在 OTA 升级、固件烧录或大规模文件处理时,一个直观的进度条远比刷屏的日志更让人安心。实现效果如下:
其核心原理是利用回车符 \r(不换行)配合 fflush 刷新输出缓冲区,实现在同一行动态更新显示内容。
完整代码示例:
#include <stdio.h>
#include <string.h>
#include <unistd.h>

typedef struct _progress
{
    int cur_size;
    int sum_size;
} progress_t;

void progress_bar(progress_t *progress_data)
{
    int percentage = 0;
    int cnt = 0;
    char proc[102]; // 100个字符位 + 最后一个'#' + '\0'

    memset(proc, '\0', sizeof(proc));

    percentage = (int)((long long)progress_data->cur_size * 100 / progress_data->sum_size);
    printf("percentage = %d %%\n", percentage);

    if (percentage <= 100)
    {
        while (cnt <= percentage)
        {
            printf("[%-100s] [%d%%]\r", proc, cnt);
            fflush(stdout);
            proc[cnt] = '#';
            usleep(100000);
            cnt++;
        }
    }
    printf("\n");
}

int main(int arc, char *argv[])
{
    progress_t progress_test = {0};

    progress_test.cur_size = 65;
    progress_test.sum_size = 100;
    progress_bar(&progress_test);

    return 0;
}
运行结果截图:
快速获取结构体成员大小与偏移量
在嵌入式开发中,尤其是在处理通信协议或共享内存时,必须对结构体的内存布局和对齐规则了如指掌。标准库 <stddef.h> 提供了 offsetof 宏,但我们也可以自己实现以理解其原理。
其思路是:将地址 0 强制转换为目标结构体类型的指针,然后访问其成员。此时成员地址的数值即为其偏移量(因为基址为0),对成员进行 sizeof 操作即可得到其大小。
自定义宏实现:
#include <stdio.h>

#define  GET_MEMBER_SIZE(type, member)   sizeof(((type*)0)->member)

#define  GET_MEMBER_OFFSET(type, member)  ((size_t)(&(((type*)0)->member)))

typedef struct _test_struct0
{
    char x;
    char y;
    char z;
}test_struct0;

typedef struct _test_struct1
{
    char a;
    char c;
    short b;
    int d;
    test_struct0 e;
}test_struct1;

int main(int arc, char *argv[])
{
    printf("GET_MEMBER_SIZE(test_struct1, a) = %zu\n", GET_MEMBER_SIZE(test_struct1, a));
    printf("GET_MEMBER_SIZE(test_struct1, c) = %zu\n", GET_MEMBER_SIZE(test_struct1, c));
    printf("GET_MEMBER_SIZE(test_struct1, b) = %zu\n", GET_MEMBER_SIZE(test_struct1, b));
    printf("GET_MEMBER_SIZE(test_struct1, d) = %zu\n", GET_MEMBER_SIZE(test_struct1, d));
    printf("GET_MEMBER_SIZE(test_struct1, e) = %zu\n", GET_MEMBER_SIZE(test_struct1, e));
    printf("test_struct1 size = %zu\n", sizeof(test_struct1));

    printf("GET_MEMBER_OFFSET(a): %zu\n", GET_MEMBER_OFFSET(test_struct1, a));
    printf("GET_MEMBER_OFFSET(c): %zu\n", GET_MEMBER_OFFSET(test_struct1, c));
    printf("GET_MEMBER_OFFSET(b): %zu\n", GET_MEMBER_OFFSET(test_struct1, b));
    printf("GET_MEMBER_OFFSET(d): %zu\n", GET_MEMBER_OFFSET(test_struct1, d));
    printf("GET_MEMBER_OFFSET(e): %zu\n", GET_MEMBER_OFFSET(test_struct1, e));

    return 0;
}
运行结果分析:

观察输出结果,重点关注偏移量。成员 b 的偏移量是2,而非紧邻 c 之后的1,而 d 的偏移量是4。这正是内存对齐在起作用。编译器为了满足 int 类型的4字节对齐要求,在 b 之后自动进行了填充。在跨平台或网络协议解析时忽略这一点,极易导致数据错乱。
通用文件读写操作封装
配置文件存储、日志记录、固件数据读写……文件操作在嵌入式项目中无处不在。与其每次都重写 fopen/fwrite/fclose 流程,不如将其封装成通用函数,实现开箱即用。
封装函数与示例:
#include <stdio.h>

static int file_opt_write(const char *filename, void *ptr, int size)
{
    FILE *fp;
    size_t num;

    fp = fopen(filename, "wb");
    if (NULL == fp)
    {
        printf("open %s file error!\n", filename);
        return -1;
    }

    num = fwrite(ptr, 1, size, fp);
    if (num != size)
    {
        fclose(fp);
        printf("write %s file error!\n", filename);
        return -1;
    }

    fclose(fp);

    return (int)num;
}

static int file_opt_read(const char *filename, void *ptr, int size)
{
    FILE *fp;
    size_t num;

    fp = fopen(filename, "rb");
    if (NULL == fp)
    {
        printf("open %s file error!\n", filename);
        return -1;
    }

    num = fread(ptr, 1, size, fp);
    if (num != size)
    {
        fclose(fp);
        printf("read %s file error!\n", filename);
        return -1;
    }
    fclose(fp);

    return (int)num;
}

typedef struct _test_struct
{
    char a;
    char c;
    short b;
    int d;
}test_struct;

#define FILE_NAME  "./test_file"

int main(int arc, char *argv[])
{
    test_struct write_data = {0};
    write_data.a = 1;
    write_data.b = 2;
    write_data.c = 3;
    write_data.d = 4;
    printf("write_data.a = %d\n", write_data.a);
    printf("write_data.b = %d\n", write_data.b);
    printf("write_data.c = %d\n", write_data.c);
    printf("write_data.d = %d\n", write_data.d);
    file_opt_write(FILE_NAME, (test_struct*)&write_data, sizeof(test_struct));

    test_struct read_data = {0};
    file_opt_read(FILE_NAME, (test_struct*)&read_data, sizeof(test_struct));
    printf("read_data.a = %d\n", read_data.a);
    printf("read_data.b = %d\n", read_data.b);
    printf("read_data.c = %d\n", read_data.c);
    printf("read_data.d = %d\n", read_data.d);

    return 0;
}
这里使用 "wb" 和 "rb" 模式(二进制读写)打开文件,这与 "w"/"r"(文本模式)的关键区别在于,二进制模式不会对换行符进行转换。在写入结构体等二进制数据时,必须使用二进制模式,尤其是在 Linux系统 与 Windows 之间交叉处理文件时,可以避免引入多余的 \r 字符。
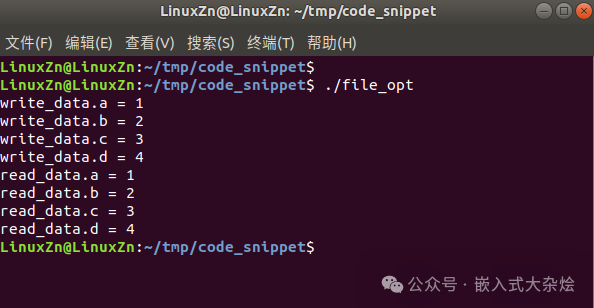
运行验证:
启用 Core Dump 便于事后调试
程序运行时发生段错误等致命问题,通常现场瞬间消失,难以定位。若能在崩溃时自动生成 core dump 文件,即可在事后通过调试器精准回溯到崩溃点。
Core Dump 启用代码:
#include <stdio.h>
#include <stdlib.h>
#include <sys/time.h>
#include <sys/resource.h>

#define SHELL_CMD_CONF_CORE_FILE    "echo /var/core-%e-%p-%t > /proc/sys/kernel/core_pattern"
#define SHELL_CMD_DEL_CORE_FILE     "rm -f /var/core*"

static int enable_core_dump(void)
{
    int resource = RLIMIT_CORE;
    struct rlimit rlim;

    rlim.rlim_cur = RLIM_INFINITY;
    rlim.rlim_max = RLIM_INFINITY;

    system(SHELL_CMD_DEL_CORE_FILE);

    if (0 != setrlimit(resource, &rlim))
    {
        printf("setrlimit error!\n");
        return -1;
    }

    system(SHELL_CMD_CONF_CORE_FILE);
    printf("core dump enabled, pattern: /var/core-%%e-%%p-%%t\n");

    return 0;
}

int main(int argc, char **argv)
{
    enable_core_dump();

    printf("==================segmentation fault test==================\n");

    // 下面故意触发段错误,仅为演示 core dump 功能
    int *p = NULL;
    *p = 1234;

    return 0;
}
程序崩溃生成 core 文件(如 /var/core-a.out-12345-1698765432)后,使用 gdb ./your_program /var/core-xxx 命令加载,再执行 bt(backtrace)命令查看调用堆栈,即可迅速定位到导致崩溃的代码行。
总结
以上四个代码片段覆盖了嵌入式 Linux 开发中几个常见且实用的场景,现将它们汇总如下:
| 代码片段 |
主要应用场景 |
| 终端进度条 |
OTA 升级、固件烧录、批量文件操作 |
| 结构体成员大小/偏移 |
通信协议解析、内存布局分析与调试 |
| 文件读写封装 |
配置文件存储、日志落盘、数据持久化 |
| Core Dump 使能 |
程序崩溃事后分析与定位 |
建议将这些代码加入你的个人工具库,在需要时直接取用,能有效提升开发与调试效率。如果你有其他实用的嵌入式代码片段,欢迎在 云栈社区 分享交流,共同充实开发者的工具箱。
 发表于 2026-3-26 18:21:12
|
查看: 120|
回复: 0
发表于 2026-3-26 18:21:12
|
查看: 120|
回复: 0
