本文将详细介绍如何使用预训练的深度学习模型实现汽车图像分割,从理论原理到代码实现进行全面讲解。
一、什么是图像分割?
1.1 图像分割的定义
图像分割(Image Segmentation)是计算机视觉中的核心任务之一,目标是将图像中的每个像素分配到特定的类别。
┌─────────────────────────────────────────────────────────────┐
│  图像分类          目标检测            语义分割              │
│  ─────────        ─────────          ─────────              │
│  [图片]           [图片+框]          [图片+像素着色]          │
│     ↓                ↓                   ↓                  │
│  “这是一辆车”     “车在这个位置”      “每个像素属于什么”       │
└─────────────────────────────────────────────────────────────┘
1.2 分割类型对比
| 类型 |
描述 |
输出 |
| 语义分割 |
每个像素分类,不区分实例 |
像素级类别图 |
| 实例分割 |
区分同类的不同实例 |
实例+类别 |
| 全景分割 |
语义+实例的结合 |
完整场景理解 |
本文采用的是语义分割方法。
二、DeepLabV3 模型架构
2.1 为什么选择 DeepLabV3?
DeepLabV3 是 Google 提出的语义分割模型,具有以下优势:
- ✅ PyTorch 内置:torchvision 直接提供预训练权重
- ✅ 高精度:在 COCO 数据集上表现优异
- ✅ 支持多类别:包括汽车、行人、动物等 21 个类别
- ✅ 端到端推理:输入图像直接输出分割图
2.2 核心技术:空洞卷积(Atrous Convolution)
DeepLabV3 的核心创新是空洞卷积(也称膨胀卷积):
普通卷积 (dilation=1)        空洞卷积 (dilation=2)
┌───┬───┬───┐               ┌───┬   ┬───┬   ┬───┐
│ × │ × │ × │               │ × │   │ × │   │ × │
├───┼───┼───┤               ├───┤   ├───┤   ├───┤
│ × │ × │ × │               │   │   │   │   │   │
├───┼───┼───┤               ├───┤   ├───┤   ├───┤
│ × │ × │ × │               │ × │   │ × │   │ × │
└───┴───┴───┘               └───┴   ┴───┴   ┴───┘
  感受野: 3×3                  感受野: 5×5
优势:
- 在不增加参数量的情况下扩大感受野
- 捕获多尺度上下文信息
- 保持空间分辨率
2.3 ASPP 模块(Atrous Spatial Pyramid Pooling)
DeepLabV3 使用 ASPP 模块并行处理多个尺度:
输入特征图
        │
    ┌───┼───┐
    │   │   │
    ▼   ▼   ▼
 1×1卷积   3×3空洞    3×3空洞    → 不同 dilation rate
 rate=1   rate=6    rate=12
    │       │         │
    └───┬───┴────┬────┘
        │        │
        ▼        ▼
     全局平均池化 + 1×1卷积
            │
            ▼
       拼接 + 1×1卷积
            │
            ▼
       输出特征图
三、实际分割效果展示
3.1 原始输入图像
下面是我们用于测试的汽车图像:
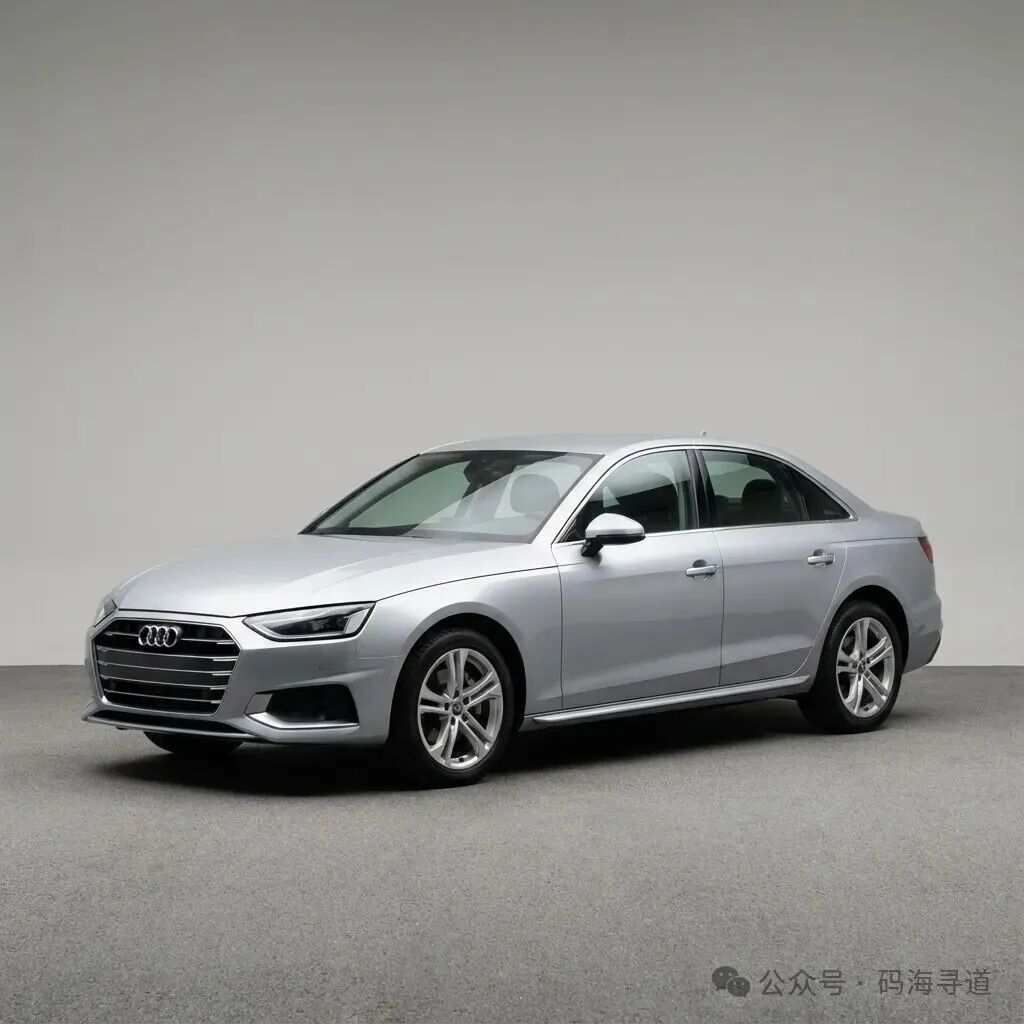 图1:输入的高分辨率汽车照片(1024×1024)
3.2 分割掩码输出
模型推理后生成的二值分割掩码,粉色区域表示检测到的汽车:
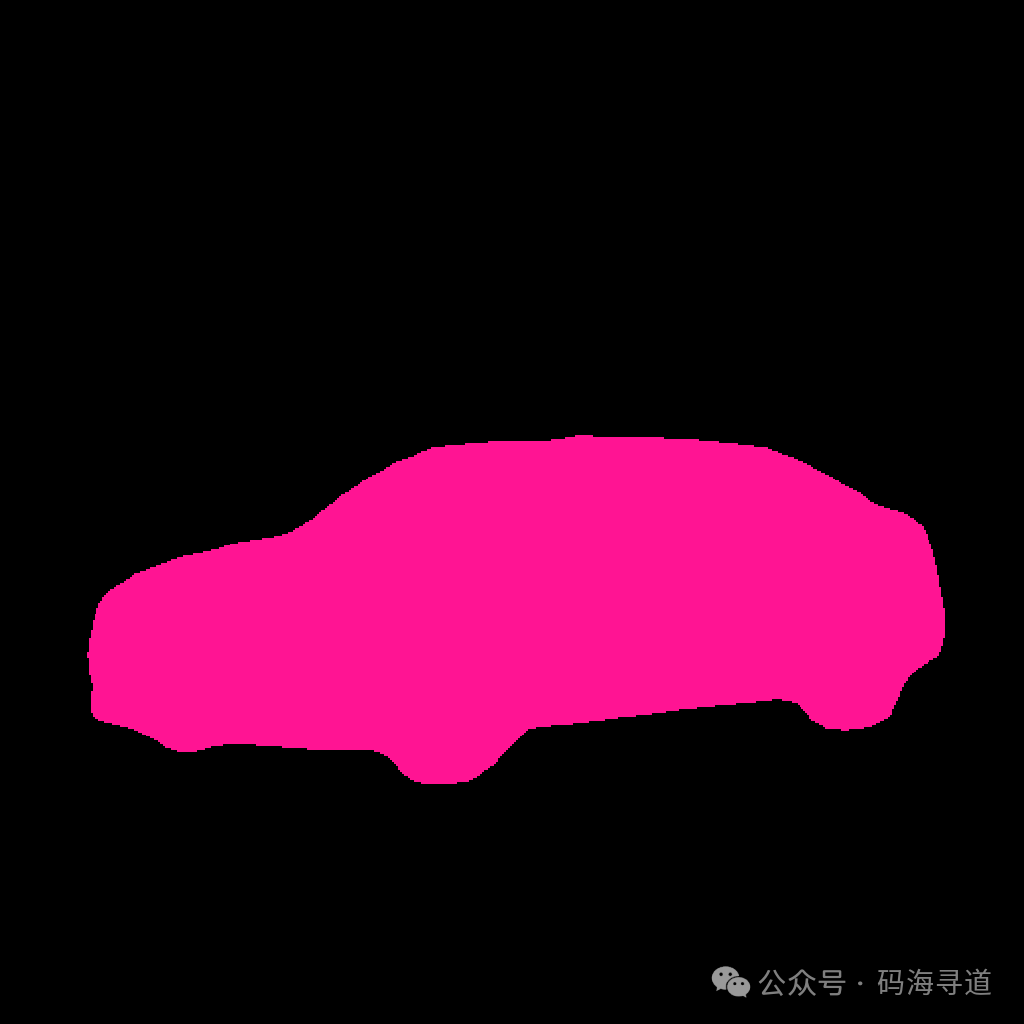 图2:DeepLabV3 生成的汽车分割掩码(检测到 19.93% 像素属于汽车)
3.3 叠加可视化效果
将分割掩码以 50% 透明度叠加到原图上,直观展示分割效果:
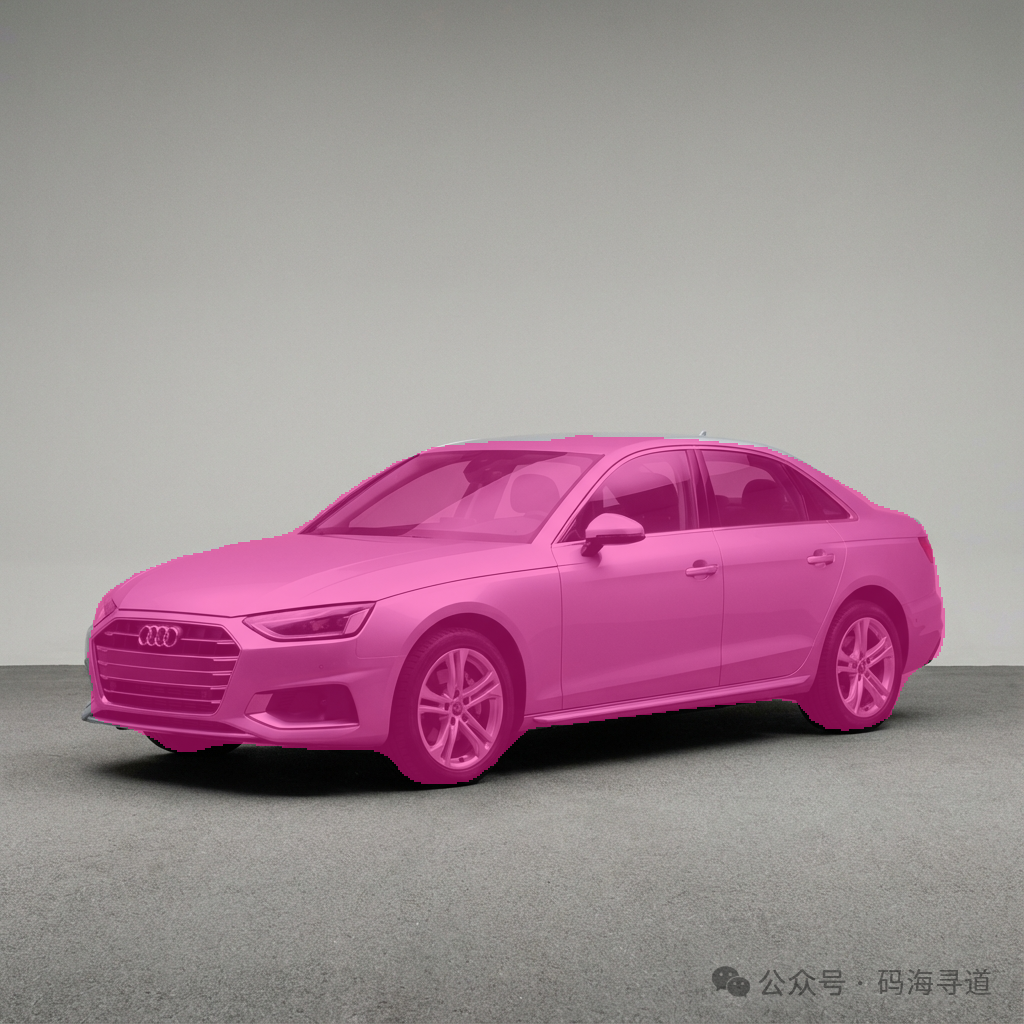 图3:原图与掩码的 Alpha 混合叠加可视化
四、代码实现详解
4.1 模型加载
from torchvision.models.segmentation import deeplabv3_resnet101, DeepLabV3_ResNet101_Weights

def load_model():
    """加载预训练的 DeepLabV3 模型"""
    # 使用默认的 COCO 数据集预训练权重
    weights = DeepLabV3_ResNet101_Weights.DEFAULT
    model = deeplabv3_resnet101(weights=weights)
    model.eval()  # 设置为评估模式,关闭 Dropout 和 BatchNorm 训练行为
    return model, weights
| 关键点解析: |
参数 |
说明 |
DeepLabV3_ResNet101_Weights.DEFAULT |
使用最新的预训练权重 |
model.eval() |
推理模式:BN使用全局统计量,Dropout关闭 |
ResNet101 |
骨干网络,101层残差网络 |
4.2 图像预处理
def preprocess_image(image_path, weights):
    """加载并预处理图像"""
    image = Image.open(image_path).convert(“RGB”)
    original_size = image.size

    # 获取模型权重定义的标准预处理流程
    preprocess = weights.transforms()
    input_tensor = preprocess(image)
    input_batch = input_tensor.unsqueeze(0)  # [C, H, W] → [1, C, H, W]

    return input_batch, image, original_size
预处理流程:
原始图像
    │
    ▼
① 调整尺寸 → 520×520(模型默认输入尺寸)
    │
    ▼
② 转为 Tensor → [0, 255] → [0.0, 1.0]
    │
    ▼
③ 标准化 → 减均值、除标准差(ImageNet统计量)
   mean = [0.485, 0.456, 0.406]
   std = [0.229, 0.224, 0.225]
    │
    ▼
④ 添加 Batch 维度 → [1, 3, 520, 520]
4.3 模型推理
def run_inference(model, input_batch):
    """运行模型推理"""
    with torch.no_grad():  # 禁用梯度计算
        output = model(input_batch)[‘out’][0]

    # 对每个像素取概率最大的类别
    predictions = output.argmax(0).cpu().numpy()
    return predictions
推理过程详解:
输入: [1, 3, 520, 520]
        │
        ▼
    ┌─────────────┐
    │  ResNet101  │  ← 骨干网络提取特征
    │  Backbone   │
    └─────────────┘
        │
        ▼
    ┌─────────────┐
    │    ASPP     │  ← 多尺度特征融合
    │   Module    │
    └─────────────┘
        │
        ▼
    ┌─────────────┐
    │   Decoder   │  ← 上采样恢复分辨率
    └─────────────┘
        │
        ▼
输出: [1, 21, 520, 520]  ← 21个类别的概率图
        │
        ▼
    argmax(dim=1)
        │
        ▼
预测: [520, 520]  ← 每个像素的类别ID
4.4 掩码提取
CAR_CLASS_ID = 7  # COCO 数据集中汽车的类别ID

def create_car_mask(predictions, original_size):
    """从预测结果中提取汽车掩码"""
    # 创建二值掩码:汽车像素=1,其他=0
    car_mask = (predictions == CAR_CLASS_ID).astype(np.uint8)

    # 调整回原始图像尺寸
    mask_image = Image.fromarray(car_mask * 255)
    mask_image = mask_image.resize(original_size, Image.NEAREST)

    return mask_image
| COCO 类别对照表: |
ID |
类别 |
ID |
类别 |
ID |
类别 |
| 0 |
背景 |
7 |
汽车 |
14 |
摩托车 |
| 1 |
飞机 |
8 |
猫 |
15 |
人 |
| 2 |
自行车 |
9 |
椅子 |
16 |
盆栽 |
| 3 |
鸟 |
10 |
牛 |
17 |
羊 |
| 4 |
船 |
11 |
餐桌 |
18 |
沙发 |
| 5 |
瓶子 |
12 |
狗 |
19 |
火车 |
| 6 |
公交车 |
13 |
马 |
20 |
电视 |
4.5 可视化叠加
MASK_COLOR = (255, 20, 147)  # 粉色
OVERLAY_ALPHA = 0.5          # 透明度

def create_overlay(original_image, mask_image):
    """创建原图与掩码的叠加可视化"""
    original_array = np.array(original_image).astype(np.float32)
    mask_array = np.array(mask_image)

    overlay_array = original_array.copy()
    mask_bool = mask_array > 0

    # Alpha 混合公式:result = original * (1-α) + color * α
    overlay_array[mask_bool] = (
        original_array[mask_bool] * (1 - OVERLAY_ALPHA) +
        np.array(MASK_COLOR) * OVERLAY_ALPHA
    )

    return Image.fromarray(overlay_array.astype(np.uint8))
Alpha 混合原理:
对于掩码区域的每个像素:
  R_out = R_原图 × 0.5 + 255 × 0.5
  G_out = G_原图 × 0.5 + 20  × 0.5
  B_out = B_原图 × 0.5 + 147 × 0.5
效果:保留原图细节的同时叠加半透明粉色
五、完整处理流程
┌─────────────────────────────────────────────────────────────────┐
│                     汽车图像分割完整流程                          │
└─────────────────────────────────────────────────────────────────┘
      原始图像                                      输出结果
  car_original.png
        │
        ▼
   ┌──────────┐ ← PIL.Image.open()
   │ 图像加载  │
   └──────────┘
        │
        ▼
   ┌──────────┐ ← 缩放、归一化、转Tensor
   │ 预处理   │
   └──────────┘
        │
        ▼
   ┌──────────┐ ← deeplabv3_resnet101
   │ 模型推理  │
   └──────────┘
        │
        ▼
   ┌──────────┐ ← predictions == 7 (汽车)
   │ 类别提取  │
   └──────────┘
        │
    ┌───┴───┐
    │       │
    ▼       ▼
 ┌──────┐ ┌──────┐
 │ 掩码  │ │ 叠加  │
 └──────┘ └──────┘
    │       │
    ▼       ▼
 car_mask   car_overlay
  _real.png  _real.png
六、运行结果分析
6.1 控制台输出
==================================================
🚗 汽车图像分割 - DeepLabV3
==================================================
📦 正在加载预训练 DeepLabV3-ResNet101 模型...
✅ 模型加载成功!
📷 正在加载图像: car_original.png
   图像尺寸: 1024x1024
🔄 正在进行分割推理...
   输出尺寸: (520, 520)
🎭 正在提取汽车掩码 (类别ID: 7)...
   检测到汽车像素: 53887 (19.93%)
✨ 正在创建叠加可视化...
💾 正在保存结果...
   ✅ 掩码已保存: car_mask_real.png
   ✅ 叠加图已保存: car_overlay_real.png
🎉 分割完成!
6.2 分割统计
| 指标 |
数值 |
| 输入尺寸 |
1024×1024 |
| 模型输出尺寸 |
520×520 |
| 汽车像素数 |
53,887 |
| 汽车像素占比 |
19.93% |
| 处理时间 |
~2-3秒 |
6.3 结果解读
| 输出文件 |
描述 |
用途 |
car_original.png |
原始输入图像 |
对照参考 |
car_mask_real.png |
二值分割掩码 |
后续处理(抠图、替换背景) |
car_overlay_real.png |
半透明叠加 |
可视化验证效果 |
七、与 UNet 的对比
| 特性 |
UNet |
DeepLabV3 |
| 架构 |
编码器-解码器 + 跳跃连接 |
骨干网络 + ASPP + 解码器 |
| 核心技术 |
跳跃连接保留细节 |
空洞卷积扩大感受野 |
| 适用场景 |
医学图像、小数据集 |
自然图像、大规模数据 |
| 预训练 |
较少公开权重 |
torchvision 内置 |
| 输入尺寸 |
灵活 |
通常需要固定尺寸 |
两者都是强大的分割架构,选择取决于具体任务和数据。
八、扩展应用
8.1 背景替换
# 使用掩码提取前景
foreground = original_image * mask
# 合成到新背景
result = foreground + new_background * (1 - mask)
8.2 颜色修改
# 只在汽车区域应用颜色变换
car_region = original_image[mask > 0]
car_region = apply_color_transform(car_region)
8.3 批量处理
for image_path in image_list:
    result = segment_car(image_path)
    save_result(result)
九、总结
本文介绍了如何使用 PyTorch 的 DeepLabV3 预训练模型实现汽车图像分割:
- 模型加载:使用 torchvision 加载预训练权重
- 图像预处理:标准化、调整尺寸、转换格式
- 模型推理:前向传播获取21类别概率图
- 掩码提取:根据类别ID提取目标区域
- 可视化:Alpha混合生成叠加效果
这套方法可以快速应用到各种图像分割任务中,如人像分割、物体抠图等。
十、完整源代码
以下是 segment_car.py 的完整代码:
“”“
汽车图像分割 - 使用预训练 DeepLabV3 模型
==========================================
本脚本使用 PyTorch 预训练的 DeepLabV3-ResNet101 模型对汽车图像进行语义分割。
该模型在 COCO 数据集上训练,包含 ‘car’ 作为 21 个类别之一。

COCO 数据集类别对照表:
0: 背景, 1: 飞机, 2: 自行车, 3: 鸟, 4: 船,
5: 瓶子, 6: 公交车, 7: 汽车, 8: 猫, 9: 椅子, 10: 牛,
11: 餐桌, 12: 狗, 13: 马, 14: 摩托车, 15: 人,
16: 盆栽, 17: 羊, 18: 沙发, 19: 火车, 20: 电视
”“”
import torch
import torchvision.transforms as T
from torchvision.models.segmentation import deeplabv3_resnet101, DeepLabV3_ResNet101_Weights
from PIL import Image
import numpy as np
import os

# 配置参数
INPUT_IMAGE = “car_original.png”      # 输入的汽车图像
OUTPUT_MASK = “car_mask_real.png”     # 输出的二值掩码
OUTPUT_OVERLAY = “car_overlay_real.png” # 叠加可视化结果
CAR_CLASS_ID = 7                      # COCO 数据集中 ‘汽车’ 的类别ID
MASK_COLOR = (255, 20, 147)           # 掩码颜色 (粉色 RGB)
OVERLAY_ALPHA = 0.5                   # 叠加透明度

def load_model():
    “”“加载预训练的 DeepLabV3 模型”“”
    print(“📦 正在加载预训练 DeepLabV3-ResNet101 模型...”)
    weights = DeepLabV3_ResNet101_Weights.DEFAULT
    model = deeplabv3_resnet101(weights=weights)
    model.eval()  # 设置为评估模式
    print(“✅ 模型加载成功!”)
    return model, weights

def preprocess_image(image_path, weights):
    “”“加载并预处理图像”“”
    print(f“📷 正在加载图像: {image_path}”)
    image = Image.open(image_path).convert(“RGB”)
    original_size = image.size  # (宽度, 高度)

    # 使用模型权重中定义的预处理方式
    preprocess = weights.transforms()
    input_tensor = preprocess(image)
    input_batch = input_tensor.unsqueeze(0)  # 添加 batch 维度

    print(f“   图像尺寸: {original_size[0]}x{original_size[1]}”)
    return input_batch, image, original_size

def run_inference(model, input_batch):
    “”“运行模型推理”“”
    print(“🔄 正在进行分割推理...”)
    with torch.no_grad():  # 禁用梯度计算以节省内存
        output = model(input_batch)[‘out’][0]

    # 获取每个像素的类别预测
    predictions = output.argmax(0).cpu().numpy()
    print(f“   输出尺寸: {predictions.shape}”)
    return predictions

def create_car_mask(predictions, original_size):
    “”“从预测结果中提取汽车类别,创建二值掩码”“”
    print(f“🎭 正在提取汽车掩码 (类别ID: {CAR_CLASS_ID})...”)

    # 创建汽车类别的二值掩码
    car_mask = (predictions == CAR_CLASS_ID).astype(np.uint8)

    # 统计汽车像素数量
    car_pixels = np.sum(car_mask)
    total_pixels = car_mask.size
    car_percentage = (car_pixels / total_pixels) * 100
    print(f“   检测到汽车像素: {car_pixels} ({car_percentage:.2f}%)”)

    # 如果没有检测到汽车,尝试其他车辆类别
    if car_pixels == 0:
        print(“⚠️  未检测到汽车! 尝试其他车辆类别...”)
        for alt_class, name in [(6, ‘公交车’), (14, ‘摩托车’)]:
            alt_mask = (predictions == alt_class).astype(np.uint8)
            if np.sum(alt_mask) > 0:
                print(f“   检测到 {name}!”)
                car_mask = alt_mask
                break

    # 转换为 PIL 图像并调整到原始尺寸
    mask_image = Image.fromarray(car_mask * 255)
    mask_image = mask_image.resize(original_size, Image.NEAREST)

    return mask_image, car_mask

def create_colored_mask(mask_image):
    “”“创建彩色版本的掩码”“”
    mask_array = np.array(mask_image)

    # 创建 RGB 彩色掩码
    colored_mask = np.zeros((*mask_array.shape, 3), dtype=np.uint8)
    colored_mask[mask_array > 0] = MASK_COLOR

    return Image.fromarray(colored_mask)

def create_overlay(original_image, mask_image):
    “”“创建原图与掩码的叠加可视化”“”
    print(“✨ 正在创建叠加可视化...”)

    # 转换为 numpy 数组
    original_array = np.array(original_image).astype(np.float32)
    mask_array = np.array(mask_image)

    # 复制原图
    overlay_array = original_array.copy()

    # 在掩码区域应用彩色叠加
    mask_bool = mask_array > 0
    overlay_array[mask_bool] = (
        original_array[mask_bool] * (1 - OVERLAY_ALPHA) +
        np.array(MASK_COLOR) * OVERLAY_ALPHA
    )

    return Image.fromarray(overlay_array.astype(np.uint8))

def save_results(original, mask, overlay):
    “”“保存所有输出图像”“”
    print(“\n💾 正在保存结果...”)

    # 保存彩色掩码
    colored_mask = create_colored_mask(mask)
    colored_mask.save(OUTPUT_MASK)
    print(f“   ✅ 掩码已保存: {OUTPUT_MASK}”)

    # 保存叠加图
    overlay.save(OUTPUT_OVERLAY)
    print(f“   ✅ 叠加图已保存: {OUTPUT_OVERLAY}”)

    print(“\n🎉 分割完成!”)

def main():
    “”“主分割流程”“”
    print(“=” * 50)
    print(“🚗 汽车图像分割 - DeepLabV3”)
    print(“=” * 50 + “\n”)

    # 检查输入图像是否存在
    if not os.path.exists(INPUT_IMAGE):
        print(f“❌ 错误: 输入图像 ‘{INPUT_IMAGE}’ 不存在!”)
        print(“   请确保图像文件位于当前目录中。”)
        return

    # 加载模型
    model, weights = load_model()

    # 预处理图像
    input_batch, original_image, original_size = preprocess_image(INPUT_IMAGE, weights)

    # 运行推理
    predictions = run_inference(model, input_batch)

    # 创建汽车掩码
    mask_image, _ = create_car_mask(predictions, original_size)

    # 创建叠加可视化
    overlay_image = create_overlay(original_image, mask_image)

    # 保存结果
    save_results(original_image, mask_image, overlay_image)

    print(“\n📁 输出文件:”)
    print(f“   - 原图: {INPUT_IMAGE}”)
    print(f“   - 掩码: {OUTPUT_MASK}”)
    print(f“   - 叠加: {OUTPUT_OVERLAY}”)

if __name__ == “__main__”:
    main()
运行方式
# 确保已安装依赖
pip install torch torchvision pillow numpy

# 运行脚本
python segment_car.py
 发表于 2025-12-12 19:13:01
|
查看: 198|
回复: 0
发表于 2025-12-12 19:13:01
|
查看: 198|
回复: 0
