随着通用大模型在Agent化和GUI理解能力上的不断增强,如今像Gemini 3 Flash这样的模型已经可以直接用于搭建效果不错的GUI Agent,实践门槛大幅降低。本文将通过一个具体的实例,详细讲解如何逐步搭建一个可用的GUI Agent,从中你也可以快速理解其核心工作原理。
一、GUI Agent是什么?
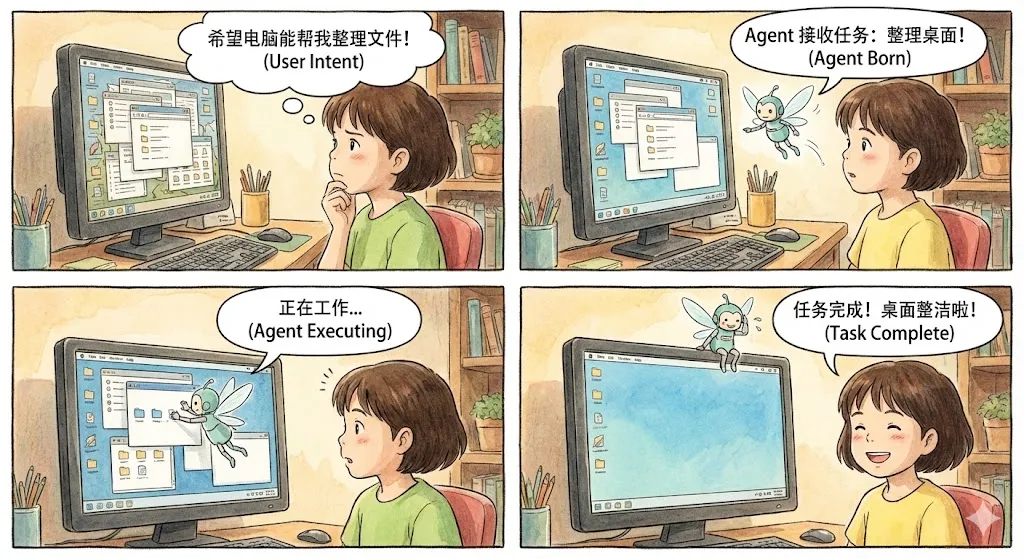
简单来说,GUI Agent是一个能够“看懂”屏幕(无论是手机、电脑还是网页界面)并进行自动化操作的智能体。例如,当用户发出“整理文件”的指令后,PC端的GUI Agent就能基于对纯图形界面的理解,一步步做出决策并执行操作,直至完成任务。
近年来,GUI Agent的应用前景日益清晰,发展迅猛。一个显著的新趋势是,通用大模型也开始在训练中强化GUI相关的能力。
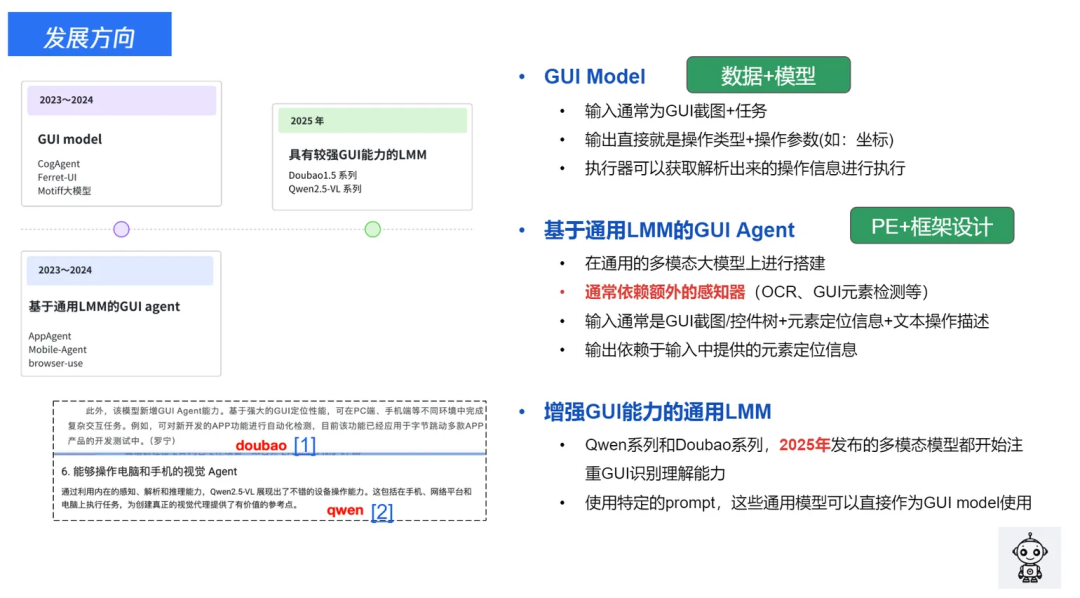
因此,构建一个功能强大的GUI Agent正变得越来越简单。本文将介绍如何使用通用大模型的API,快速从零开始搭建一个实用性强的PC端GUI Agent,用于自动完成桌面环境下的各类任务。
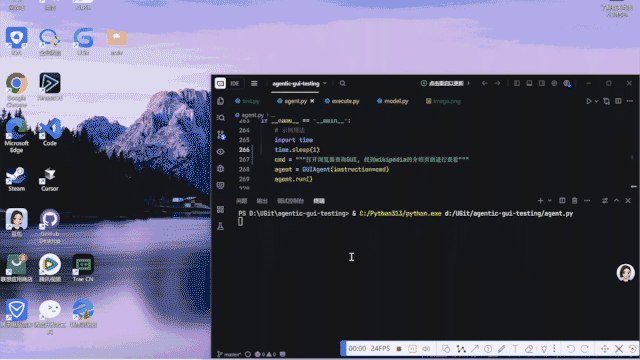
前置准备:本文示例使用的是Gemini 3 Flash模型。首先来看看最终实现的效果:一个能够自动打开浏览器、搜索并浏览维基百科页面的Agent。
二、GUI Agent基础原理
一个典型的GUI Agent通常包含以下几个核心组件:
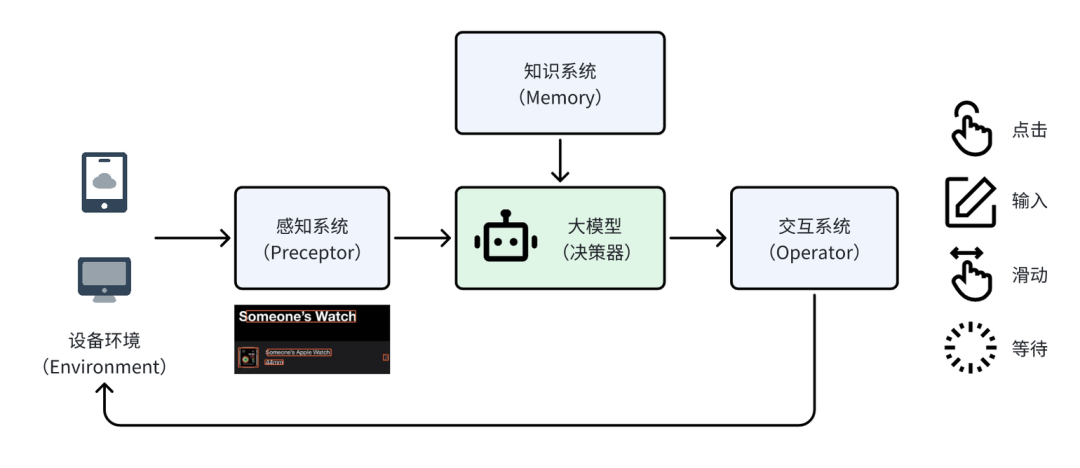
- 设备环境(Environment):即交互发生的“载体”,如手机、电脑等硬件设备。本文将以电脑为例。
- 感知系统(Preceptor):负责“接收信息”。对于GUI能力较弱的通用大模型,通常需要设计独立的感知模块(如OCR、控件检测)。但像Gemini 3 Flash这类本身具备较强GUI理解能力的大模型,则通常不再需要单独的感知系统。
- 大模型(决策器):作为整个系统的“大脑”,它结合知识库中的信息,分析感知到的界面内容,决策出为完成任务所需的下一步操作。
- 交互系统(Operator):相当于“手脚”,负责将大模型的决策结果(操作类型和坐标)转化为与设备的具体交互动作。
为了完成一项任务,Agent需要反复进行“感知 -> 决策 -> 执行”的循环,直至任务完成为止。下文将具体介绍如何搭建一个PC端的GUI Agent。
三、逐步搭建GUI Agent
1. 实现基础的多模态对话
在构建复杂的Agent框架之前,我们先实现最基础的功能:让AI模型能够理解一张图片并回答问题。
# utils/model.py

import os
import base64
from openai import OpenAI
from typing import List, Dict, Any

API_KEY = os.getenv("OPENAI_API_KEY")
BASE_URL = os.getenv("OPENAI_BASE_URL")

class LVMChat:
    """多模态大模型聊天类"""

    def __init__(self, api_key: str = API_KEY, base_url: str = BASE_URL,
                 model: str = "gemini-3-flash-preview"):
        self.client = OpenAI(api_key=api_key, base_url=base_url)
        self.model = model

    def _encode_image(self, image_path: str) -> str:
        """将图片编码为base64"""
        with open(image_path, "rb") as image_file:
            return base64.b64encode(image_file.read()).decode('utf-8')

    def get_multimodal_response(self, text: str, image_paths: str) -> str:
        """
        最简单的图文对话

        Args:
            text: 你的问题
            image_paths: 图片路径

        Returns:
            模型的回答
        """
        # 1. 加载图片
        base64_image = self._encode_image(image_paths)

        # 2. 构建消息
        messages = [{
            "role": "user",
            "content": [
                {"type": "image_url",
                 "image_url": {"url": f"data:image/jpeg;base64,{base64_image}"}},
                {"type": "text", "text": text}
            ]
        }]

        # 3. 调用API
        response = self.client.chat.completions.create(
            model=self.model,
            messages=messages
        )

        return response.choices[0].message.content
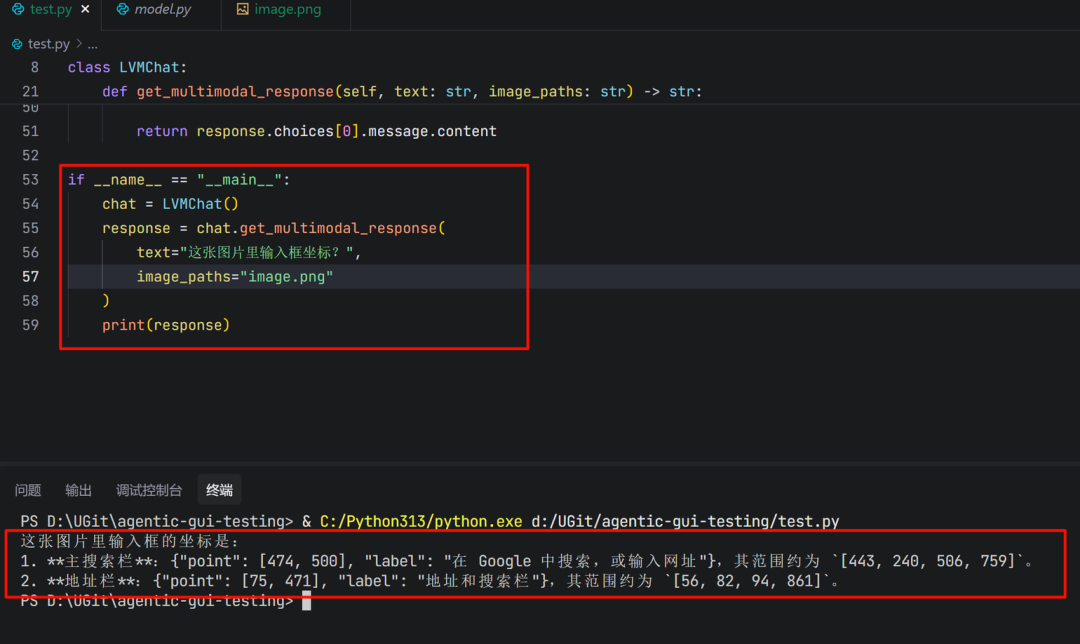
进行简单测试:
chat = LVMChat()
response = chat.get_multimodal_response(
    text="这张图片里输入框坐标?",
    image_paths="image.png"
)
print(response)
这里有一个关键点:模型本身具备定位能力,能够直接输出操作对象(如输入框)的坐标位置。这意味着我们不再需要额外设计一个复杂的感知器来锚定UI元素。
2. 加入记忆能力:让AI记住上下文
上面的代码存在一个问题:AI每次对话都是“失忆”的,不记得之前发生过什么。这对于需要多步协作的GUI Agent来说是致命的。
例如,对于任务“在输入框输入‘你好’”,一个没有记忆的Agent在执行完输入操作后,看到屏幕状态变化,可能会忘记自己已经做过输入,从而陷入不断重复输入的循环。而有记忆的Agent,则能结合历史记录和当前页面状态,判断任务已完成,并输出“finish”指令。
因此,我们需要升级 LVMChat 类,为其添加会话历史功能。
class LVMChat:
    """支持会话记忆的多模态聊天类"""

    def __init__(self, api_key: str = API_KEY, base_url: str = BASE_URL,
                 model: str = "gemini-3-flash-preview"):
        self.client = OpenAI(api_key=api_key, base_url=base_url)
        self.model = model
        # 🔥 核心改动:添加会话历史记录
        self.conversation_history: List[Dict[str, Any]] = []

    def get_multimodal_response(self, text: str, image_paths: str,
                                    use_history: bool = False) -> str:
        """
        支持记忆的图文对话

        Args:
            text: 你的问题
            image_paths: 图片路径
            use_history: 是否使用会话历史(记住之前的对话)
        """
        # 1. 加载图片并构建当前消息
        base64_image = self._encode_image(image_paths)
        current_message = {
            "role": "user",
            "content": [
                {"type": "image_url",
                 "image_url": {"url": f"data:image/jpeg;base64,{base64_image}"}},
                {"type": "text", "text": text}
            ]
        }

        # 2. 🔥 关键:如果启用历史,把之前的对话也带上
        if use_history:
            messages = self.conversation_history + [current_message]
            print(f"📚 使用历史上下文,共 {len(self.conversation_history)} 条")
        else:
            messages = [current_message]

        # 3. 调用API
        response = self.client.chat.completions.create(
            model=self.model,
            messages=messages
        )

        result = response.choices[0].message.content

        # 4. 🔥 更新历史记录
        if use_history:
            self.conversation_history.append(current_message)
            self.conversation_history.append({
                "role": "assistant",
                "content": result
            })

        return result

    def clear_history(self):
        """清空记忆"""
        self.conversation_history = []
记忆机制的原理:
模型在每一轮决策时,不仅能接收到当前的屏幕截图和任务指令,还能看到之前所有轮次的对话记录(用户指令、截图和模型的思考与动作)。这样,它就能清楚地知道自己已经执行过哪些操作,当前处于任务流的哪个阶段,从而做出更合理的下一步决策。
3. 搭建完整的Agent框架
现在,我们将各个模块组装成一个完整的Agent。这里使用 LangGraph 来构建清晰的工作流。LangGraph是一个用于构建有状态、多步骤应用(如Agent)的库,它通过图(Graph)的方式来定义执行逻辑。
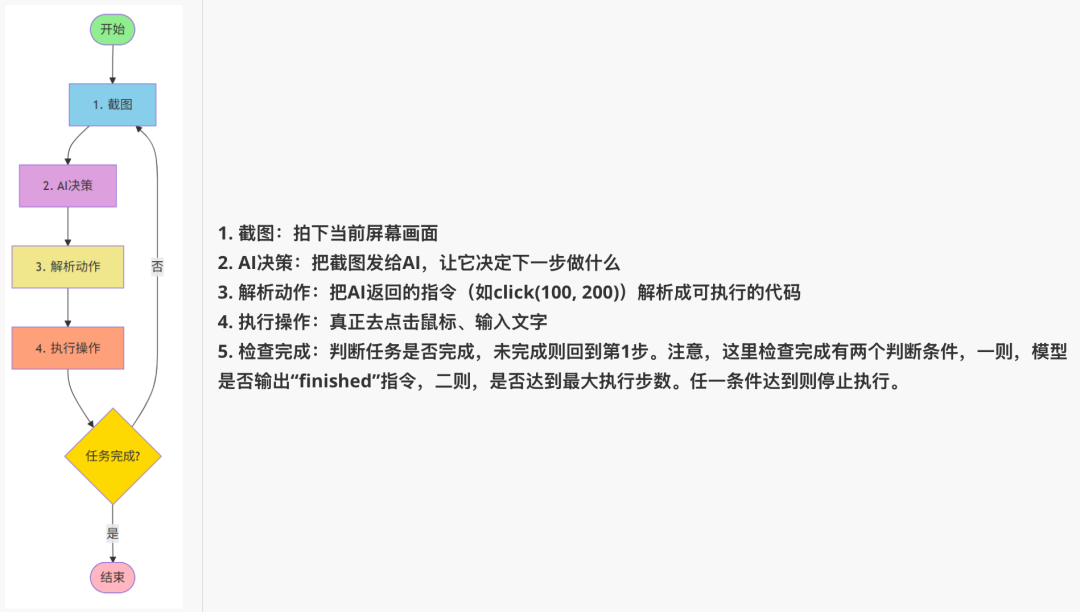
(1)Agent的核心循环
一个GUI Agent的标准工作流程可以概括为以下步骤:
(2)执行器(Operator)
我们需要一个能够实际控制鼠标和键盘的工具类。这里强烈推荐使用 pyautogui,它用于模拟键鼠操作,简单易用。
但需要注意一个细节:对于输入操作,应使用复制粘贴而非直接打字,因为 pyautogui.write() 不支持中文,而通过剪贴板粘贴可以完美支持中英文及特殊字符。
# operator/execute.py
import pyautogui
import pyperclip
import mss
import time

# 允许鼠标移动到屏幕角落(默认会触发fail-safe)
pyautogui.FAILSAFE = False

class Operation:
    """GUI操作工具类"""

    def click(self, x: int, y: int):
        """点击指定坐标"""
        print(f"🖱️  点击坐标 ({x}, {y})")
        pyautogui.click(x=x, y=y)

    def input(self, text: str):
        """输入文本(使用粘贴方式,支持中文)"""
        print(f"⌨️  输入: {text}")
        pyperclip.copy(text)  # 复制到剪贴板
        pyautogui.hotkey('command', 'v')  # Mac用command,Windows用ctrl

    def screenshot(self, save_path: str):
        """截图并保存"""
        with mss.mss() as sct:
            sct.shot(output=save_path)
        print(f"📸 截图已保存: {save_path}")

    def hotkey(self, *keys):
        """按下组合键(如ctrl+c)"""
        print(f"⌨️  按下组合键: {' + '.join(keys)}")
        pyautogui.hotkey(*keys)

    def wait(self, seconds: float = 1.0):
        """等待指定时间"""
        print(f"⏱️  等待 {seconds} 秒...")
        time.sleep(seconds)
(3)设计提示词(Prompt)
提示词用于告诉AI模型应如何“思考”和“行动”,需要明确定义操作空间和输出格式。本文的提示词在 UI-TARS官方Prompt 基础上做了微调,主要是增加了输出示例,以确保Gemini 3 Flash的输出格式更稳定。
# utils/prompts.py
COMPUTER_USE_UITARS = """You are a GUI agent. You are given a task and your action history, with screenshots. You need to perform the next action to complete the task.

## Action Space
click(point='<point>x1 y1</point>')
left_double(point='<point>x1 y1</point>')
right_single(point='<point>x1 y1</point>')
drag(start_point='<point>x1 y1</point>', end_point='<point>x2 y2</point>')
hotkey(key='ctrl c') # Split keys with a space and use lowercase. Also, do not use more than 3 keys in one hotkey action.
type(content='xxx') # Use escape characters \\', \\\", and \\n in content part to ensure we can parse the content in normal python string format. If you want to submit your input, use \\n at the end of content.
scroll(point='<point>x1 y1</point>', direction='down or up or right or left') # Show more information on the `direction` side.
wait() #Sleep for 5s and take a screenshot to check for any changes.
finished(content='xxx') # Use escape characters \\', \\", and \\n in content part to ensure we can parse the content in normal python string format.

## Note
- Use Chinese in `Thought` part.
- Write a small plan and finally summarize your next action (with its target element) in one sentence in `Thought` part.
- One action per turn.

## Output Example
{{
    "Thought": "...",
    "Action": "..."
}}

## User Instruction
{instruction}
"""
(4)坐标归一化处理
不同电脑的屏幕分辨率各异(如1920x1080、2560x1440)。为了通用性,GUI Agent常采用归一化坐标策略,即所有坐标都映射到0-1000的范围。因此,在得到大模型返回的归一化坐标后,需要将其转换为当前屏幕的实际像素坐标。
# AI返回归一化坐标: (500, 500) - 表示屏幕中心
# 在1920x1080屏幕上: (500, 500) -> (960, 540)
# 在2560x1440屏幕上: (500, 500) -> (1280, 720)

def normalize_coords(self, x: int, y: int) -> tuple[int, int]:
    """将归一化坐标(0-1000)转换为实际像素坐标"""
    actual_x = int(x / 1000.0 * self.screen_width)
    actual_y = int(y / 1000.0 * self.screen_height)
    return actual_x, actual_y
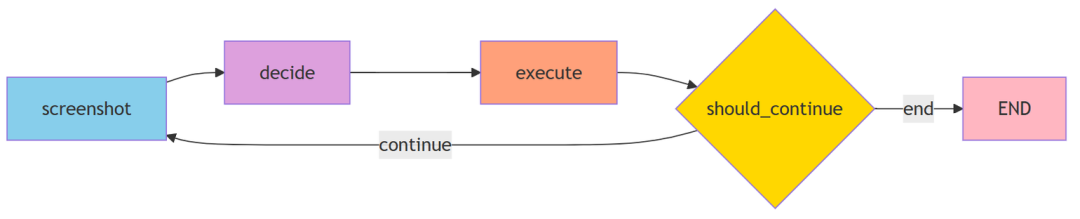
(5)使用LangGraph组织工作流
与传统的硬编码循环相比,使用LangGraph以声明式的方式构建工作流,优势明显:
- 逻辑清晰:工作流可视化,易于理解。
- 易于修改:添加节点或改变流程非常简单。
- 状态管理:自动在节点间传递和更新状态。
# 传统方式(硬编码)
def run_agent():
    while not finished:
        screenshot()
        decision = model_decide()
        execute(decision)
        if check_finished():
            break

# LangGraph方式(声明式)
workflow = StateGraph(AgentState)
workflow.add_node("screenshot", take_screenshot)
workflow.add_node("decide", model_decide)
workflow.add_node("execute", execute_action)
workflow.add_edge("screenshot", "decide")
workflow.add_edge("decide", "execute")
workflow.add_conditional_edges("execute", should_continue, {...})
AgentState 是整个工作流的“记忆载体”,在各个节点间传递,包含当前指令、截图路径、步骤计数、模型思考、动作指令和完成状态等信息。
(6)组装Agent主程序
现在,我们将所有模块整合到一起,形成完整的GUI Agent。
#!/usr/bin/env python3
# -*- coding: utf-8 -*-
"""
GUI Agent - 自动化GUI测试Agent
截图 -> 模型决策 -> 解析Action -> 执行 -> 循环,直到finished
"""
import re
import json
from datetime import datetime
from typing import TypedDict
from pathlib import Path

from langgraph.graph import StateGraph, END
from operator.execute import Operation
from utils.model import LVMChat, Model
from utils.prompts import COMPUTER_USE_UITARS

# 定义State
class AgentState(TypedDict):
    instruction: str  # 用户指令
    screenshot_path: str  # 当前截图路径
    step: int  # 当前步骤
    thought: str  # 模型思考
    action: str  # 模型输出的动作
    finished: bool  # 是否完成

class GUIAgent:
    """GUI自动化Agent"""

    def __init__(self, instruction: str, model_name: str = Model.GOOGLE_GEMINI_3_FLASH_PREVIEW.value):
        self.instruction = instruction
        self.operation = Operation()
        self.lvm_chat = LVMChat(model=model_name)
        self.s_dir = Path("s")
        self.s_dir.mkdir(exist_ok=True)

        # 获取屏幕尺寸用于坐标映射
        import pyautogui
        self.screen_width, self.screen_height = pyautogui.size()
        print(f"🖥️  屏幕尺寸: {self.screen_width}x{self.screen_height}")

    def normalize_coords(self, x: int, y: int) -> tuple[int, int]:
        """将归一化坐标(0-1000)转换为实际像素坐标"""
        actual_x = int(x / 1000.0 * self.screen_width)
        actual_y = int(y / 1000.0 * self.screen_height)
        print(f"   归一化坐标 ({x}, {y}) -> 实际坐标 ({actual_x}, {actual_y})")
        return actual_x, actual_y

    def take_screenshot(self, state: AgentState) -> AgentState:
        """步骤1: 截图并保存"""
        step = state.get("step", 0) + 1
        timestamp = datetime.now().strftime("%Y%m%d_%H%M%S")
        screenshot_path = str(self.s_dir / f"step_{step}_{timestamp}.png")

        self.operation.screenshot(screenshot_path)

        return {
            **state,
            "instruction": self.instruction,
            "screenshot_path": screenshot_path,
            "step": step,
            "finished": False
        }

    def model_decide(self, state: AgentState) -> AgentState:
        """步骤2: 模型决策(自动使用会话历史)"""
        prompt = COMPUTER_USE_UITARS.format(instruction=state["instruction"])

        # 调用多模态模型(use_history=True 自动保留上下文)
        response = self.lvm_chat.get_multimodal_response(
            text=prompt,
            image_paths=state["screenshot_path"],
            res_format="json",
            use_history=True  # 启用会话历史,模型会记住之前的所有交互
        )

        print(f"\n📸 Step {state['step']} - 模型响应:\n{response}\n")

        # 解析JSON响应
        try:
            result = json.loads(response)
            thought = result.get("Thought", "")
            action = result.get("Action", "")
        except json.JSONDecodeError:
            # 如果不是JSON格式,尝试正则提取
            thought_match = re.search(r'"Thought":\s*"([^"]*)"', response)
            action_match = re.search(r'"Action":\s*"([^"]*)"', response)
            thought = thought_match.group(1) if thought_match else ""
            action = action_match.group(1) if action_match else ""

        return {
            **state,
            "thought": thought,
            "action": action
        }

    def execute_action(self, state: AgentState) -> AgentState:
        """步骤3: 解析并执行动作"""
        action = state["action"]

        if not action:
            print("⚠️ 没有可执行的动作")
            return {**state, "finished": True}

        # 检查是否完成
        if action.startswith("finished("):
            content_match = re.search(r"finished\(content='([^']*)'\)", action)
            content = content_match.group(1) if content_match else "任务完成"
            print(f"✅ 任务完成: {content}")
            return {**state, "finished": True}

        # 解析并执行动作
        try:
            self._parse_and_execute(action)
        except Exception as e:
            print(f"❌ 执行动作失败: {e}")
            print(f"   动作: {action}")

        return state

    def _parse_and_execute(self, action: str):
        """解析动作字符串并执行"""
        print(f"🔧 执行动作: {action}")

        # click(point='<point>x y</point>') 或 click(point='x y')
        if action.startswith("click("):
            # 尝试带标签的格式
            point_match = re.search(r"<point>(\d+)\s+(\d+)</point>", action)
            if not point_match:
                # 尝试不带标签的格式
                point_match = re.search(r"point=['\"](\d+)\s+(\d+)['\"]", action)

            if point_match:
                x, y = int(point_match.group(1)), int(point_match.group(2))
                actual_x, actual_y = self.normalize_coords(x, y)
                self.operation.click(actual_x, actual_y)
            else:
                print(f"⚠️ 无法解析点击坐标: {action}")

        # left_double(point='<point>x y</point>') 或 double_click(point='x y')
        elif action.startswith("left_double("):
            # 尝试带标签的格式
            point_match = re.search(r"<point>(\d+)\s+(\d+)</point>", action)
            if not point_match:
                # 尝试不带标签的格式
                point_match = re.search(r"point=['\"](\d+)\s+(\d+)['\"]", action)

            if point_match:
                x, y = int(point_match.group(1)), int(point_match.group(2))
                actual_x, actual_y = self.normalize_coords(x, y)
                self.operation.double_click(actual_x, actual_y)
            else:
                print(f"⚠️ 无法解析双击坐标: {action}")

        # type(content='xxx')
        elif action.startswith("type("):
            content_match = re.search(r"content=['\"]([^'\"]*)['\"]", action)
            if content_match:
                text = content_match.group(1)
                # 处理转义字符
                text = text.replace(r"\'", "'").replace(r'\"', '"').replace(r"\n", "\n")
                self.operation.input(text)

        # hotkey(key='ctrl c')
        elif action.startswith("hotkey("):
            key_match = re.search(r"key=['\"]([^'\"]*)['\"]", action)
            if key_match:
                keys = key_match.group(1).split()
                self.operation.hotkey(*keys)

        # scroll(point='<point>x y</point>', direction='down') 或 scroll(point='x y', direction='down')
        elif action.startswith("scroll("):
            # 尝试带标签的格式
            point_match = re.search(r"<point>(\d+)\s+(\d+)</point>", action)
            if not point_match:
                # 尝试不带标签的格式
                point_match = re.search(r"point=['\"](\d+)\s+(\d+)['\"]", action)

            direction_match = re.search(r"direction=['\"]([^'\"]*)['\"]", action)
            if point_match and direction_match:
                x, y = int(point_match.group(1)), int(point_match.group(2))
                actual_x, actual_y = self.normalize_coords(x, y)
                direction = direction_match.group(1)
                # 移动到位置并滚动
                import pyautogui
                pyautogui.moveTo(actual_x, actual_y)
                scroll_amount = 3 if direction in ["up", "left"] else -3
                pyautogui.scroll(scroll_amount)

        # wait()
        elif action.startswith("wait("):
            self.operation.wait(seconds=5)

        # drag(start_point='<point>x1 y1</point>', end_point='<point>x2 y2</point>')
        elif action.startswith("drag("):
            # 尝试带标签的格式
            start_match = re.search(r"start_point=['\"]<point>(\d+)\s+(\d+)</point>['\"]", action)
            end_match = re.search(r"end_point=['\"]<point>(\d+)\s+(\d+)</point>['\"]", action)

            if not start_match:
                # 尝试不带标签的格式
                start_match = re.search(r"start_point=['\"](\d+)\s+(\d+)['\"]", action)
                end_match = re.search(r"end_point=['\"](\d+)\s+(\d+)['\"]", action)

            if start_match and end_match:
                x1, y1 = int(start_match.group(1)), int(start_match.group(2))
                x2, y2 = int(end_match.group(1)), int(end_match.group(2))
                actual_x1, actual_y1 = self.normalize_coords(x1, y1)
                actual_x2, actual_y2 = self.normalize_coords(x2, y2)
                import pyautogui
                pyautogui.moveTo(actual_x1, actual_y1)
                pyautogui.drag(actual_x2 - actual_x1, actual_y2 - actual_y1, duration=0.5)

        # 等待一下让界面响应
        self.operation.wait(seconds=1)

    def should_continue(self, state: AgentState) -> str:
        """判断是否继续循环"""
        return "end" if state.get("finished", False) else "continue"

    def run(self):
        """运行Agent"""
        # 构建graph
        workflow = StateGraph(AgentState)

        # 添加节点
        workflow.add_node("screenshot", self.take_screenshot)
        workflow.add_node("decide", self.model_decide)
        workflow.add_node("execute", self.execute_action)

        # 添加边
        workflow.set_entry_point("screenshot")
        workflow.add_edge("screenshot", "decide")
        workflow.add_edge("decide", "execute")
        workflow.add_conditional_edges(
            "execute",
            self.should_continue,
            {
                "continue": "screenshot",
                "end": END
            }
        )

        # 编译并运行
        app = workflow.compile()

        print(f"🚀 开始执行任务: {self.instruction}\n")

        # 设置递归限制为100步
        config = {"recursion_limit": 100}
        final_state = app.invoke(
            {"instruction": self.instruction, "step": 0},
            config=config
        )

        print(f"\n🎉 任务完成! 共执行 {final_state['step']} 步")
        return final_state

if __name__ == "__main__":
    agent = GUIAgent(instruction="""打开浏览器查询GUI, 找到wikipedia的介绍页面进行查看""")
    agent.run()
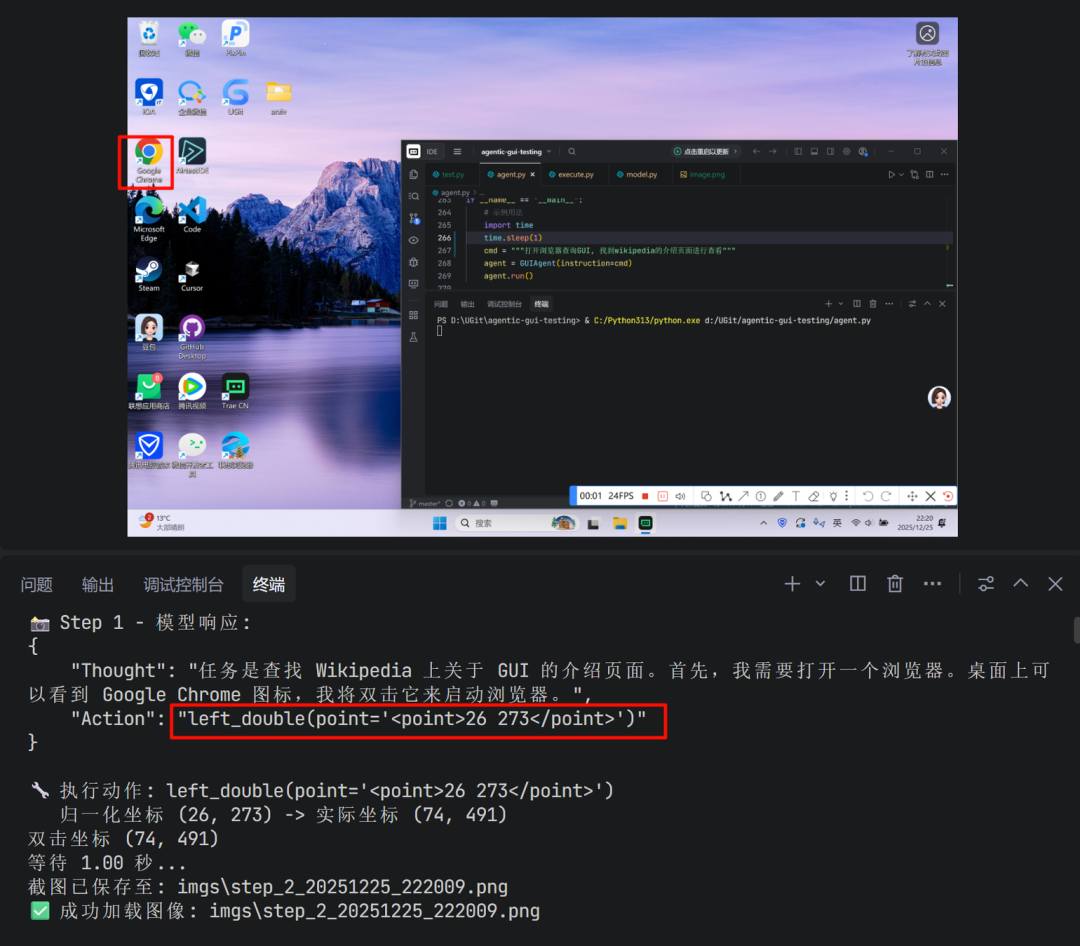
4. 实际执行效果
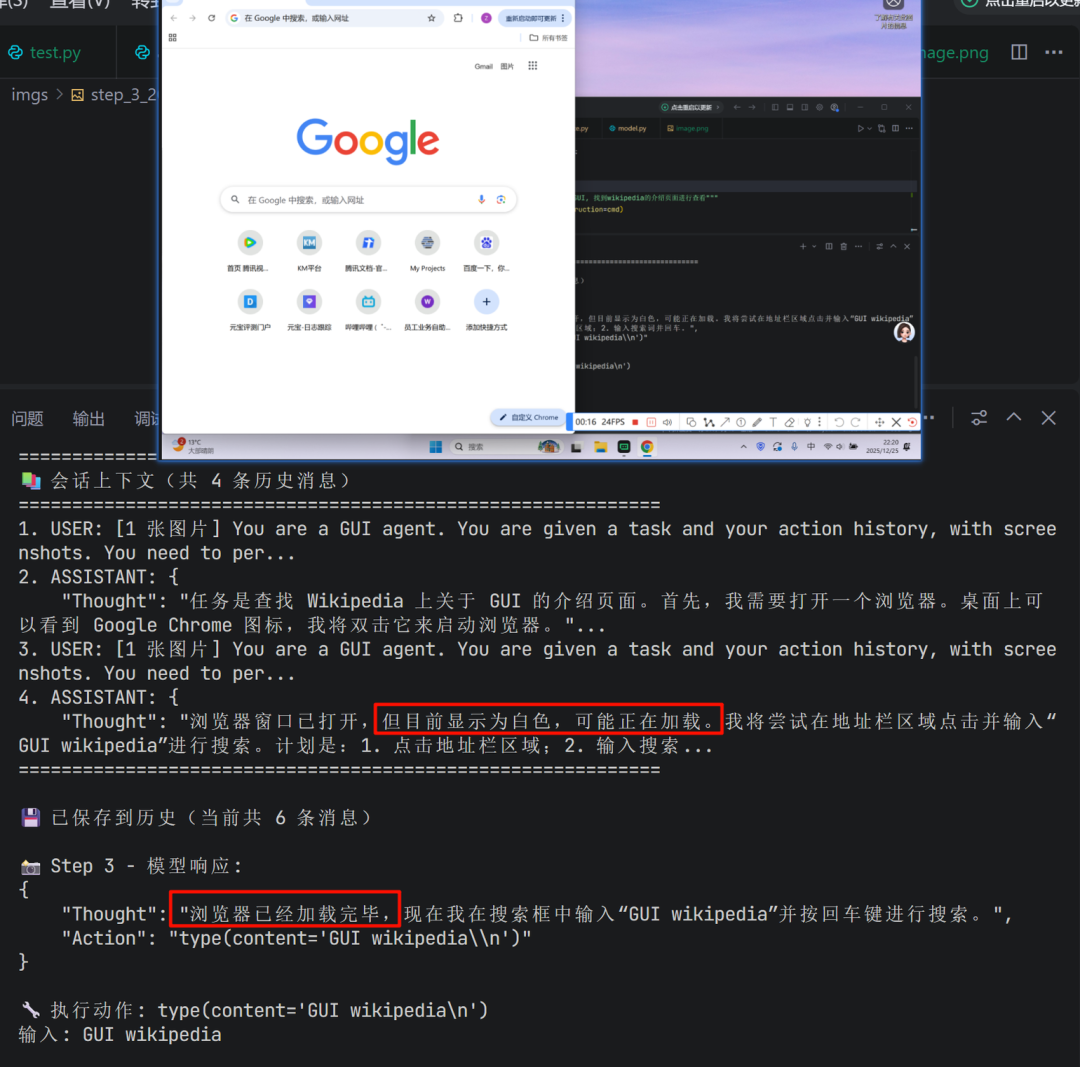
运行上述代码,Agent便开始自动执行任务。以下是模型在任务过程中的部分决策内容展示:
第一步:识别桌面环境,决定双击Chrome图标打开浏览器。
中间步骤:模型会利用历史对话的上下文,结合当前浏览器窗口的状态,决策下一步操作(如点击地址栏并输入搜索内容)。
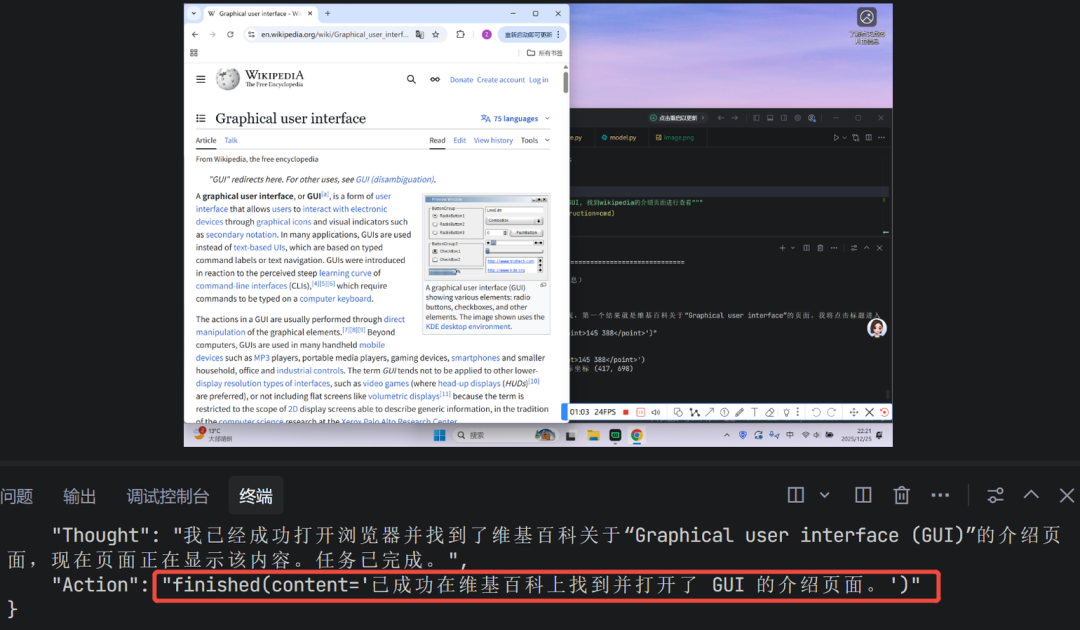
最终步骤:当模型判断已成功打开目标页面(维基百科的GUI介绍页)时,会输出 finished 指令,程序随之停止。
四、总结与展望
本文介绍了一种简洁实用的方案,用于搭建PC端的GUI Agent。该方案基于 Python 和强大的多模态大模型,通过 pyautogui 实现跨应用的键鼠模拟操作,使其能够在Windows和macOS系统上直接运行,并操控包括Web应用在内的各种图形界面。
该框架的核心优势在于其模块化和易扩展性。未来,可以通过以下方式进行增强:
- 丰富交互动作:补充如滑动、长按、拖拽文件等更复杂的交互方式。
- 结合知识库:为Agent构建特定领域的知识库(Memory),使其能更好地理解和处理专业业务场景。
- 优化提示工程与模型选择:针对具体任务微调提示词,或尝试不同的开源或商用多模态模型,以平衡成本与性能。
通过持续的迭代和优化,可以基于此框架打造出功能更强大、更智能的GUI自动化助手。希望这篇实践指南能为你开启GUI Agent开发之门提供清晰的路径。欢迎在技术社区交流你的实现心得与优化思路,例如在 云栈社区 的相关板块进行讨论。
 发表于 2026-1-20 06:03:50
|
查看: 199|
回复: 0
发表于 2026-1-20 06:03:50
|
查看: 199|
回复: 0
