今天我们来深入剖析 Apache Flink 中双流操作的核心源码实现。Flink 作为业界领先的流处理框架,其提供的多种数据流关联(Join)方式是处理复杂事件逻辑的关键。
三种双流关联方式概览
通过相关技术文章的介绍,我们了解到 Flink 主要提供了三种数据流关联方式,分别是 Window Join、Interval Join 和 CoGroup。这三种方式各有适用场景,下面我们将逐一解读其源码层面的实现机制。
Window Join 源码实现
我们先回顾一下 Window Join 的典型使用方法。
DataStream<Tuple2<String, Double>> result = source1.join(source2)
        .where(record -> record.f0)
        .equalTo(record -> record.f0)
        .window(TumblingEventTimeWindows.of(Time.seconds(2L)))
        .apply(new JoinFunction<Tuple2<String, Double>, Tuple2<String, Double>, Tuple2<String, Double>>() {
            @Override
            public Tuple2<String, Double> join(Tuple2<String, Double> record1, Tuple2<String, Double> record2) throws Exception {
                return Tuple2.of(record1.f0, record1.f1);
            }
        });
上述 API 调用会引发一系列内部类的转换,其流程可以概括为下图:
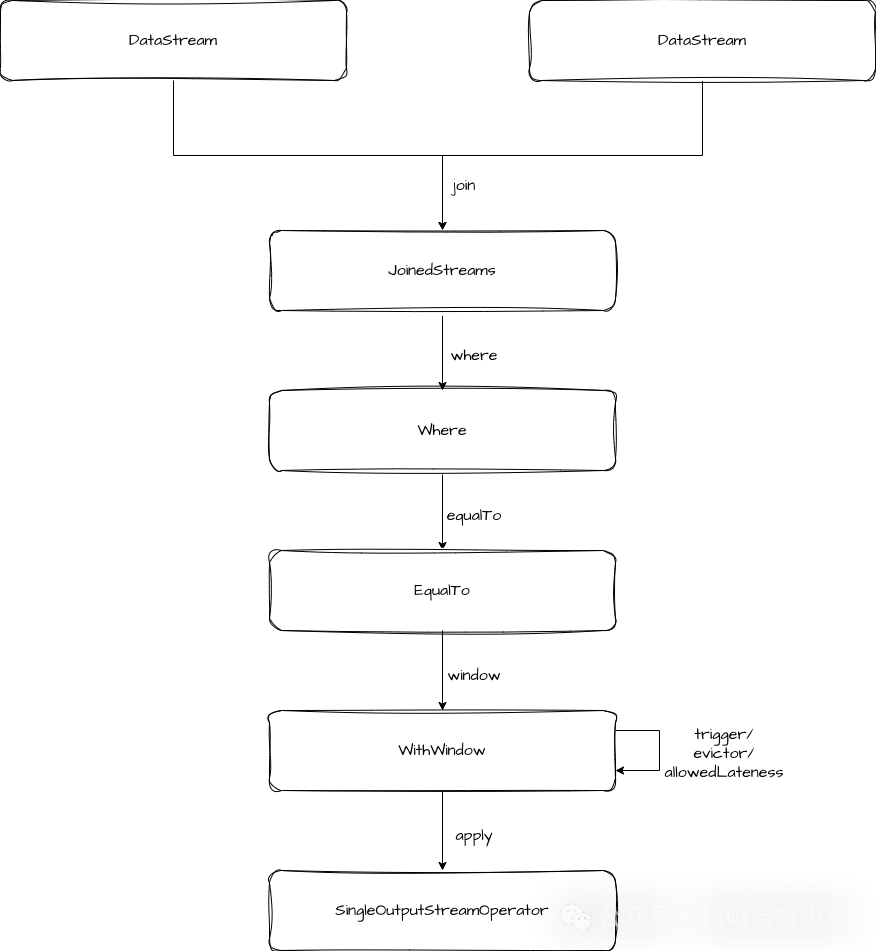
核心转换发生在 WithWindow 的 apply 方法中。你会发现,这里实际上是构建了一个 CoGroupedWindowedStream,然后转而调用它的 apply 方法。
public <T> SingleOutputStreamOperator<T> apply(
        JoinFunction<T1, T2, T> function, TypeInformation<T> resultType) {
    // clean the closure
    function = input1.getExecutionEnvironment().clean(function);

    coGroupedWindowedStream =
            input1.coGroup(input2)
                    .where(keySelector1)
                    .equalTo(keySelector2)
                    .window(windowAssigner)
                    .trigger(trigger)
                    .evictor(evictor)
                    .allowedLateness(allowedLateness);

    return coGroupedWindowedStream.apply(new JoinCoGroupFunction<>(function), resultType);
}
关键点:从这里我们可以清晰地看出,Window Join 在底层被转换成了 CoGroup 操作 来进行处理。
那么,在 JoinCoGroupFunction 中,具体的关联逻辑又是怎样的呢?其 coGroup 方法采用了简单的两层循环遍历,将两个数据流中的元素一一配对,并调用用户自定义的 JoinFunction。
private static class JoinCoGroupFunction<T1, T2, T>
        extends WrappingFunction<JoinFunction<T1, T2, T>>
        implements CoGroupFunction<T1, T2, T> {

    private static final long serialVersionUID = 1L;

    public JoinCoGroupFunction(JoinFunction<T1, T2, T> wrappedFunction) {
        super(wrappedFunction);
    }

    @Override
    public void coGroup(Iterable<T1> first, Iterable<T2> second, Collector<T> out)
            throws Exception {
        for (T1 val1 : first) {
            for (T2 val2 : second) {
                out.collect(wrappedFunction.join(val1, val2));
            }
        }
    }
}
CoGroup 源码实现
CoGroup 的整体 API 调用流程与 Join 非常相似,我们直接深入其 apply 方法的核心。
public <T> SingleOutputStreamOperator<T> apply(
        CoGroupFunction<T1, T2, T> function, TypeInformation<T> resultType) {
    // clean the closure
    function = input1.getExecutionEnvironment().clean(function);

    UnionTypeInfo<T1, T2> unionType =
            new UnionTypeInfo<>(input1.getType(), input2.getType());
    UnionKeySelector<T1, T2, KEY> unionKeySelector =
            new UnionKeySelector<>(keySelector1, keySelector2);

    SingleOutputStreamOperator<TaggedUnion<T1, T2>> taggedInput1 =
            input1.map(new Input1Tagger<T1, T2>());
    taggedInput1.getTransformation().setParallelism(input1.getParallelism(), false);
    taggedInput1.returns(unionType);

    SingleOutputStreamOperator<TaggedUnion<T1, T2>> taggedInput2 =
            input2.map(new Input2Tagger<T1, T2>());
    taggedInput2.getTransformation().setParallelism(input2.getParallelism(), false);
    taggedInput2.returns(unionType);

    DataStream<TaggedUnion<T1, T2>> unionStream = taggedInput1.union(taggedInput2);

    // we explicitly create the keyed stream to manually pass the key type information in
    windowedStream =
            new KeyedStream<TaggedUnion<T1, T2>, KEY>(
                            unionStream, unionKeySelector, keyType)
                    .window(windowAssigner);

    if (trigger != null) {
        windowedStream.trigger(trigger);
    }
    if (evictor != null) {
        windowedStream.evictor(evictor);
    }
    if (allowedLateness != null) {
        windowedStream.allowedLateness(allowedLateness);
    }

    return windowedStream.apply(
            new CoGroupWindowFunction<T1, T2, T, KEY, W>(function), resultType);
}
在 apply 方法中,Flink 先将两个输入流进行标记(Tagger)和合并(Union),然后基于合并后的流创建 KeyedStream 并设置窗口属性。最终,它会调用 windowedStream.apply 方法,并将用户传入的 function 包装成 CoGroupWindowFunction。
private static class CoGroupWindowFunction<T1, T2, T, KEY, W extends Window>
        extends WrappingFunction<CoGroupFunction<T1, T2, T>>
        implements WindowFunction<TaggedUnion<T1, T2>, T, KEY, W> {

    private static final long serialVersionUID = 1L;

    public CoGroupWindowFunction(CoGroupFunction<T1, T2, T> userFunction) {
        super(userFunction);
    }

    @Override
    public void apply(KEY key, W window, Iterable<TaggedUnion<T1, T2>> values, Collector<T> out)
            throws Exception {

        List<T1> oneValues = new ArrayList<>();
        List<T2> twoValues = new ArrayList<>();

        for (TaggedUnion<T1, T2> val : values) {
            if (val.isOne()) {
                oneValues.add(val.getOne());
            } else {
                twoValues.add(val.getTwo());
            }
        }
        wrappedFunction.coGroup(oneValues, twoValues, out);
    }
}
在 CoGroupWindowFunction.apply 方法中,它首先将同一个 key 下的数据按来源流(oneValues 和 twoValues)进行分离,然后再调用 JoinCoGroupFunction.coGroup 方法完成关联。这里 values 之所以都是相同 key 的数据,是因为底层 windowState 在维护状态时,是以窗口命名空间(namespace)和 key 共同作为标识的。当窗口触发计算时,就会对相同 key 的所有数据进行处理。
Interval Join 源码实现
接下来,我们分析另一种基于时间间隔的关联方式——Interval Join。首先回顾其用法:
DataStream<Tuple2<String, Double>> intervalJoinResult = source1.keyBy(record -> record.f0)
        .intervalJoin(source2.keyBy(record -> record.f0))
        .between(Time.seconds(-2), Time.seconds(2))
        .process(new ProcessJoinFunction<Tuple2<String, Double>, Tuple2<String, Double>, Tuple2<String, Double>>() {
            @Override
            public void processElement(Tuple2<String, Double> record1, Tuple2<String, Double> record2, ProcessJoinFunction<Tuple2<String, Double>, Tuple2<String, Double>, Tuple2<String, Double>>.Context context, Collector<Tuple2<String, Double>> out) throws Exception {
                out.collect(Tuple2.of(record1.f0, record1.f1 + record2.f1));
            }
        });
从 API 可以看出,Interval Join 操作的是两个 KeyedStream,通过 between 方法定义时间间隔的上下界,最终通过 process 方法执行计算逻辑。其内部类型转换流程如下图所示:

我们重点关注 process 方法的实现:
public <OUT> SingleOutputStreamOperator<OUT> process(
        ProcessJoinFunction<IN1, IN2, OUT> processJoinFunction,
        TypeInformation<OUT> outputType) {
    Preconditions.checkNotNull(processJoinFunction);
    Preconditions.checkNotNull(outputType);

    final ProcessJoinFunction<IN1, IN2, OUT> cleanedUdf =
            left.getExecutionEnvironment().clean(processJoinFunction);

    if (isEnableAsyncState) {
        final AsyncIntervalJoinOperator<KEY, IN1, IN2, OUT> operator =
                new AsyncIntervalJoinOperator<>(
                        lowerBound,
                        upperBound,
                        lowerBoundInclusive,
                        upperBoundInclusive,
                        leftLateDataOutputTag,
                        rightLateDataOutputTag,
                        left.getType()
                                .createSerializer(
                                        left.getExecutionConfig().getSerializerConfig()),
                        right.getType()
                                .createSerializer(
                                        right.getExecutionConfig().getSerializerConfig()),
                        cleanedUdf);

        return left.connect(right)
                .keyBy(keySelector1, keySelector2)
                .transform("Interval Join [Async]", outputType, operator);
    } else {
        final IntervalJoinOperator<KEY, IN1, IN2, OUT> operator =
                new IntervalJoinOperator<>(
                        lowerBound,
                        upperBound,
                        lowerBoundInclusive,
                        upperBoundInclusive,
                        leftLateDataOutputTag,
                        rightLateDataOutputTag,
                        left.getType()
                                .createSerializer(
                                        left.getExecutionConfig().getSerializerConfig()),
                        right.getType()
                                .createSerializer(
                                        right.getExecutionConfig().getSerializerConfig()),
                        cleanedUdf);

        return left.connect(right)
                .keyBy(keySelector1, keySelector2)
                .transform("Interval Join", outputType, operator);
    }
}
实现原理:Interval Join 是基于 ConnectedStreams 实现的。ConnectedStreams 为双流操作提供了一个更通用的抽象,它将两个流组合成一个 TwoInputTransformation 并加入执行图。具体的算子(Operator)是 IntervalJoinOperator 或其异步版本 AsyncIntervalJoinOperator。这两个算子都是 TwoInputStreamOperator 的实现,分别通过 processElement1 和 processElement2 方法处理两个输入源的数据,其核心逻辑最终都收敛到 processElement 方法。
private <THIS, OTHER> void processElement(
        final StreamRecord<THIS> record,
        final MapState<Long, List<IntervalJoinOperator.BufferEntry<THIS>>> ourBuffer,
        final MapState<Long, List<IntervalJoinOperator.BufferEntry<OTHER>>> otherBuffer,
        final long relativeLowerBound,
        final long relativeUpperBound,
        final boolean isLeft)
        throws Exception {

    final THIS ourValue = record.getValue();
    final long ourTimestamp = record.getTimestamp();

    if (ourTimestamp == Long.MIN_VALUE) {
        throw new FlinkException(
                "Long.MIN_VALUE timestamp: Elements used in "
                        + "interval stream joins need to have timestamps meaningful timestamps.");
    }

    if (isLate(ourTimestamp)) {
        sideOutput(ourValue, ourTimestamp, isLeft);
        return;
    }

    addToBuffer(ourBuffer, ourValue, ourTimestamp);

    for (Map.Entry<Long, List<BufferEntry<OTHER>>> bucket : otherBuffer.entries()) {
        final long timestamp = bucket.getKey();

        if (timestamp < ourTimestamp + relativeLowerBound
                || timestamp > ourTimestamp + relativeUpperBound) {
            continue;
        }

        for (BufferEntry<OTHER> entry : bucket.getValue()) {
            if (isLeft) {
                collect((T1) ourValue, (T2) entry.element, ourTimestamp, timestamp);
            } else {
                collect((T1) entry.element, (T2) ourValue, timestamp, ourTimestamp);
            }
        }
    }

    long cleanupTime =
            (relativeUpperBound > 0L) ? ourTimestamp + relativeUpperBound : ourTimestamp;
    if (isLeft) {
        internalTimerService.registerEventTimeTimer(CLEANUP_NAMESPACE_LEFT, cleanupTime);
    } else {
        internalTimerService.registerEventTimeTimer(CLEANUP_NAMESPACE_RIGHT, cleanupTime);
    }
}
核心机制:IntervalJoinOperator 内部维护了两个 MapState。每条数据到达时,会根据其时间戳被添加到对应的 MapState 中(Key 是时间戳,Value 是该时刻的元素列表)。然后,算子会遍历另一个流的 MapState,找出时间戳落在当前元素时间戳指定间隔内的所有数据,进行关联输出。最后,它会为当前数据注册一个清理定时器,当时间推进到有效范围之外时,自动清除 MapState 中过期时间戳下的数据。
总结
通过本文的源码级梳理,我们揭示了 Flink 三种双流关联操作的底层实现:
- Window Join:其底层是通过转换为 CoGroup 操作来实现的,最终在窗口触发时对相同key的数据进行笛卡尔积式的关联。
- CoGroup:其本身会将两个流合并成一个
WindowedStream,并完全依赖于 WindowState 来管理数据,在窗口计算时对分组后的数据进行关联。
- Interval Join:基于
ConnectedStreams 实现,其核心算子 IntervalJoinOperator 内部维护了两个 MapState,通过高效的时间范围查询来完成数据关联,这是一种不同于窗口模型的关联机制。
理解这些底层实现,对于在 开源实战 中设计高性能、高准确的流处理作业至关重要,也能帮助开发者更好地进行故障排查和性能调优。
 发表于 2026-1-3 09:35:38
|
查看: 307|
回复: 0
发表于 2026-1-3 09:35:38
|
查看: 307|
回复: 0
