本文我们来梳理 Kafka Connector 相关的源码。
自定义 Source 和 Sink
在介绍 Kafka Connector 之前,我们先来看一下在 Flink 中是如何支持自定义 Source 和 Sink 的。我们来看一张 Flink 官方文档提供的图。
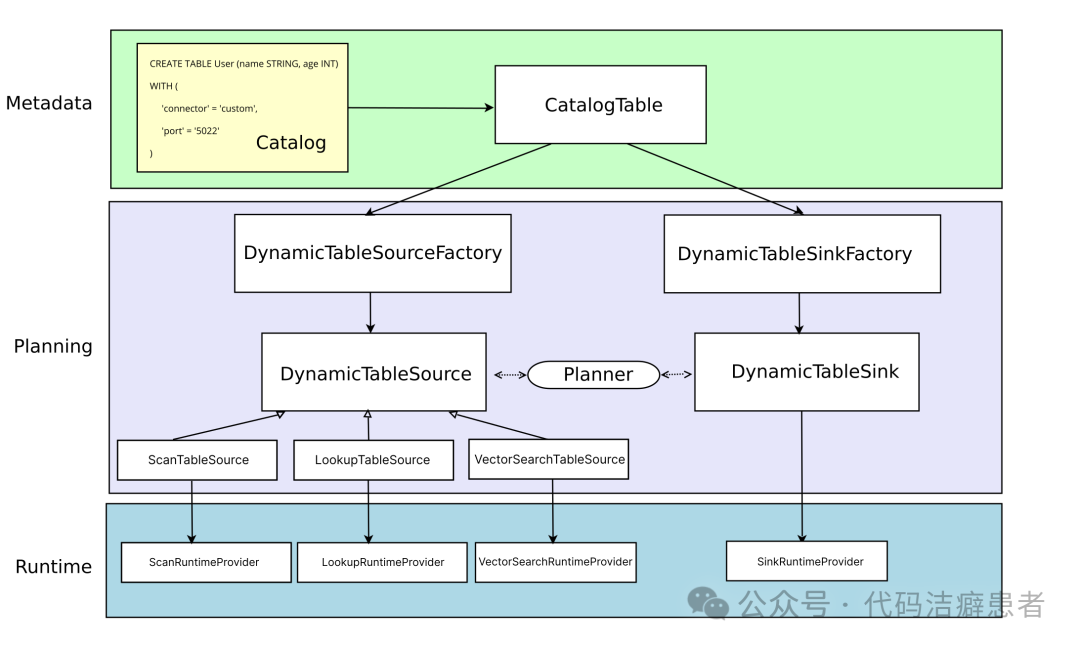
这张图清晰地展示了连接器(Connector)的基本体系结构,其三层架构划分明确,涵盖了从元数据定义到运行时执行的完整流程。
首先是最上层的 MetaData。当用户执行 CREATE TABLE 语句时,会更新 Catalog,随后该语句会被转换为 TableAPI 的 CatalogTable。CatalogTable 实例用于表示动态表(Source 或 Sink 表)的元信息,是连接 SQL 声明与底层实现的桥梁。
Planning
在 SQL 解析和程序优化阶段,CatalogTable 会被转换为 DynamicTableSource 和 DynamicTableSink,分别用于查询和插入数据。这两个实例的创建都需要对应的工厂类,工厂类的完整路径需要放到这个配置文件中:
META-INF/services/org.apache.flink.table.factories.Factory
如果有需要的话,我们还可以在解析过程中配置特定的数据编码和解码方法。
在 Source 端,Flink 通过三个核心接口来支持不同的数据查询能力:
ScanTableSource:用于消费完整的 changelog 流,扫描的数据支持 insert、update、delete 三种变更类型。ScanTableSource 还通过接口提供了许多其他功能,如过滤下推、投影下推等。LookupTableSource:与 ScanTableSource 的全量扫描不同,LookupTableSource 采用懒加载策略,它不会一次性读取全表数据,而是在需要时按需发送请求查询。目前主要支持 insert-only 变更模式,常用于维表关联场景。VectorSearchTableSource:这是一个相对较新的接口,它允许使用一个输入向量来搜索数据,并返回最相似的 Top-K 行数据,适用于一些机器学习或相似性检索的场景。
在 Sink 端,通过 DynamicTableSink 来实现具体的数据写入逻辑。同样,Flink 也提供了一系列用于扩展 Sink 能力的接口,例如支持两阶段提交等,以满足不同的数据一致性和可靠性需求。对大数据平台处理感兴趣,可以关注 云栈社区 的相关讨论。
Runtime
当逻辑计划解析并优化完成后,流程便进入 Runtime 层。这一层定义了若干 Provider,如 ScanRuntimeProvider、SinkRuntimeProvider 等。在这些 Provider 中,开发者需要实现与特定连接器(如 Kafka、数据库)的具体交互逻辑,将逻辑计划转化为可执行的 DataStream API 调用。
小结
总结一下,当我们需要为 Flink 创建一个自定义的 Source 或 Sink 时,可以通过以下步骤实现:
- 定义 Flink SQL 的 DDL 语句,并声明连接器所需的配置参数(Options)。
- 实现
DynamicTableSourceFactory 和/或 DynamicTableSinkFactory,并把实现类的完整路径写入 META-INF/services 配置文件中。
- 实现
DynamicTableSource 和/或 DynamicTableSink,在这里处理 SQL 层的元数据并定义核心逻辑。
- 提供相应的
RuntimeProvider,将 Table API 的逻辑层与底层的 DataStream API 关联起来。
- 编写底层的 SourceFunction 或 SinkFunction 算子,实现最终的数据读取或写入逻辑。
Kafka Connector 的实现
带着对 Flink 连接器框架的理解,我们一起来深入看一下 Kafka Connector 相关的源码实现。
Kafka Connector 的代码目前已经是一个独立的项目。项目地址是:
https://github.com/apache/flink-connector-kafka
Factory
我们首先找到定义工厂类的核心文件:
org.apache.flink.streaming.connectors.kafka.table.KafkaDynamicTableFactory
org.apache.flink.streaming.connectors.kafka.table.UpsertKafkaDynamicTableFactory
以 KafkaDynamicTableFactory 为例,它同时实现了 DynamicTableSourceFactory 和 DynamicTableSinkFactory 两个接口,这意味着它既能创建 Source 也能创建 Sink。
KafkaDynamicTableFactory 包含以下几个核心方法:
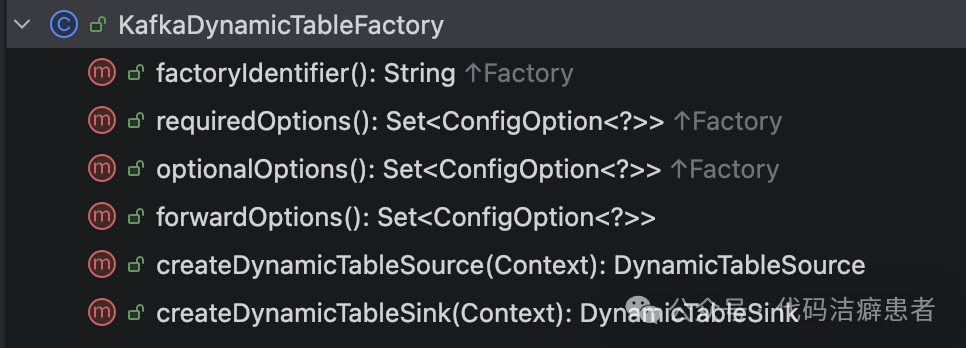
factoryIdentifier:返回一个唯一标识符,对应 Flink SQL DDL 中 connector='xxx' 的这个配置值。requiredOptions:返回连接器必须填写的配置项集合。optionalOptions:返回连接器可选填的配置项集合。forwardOptions:返回那些需要直接传递到 Runtime 层的配置项集合。createDynamicTableSource:根据上下文创建 DynamicTableSource 实例。createDynamicTableSink:根据上下文创建 DynamicTableSink 实例。
Source 端
工厂类的 createDynamicTableSource 方法负责创建 DynamicTableSource,我们来剖析一下它的创建逻辑:
public DynamicTableSource createDynamicTableSource(Context context) {
    final TableFactoryHelper helper = FactoryUtil.createTableFactoryHelper(this, context);

    final Optional<DecodingFormat<DeserializationSchema<RowData>>> keyDecodingFormat =
            getKeyDecodingFormat(helper);

    final DecodingFormat<DeserializationSchema<RowData>> valueDecodingFormat =
            getValueDecodingFormat(helper);

    helper.validateExcept(PROPERTIES_PREFIX);

    final ReadableConfig tableOptions = helper.getOptions();

    validateTableSourceOptions(tableOptions);

    validatePKConstraints(
            context.getObjectIdentifier(),
            context.getPrimaryKeyIndexes(),
            context.getCatalogTable().getOptions(),
            valueDecodingFormat);

    final StartupOptions startupOptions = getStartupOptions(tableOptions);

    final BoundedOptions boundedOptions = getBoundedOptions(tableOptions);

    final Properties properties = getKafkaProperties(context.getCatalogTable().getOptions());

    // add topic-partition discovery
    final Duration partitionDiscoveryInterval =
            tableOptions.get(SCAN_TOPIC_PARTITION_DISCOVERY);
    properties.setProperty(
            KafkaSourceOptions.PARTITION_DISCOVERY_INTERVAL_MS.key(),
            Long.toString(partitionDiscoveryInterval.toMillis()));

    final DataType physicalDataType = context.getPhysicalRowDataType();

    final int[] keyProjection = createKeyFormatProjection(tableOptions, physicalDataType);

    final int[] valueProjection = createValueFormatProjection(tableOptions, physicalDataType);

    final String keyPrefix = tableOptions.getOptional(KEY_FIELDS_PREFIX).orElse(null);

    final Integer parallelism = tableOptions.getOptional(SCAN_PARALLELISM).orElse(null);

    return createKafkaTableSource(
            physicalDataType,
            keyDecodingFormat.orElse(null),
            valueDecodingFormat,
            keyProjection,
            valueProjection,
            keyPrefix,
            getTopics(tableOptions),
            getTopicPattern(tableOptions),
            properties,
            startupOptions.startupMode,
            startupOptions.specificOffsets,
            startupOptions.startupTimestampMillis,
            boundedOptions.boundedMode,
            boundedOptions.specificOffsets,
            boundedOptions.boundedTimestampMillis,
            context.getObjectIdentifier().asSummaryString(),
            parallelism);
}
在这个方法中,流程非常清晰:首先获取 Key 和 Value 的解码格式(DecodingFormat),然后进行一系列的参数校验,并提取必要的 Kafka 连接属性。最后,调用 createKafkaTableSource 方法创建出 KafkaDynamicSource 实例。
获取解码格式需要用到 DeserializationFormatFactory 工厂。Flink 提供了该工厂的多种实现,以支持不同格式数据的反序列化。

我们来看比较常见的 Json 格式工厂 JsonFormatFactory 的核心实现:
public DecodingFormat<DeserializationSchema<RowData>> createDecodingFormat(
        DynamicTableFactory.Context context, ReadableConfig formatOptions) {
    FactoryUtil.validateFactoryOptions(this, formatOptions);
    JsonFormatOptionsUtil.validateDecodingFormatOptions(formatOptions);

    final boolean failOnMissingField = formatOptions.get(FAIL_ON_MISSING_FIELD);
    final boolean ignoreParseErrors = formatOptions.get(IGNORE_PARSE_ERRORS);
    final boolean jsonParserEnabled = formatOptions.get(DECODE_JSON_PARSER_ENABLED);
    TimestampFormat timestampOption = JsonFormatOptionsUtil.getTimestampFormat(formatOptions);

    return new ProjectableDecodingFormat<DeserializationSchema<RowData>>() {
        @Override
        public DeserializationSchema<RowData> createRuntimeDecoder(
                DynamicTableSource.Context context,
                DataType physicalDataType,
                int[][] projections) {
            final DataType producedDataType =
                    Projection.of(projections).project(physicalDataType);
            final RowType rowType = (RowType) producedDataType.getLogicalType();
            final TypeInformation<RowData> rowDataTypeInfo =
                    context.createTypeInformation(producedDataType);
            if (jsonParserEnabled) {
                return new JsonParserRowDataDeserializationSchema(
                        rowType,
                        rowDataTypeInfo,
                        failOnMissingField,
                        ignoreParseErrors,
                        timestampOption,
                        toProjectedNames(
                                (RowType) physicalDataType.getLogicalType(), projections));
            } else {
                return new JsonRowDataDeserializationSchema(
                        rowType,
                        rowDataTypeInfo,
                        failOnMissingField,
                        ignoreParseErrors,
                        timestampOption);
            }
        }

        @Override
        public ChangelogMode getChangelogMode() {
            return ChangelogMode.insertOnly();
        }

        @Override
        public boolean supportsNestedProjection() {
            return jsonParserEnabled;
        }
    };
}
在创建解码格式时,最核心的任务是创建运行时的解码器,即 DeserializationSchema。在 JsonFormatFactory 中,根据配置提供了 JsonParserRowDataDeserializationSchema 和 JsonRowDataDeserializationSchema 两种实现,分别用于将 JsonParser 和 JsonNode 转换为 Flink 内部的 RowData 格式,具体的转换逻辑都封装在 createNotNullConverter 方法中。
了解完解码格式后,我们把视角拉回到 KafkaDynamicSource。它实现了三个关键接口:ScanTableSource(用于消费数据)、SupportsReadingMetadata(用于读取 Kafka 消息元数据如 offset、timestamp)和 SupportsWatermarkPushDown(用于生成或处理水印)。
其核心方法 getScanRuntimeProvider 负责提供运行时实现:
public ScanRuntimeProvider getScanRuntimeProvider(ScanContext context) {
    final DeserializationSchema<RowData> keyDeserialization =
            createDeserialization(context, keyDecodingFormat, keyProjection, keyPrefix);

    final DeserializationSchema<RowData> valueDeserialization =
            createDeserialization(context, valueDecodingFormat, valueProjection, null);

    final TypeInformation<RowData> producedTypeInfo =
            context.createTypeInformation(producedDataType);

    final KafkaSource<RowData> kafkaSource =
            createKafkaSource(keyDeserialization, valueDeserialization, producedTypeInfo);

    return new DataStreamScanProvider() {
        @Override
        public DataStream<RowData> produceDataStream(
                ProviderContext providerContext, StreamExecutionEnvironment execEnv) {
            if (watermarkStrategy == null) {
                watermarkStrategy = WatermarkStrategy.noWatermarks();
            }
            DataStreamSource<RowData> sourceStream =
                    execEnv.fromSource(
                            kafkaSource, watermarkStrategy, "KafkaSource-" + tableIdentifier);
            providerContext.generateUid(KAFKA_TRANSFORMATION).ifPresent(sourceStream::uid);
            return sourceStream;
        }

        @Override
        public boolean isBounded() {
            return kafkaSource.getBoundedness() == Boundedness.BOUNDED;
        }

        @Override
        public Optional<Integer> getParallelism() {
            return Optional.ofNullable(parallelism);
        }
    };
}
在 ScanRuntimeProvider 的逻辑中,首先利用之前解析出的格式信息获取到 Key 和 Value 的反序列化器(DeserializationSchema)。然后,开始创建 KafkaSource 实例。KafkaSource 属于执行引擎层,是 Flink 新版 Source API 的具体实现。
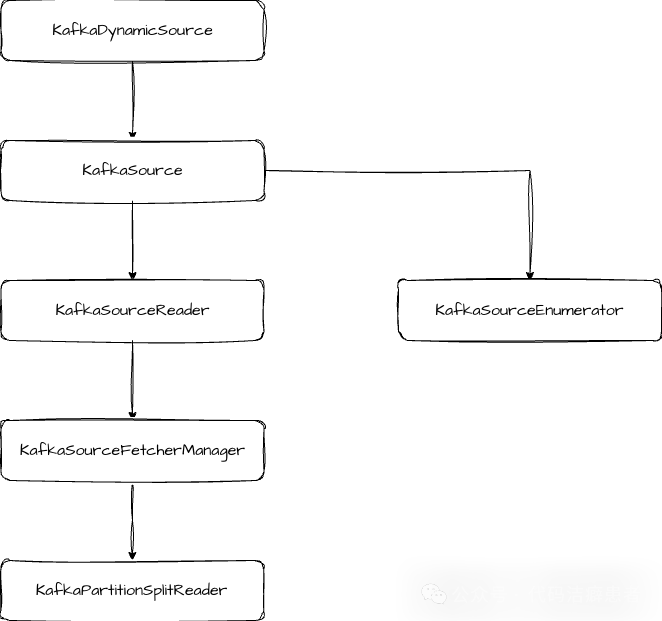
创建 KafkaSource 的过程会依次实例化上图中的这些核心类。KafkaSource 本身主要负责创建 KafkaSourceReader 和 KafkaSourceEnumerator。其中,KafkaSourceEnumerator 负责分区相关的逻辑,包括分片的分配、发现以及扩缩容时的重平衡。KafkaSourceReader 则承载了更多的状态管理逻辑,例如触发快照和完成 Checkpoint 的通知。当做 Snapshot 时,它会记录所有活跃 split(即 Kafka 分区)的消费偏移量(offset),并将这些 split 信息作为状态提交。当 Checkpoint 完成时,会调用 KafkaSourceFetcherManager.commitOffsets 来提交 offset,其部分关键代码如下:
public List<KafkaPartitionSplit> snapshotState(long checkpointId) {
    List<KafkaPartitionSplit> splits = super.snapshotState(checkpointId);
    if (!commitOffsetsOnCheckpoint) {
        return splits;
    }

    if (splits.isEmpty() && offsetsOfFinishedSplits.isEmpty()) {
        offsetsToCommit.put(checkpointId, Collections.emptyMap());
    } else {
        Map<TopicPartition, OffsetAndMetadata> offsetsMap =
                offsetsToCommit.computeIfAbsent(checkpointId, id -> new HashMap<>());
        // Put the offsets of the active splits.
        for (KafkaPartitionSplit split : splits) {
            // If the checkpoint is triggered before the partition starting offsets
            // is retrieved, do not commit the offsets for those partitions.
            if (split.getStartingOffset() >= 0) {
                offsetsMap.put(
                        split.getTopicPartition(),
                        new OffsetAndMetadata(split.getStartingOffset()));
            }
        }
        // Put offsets of all the finished splits.
        offsetsMap.putAll(offsetsOfFinishedSplits);
    }
    return splits;
}

public void notifyCheckpointComplete(long checkpointId) throws Exception {
    LOG.debug("Committing offsets for checkpoint {}", checkpointId);
    ...

    ((KafkaSourceFetcherManager) splitFetcherManager)
            .commitOffsets(
                    committedPartitions,
                    (ignored, e) -> {...});
}
KafkaSourceFetcherManager 负责管理多个 fetcher 线程,并协调 offset 的提交。而真正从 Kafka 拉取数据的核心则在 KafkaPartitionSplitReader 的 fetch 方法中:
public RecordsWithSplitIds<ConsumerRecord<byte[], byte[]>> fetch() throws IOException {
    ConsumerRecords<byte[], byte[]> consumerRecords;
    try {
        consumerRecords = consumer.poll(Duration.ofMillis(POLL_TIMEOUT));
    } catch (WakeupException | IllegalStateException e) {
        // IllegalStateException will be thrown if the consumer is not assigned any partitions.
        // This happens if all assigned partitions are invalid or empty (starting offset >=
        // stopping offset). We just mark empty partitions as finished and return an empty
        // record container, and this consumer will be closed by SplitFetcherManager.
        KafkaPartitionSplitRecords recordsBySplits =
                new KafkaPartitionSplitRecords(
                        ConsumerRecords.empty(), kafkaSourceReaderMetrics);
        markEmptySplitsAsFinished(recordsBySplits);
        return recordsBySplits;
    }
    KafkaPartitionSplitRecords recordsBySplits =
            new KafkaPartitionSplitRecords(consumerRecords, kafkaSourceReaderMetrics);
    List<TopicPartition> finishedPartitions = new ArrayList<>();
    for (TopicPartition tp : consumer.assignment()) {
        long stoppingOffset = getStoppingOffset(tp);
        long consumerPosition = getConsumerPosition(tp, "retrieving consumer position");
        // Stop fetching when the consumer's position reaches the stoppingOffset.
        // Control messages may follow the last record; therefore, using the last record's
        // offset as a stopping condition could result in indefinite blocking.
        if (consumerPosition >= stoppingOffset) {
            LOG.debug(
                    "Position of {}: {}, has reached stopping offset: {}",
                    tp,
                    consumerPosition,
                    stoppingOffset);
            recordsBySplits.setPartitionStoppingOffset(tp, stoppingOffset);
            finishSplitAtRecord(
                    tp, stoppingOffset, consumerPosition, finishedPartitions, recordsBySplits);
        }
    }

    // Only track non-empty partition's record lag if it never appears before
    consumerRecords
            .partitions()
            .forEach(
                    trackTp -> {
                        kafkaSourceReaderMetrics.maybeAddRecordsLagMetric(consumer, trackTp);
                    });

    markEmptySplitsAsFinished(recordsBySplits);

    // Unassign the partitions that has finished.
    if (!finishedPartitions.isEmpty()) {
        finishedPartitions.forEach(kafkaSourceReaderMetrics::removeRecordsLagMetric);
        unassignPartitions(finishedPartitions);
    }

    // Update numBytesIn
    kafkaSourceReaderMetrics.updateNumBytesInCounter();

    return recordsBySplits;
}
至此,Source 端相关的核心源码逻辑我们就梳理完了。接下来我们再看 Sink 端的代码。
Sink 端
我们从工厂类中的 createDynamicTableSink 方法开始:
public DynamicTableSink createDynamicTableSink(Context context) {
    final TableFactoryHelper helper =
            FactoryUtil.createTableFactoryHelper(
                    this, autoCompleteSchemaRegistrySubject(context));

    final Optional<EncodingFormat<SerializationSchema<RowData>>> keyEncodingFormat =
            getKeyEncodingFormat(helper);

    final EncodingFormat<SerializationSchema<RowData>> valueEncodingFormat =
            getValueEncodingFormat(helper);

    helper.validateExcept(PROPERTIES_PREFIX);

    final ReadableConfig tableOptions = helper.getOptions();

    final DeliveryGuarantee deliveryGuarantee = validateDeprecatedSemantic(tableOptions);
    validateTableSinkOptions(tableOptions);

    KafkaConnectorOptionsUtil.validateDeliveryGuarantee(tableOptions);

    validatePKConstraints(
            context.getObjectIdentifier(),
            context.getPrimaryKeyIndexes(),
            context.getCatalogTable().getOptions(),
            valueEncodingFormat);

    final DataType physicalDataType = context.getPhysicalRowDataType();

    final int[] keyProjection = createKeyFormatProjection(tableOptions, physicalDataType);

    final int[] valueProjection = createValueFormatProjection(tableOptions, physicalDataType);

    final String keyPrefix = tableOptions.getOptional(KEY_FIELDS_PREFIX).orElse(null);

    final Integer parallelism = tableOptions.getOptional(SINK_PARALLELISM).orElse(null);

    return createKafkaTableSink(
            physicalDataType,
            keyEncodingFormat.orElse(null),
            valueEncodingFormat,
            keyProjection,
            valueProjection,
            keyPrefix,
            getTopics(tableOptions),
            getTopicPattern(tableOptions),
            getKafkaProperties(context.getCatalogTable().getOptions()),
            getFlinkKafkaPartitioner(tableOptions, context.getClassLoader()).orElse(null),
            deliveryGuarantee,
            parallelism,
            tableOptions.get(TRANSACTIONAL_ID_PREFIX),
            tableOptions.get(TRANSACTION_NAMING_STRATEGY));
}
和 Source 端的流程高度相似:首先是获取 Key 和 Value 的编码格式(EncodingFormat),然后进行一系列参数校验,最后创建 KafkaDynamicSink 实例。获取编码格式用到的工厂类是 SerializationFormatFactory。值得注意的是,我们前面介绍的 JsonFormatFactory 同样实现了 SerializationFormatFactory 接口,因此它既提供解码格式也提供编码格式。编码格式用到的编码器是 JsonRowDataSerializationSchema,其内部通过 RowDataToJsonConverters 将 RowData 转换成 JsonNode。
在 KafkaDynamicSink 的 getSinkRuntimeProvider 方法中,核心任务就是创建 KafkaSink 实例。
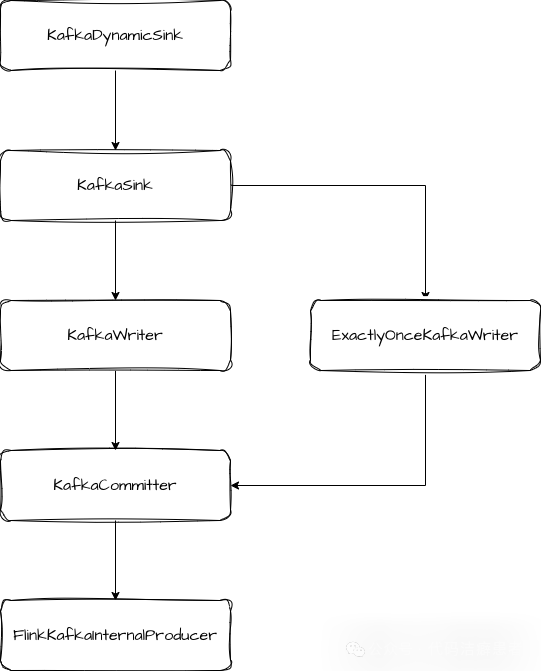
KafkaSink 类实现了 TwoPhaseCommittingStatefulSink 接口,这意味着它支持两阶段提交,从而提供端到端的 Exactly-Once 语义保证。它创建了负责写入的 KafkaWriter 和负责提交的 KafkaCommitter。
在创建 KafkaWriter 时,如果用户配置了 Exactly-Once 语义(DeliveryGuarantee.EXACTLY_ONCE),则会创建 ExactlyOnceKafkaWriter,否则创建普通的 KafkaWriter。真正实现两阶段提交逻辑的是 ExactlyOnceKafkaWriter。它在启动事务时,会调用 producer.beginTransaction() 开启一个 Kafka 事务。数据写入时调用的是 KafkaWriter.write 方法,此操作会被标记为事务内的操作。
当 Sink 接收到 Barrier 标志着一个 Checkpoint 开始时,它会先调用 flush 方法,将缓冲区中的所有数据发送到 Kafka Broker,然后调用 prepareCommit 方法进行预提交。预提交方法会记录当前事务的 epoch 和 transactionalId,并将其封装为 KafkaCommittable 返回给 Flink 框架层:
public Collection<KafkaCommittable> prepareCommit() {
    // only return a KafkaCommittable if the current transaction has been written some data
    if (currentProducer.hasRecordsInTransaction()) {
        KafkaCommittable committable = KafkaCommittable.of(currentProducer);
        LOG.debug("Prepare {}.", committable);
        currentProducer.precommitTransaction();
        return Collections.singletonList(committable);
    }

    // otherwise, we recycle the producer (the pool will reset the transaction state)
    producerPool.recycle(currentProducer);
    return Collections.emptyList();
}
在保存状态(snapshotState)时,会将正在进行中的事务信息(主要是 transactionalId)保存到状态中,以便在作业失败恢复时能够正确处理未完成的事务:
public List<KafkaWriterState> snapshotState(long checkpointId) throws IOException {
    // recycle committed producers
    TransactionFinished finishedTransaction;
    while ((finishedTransaction = backchannel.poll()) != null) {
        producerPool.recycleByTransactionId(
                finishedTransaction.getTransactionId(), finishedTransaction.isSuccess());
    }
    // persist the ongoing transactions into the state; these will not be aborted on restart
    Collection<CheckpointTransaction> ongoingTransactions =
            producerPool.getOngoingTransactions();
    currentProducer = startTransaction(checkpointId + 1);
    return createSnapshots(ongoingTransactions);
}

private List<KafkaWriterState> createSnapshots(
        Collection<CheckpointTransaction> ongoingTransactions) {
    List<KafkaWriterState> states = new ArrayList<>();
    int[] subtaskIds = this.ownedSubtaskIds;
    for (int index = 0; index < subtaskIds.length; index++) {
        int ownedSubtask = subtaskIds[index];
        states.add(
                new KafkaWriterState(
                        transactionalIdPrefix,
                        ownedSubtask,
                        totalNumberOfOwnedSubtasks,
                        transactionNamingStrategy.getOwnership(),
                        // new transactions are only created with the first owned subtask id
                        index == 0 ? ongoingTransactions : List.of()));
    }
    LOG.debug("Snapshotting state {}", states);
    return states;
}
当 Checkpoint 最终完成时,框架会调用 KafkaCommitter.commit 方法。在 commit 方法内部,会调用 producer.commitTransaction() 来正式提交 Kafka 事务,从而使得该 Checkpoint 周期内的所有写入对下游消费者可见。
FlinkKafkaInternalProducer 是 Flink 内部封装的一个与原生 Kafka Producer 交互的类,所有与 Kafka 生产者的交互操作都通过它来执行,这层封装便于统一管理生命周期、资源池和事务状态。想深入了解 Kafka 等消息中间件在复杂架构中的应用,可以参考更多实践案例。
关于 Kafka Connector 的 Sink 端的核心源码,我们就梳理到这里。
总结
最后总结一下全文内容。本文我们首先了解了 Flink 中自定义 Source 和 Sink 的标准流程和框架设计。接着,我们按照这个标准流程,深入梳理了 Kafka Connector 的源码实现。
在 Source 端,Flink Kafka Connector 基于新的 Source API 构建,封装了对消费者 Offset 的自动管理与 Checkpoint 协同的逻辑,提供了稳定可靠的数据读取能力。在 Sink 端,则巧妙地利用了 Kafka 自身提供的事务机制,通过 TwoPhaseCommittingStatefulSink 接口实现了两阶段提交,从而在配合 Kafka 自身高版本的情况下,能够实现端到端的 Exactly-Once 语义保障。理解这些底层机制,对于在实际生产环境中调试问题、优化性能具有重要意义。如果你对这类 开源实战 的源码分析感兴趣,欢迎持续交流探讨。
 发表于 2026-1-21 13:36:24
|
查看: 155|
回复: 0
发表于 2026-1-21 13:36:24
|
查看: 155|
回复: 0
